本博文为系列文章建议大家从头阅读
-
tips
实际工作时每个项目可能都有多个环境,开发、测试、线上,每个环境都有不同的配置文件,怎样通过maven编译参数直接指定打包相应环境的配置文件,及指定springboot的配置环境 -
spring的profile
Spring可使用Profile决定程序在不同环境下执行情况,包含配置、加载Bean、依赖等。
Spring的Profile一般项目包含:dev(开发), test(单元测试), qa(集成测试), prod(生产环境)。由spring.profiles.active属性决定启用的profile。
SpringBoot的配置文件默认为 application.properties(或yaml,此外仅以properties配置为说明)。不同Profile下的配置文件由application-{profile}.properties管理,同时独立的 Profile配置文件会覆盖默认文件下的属性。 -
maven的profile
Maven同样也有Profile设置,可在构建过程中针对不同的Profile环境执行不同的操作,包含配置、依赖、行为等。
Maven的Profile由 pom.xml 的标签管理。每个Profile中可设置:id(唯一标识), properties(配置属性), activation(自动触发的逻辑条件), dependencies(依赖)等。 -
配置
在创建好的项目下创建如下目录及文件,我们这里区分两个环境dev(开发)和prod(线上),我们要的最终结果是,指定dev环境的话,打包完只打包dev文件夹下的配置文件和application-dev.yml,其它文件不打包

springboot默认会读取application.yml或application.properties文件的属性,可以配置参数指定所使用的环境
spring:
  profiles:
    active: dev
或指定jvm参数:-Dspring.profiles.active=prod
在pom.xml中添加maven的profile配置:
<profiles>
        <profile>
            <id>dev</id>
            <activation>
                <activeByDefault>true</activeByDefault>
            </activation>
            <properties>
                <profileActive>dev</profileActive>
            </properties>
        </profile>

        <profile>
            <id>prod</id>
            <properties>
                <profileActive>prod</profileActive>
            </properties>
        </profile>
    </profiles>
接下来配置maven打包时的资源过滤:
<build>
        <plugins>
            <plugin>
                <groupId>org.springframework.boot</groupId>
                <artifactId>spring-boot-maven-plugin</artifactId>
            </plugin>
        </plugins>

        <!-- profile对资源的操作 -->
        <resources>
            <resource>
                <directory>src/main/resources</directory>
                <!-- 是否替换@xx@表示的maven properties属性值 -->
                <filtering>true</filtering>
                <includes>
                    <include>application.properties</include>
                    <include>application-${profileActive}.yml</include>
                    <include>properties/${profileActive}/*.*</include>
                </includes>
            </resource>
        </resources>
    </build>
最后把application.yml中的指定springboot的profile的配置改为:
spring:
  profiles:
    active: @profileActive@
这样springboot就会根据maven参数指定的maven profile,去加载自己的application-xxx.yml文件了。
这里一些朋友经常遇到启动项目报错:application文件不能包含@符号
这是因为只有经过资源过滤的maven属性才会被替换
<!-- profile对资源的操作 -->
        <resources>
            <resource>
                <directory>src/main/resources</directory>
                <!-- 是否替换@xx@表示的maven properties属性值 -->
                <filtering>true</filtering>
                <includes>
                    <include>application.properties</include>
                    <include>application-${profileActive}.yml</include>
                    <include>properties/${profileActive}/*.*</include>
                </includes>
            </resource>
        </resources>
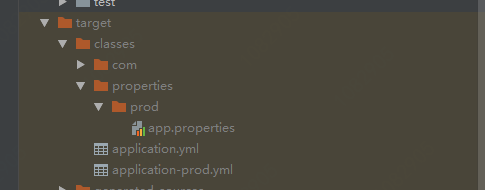
效果:
执行:>mvn clean package -Dmaven.test.skip=true -Pprod