Spring 中的 JdbcTemplate
JdbcTemplate 概述
它是 spring 框架中提供的一个对象,是对原始 Jdbc API 对象的简单封装。spring 框架为我们提供了很多
的操作模板类。
操作关系型数据的:
JdbcTemplate
HibernateTemplate
操作 nosql 数据库的:
RedisTemplate
操作消息队列的:
JmsTemplate
我们今天的主角在 spring-jdbc-5.0.2.RELEASE.jar 中,我们在导包的时候,除了要导入这个 jar 包 外,
还需要导入一个 spring-tx-5.0.2.RELEASE.jar(它是和事务相关的)。
JdbcTemplate 对象的创建
我们可以参考它的源码,来一探究竟:
public JdbcTemplate() {
}
public JdbcTemplate(DataSource dataSource) {
    setDataSource(dataSource);
    afterPropertiesSet();
}
public JdbcTemplate(DataSource dataSource, boolean lazyInit) {
    setDataSource(dataSource);
    setLazyInit(lazyInit);
    afterPropertiesSet();
}
除了默认构造函数之外,都需要提供一个数据源。既然有set方法,依据我们之前学过的依赖注入,我们可以
在配置文件中配置这些对象。
spring 中配置数据源
配置 C3P0 数据源
导入 c3p0-0.9.2.1.jar到工程的 lib 目录。在 spring 的配置文件中配置:
<bean id="dataSource" class="com.mchange.v2.c3p0.ComboPooledDataSource">
    <property name="driverClass" value="com.mysql.jdbc.Driver"></property>
    <property name="jdbcUrl" value="jdbc:mysql:///spring"></property>
    <property name="user" value="root"></property>
    <property name="password" value="1234"></property>
</bean>
配置
DBCP
数据源
导入 commons-dbcp.jar,commons-pool.jar到工程的 lib 目录。在 spring 的配置文件中配置:
<!-- 配置数据源 -->
<bean id="dataSource" class="org.apache.commons.dbcp.BasicDataSource">
    <property name="driverClassName" value="com.mysql.jdbc.Driver"></property>
    <property name="url" value="jdbc:mysql:// /spring"></property>
    <property name="username" value="root"></property>
    <property name="password" value="1234"></property>
</bean>
配置
spring
内置数据源
spring 框架也提供了一个内置数据源,我们也可以使用 spring 的内置数据源,它就在
spring-jdbc-5.0.2.REEASE.jar 包中:
<bean id="dataSource"class="org.springframework.jdbc.datasource.DriverManagerDataSource">
    <property name="driverClassName" value="com.mysql.jdbc.Driver"></property>
    <property name="url" value="jdbc:mysql:///spring_day02"></property>
    <property name="username" value="root"></property>
    <property name="password" value="1234"></property>
</bean>将数据库连接的信息配置到属性文件中:
【定义属性文件】
jdbc.driverClass=com.mysql.jdbc.Driver
jdbc.url=jdbc:mysql:///spring
jdbc.username=root
jdbc.password=123
【引入外部的属性文件】
一种方式:
 <!-- 引入外部属性文件: -->
 <bean class="org.springframework.beans.factory.config.PropertyPlaceholderConfigurer">
    <property name="location" value="classpath:jdbc.properties"/>
 </bean>
另一种方式:
<context:property-placeholder location="classpath:jdbc.properties"/>
JdbcTemplate 的增删改查操作
在 spring 配置文件中配置 JdbcTemplate
<?xml version="1.0" encoding="UTF-8"?>
<beans xmlns="http://www.springframework.org/schema/beans"
 xmlns:xsi="http://www.w3.org/2001/XMLSchema-instance"
 xsi:schemaLocation="http://www.springframework.org/schema/beans
 http://www.springframework.org/schema/beans/spring-beans.xsd">
<!-- 配置一个数据库的操作模板:JdbcTemplate -->
<bean id="jdbcTemplate" class="org.springframework.jdbc.core.JdbcTemplate">
    <property name="dataSource" ref="dataSource"></property>
</bean>
<!-- 配置数据源 -->
<bean id="dataSource"class="org.springframework.jdbc.datasource.DriverManagerDataSource">
    <property name="driverClassName" value="com.mysql.jdbc.Driver"></property>
    <property name="url" value="jdbc:mysql:///spring"></property>
    <property name="username" value="root">
    </property> <property name="password" value="1234"></property>
</bean>
</beans>
最基本使用
public class JdbcTemplateDemo3 {

    public static void main(String[] args) {
        //1.获取容器
        ApplicationContext ac = new ClassPathXmlApplicationContext("bean.xml");
        //2.获取对象
        JdbcTemplate jt = ac.getBean("jdbcTemplate",JdbcTemplate.class);
        //3.执行操作
        //保存
//        jt.update("insert into account(name,money)values(?,?)","eee",3333f);
        //更新
//        jt.update("update account set name=?,money=? where id=?","test",4567,7);
        //删除
//        jt.update("delete from account where id=?",8);
        //查询所有
//        List<Account> accounts = jt.query("select * from account where money > ?",new AccountRowMapper(),1000f);
//        List<Account> accounts = jt.query("select * from account where money > ?",new BeanPropertyRowMapper<Account>(Account.class),1000f);
//        for(Account account : accounts){
//            System.out.println(account);
//        }
        //查询一个
//        List<Account> accounts = jt.query("select * from account where id = ?",new BeanPropertyRowMapper<Account>(Account.class),1);
//        System.out.println(accounts.isEmpty()?"没有内容":accounts.get(0));

        //查询返回一行一列(使用聚合函数,但不加group by子句)
        Long count = jt.queryForObject("select count(*) from account where money > ?",Long.class,1000f);
        System.out.println(count);


    }
}
/**
* 定义Account的封装策略
*/
class AccountRowMapper implements RowMapper<Account>{
/**
* 把结果集中的数据封装到Account中,然后由spring把每个Account加到集合中
* @param rs
* @param rowNum
* @return
* @throws SQLException
*/
@Override
public Account mapRow(ResultSet rs, int rowNum) throws SQLException {
Account account = new Account();
account.setId(rs.getInt("id"));
account.setName(rs.getString("name"));
account.setMoney(rs.getFloat("money"));
return account;
}
}JdbcTemplate 与queryrunner区别

如何区别多种同名方法

dao 中使用 JdbcTemplate
第一种方式:在 dao 中定义 JdbcTemplate
/**
* 账户的接口
*/
public interface IAccountDao {
/**
* 根据 id 查询账户信息
* @param id
* @return
*/
Account findAccountById(Integer id);
/**
* 根据名称查询账户信息
* @return
*/
Account findAccountByName(String name);
/**
* 更新账户信息
* @param account
*/
void updateAccount(Account account);
}
/**
* 账户的持久层实现类
* 此版本的 dao,需要给 dao 注入 JdbcTemplate
*/
public class AccountDaoImpl implements IAccountDao {
    private JdbcTemplate jdbcTemplate;
    public void setJdbcTemplate(JdbcTemplate jdbcTemplate) {
        this.jdbcTemplate = jdbcTemplate;
    }
    @Override
    public Account findAccountById(Integer id) {
        List<Account> list = jdbcTemplate.query("select * from account where id = ?
                ",new AccountRowMapper(),id);
        return list.isEmpty()?null:list.get(0);
    }
    @Override
    public Account findAccountByName(String name) {
        List<Account> list = jdbcTemplate.query("select * from account where name
            = ? ",new AccountRowMapper(),name);
        if(list.isEmpty()){
            return null;
        }
        if(list.size()>1){
            throw new RuntimeException("结果集不唯一,不是只有一个账户对象");
        }
        return list.get(0);
    }
    @Override
    public void updateAccount(Account account) {
        jdbcTemplate.update("update account set money = ? where id = ?
            ",account.getMoney(),account.getId());
    }
}


配置文件
<?xml version="1.0" encoding="UTF-8"?>
<beans xmlns="http://www.springframework.org/schema/beans"
 xmlns:xsi="http://www.w3.org/2001/XMLSchema-instance"
 xsi:schemaLocation="http://www.springframework.org/schema/beans
 http://www.springframework.org/schema/beans/spring-beans.xsd">
<!-- 配置一个 dao -->
<bean id="accountDao" class="com.itheima.dao.impl.AccountDaoImpl">
    <!-- 注入 jdbcTemplate -->
    <property name="jdbcTemplate" ref="jdbcTemplate"></property>
</bean>
<!-- 配置一个数据库的操作模板:JdbcTemplate -->
<bean id="jdbcTemplate" class="org.springframework.jdbc.core.JdbcTemplate">
    <property name="dataSource" ref="dataSource"></property>
</bean>
<!-- 配置数据源 -->
<bean id="dataSource"class="org.springframework.jdbc.datasource.DriverManagerDataSource">
    <property name="driverClassName"value="com.mysql.jdbc.Driver"></property>
    <property name="url" value="jdbc:mysql:///spring_day04"></property>
    <property name="username" value="root"></property>
    <property name="password" value="1234"></property>
</bean>
</beans>


思考:
此种方式有什么问题吗?
答案:
有个小问题。就是我们的 dao 有很多时,每个 dao 都有一些重复性的代码。下面就是重复代码:
private JdbcTemplate jdbcTemplate;
public void setJdbcTemplate(JdbcTemplate jdbcTemplate) {
    this.jdbcTemplate = jdbcTemplate;
}
能不能把它抽取出来呢?
第二种方式:让 dao 继承 JdbcDaoSupport
JdbcDaoSupport 是 spring 框架为我们提供的一个类,该类中定义了一个 JdbcTemplate 对象,我们可以
直接获取使用,但是要想创建该对象,需要为其提供一个数据源:具体源码如下:
public abstract class JdbcDaoSupport extends DaoSupport {
    //定义对象
    private JdbcTemplate jdbcTemplate;
    //set 方法注入数据源,判断是否注入了,注入了就创建 JdbcTemplate
    public final void setDataSource(DataSource dataSource) {
        if (this.jdbcTemplate == null || dataSource != this.jdbcTemplate.getDataSource())
        {    //如果提供了数据源就创建 JdbcTemplate
            this.jdbcTemplate = createJdbcTemplate(dataSource);
            initTemplateConfig();
        }
    }
    //使用数据源创建 JdcbTemplate
    protected JdbcTemplate createJdbcTemplate(DataSource dataSource) {
        return new JdbcTemplate(dataSource);
    }
    //当然,我们也可以通过注入 JdbcTemplate 对象
    public final void setJdbcTemplate(JdbcTemplate jdbcTemplate) {
        this.jdbcTemplate = jdbcTemplate;
        initTemplateConfig();
    }
    //使用 getJdbcTmeplate 方法获取操作模板对象
    public final JdbcTemplate getJdbcTemplate() {
         return this.jdbcTemplate;
    }
}
/**
* 账户的接口
*/
public interface IAccountDao {
/**
* 根据 id 查询账户信息
* @param id
* @return
*/
Account findAccountById(Integer id);
/**
* 根据名称查询账户信息
* @return
*/
Account findAccountByName(String name);
/**
* 更新账户信息
* @param account
*/
void updateAccount(Account account);
}


/**
* 账户的持久层实现类
* 此版本 dao,只需要给它的父类注入一个数据源
*/
public class AccountDaoImpl2 extends JdbcDaoSupport implements IAccountDao {
    @Override
    public Account findAccountById(Integer id) {
        //getJdbcTemplate()方法是从父类上继承下来的。
        List<Account> list = getJdbcTemplate().query("select * from account where
            id = ? ",new AccountRowMapper(),id);
        return list.isEmpty()?null:list.get(0);
    }
    @Override
    public Account findAccountByName(String name) {
        //getJdbcTemplate()方法是从父类上继承下来的。
        List<Account> list = getJdbcTemplate().query("select * from account where
            name = ? ",new AccountRowMapper(),name);
        if(list.isEmpty()){
            return null;
        }
        if(list.size()>1){
            throw new RuntimeException("结果集不唯一,不是只有一个账户对象");
        }
        return list.get(0);
    }
    @Override
    public void updateAccount(Account account) {
        //getJdbcTemplate()方法是从父类上继承下来的。
        getJdbcTemplate().update("update account set money = ? where id = ?
            ",account.getMoney(),account.getId());
        }
    }


配置文件:
<?xml version="1.0" encoding="UTF-8"?>
<beans xmlns="http://www.springframework.org/schema/beans"
 xmlns:xsi="http://www.w3.org/2001/XMLSchema-instance"
 xsi:schemaLocation="http://www.springframework.org/schema/beans
 http://www.springframework.org/schema/beans/spring-beans.xsd">
<!-- 配置 dao2 -->
<bean id="accountDao2" class="com.itheima.dao.impl.AccountDaoImpl2">
    <!-- 注入 dataSource -->
    <property name="dataSource" ref="dataSource"></property>
</bean>
<!-- 配置数据源 -->
<bean id="dataSource"class="org.springframework.jdbc.datasource.DriverManagerDataSource">
    <property name="driverClassName" value="com.mysql.jdbc.Driver"></property>
    <property name="url" value="jdbc:mysql:///spring_day04"></property>
    <property name="username" value="root"></property>
    <property name="password" value="1234"></property>
</bean>
</beans>
思考:
两版
Dao
有什么区别呢?
答案:
第一种在
Dao
类中定义
JdbcTemplate
的方式,适用于所有配置方式(
xml
和注解都可以)。
第二种让
Dao
继承
JdbcDaoSupport
的方式,只能用于基于
XML
的方式,注解用不了。
基于注解的aop实现事务控制
/**
 * 账户的持久层实现类
 */
@Repository("accountDao")
public class AccountDaoImpl implements IAccountDao {

    @Autowired
    private QueryRunner runner;

    @Autowired
    private ConnectionUtils connectionUtils;


    @Override
    public List<Account> findAllAccount() {
        try{
            return runner.query(connectionUtils.getThreadConnection(),"select * from account",new BeanListHandler<Account>(Account.class));
        }catch (Exception e) {
            throw new RuntimeException(e);
        }
    }

    @Override
    public Account findAccountById(Integer accountId) {
        try{
            return runner.query(connectionUtils.getThreadConnection(),"select * from account where id = ? ",new BeanHandler<Account>(Account.class),accountId);
        }catch (Exception e) {
            throw new RuntimeException(e);
        }
    }

    @Override
    public void saveAccount(Account account) {
        try{
            runner.update(connectionUtils.getThreadConnection(),"insert into account(name,money)values(?,?)",account.getName(),account.getMoney());
        }catch (Exception e) {
            throw new RuntimeException(e);
        }
    }

    @Override
    public void updateAccount(Account account) {
        try{
            runner.update(connectionUtils.getThreadConnection(),"update account set name=?,money=? where id=?",account.getName(),account.getMoney(),account.getId());
        }catch (Exception e) {
            throw new RuntimeException(e);
        }
    }

    @Override
    public void deleteAccount(Integer accountId) {
        try{
            runner.update(connectionUtils.getThreadConnection(),"delete from account where id=?",accountId);
        }catch (Exception e) {
            throw new RuntimeException(e);
        }
    }

    @Override
    public Account findAccountByName(String accountName) {
        try{
            List<Account> accounts = runner.query(connectionUtils.getThreadConnection(),"select * from account where name = ? ",new BeanListHandler<Account>(Account.class),accountName);
            if(accounts == null || accounts.size() == 0){
                return null;
            }
            if(accounts.size() > 1){
                throw new RuntimeException("结果集不唯一,数据有问题");
            }
            return accounts.get(0);
        }catch (Exception e) {
            throw new RuntimeException(e);
        }
    }
}
/**
 * 账户的业务层实现类
 *
 * 事务控制应该都是在业务层
 */
@Service("accountService")
public class AccountServiceImpl implements IAccountService{

    @Autowired
    private IAccountDao accountDao;


    @Override
    public List<Account> findAllAccount() {
       return accountDao.findAllAccount();
    }

    @Override
    public Account findAccountById(Integer accountId) {
        return accountDao.findAccountById(accountId);

    }

    @Override
    public void saveAccount(Account account) {
        accountDao.saveAccount(account);
    }

    @Override
    public void updateAccount(Account account) {
        accountDao.updateAccount(account);
    }

    @Override
    public void deleteAccount(Integer acccountId) {
        accountDao.deleteAccount(acccountId);
    }

    @Override
    public void transfer(String sourceName, String targetName, Float money) {
        System.out.println("transfer....");
            //2.1根据名称查询转出账户
            Account source = accountDao.findAccountByName(sourceName);
            //2.2根据名称查询转入账户
            Account target = accountDao.findAccountByName(targetName);
            //2.3转出账户减钱
            source.setMoney(source.getMoney()-money);
            //2.4转入账户加钱
            target.setMoney(target.getMoney()+money);
            //2.5更新转出账户
            accountDao.updateAccount(source);

            int i=1/0;

            //2.6更新转入账户
            accountDao.updateAccount(target);
    }
}
以上是账户的实现类以及业务的实现类,此处略去接口代码。这里事务很容易,就是查数据库同时A转账100给B,int i=1/0;是一个人为异常,用来模拟出现异常后,事务的一致性是否被破坏。
/**
 * 连接的工具类,它用于从数据源中获取一个连接,并且实现和线程的绑定
 */
@Component("connectionUtils")
public class ConnectionUtils {

    private ThreadLocal<Connection> tl = new ThreadLocal<Connection>();

    @Autowired
    private DataSource dataSource;


    /**
     * 获取当前线程上的连接
     * @return
     */
    public Connection getThreadConnection() {
        try{
            //1.先从ThreadLocal上获取
            Connection conn = tl.get();
            //2.判断当前线程上是否有连接
            if (conn == null) {
                //3.从数据源中获取一个连接,并且存入ThreadLocal中
                conn = dataSource.getConnection();
                tl.set(conn);
            }
            //4.返回当前线程上的连接
            return conn;
        }catch (Exception e){
            throw new RuntimeException(e);
        }
    }

    /**
     * 把连接和线程解绑
     */
    public void removeConnection(){
        tl.remove();
    }
}
以上是获取链接的工具类。
/**
 * 和事务管理相关的工具类,它包含了,开启事务,提交事务,回滚事务和释放连接
 */
@Component("txManager")
@Aspect
public class TransactionManager {

    @Autowired
    private ConnectionUtils connectionUtils;

    @Pointcut("execution(* com.itheima.service.impl.*.*(..))")
    private void pt1(){}


    /**
     * 开启事务
     */
    public  void beginTransaction(){
        try {
            connectionUtils.getThreadConnection().setAutoCommit(false);
        }catch (Exception e){
            e.printStackTrace();
        }
    }

    /**
     * 提交事务
     */
    public  void commit(){
        try {
            connectionUtils.getThreadConnection().commit();
        }catch (Exception e){
            e.printStackTrace();
        }
    }

    /**
     * 回滚事务
     */
    public  void rollback(){
        try {
            connectionUtils.getThreadConnection().rollback();
        }catch (Exception e){
            e.printStackTrace();
        }
    }


    /**
     * 释放连接
     */
    public  void release(){
        try {
            connectionUtils.getThreadConnection().close();//还回连接池中
            connectionUtils.removeConnection();
        }catch (Exception e){
            e.printStackTrace();
        }
    }

    @Around("pt1()")
    public Object aroundAdvice(ProceedingJoinPoint pjp){
        Object rtValue = null;
        try {
            //1.获取参数
            Object[] args = pjp.getArgs();
            //2.开启事务
            this.beginTransaction();
            //3.执行方法
            rtValue = pjp.proceed(args);
            //4.提交事务
            this.commit();

            //返回结果
            return  rtValue;

        }catch (Throwable e){
            //5.回滚事务
            this.rollback();
            throw new RuntimeException(e);
        }finally {
            //6.释放资源
            this.release();
        }
    }
}
值得注意
由于spring使用注解配置AOP时,通知的执行顺序不是按照我们想的前置 -> 切入点->后置(异常)->最终 这样的顺序来执行,因此使用注解配置事务控制的时候,也会出现线程先与数据库连接解绑,进而无法提交事务的情况,因此,使用环绕通知来进行事务控制是推荐的选择。
Spring 中的事务控制
Spring 事务控制我们要明确的
第一:JavaEE 体系进行分层开发,事务处理位于业务层,Spring 提供了分层设计业务层的事务处理解决方案。
第二:spring 框架为我们提供了一组事务控制的接口。具体在后面的第二小节介绍。这组接口是在
spring-tx-5.0.2.RELEASE.jar 中。
第三:spring 的事务控制都是基于 AOP 的,它既可以使用编程的方式实现,也可以使用配置的方式实现。我
们学习的重点是使用配置的方式实现。
Spring 中事务控制的 API
PlatformTransactionManager
此接口是 spring 的事务管理器,它里面提供了我们常用的操作事务的方法,如下图:
我们在开发中都是使用它的实现类,
真正管理事务的对象
org.springframework.jdbc.datasource.
DataSourceTransactionManager
使用
Spring
JDBC
或
iBatis
进行持久化数据时使用
org.springframework.orm.hibernate5.
HibernateTransactionManager
使用
Hibernate
版本进行持久化数据时使用
TransactionDefinition
它是事务的定义信息对象,里面有如下方法:
事务的隔离级别

事务的传播行为
REQUIRED:如果当前没有事务,就新建一个事务,如果已经存在一个事务中,加入到这个事务中。一般的选
择(默认值)
SUPPORTS:支持当前事务,如果当前没有事务,就以非事务方式执行(没有事务)
MANDATORY:使用当前的事务,如果当前没有事务,就抛出异常
REQUERS_NEW:新建事务,如果当前在事务中,把当前事务挂起。
NOT_SUPPORTED:以非事务方式执行操作,如果当前存在事务,就把当前事务挂起
NEVER:以非事务方式运行,如果当前存在事务,抛出异常
NESTED:如果当前存在事务,则在嵌套事务内执行。如果当前没有事务,则执行 REQUIRED 类似的操作。
超时时间
默认值是
-1
,没有超时限制。如果有,以秒为单位进行设置。
是否是只读事务
建议查询时设置为只读。
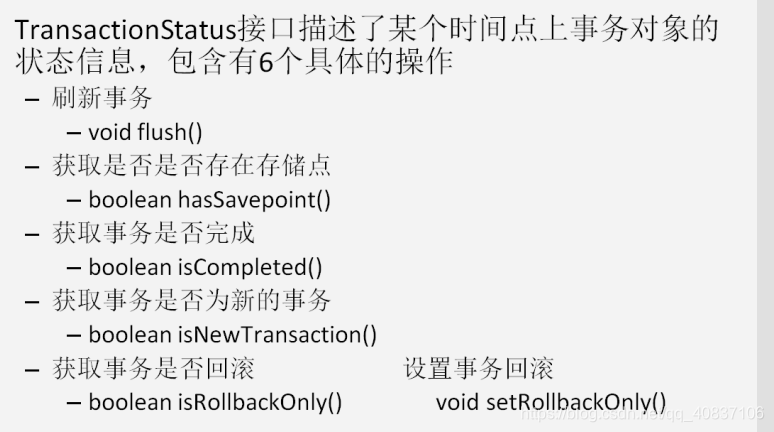
TransactionStatus
此接口提供的是事务具体的运行状态,方法介绍如下图:
基于 XML 的声明式事务控制(配置方式)
xml
spring中基于XML的声明式事务控制配置步骤
    1、配置事务管理器
    2、配置事务的通知
            此时我们需要导入事务的约束 tx名称空间和约束,同时也需要aop的
            使用tx:advice标签配置事务通知
                属性:
                    id:给事务通知起一个唯一标识
                    transaction-manager:给事务通知提供一个事务管理器引用
    3、配置AOP中的通用切入点表达式
    4、建立事务通知和切入点表达式的对应关系
    5、配置事务的属性
           是在事务的通知tx:advice标签的内部
配置事务管理器
<!-- 配置一个事务管理器 -->
<bean id="transactionManager"
class="org.springframework.jdbc.datasource.DataSourceTransactionManager">
<!-- 注入 DataSource -->
<property name="dataSource" ref="dataSource"></property>
</bean>
配置事务的通知
<!-- 配置事务的通知-->
    <tx:advice id="txAdvice" transaction-manager="transactionManager">
      配置事务的属性
                isolation:用于指定事务的隔离级别。默认值是DEFAULT,表示使用数据库的默认隔离级别。
                propagation:用于指定事务的传播行为。默认值是REQUIRED,表示一定会有事务,增删改的选择。查询方法可以选择SUPPORTS。
                read-only:用于指定事务是否只读。只有查询方法才能设置为true。默认值是false,表示读写。
                timeout:用于指定事务的超时时间,默认值是-1,表示永不超时。如果指定了数值,以秒为单位。
                rollback-for:用于指定一个异常,当产生该异常时,事务回滚,产生其他异常时,事务不回滚。没有默认值。表示任何异常都回滚。
                no-rollback-for:用于指定一个异常,当产生该异常时,事务不回滚,产生其他异常时事务回滚。没有默认值。表示任何异常都回滚。
       <tx:attributes>
            <tx:method name="*" propagation="REQUIRED" read-only="false"/>
            <tx:method name="find*" propagation="SUPPORTS" read-only="true"></tx:method>
        </tx:attributes>
    </tx:advice>
配置aop
    <aop:config>
        <!-- 配置切入点表达式-->
        <aop:pointcut id="pt1" expression="execution(* com.itheima.service.impl.*.*(..))"></aop:pointcut>
        <!--建立切入点表达式和事务通知的对应关系 -->
        <aop:advisor advice-ref="txAdvice" pointcut-ref="pt1"></aop:advisor>
    </aop:config>
基于注解的配置方式
创建 spring 的配置文件导入约束并配置扫描的包
<?xml version="1.0" encoding="UTF-8"?>
<beans xmlns="http://www.springframework.org/schema/beans"
       xmlns:xsi="http://www.w3.org/2001/XMLSchema-instance"
       xmlns:aop="http://www.springframework.org/schema/aop"
       xmlns:tx="http://www.springframework.org/schema/tx"
       xmlns:context="http://www.springframework.org/schema/context"
       xsi:schemaLocation="
        http://www.springframework.org/schema/beans
        http://www.springframework.org/schema/beans/spring-beans.xsd
        http://www.springframework.org/schema/tx
        http://www.springframework.org/schema/tx/spring-tx.xsd
        http://www.springframework.org/schema/aop
        http://www.springframework.org/schema/aop/spring-aop.xsd
        http://www.springframework.org/schema/context
        http://www.springframework.org/schema/context/spring-context.xsd">

    <!-- 配置spring创建容器时要扫描的包-->
    <context:component-scan base-package="com.itheima"></context:component-scan>
</beans>
<!-- 配置JdbcTemplate-->
<bean id="jdbcTemplate" class="org.springframework.jdbc.core.JdbcTemplate">
<property name="dataSource" ref="dataSource"></property>
</bean>
<!-- 配置数据源-->
<bean id="dataSource" class="org.springframework.jdbc.datasource.DriverManagerDataSource">
<property name="driverClassName" value="com.mysql.jdbc.Driver"></property>
<property name="url" value="jdbc:mysql://localhost:3306/eesy"></property>
<property name="username" value="root"></property>
<property name="password" value="1234"></property>
</bean>
spring中基于注解 的声明式事务控制配置步骤
1、配置事务管理器
2、开启spring对注解事务的支持
3、在需要事务支持的地方使用@Transactional注解
<!-- 配置事务管理器 -->
<bean id="transactionManager" class="org.springframework.jdbc.datasource.DataSourceTransactionManager">
<property name="dataSource" ref="dataSource"></property>
</bean>
<!-- 开启spring对注解事务的支持-->
<tx:annotation-driven transaction-manager="transactionManager"></tx:annotation-driven>/**
* 账户的持久层实现类
*/
@Repository("accountDao")
public class AccountDaoImpl implements IAccountDao {
@Autowired
private JdbcTemplate jdbcTemplate;
@Override
public Account findAccountById(Integer accountId) {
List<Account> accounts = jdbcTemplate.query("select * from account where id = ?",new BeanPropertyRowMapper<Account>(Account.class),accountId);
return accounts.isEmpty()?null:accounts.get(0);
}
@Override
public Account findAccountByName(String accountName) {
List<Account> accounts = jdbcTemplate.query("select * from account where name = ?",new BeanPropertyRowMapper<Account>(Account.class),accountName);
if(accounts.isEmpty()){
return null;
}
if(accounts.size()>1){
throw new RuntimeException("结果集不唯一");
}
return accounts.get(0);
}
@Override
public void updateAccount(Account account) {
jdbcTemplate.update("update account set name=?,money=? where id=?",account.getName(),account.getMoney(),account.getId());
}
}/**
* 账户的业务层实现类
*
* 事务控制应该都是在业务层
*/
@Service("accountService")
@Transactional(propagation= Propagation.SUPPORTS,readOnly=true)//只读型事务的配置
public class AccountServiceImpl implements IAccountService{
@Autowired
private IAccountDao accountDao;
@Override
public Account findAccountById(Integer accountId) {
return accountDao.findAccountById(accountId);
}
//需要的是读写型事务配置
@Transactional(propagation= Propagation.REQUIRED,readOnly=false)
@Override
public void transfer(String sourceName, String targetName, Float money) {
System.out.println("transfer....");
//2.1根据名称查询转出账户
Account source = accountDao.findAccountByName(sourceName);
//2.2根据名称查询转入账户
Account target = accountDao.findAccountByName(targetName);
//2.3转出账户减钱
source.setMoney(source.getMoney()-money);
//2.4转入账户加钱
target.setMoney(target.getMoney()+money);
//2.5更新转出账户
accountDao.updateAccount(source);
int i=1/0;
//2.6更新转入账户
accountDao.updateAccount(target);
}
}
一个综合工程(综合spring所有基础知识)
/**
* spring的配置类,相当于bean.xml
*/
@Configuration
@ComponentScan("com.itheima")
@Import({JdbcConfig.class,TransactionConfig.class})
@PropertySource("jdbcConfig.properties")
@EnableTransactionManagement
public class SpringConfiguration {
}/**
* 和连接数据库相关的配置类
*/
public class JdbcConfig {
@Value("${jdbc.driver}")
private String driver;
@Value("${jdbc.url}")
private String url;
@Value("${jdbc.username}")
private String username;
@Value("${jdbc.password}")
private String password;
/**
* 创建JdbcTemplate
* @param dataSource
* @return
*/
@Bean(name="jdbcTemplate")
public JdbcTemplate createJdbcTemplate(DataSource dataSource){
return new JdbcTemplate(dataSource);
}
/**
* 创建数据源对象
* @return
*/
@Bean(name="dataSource")
public DataSource createDataSource(){
DriverManagerDataSource ds = new DriverManagerDataSource();
ds.setDriverClassName(driver);
ds.setUrl(url);
ds.setUsername(username);
ds.setPassword(password);
return ds;
}
}
/**
* 和事务相关的配置类
*/
public class TransactionConfig {
/**
* 用于创建事务管理器对象
* @param dataSource
* @return
*/
@Bean(name="transactionManager")
public PlatformTransactionManager createTransactionManager(DataSource dataSource){
return new DataSourceTransactionManager(dataSource);
}
}jdbc.driver=com.mysql.jdbc.Driver
jdbc.url=jdbc:mysql://localhost:3306/eesy
jdbc.username=root
jdbc.password=1234至此配置结束,来看代码的编写
/**
 * 账户的持久层实现类
 */
@Repository("accountDao")
public class AccountDaoImpl implements IAccountDao {

    @Autowired
    private JdbcTemplate jdbcTemplate;

    @Override
    public Account findAccountById(Integer accountId) {
        List<Account> accounts = jdbcTemplate.query("select * from account where id = ?",new BeanPropertyRowMapper<Account>(Account.class),accountId);
        return accounts.isEmpty()?null:accounts.get(0);
    }

    @Override
    public Account findAccountByName(String accountName) {
        List<Account> accounts = jdbcTemplate.query("select * from account where name = ?",new BeanPropertyRowMapper<Account>(Account.class),accountName);
        if(accounts.isEmpty()){
            return null;
        }
        if(accounts.size()>1){
            throw new RuntimeException("结果集不唯一");
        }
        return accounts.get(0);
    }

    @Override
    public void updateAccount(Account account) {
        jdbcTemplate.update("update account set name=?,money=? where id=?",account.getName(),account.getMoney(),account.getId());
    }
}
/**
 * 账户的业务层实现类
 *
 * 事务控制应该都是在业务层
 */
@Service("accountService")
@Transactional(propagation= Propagation.SUPPORTS,readOnly=true)//只读型事务的配置
public class AccountServiceImpl implements IAccountService{

    @Autowired
    private IAccountDao accountDao;


    @Override
    public Account findAccountById(Integer accountId) {
        return accountDao.findAccountById(accountId);

    }


    //需要的是读写型事务配置
    @Transactional(propagation= Propagation.REQUIRED,readOnly=false)
    @Override
    public void transfer(String sourceName, String targetName, Float money) {
        System.out.println("transfer....");
            //2.1根据名称查询转出账户
            Account source = accountDao.findAccountByName(sourceName);
            //2.2根据名称查询转入账户
            Account target = accountDao.findAccountByName(targetName);
            //2.3转出账户减钱
            source.setMoney(source.getMoney()-money);
            //2.4转入账户加钱
            target.setMoney(target.getMoney()+money);
            //2.5更新转出账户
            accountDao.updateAccount(source);

//            int i=1/0;

            //2.6更新转入账户
            accountDao.updateAccount(target);
    }
}
来看测试类
/**
 * 使用Junit单元测试:测试我们的配置
 */
@RunWith(SpringJUnit4ClassRunner.class)
@ContextConfiguration(classes= SpringConfiguration.class)
public class AccountServiceTest {

    @Autowired
    private  IAccountService as;

    @Test
    public  void testTransfer(){
        as.transfer("aaa","bbb",100f);

    }

}
至此,项目完成,事务控制成功。
Spring 编程式事务控制
<!-- 配置事务管理器-->
    <bean id="transactionManager" class="org.springframework.jdbc.datasource.DataSourceTransactionManager">
        <property name="dataSource" ref="dataSource"></property>
    </bean>

    <!--配置事务模板对象-->
    <bean id="transactionTemplate" class="org.springframework.transaction.support.TransactionTemplate">
        <property name="transactionManager" ref="transactionManager"></property>
    </bean>
<!-- 配置数据源-->
    <bean id="dataSource" class="org.springframework.jdbc.datasource.DriverManagerDataSource">
        <property name="driverClassName" value="com.mysql.jdbc.Driver"></property>
        <property name="url" value="jdbc:mysql://localhost:3306/eesy"></property>
        <property name="username" value="root"></property>
        <property name="password" value="1234"></property>
    </bean>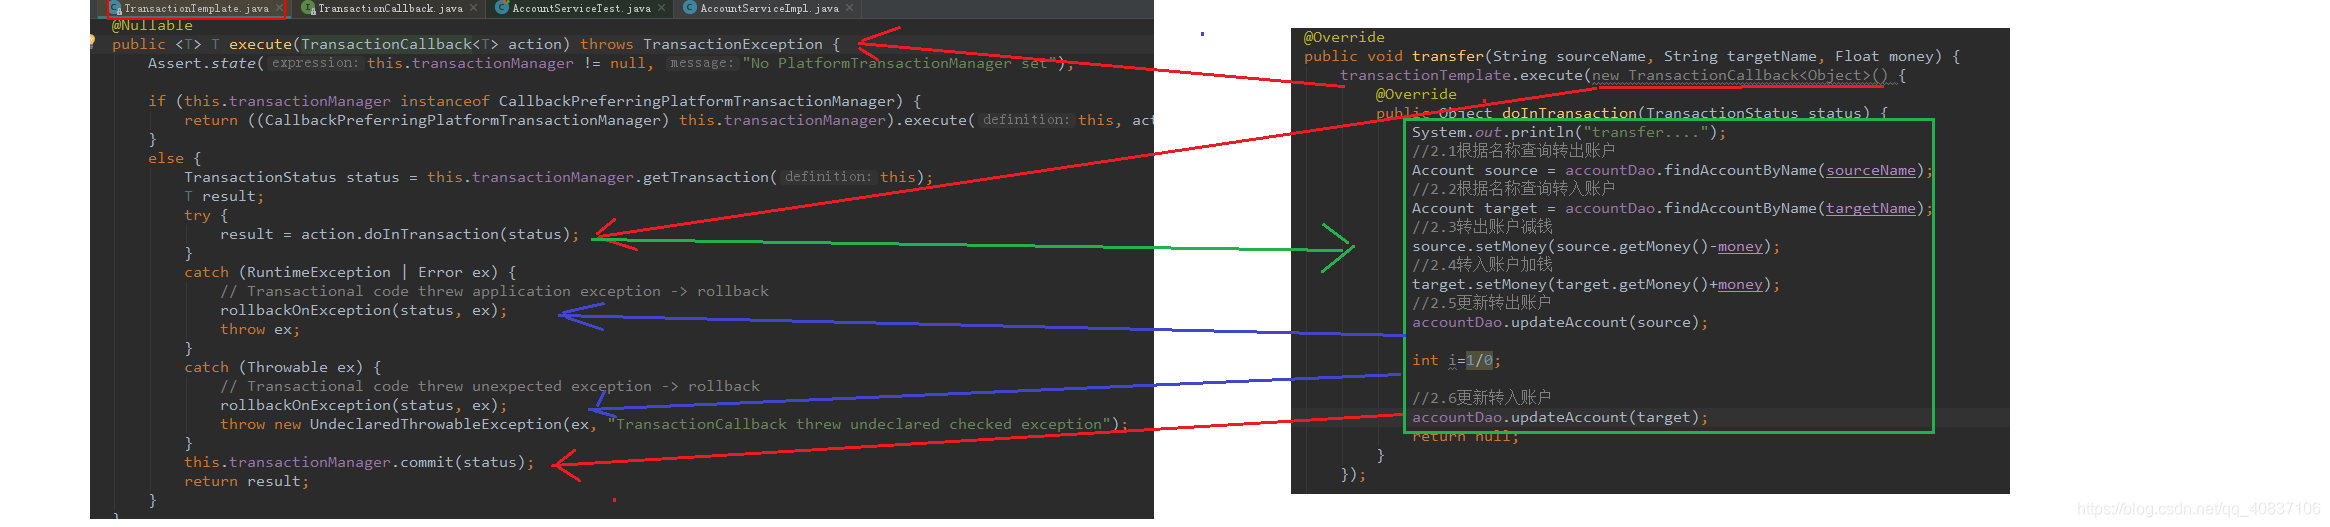
/**
 * 账户的业务层实现类
 *
 * 事务控制应该都是在业务层
 */
public class AccountServiceImpl implements IAccountService{

    private IAccountDao accountDao;

    private TransactionTemplate transactionTemplate;

    public void setTransactionTemplate(TransactionTemplate transactionTemplate) {
        this.transactionTemplate = transactionTemplate;
    }

    public void setAccountDao(IAccountDao accountDao) {
        this.accountDao = accountDao;
    }

    @Override
    public Account findAccountById(Integer accountId) {
      return  transactionTemplate.execute(new TransactionCallback<Account>() {
            @Override
            public Account doInTransaction(TransactionStatus status) {
                return accountDao.findAccountById(accountId);
            }
        });
    }


    @Override
    public void transfer(String sourceName, String targetName, Float money) {
        transactionTemplate.execute(new TransactionCallback<Object>() {
            @Override
            public Object doInTransaction(TransactionStatus status) {
                System.out.println("transfer....");
                //2.1根据名称查询转出账户
                Account source = accountDao.findAccountByName(sourceName);
                //2.2根据名称查询转入账户
                Account target = accountDao.findAccountByName(targetName);
                //2.3转出账户减钱
                source.setMoney(source.getMoney()-money);
                //2.4转入账户加钱
                target.setMoney(target.getMoney()+money);
                //2.5更新转出账户
                accountDao.updateAccount(source);

//                int i=1/0;

                //2.6更新转入账户
                accountDao.updateAccount(target);
                return null;
            }
        });

    }
}
可以看出来,重复代码又出现了,失去了AOP提取重复代码的优势,所以不建议使用。
Spring5 的新特性
与 JDK 相关的升级
jdk 版本要求
spring5.0 在 2017 年 9 月发布了它的 GA(通用)版本。该版本是基于 jdk8 编写的,所以 jdk8 以下版本
将无法使用。同时,可以兼容 jdk9 版本。
tomcat 版本要求 8.5 及以上。
注:
我们使用 jdk8 构建工程,可以降版编译。但是不能使用 jdk8 以下版本构建工程。
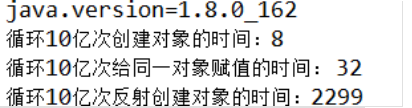
由于 jdk 和 tomcat 版本的更新,我们的 IDE 也需要同时更新。(目前使用的 eclipse 4.7.2)利用 jdk8 版本更新的内容
public class Test {
//循环次数定义:10亿次
private static final int loopCnt = 1000 * 1000 * 1000;
public static void main(String[] args) throws Exception {
//输出jdk的版本
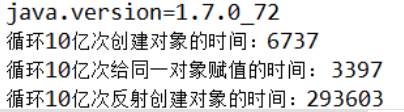
System.out.println("java.version=" + System.getProperty("java.version"));
t1();
t2();
t3();
}
// 每次重新生成对象
public static void t1() {
long s = System.currentTimeMillis();
for (int i = 0; i < loopCnt; i++) {
Person p = new Person();
p.setAge(31);
}
long e = System.currentTimeMillis();
System.out.println("循环10亿次创建对象的时间:" + (e - s));
}
// 同一个对象
public static void t2() {
long s = System.currentTimeMillis();
Person p = new Person();
for (int i = 0; i < loopCnt; i++) {
p.setAge(32);
}
long e = System.currentTimeMillis();
System.out.println("循环10亿次给同一对象赋值的时间: " + (e - s));
}
//使用反射创建对象
public static void t3() throws Exception {
long s = System.currentTimeMillis();
Class<Person> c = Person.class;
Person p = c.newInstance();
Method m = c.getMethod("setAge", Integer.class);
for (int i = 0; i < loopCnt; i++) {
m.invoke(p, 33);
}
long e = System.currentTimeMillis();
System.out.println("循环10亿次反射创建对象的时间:" + (e - s));
}
static class Person {
private int age = 20;
public int getAge() {
return age;
}
public void setAge(Integer age) {
this.age = age;
}
}
}
核心容器的更新
Spring Framework 5.0 现在支持候选组件索引作为类路径扫描的替代方案。该功能已经在类路径扫描器中
添加,以简化添加候选组件标识的步骤。
应用程序构建任务可以定义当前项目自己的 META-INF/spring.components 文件。在编译时,源模型是
自包含的,JPA 实体和 Spring 组件是已被标记的。
从索引读取实体而不是扫描类路径对于小于 200 个类的小型项目是没有明显差异。但对大型项目影响较大。
加载组件索引开销更低。因此,随着类数的增加,索引读取的启动时间将保持不变。
加载组件索引的耗费是廉价的。因此当类的数量不断增长,加上构建索引的启动时间仍然可以维持一个常数,
不过对于组件扫描而言,启动时间则会有明显的增长。
这个对于我们处于大型 Spring 项目的开发者所意味着的,是应用程序的启动时间将被大大缩减。虽然 20
或者 30 秒钟看似没什么,但如果每天要这样登上好几百次,加起来就够你受的了。使用了组件索引的话,就能帮
助你每天过的更加高效。
你可以在 Spring 的 Jira 上了解更多关于组件索引的相关信息。
JetBrains Kotlin 语言支持
Kolin概述:是一种支持函数式编程编程风格的面向对象语言。Kotlin 运行在 JVM 之上,但运行环境并不
限于 JVM。
响应式编程风格
此次 Spring 发行版本的一个激动人心的特性就是新的响应式堆栈 WEB 框架。这个堆栈完全的响应式且非
阻塞,适合于事件循环风格的处理,可以进行少量线程的扩展。
Reactive Streams 是来自于 Netflix, Pivotal, Typesafe, Red Hat, Oracle, Twitter 以及
Spray.io 的工程师特地开发的一个 API。它为响应式编程实现的实现提供一个公共的 API,好实现
Hibernate 的 JPA。这里 JPA 就是这个 API, 而 Hibernate 就是实现。
Reactive Streams API 是 Java 9 的官方版本的一部分。在 Java 8 中, 你会需要专门引入依赖来使
用 Reactive Streams API。
Spring Framework 5.0 对于流式处理的支持依赖于 Project Reactor 来构建, 其专门实现了
Reactive Streams API。
Spring Framework 5.0 拥有一个新的 spring-webflux 模块,支持响应式 HTTP 和 WebSocket 客
户端。Spring Framework 5.0 还提供了对于运行于服务器之上,包含了 REST, HTML, 以及 WebSocket 风
格交互的响应式网页应用程序的支持。
在 spring-webflux 中包含了两种独立的服务端编程模型:
基于注解:使用到了@Controller 以及 Spring MVC 的其它一些注解;
使用 Java 8 lambda 表达式的函数式风格的路由和处理。
有 了 Spring Webflux, 你现在可以创建出 WebClient, 它是响应式且非阻塞的,可以作为
RestTemplate 的一个替代方案。
这里有一个使用 Spring 5.0 的 REST 端点的 WebClient 实现:
WebClient webClient = WebClient.create();
Mono person = webClient.get()
.uri("http://localhost:8080/movie/42")
.accept(MediaType.APPLICATION_JSON)
.exchange()
.then(response -> response.bodyToMono(Movie.class));
Junit5 支持
完全支持 JUnit 5 Jupiter,所以可以使用 JUnit 5 来编写测试以及扩展。此外还提供了一个编程以及
扩展模型,Jupiter 子项目提供了一个测试引擎来在 Spring 上运行基于 Jupiter 的测试。
另外,Spring Framework 5 还提供了在 Spring TestContext Framework 中进行并行测试的扩展。
针对响应式编程模型, spring-test 现在还引入了支持 Spring WebFlux 的 WebTestClient 集成测
试的支持,类似于 MockMvc,并不需要一个运行着的服务端。使用一个模拟的请求或者响应, WebTestClient
就可以直接绑定到 WebFlux 服务端设施。
你可以在这里找到这个激动人心的 TestContext 框架所带来的增强功能的完整列表。
当然, Spring Framework 5.0 仍然支持我们的老朋友 JUnit! 在我写这篇文章的时候, JUnit 5 还
只是发展到了 GA 版本。对于 JUnit4, Spring Framework 在未来还是要支持一段时间的。