最近在看写公开视频,发现layout_weight跟我以前所认知的略有不同,在这总结下。
在LinearLayout中的子控件使用layout_weight属性可以让子控件按照父控件的一定比例来显示,先看几个常规的使用方法
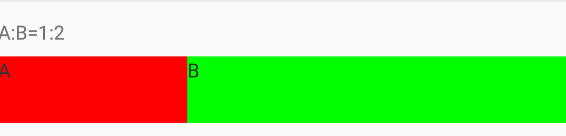
1 子控件与子控件按照一定比例显示
<LinearLayout
    android:layout_width="match_parent"
    android:layout_height="48dp"
    android:orientation="horizontal">

    <TextView
        android:layout_width="0dp"
        android:layout_height="match_parent"
        android:layout_weight="1"
        android:background="#F00"
        android:text="A"
        android:textColor="@color/black" />

    <TextView
        android:layout_width="0dp"
        android:layout_height="match_parent"
        android:layout_weight="2"
        android:background="#0F0"
        android:text="B"
        android:textColor="@color/black" />
</LinearLayout>
效果如图所示:
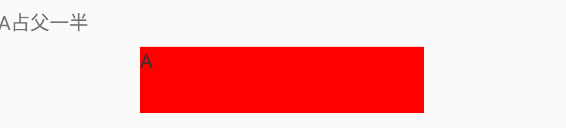
2 子控件按父控件的一定比例显示
<LinearLayout
    android:layout_width="match_parent"
    android:layout_height="48dp"
    android:gravity="center_horizontal"
    android:weightSum="2">

    <TextView
        android:layout_width="0dp"
        android:layout_height="match_parent"
        android:layout_weight="1"
        android:background="#F00"
        android:text="A"
        android:textColor="@color/black" />
</LinearLayout>
效果如图所示:
3 某一个子控件右对齐
最常见的就是标题栏,左边一个按钮,右边一个按钮,中间是标题
<LinearLayout
    android:layout_width="match_parent"
    android:layout_height="48dp">

    <Button
        android:layout_width="wrap_content"
        android:layout_height="wrap_content"
        android:text="Button" />

    <TextView
        android:layout_width="0dp"
        android:layout_height="match_parent"
        android:layout_weight="1"
        android:gravity="center"
        android:text="TITLE" />

    <Button
        android:layout_width="wrap_content"
        android:layout_height="wrap_content"
        android:text="Button" />
</LinearLayout>

上面几种是我们比较常用的方式,下面总结下一些"错误"的使用。
4 wrap、match乱入
我们在用layout_weight属性时一般都是指定layout_width(或layout_height)为0,如果我们指定的是wrap_content或者match_parent会有什么效果呢,如下所示:
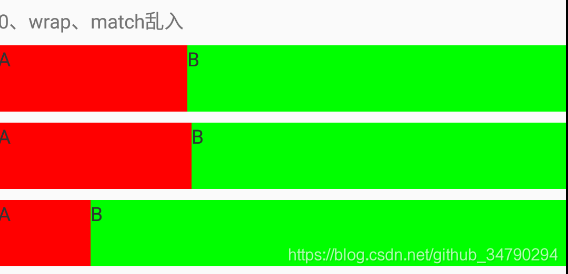
代码是1中的控件A和控件B依次将layout_width设置为0,wrap_content、match_parent
从图中我们可以看到wrap_content和0显示效果接近,但还是有丝毫的差距,match_parent和0显示的效果相差甚远。
先给出一个weight的计算公式,我们在用wrap_content和match_parent带入公式,看是否符合。
子控件宽度=该控件的已知宽度+(父控件宽度-所有子控件已知宽度)/总weight*当前子控件所占的weight
先看match_parent,我的屏幕总宽度是1080px,A和B的已知宽度为match_parent(即1080px)
套用上面的公式得出A的宽度:
width_A=width_A_known+(width_P-width_A_known-width_B_konwn)/3*1
width_A_weight=1080+(1080-1080-1080)/3*1
width_A_weigh=720
其中:
width_A_known: A的已经宽度
width_B_known: B的已经宽度
width_P: 父布局宽度
以下公式相同
B的宽度
width_B=width_B_known+(width_P-width_A_known-width_B_known)/3*2
width_B=1080+(1080-1080-1080)/3*2
width_B=360
再看wrap_content,我们先看下控件A在不设置layout_weight的情况下wrap_content的宽度是多少,通过Layout_Inspector得出24px,使用上面公式
A的宽度
width_A=width_A_known+(width_P-width_A_known-width_B_known)/3*1
width_A=24+(1080-24-24)/3*1
width_A=368
B的宽度
width_B=width_B_known+width_P-width_A_known-width_B_known)/3*2
width_B=24+(1080-24-24)/3*2
width_B=712
上面结果均与Layout_Inspector中显示的结果相同。
5 指定宽高
既然上面的公式对wrap_content和match_parent均使用,那么如果指定了宽高呢,试下,将A的宽度指定为600px,B的宽度指定为300px,先看下效果:

此时Layout_Inspector给出的值是A的宽度是660px,B的宽度是420px,带入公式试一下:
A的宽度
width_A=width_A_known+(width_P-width_A_known-width_B_known)/3*1
width_A=600+(1080-600-300)/3*1
width_A=660
B的宽度
width_B=width_B_known+width_P-width_A_known-width_B_known)/3*2
width_B=300+(1080-600-300)/3*2
width_B=420
准确无误
6 设置Padding
padding设置对0、和match_parent都没有影响,只会对wrap_content起作用,第一行是没有padding的,第二行A的padding为20px,B的padding为30px

还是可以看出宽度不太一样的。
此时Layout_Inspector给出的值是A的宽度是375px,B的宽度是705px,带入公式试一下:
A的宽度
width_A=width_A_known+(width_P-width_A_known-width_B_known)/3*1
width_A=24+2*20+(1080-(24+2*20)-(24+2*30))/3*1
width_A=375
B的宽度
width_B=width_B_known+width_P-width_A_known-width_B_known)/3*2
width_B=24+2*30+(1080-(24+2*20)-(24+2*30))/3*2
width_B=705
准确无误
综上我们最终得到的layout_weight的计算公式为:
子控件宽度=该控件的已知宽度+(父控件宽度-所有子控件已知宽度)/总weight*当前子控件所占的weight
