Introduction
RabbitMQ is a message broker: it accepts and forwards messages. You can think about it as a post office: when you put the mail that you want posting in a post box, you can be sure that Mr. or Ms. Mailperson will eventually deliver the mail to your recipient. In this analogy, RabbitMQ is a post box, a post office and a postman.
RabbitMQ是一个消息中转器,它接收并转发消息。你可以把它看成是一个邮局:当你放了一封你要寄出的信到邮箱里时,你可以肯定邮递员先生或女士最终会把信交给你的收件人。在这个类比中,RabbitMQ充当了邮箱,邮局以及邮递员的角色。
The major difference between RabbitMQ and the post office is that it doesn't deal with paper, instead it accepts, stores and forwards binary blobs of data ‒ messages.
RabbitMQ和邮局最大的不同就是,它不跟纸打交道,相反,它接收、保存以及转发二进制数据块 - 消息。
RabbitMQ, and messaging in general, uses some jargon.
RabbitMQ和消息传递通常使用一些行话
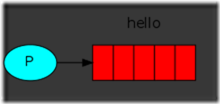
- Producing means nothing more than sending. A program that sends messages is a producer :
- A queue is the name for a post box which lives inside RabbitMQ. Although messages flow through RabbitMQ and your applications, they can only be stored inside a queue. A queue is only bound by the host's memory & disk limits, it's essentially a large message buffer. Many producers can send messages that go to one queue, and many consumers can try to receive data from one queue. This is how we represent a queue:
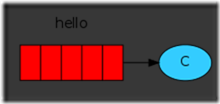
- Consuming has a similar meaning to receiving. A consumer is a program that mostly waits to receive messages:
- 生产只意味着发送。发送消息的程序是生产者
- 队列是在RabbitMQ内部的邮箱的名称。尽管消息从RabbitMQ和你的应用程序里经过,但他们只能存储在队列中。队列仅受主机内存和磁盘限制的约束,它本质上是一个大的消息缓冲区。多个生产者可以发送消息到一个队列中,并且多个消费者也能尝试从一个队列中接收数据。
- 消费的意思就是接收。消费者主要就是等待接收消息的程序。
Note that the producer, consumer, and broker do not have to reside on the same host; indeed in most applications they don't. An application can be both a producer and consumer, too.
注意,生产者、消费者以及中转器不必驻留在同一主机上;在大多数应用中他们的确没有。一个应用程序也可以同时担当生产者和消费者两个角色。
Hello World!
using the Pika Python client
In this part of the tutorial we'll write two small programs in Python; a producer (sender) that sends a single message, and a consumer (receiver) that receives messages and prints them out. It's a "Hello World" of messaging.
教程的这个部分,我们会用python写两个小程序;一个发送一条消息的生产者(发送者),和一个接收消息并把它们打印出来的消费者。消息就是‘Hello World’。
In the diagram below, "P" is our producer and "C" is our consumer. The box in the middle is a queue - a message buffer that RabbitMQ keeps on behalf of the consumer.
下图中,‘P’就是我们的生产者,‘C’就是我们的消费者。中间的盒子是一个队列 - 一个RabbitMQ代表消费者保留的消息缓冲区
Our overall design will look like: 我们的总体设计看起来是这样的:
Producer sends messages to the "hello" queue. The consumer receives messages from that queue.
生产者发送消息‘Hello’到队列。消费者从队列中接收消息。
Sending
Our first program send.py will send a single message to the queue. The first thing we need to do is to establish a connection with RabbitMQ server.
我们的第一个程序send.py会发送一条消息到队列。我们要做的第一件事是建立一个和RabbitMQ服务端的链接。
import pika

connection = pika.BlockingConnection(pika.ConnectionParameters(host='localhost'))
channel = connection.channel()
We're connected now, to a broker on the local machine - hence the localhost. If we wanted to connect to a broker on a different machine we'd simply specify its name or IP address here.
现在我们连接到本地机器上的一个中转器上了-‘localhost’由此而来。如果我们想要连接到不同机器上的中转器,我们只需在这里简单的指定一下它的主机名和IP地址就行。
Next, before sending we need to make sure the recipient queue exists. If we send a message to non-existing location, RabbitMQ will just drop the message. Let's create a hello queue to which the message will be delivered:
下一步,发送前我们需要确保接收队列的确存在。富国我们给一个不存在的地点发送了消息,RabbitMQ会丢掉该消息。让我们创建一个名叫‘Hello’的队列,消息将被传递至该队列
At this point we're ready to send a message. Our first message will just contain a string Hello World! and we want to send it to our hello queue.
此时我们已准备好发送消息。我们的第一条消息将只包含一个字符串‘Hello World!’并且我们要将他发送到我们的hello队列中
In RabbitMQ a message can never be sent directly to the queue, it always needs to go through an exchange. But let's not get dragged down by the details ‒ you can read more about exchanges in the third part of this tutorial. All we need to know now is how to use a default exchange identified by an empty string. This exchange is special ‒ it allows us to specify exactly to which queue the message should go. The queue name needs to be specified in the routing_key parameter:
在RabbitMQ中一条消息永远不会被直接地发送到队列中,它总是会经过一个交换。但我们不要被这些细节拖累 - 你可以在此教程的第三部分了解到更多关于交换的内容。我们现在只需要知道如何使用由空字符串标识的默认的交换。这个交换很特别 - 它允许我们具体指定消息要去哪条队列。队列名需要在routing_key参数中指定
channel.basic_publish(exchange='',
                      routing_key='hello',
                      body='Hello World!')
print(" [x] Sent 'Hello World!'")
Before exiting the program we need to make sure the network buffers were flushed and our message was actually delivered to RabbitMQ. We can do it by gently closing the connection.
在退出程序之前,我们需要确保网络缓冲区被刷新,并且我们的消息确实传递给了RabbitMQ。我们可以小心地关闭链接。
connection.close()
Receiving
Our second program receive.py will receive messages from the queue and print them on the screen.
Again, first we need to connect to RabbitMQ server. The code responsible for connecting to Rabbit is the same as previously.
我们的第二个程序receive.py将会从队列中接收消息并将他们打印在屏幕上。
再说一次,第一步我们需要连接到RabbitMQ服务端。负责连接到Rabbit的代码与前面相同。
The next step, just like before, is to make sure that the queue exists. Creating a queue using queue_declare is idempotent ‒ we can run the command as many times as we like, and only one will be created.
下一步,就像之前那样,确保队列存在。使用queue_declare创建一个等幂的队列 - 我们可以多次运行该命令,但最后只有一个被创建。
channel.queue_declare(queue='hello')
You may ask why we declare the queue again ‒ we have already declared it in our previous code. We could avoid that if we were sure that the queue already exists. For example if send.py program was run before. But we're not yet sure which program to run first. In such cases it's a good practice to repeat declaring the queue in both programs.
你或许会问为什么我们要再次声明队列 - 之前的代码中我们已经声明了一个。如果我们确信队列已经存在,我们可以避免这样做。比如如果send.py程序之前就已经运行过。但我们目前还不确定哪个程序会先运行。这种情况下最好在两个程序中重复声明队列。
Listing queues列出队列
You may wish to see what queues RabbitMQ has and how many messages are in them. You can do it (as a privileged user) using the rabbitmqctl tool:
你也许想要看看RabbitMQ都有哪些队列以及有多少条消息在里面。你(作为特权用户)可以使用rabbitmqctl工具来查看,这里针对的是Linux操作系统
sudo rabbitmqctl list_queuesOn Windows, omit the sudo: 在Windows上,可以忽略sudo
rabbitmqctl.bat list_queues
D:\RabbitMQ Server\rabbitmq_server-3.7.23>cd sbin

D:\RabbitMQ Server\rabbitmq_server-3.7.23\sbin>rabbitmqctl.bat list_queues
Timeout: 60.0 seconds ...
Listing queues for vhost / ...
name    messages
Hello   0

D:\RabbitMQ Server\rabbitmq_server-3.7.23\sbin>
Receiving messages from the queue is more complex. It works by subscribing a callback function to a queue. Whenever we receive a message, this callback function is called by the Pika library. In our case this function will print on the screen the contents of the message.
从队列中接收消息要复杂一些。它通过给一个队列订阅一个回调callback函数来工作。每当我们收到一条消息,这个callback函数就会被Pika库调用。在我们的示例中这个函数会将消息的内容打印在屏幕上。
def callback(ch, method, properties, body):
    print(" [x] Received %r" % body)
Next, we need to tell RabbitMQ that this particular callback function should receive messages from our hello queue:
下一步,我们需要告诉RabbitMQ这个专门的特别的callback函数应该从我们的hello队列中接收消息
channel.basic_consume(queue='hello',
                      auto_ack=True,
                      on_message_callback=callback)
For that command to succeed we must be sure that a queue which we want to subscribe to exists. Fortunately we're confident about that ‒ we've created a queue above ‒ using queue_declare.
为了使命令能够成功执行,我们必须确保要订阅的队列存在。幸运的是我们对这点有自信 - 之前我们已经使用queue_declare创建了一个队列。
The auto_ack parameter will be described later on.
auto_ack参数之后会讲。
And finally, we enter a never-ending loop that waits for data and runs callbacks whenever necessary.
最后,我们输入一个死循环,它会一直等待数据并在需要时执行回调函数。
print(' [*] Waiting for messages. To exit press CTRL+C')
channel.start_consuming()
Putting it all together合并
send.py
import pika

connection = pika.BlockingConnection(
    pika.ConnectionParameters(host='localhost'))
channel = connection.channel()

channel.queue_declare(queue='hello')

channel.basic_publish(exchange='', routing_key='hello', body='Hello World!')
print(" [x] Sent 'Hello World!'")
connection.close()
receive.py
import pika

connection = pika.BlockingConnection(
    pika.ConnectionParameters(host='localhost'))
channel = connection.channel()

channel.queue_declare(queue='hello')


def callback(ch, method, properties, body):
    print(" [x] Received %r" % body)


channel.basic_consume(
    queue='hello', on_message_callback=callback, auto_ack=True)

print(' [*] Waiting for messages. To exit press CTRL+C')
channel.start_consuming()
Now we can try out our programs in a terminal. First, let's start a consumer, which will run continuously waiting for deliveries:
现在我们可以在控制台里试试我们的程序了。首先,我们启动一个消费者,它会一直运行等待消息的传递:
python receive.py
# => [*] Waiting for messages. To exit press CTRL+C
Now start the producer. The producer program will stop after every run:
现在启动生产者。生产者程序会在每次运行完之后停止
python send.py
# => [x] Sent 'Hello World!'
receive.py
python receive.py
# => [*] Waiting for messages. To exit press CTRL+C
# => [x] Received 'Hello World!'
Hurray! We were able to send our first message through RabbitMQ. As you might have noticed, the receive.py program doesn't exit. It will stay ready to receive further messages, and may be interrupted with Ctrl-C.
万岁!我们可以通过RabbitMQ发送我们的第一条消息了。就像你可能注意到的,receive.py程序不会退出。它会一直等待接收更进一步的消息,同时可以被Ctrl+C打断。
Try to run send.py again in a new terminal.
试试在一个新控制台里运行send.py
We've learned how to send and receive a message from a named queue. It's time to move on to part 2 and build a simple work queue.
我们已经学会如何从一个命名的队列中发送和接收消息了。现在是时候移步第二部分并建立一个简单的工作队列了。


