前言
Bitmap在开发中是经常遇到的,因为他用到的地方有很多,比如Android的图片预览,自定义相机,自定义美颜相机,图片滤镜,图像算法。。。。,既然使用场景这么多,今天就先讲一下Android中常用的吧。
今天,我们来说说Bitmap相关的绘制以及颜色滤镜。看看我们是怎样虐狗的哈
看看虐狗前的图原图,是一只可爱的阿拉斯加。

Bitmap 绘制
Bitmap的绘制,主要有以下4个方法,其中2、3可以说是一样的。
- drawBitmap(Bitmap bitmap, float left, float top, Paint paint)
- drawBitmap(Bitmap bitmap, Rect src, RectF dst,Paint paint)
- drawBitmap(Bitmap bitmap, Rect src, Rect dst,Paint paint)
- drawBitmap(Bitmap bitmap, Matrix matrix, Paint paint)
好了,下面我们一一来讲解这几种方法。
- 方式一: drawBitmap(Bitmap bitmap, float left, float top, Paint paint)
代码如下:
package com.example.myapp.view;

import android.content.Context;
import android.graphics.Bitmap;
import android.graphics.BitmapFactory;
import android.graphics.Canvas;
import android.graphics.Color;
import android.graphics.Paint;
import android.os.Build;
import android.util.AttributeSet;
import android.view.View;

import androidx.annotation.Nullable;
import androidx.annotation.RequiresApi;

import com.example.myapp.R;

public class DrawBitmap extends View {
    //绘制的所需要的画笔
    private Paint paint;

    public DrawBitmap(Context context) {
        super(context);
        initAttributeSet();
    }

    public DrawBitmap(Context context, @Nullable AttributeSet attrs) {
        super(context, attrs);
        initAttributeSet();
    }
    public DrawBitmap(Context context, @Nullable AttributeSet attrs, int defStyleAttr) {
        super(context, attrs, defStyleAttr);
        initAttributeSet();
    }

    @RequiresApi(api = Build.VERSION_CODES.LOLLIPOP)
    public DrawBitmap(Context context, @Nullable AttributeSet attrs, int defStyleAttr, int defStyleRes) {
        super(context, attrs, defStyleAttr, defStyleRes);
        initAttributeSet();
    }
    //初始化参数
    private void initAttributeSet(){
        paint = new Paint();
    }
    @Override
    protected void onDraw(Canvas canvas) {
        super.onDraw(canvas);
        paint.setColor(Color.RED); //画笔颜色
        paint.setStrokeWidth(3);   //边宽
        Bitmap bitmap = BitmapFactory.decodeResource(getResources(), R.mipmap.pig);
        //左上角的坐标left,top
        canvas.drawBitmap(bitmap, 100, 100, paint);
    }
}
看一下最终效果图:

注意:
这里的left,top为开始绘制起点的左上角的坐标
- 方式二和三:drawBitmap(Bitmap bitmap, Rect src, RectF dst,Paint paint)
代码如下:
package com.example.myapp.view;

import android.content.Context;
import android.graphics.Bitmap;
import android.graphics.BitmapFactory;
import android.graphics.Canvas;
import android.graphics.Color;
import android.graphics.Paint;
import android.graphics.Rect;
import android.os.Build;
import android.util.AttributeSet;
import android.view.View;

import androidx.annotation.Nullable;
import androidx.annotation.RequiresApi;

import com.example.myapp.R;

public class DrawBitmap extends View {
    private Paint paint;

    public DrawBitmap(Context context) {
        super(context);
        initAttributeSet();
    }

    public DrawBitmap(Context context, @Nullable AttributeSet attrs) {
        super(context, attrs);
        initAttributeSet();
    }

    public DrawBitmap(Context context, @Nullable AttributeSet attrs, int defStyleAttr) {
        super(context, attrs, defStyleAttr);
        initAttributeSet();
    }

    @RequiresApi(api = Build.VERSION_CODES.LOLLIPOP)
    public DrawBitmap(Context context, @Nullable AttributeSet attrs, int defStyleAttr, int defStyleRes) {
        super(context, attrs, defStyleAttr, defStyleRes);
        initAttributeSet();
    }

    //初始化参数
    private void initAttributeSet(){
        paint = new Paint();
    }

    @Override
    protected void onDraw(Canvas canvas) {
        super.onDraw(canvas);
        paint.setColor(Color.RED);
        paint.setStrokeWidth(3);
        Bitmap bitmap = BitmapFactory.decodeResource(getResources(), R.mipmap.pig);
        Rect rectF = new Rect(100, 300, 300, 100);
        canvas.drawRect(rectF, paint);
        canvas.drawBitmap(bitmap, null, rectF, paint);
        Rect dst = new Rect(0, 0, 300, 300);
        Rect src = new Rect(0, 0, bitmap.getWidth() / 2, bitmap.getHeight() / 2);
        canvas.drawRect(src, paint);
        //src 本次绘制的原区域 dst 本次绘制的目标区域
        canvas.drawBitmap(bitmap, src, dst, paint);
        canvas.drawBitmap(bitmap, 0, bitmap.getHeight() / 2, paint);
    }
}
好了,执行以下,再看看虐狗后的图片。

注意:
这里的src 为本次绘制的原区域,dst 本次绘制的目标区域,简单来说,就是把src 区域的图像绘制到dst区域
- 方式四:drawBitmap(Bitmap bitmap, Matrix matrix, Paint paint)**
          Matrix matrix = new Matrix();
        //        //缩放
                matrix.setScale(0.5f, 0.5f);
        //        //平移
        //        matrix.setTranslate(100, 100);
        //        //旋转
        //        matrix.setRotate(30);
        //        //倾斜
        //        matrix.setSkew(0.5f, 0.5f);
        //
                canvas.drawBitmap(bitmap, matrix, paint);
效果图如下:

注意:
这里的matrix为矩阵,可以对图像进行一些简单的处理
这只是最简单的方式,下面我们讲讲如何用矩阵算法实现复杂的滤镜效果。
ColorFilter颜色滤镜
首先,对于色彩的存储,Bitmap类使用一个32位的数值来保存。红(R)、绿(G)、蓝(B)及透明度(A)各占8位,也就是所谓的RGBA,每一个色彩分量的取值范围是0-255。透明度为0表示完全透明,为255时,色彩完全可见。
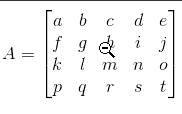
Android中的颜色矩阵是一个 4x5 的数字矩阵,它用来对图片的色彩进行处理。

而处理是方式就涉及到了矩阵的乘法,具体方式如下图:

简单的代码如下:
R1 = aR + bG + cB + dA + e;
G1 = fR + gG + hB + iA + j;
B1 = kR + lG + mB + nA + o;
A1 = pR + qG + rB + sA + t;
这也解释了为啥用五阶矩阵,比如说只是在原R上添加一些偏移量,使用四阶矩阵难以实现这个效果,(四阶矩阵只能实现乘法效果) 下面我们结合一些实例,再来深入了解下蓝色模式。
蓝色模式
蓝色模式就是去掉红色和绿色,代码如下:
        ColorMatrix colorMatrix = new ColorMatrix(new float[]{
                0, 0, 0, 0, 0,
                0, 0, 0, 0, 0,
                0, 0, 1, 0, 0,
                0, 0, 0, 1, 0,
        });
        paint.setColorFilter(new ColorMatrixColorFilter(colorMatrix));
        canvas.drawBitmap(bitmap, 400, 0, paint);
好了,看一下效果图:

反相:
        //反相
        ColorMatrix colorMatrix = new ColorMatrix(new float[]{
                -1, 0, 0, 0, 255,
                0, -1, 0, 0, 255,
                0, 0, -1, 0, 255,
                0, 0, 0, 1, 0,
        });

        paint.setColorFilter(new ColorMatrixColorFilter(colorMatrix));
        canvas.drawBitmap(bitmap, 400, 0, paint);
效果图如下:

变亮:
变量就是同时对R、G、B、A同时增大。
代码如下:
 ColorMatrix light = new ColorMatrix(new float[]{
                1.2f, 0, 0, 0, 0,
                0, 1.2f, 0, 0, 0,
                0, 0, 1.2f, 0, 0,
                0, 0, 0, 1.2f, 0,
        });

        paint.setColorFilter(new ColorMatrixColorFilter(light));
        canvas.drawBitmap(bitmap, 400, 0, paint);
效果图如下:

灰度/去色
只要把RGB的色彩信息设置成一样;即:R=G=B,那么图像就变成了灰色:
        //灰度
        ColorMatrix grey1 = new ColorMatrix(new float[]{
                0.33f, 0.59f, 0.11f, 0, 0,
                0.33f, 0.59f, 0.11f, 0, 0,
                0.33f, 0.59f, 0.11f, 0, 0,
                0, 0, 0, 1, 0,
        });
        paint.setColorFilter(new ColorMatrixColorFilter(grey1));
        canvas.drawBitmap(bitmap, 400, 0, paint);
效果图:

当然,灰度算法,还有更高高深的,下面介绍一下另外一种算法,0.213, 0.715, 0.072 这是谷歌给出的比例,跟人眼的色彩学有关系。
        //灰度2=====谷歌算法
        ColorMatrix grey2 = new ColorMatrix(new float[]{
                0.213f, 0.715f, 0.072f, 0, 0,
                0.213f, 0.715f, 0.072f, 0, 0,
                0.213f, 0.715f, 0.072f, 0, 0,
                0, 0, 0, 1, 0,
        });
        paint.setColorFilter(new ColorMatrixColorFilter(grey2));
        canvas.drawBitmap(bitmap, 200, 0, paint);在这里插入代码片
效果图如下:

红绿反色
 //红绿反色
        ColorMatrix rtog = new ColorMatrix(new float[]{
                0, 1, 0, 0, 0,
                1, 0, 0, 0, 0,
                0, 0, 1, 0, 0,
                0, 0, 0, 1, 0,
        });

        paint.setColorFilter(new ColorMatrixColorFilter(rtog));
效果图如下:

是不是很神奇,红毛的阿拉斯加瞬间被你绿了哈。哈哈哈。。。。。。。。。
变旧
        //变旧
        ColorMatrix old = new ColorMatrix(new float[]{
                1 / 2f, 1 / 2f, 1 / 2f, 0, 0,
                1 / 3f, 1 / 3f, 1 / 3f, 0, 0,
                1 / 4f, 1 / 4f, 1 / 4f, 0, 0,
                0, 0, 0, 1, 0
        });
        paint.setColorFilter(new ColorMatrixColorFilter(old));
        canvas.drawBitmap(bitmap, 200, 0, paint);
效果图如下:

粉调
 //粉调
        ColorMatrix pink = new ColorMatrix(new float[]{
                0.8f, 0, 0, 0, 0,
                0, 0.8f, 0, 0, 0,
                0, 0.7f, 0.7f, 0, 0,
                0, 0, 0, 0.8f, 0,
        });
        paint.setColorFilter(new ColorMatrixColorFilter(pink));
        canvas.drawBitmap(bitmap, 200, 0, paint);
效果图如下:

好了,如果感觉对你有帮助,是否可以给个小红心啦。
