文章目录
项目源码地址 https://github.com/nieandsun/security
动力往往来自身边人的优秀!!!
1 客户端+token信息存储配置方式1
先将客户端信息存储在内存(不是很好),token信息由存储在内存改为存到redis数据库(应该是挺好的一种方式)
1.1 代码实现
- 资源服务器配置类和具体解释看如下代码:
package com.nrsc.security.app.config;

import org.springframework.beans.factory.annotation.Autowired;
import org.springframework.context.annotation.Configuration;
import org.springframework.security.authentication.AuthenticationManager;
import org.springframework.security.core.userdetails.UserDetailsService;
import org.springframework.security.crypto.password.PasswordEncoder;
import org.springframework.security.oauth2.config.annotation.configurers.ClientDetailsServiceConfigurer;
import org.springframework.security.oauth2.config.annotation.web.configuration.AuthorizationServerConfigurerAdapter;
import org.springframework.security.oauth2.config.annotation.web.configuration.EnableAuthorizationServer;
import org.springframework.security.oauth2.config.annotation.web.configurers.AuthorizationServerEndpointsConfigurer;
import org.springframework.security.oauth2.provider.token.TokenStore;

/**
 * @author : Sun Chuan
 * @date : 2019/10/11 22:25
 * Description:认证服务器
 */
@Configuration
@EnableAuthorizationServer
public class NrscAuthorizationServerConfig extends AuthorizationServerConfigurerAdapter {
    //对正在进行授权的用户进行认证+校验时需要用到
    @Autowired
    private UserDetailsService NRSCDetailsService;

    @Autowired
    private AuthenticationManager authenticationManager;

    @Autowired
    private TokenStore redisTokenStore;

    @Autowired
    private PasswordEncoder passwordEncoder;

    /***
     * 入口点相关配置  ---  token的生成,存储方式等在这里配置
     * @param endpoints
     * @throws Exception
     */
    @Override
    public void configure(AuthorizationServerEndpointsConfigurer endpoints) throws Exception {
        endpoints
                //指定使用的TokenStore,tokenStore用来存取token,默认使用InMemoryTokenStore
                //这里使用redis存储token
                .tokenStore(redisTokenStore)
                //下面的配置主要用来指定"对正在进行授权的用户进行认证+校验"的类
                //在实现了AuthorizationServerConfigurerAdapter适配器类后,必须指定下面两项
                .authenticationManager(authenticationManager)
                .userDetailsService(NRSCDetailsService);
    }

    /***
     * 第三方客户端相关的配置在这里进行配置 ,之前我们在yml配置文件里对客户端进行过简单的配置
     * 在这里进行配置会覆盖yml中的配置
     * @param clients
     * @throws Exception
     */
    @Override
    public void configure(ClientDetailsServiceConfigurer clients) throws Exception {
        //注意:可配置的内容不止下面几个
        clients.inMemory()
                    //设置client-id和client-secret,注意client-secret必须要进行加密处理
                    .withClient("test")
                    .secret(passwordEncoder.encode("test"))
                    //设置accessToken的过期时间
                    .accessTokenValiditySeconds(600)
                    //客户端可以进行认证的方式
                    .authorizedGrantTypes("refresh_token", "authorization_code", "password")
                    //客户端能请求的授权类型
                    .scopes("read,write")
                .and()
                    //指定另一个客户端
                    .withClient("nrsc")
                    .secret(passwordEncoder.encode("123456"))
                    .accessTokenValiditySeconds(1200)
                    .authorizedGrantTypes("refresh_token", "authorization_code", "password")
                    .accessTokenValiditySeconds(7200)
                    .refreshTokenValiditySeconds(2592000)
                    .scopes("all");
    }
}
上面代码中注入的UserDetailsService 和PasswordEncoder 之前就已经有了,AuthenticationManager 和TokenStore的配置如下:
- 将AuthenticationManager注入spring容器
package com.nrsc.security.app.config;

import org.springframework.beans.factory.annotation.Autowired;
import org.springframework.context.annotation.Bean;
import org.springframework.context.annotation.Configuration;
import org.springframework.security.authentication.AuthenticationManager;
import org.springframework.security.config.annotation.authentication.builders.AuthenticationManagerBuilder;
import org.springframework.security.config.annotation.web.builders.HttpSecurity;
import org.springframework.security.config.annotation.web.configuration.EnableWebSecurity;
import org.springframework.security.config.annotation.web.configuration.WebSecurityConfigurerAdapter;
import org.springframework.security.core.userdetails.UserDetailsService;
import org.springframework.security.crypto.password.PasswordEncoder;

/**
 * @author : Sun Chuan
 * @date : 2019/10/12 23:39
 * Description: 用户访问授权服务器时,认证+授权所需要的配置类
 */
@Configuration
@EnableWebSecurity
public class AppSecurityConfig extends WebSecurityConfigurerAdapter {

    @Autowired
    private UserDetailsService NRSCDetailsService;
    @Autowired
    private PasswordEncoder passwordEncoder;
    /***
     * 构造AuthenticationManager --- 可选参数不止下面两个
     * @param auth
     * @throws Exception
     */
    @Override
    protected void configure(AuthenticationManagerBuilder auth) throws Exception {
        auth.userDetailsService(NRSCDetailsService)
                .passwordEncoder(passwordEncoder);
    }

    /***
     * 真正将AuthenticationManager注入到spring容器
     * @return
     * @throws Exception
     */
    @Bean
    @Override
    public AuthenticationManager authenticationManagerBean() throws Exception {
        return super.authenticationManagerBean();
    }

    /***
     * 可以像资源服务器一样进行配置,然后访问认证服务器时就会根据下面的配置进行认证+授权
     * @param http
     * @throws Exception
     */
    @Override
    protected void configure(HttpSecurity http) throws Exception {
        //security5+ 认证默认为表单了也就是http.formLogin()
        http.httpBasic();
    }
}
- 将 TokenStore注入spring容器
package com.nrsc.security.app.config;

import org.springframework.beans.factory.annotation.Autowired;
import org.springframework.context.annotation.Bean;
import org.springframework.context.annotation.Configuration;
import org.springframework.data.redis.connection.RedisConnectionFactory;
import org.springframework.security.oauth2.provider.token.TokenStore;
import org.springframework.security.oauth2.provider.token.store.redis.RedisTokenStore;

/**
 * @author : Sun Chuan
 * @date : 2019/10/24 13:56
 * Description: TokenStore的实现类有5个,这里将RedisTokenStore注入spring容器
 */
@Configuration
public class TokenStoreConfig {

    /***
     * RedisTokenStore需要一个连接工厂,这里可以直接注入进来
     */
    @Autowired
    private RedisConnectionFactory redisConnectionFactory;

    /***
     * 将RedisTokenStore注入到spring容器
     * @return
     */
    @Bean
    public TokenStore redisTokenStore() {
        return new RedisTokenStore(redisConnectionFactory);
    }
}
1.2 测试
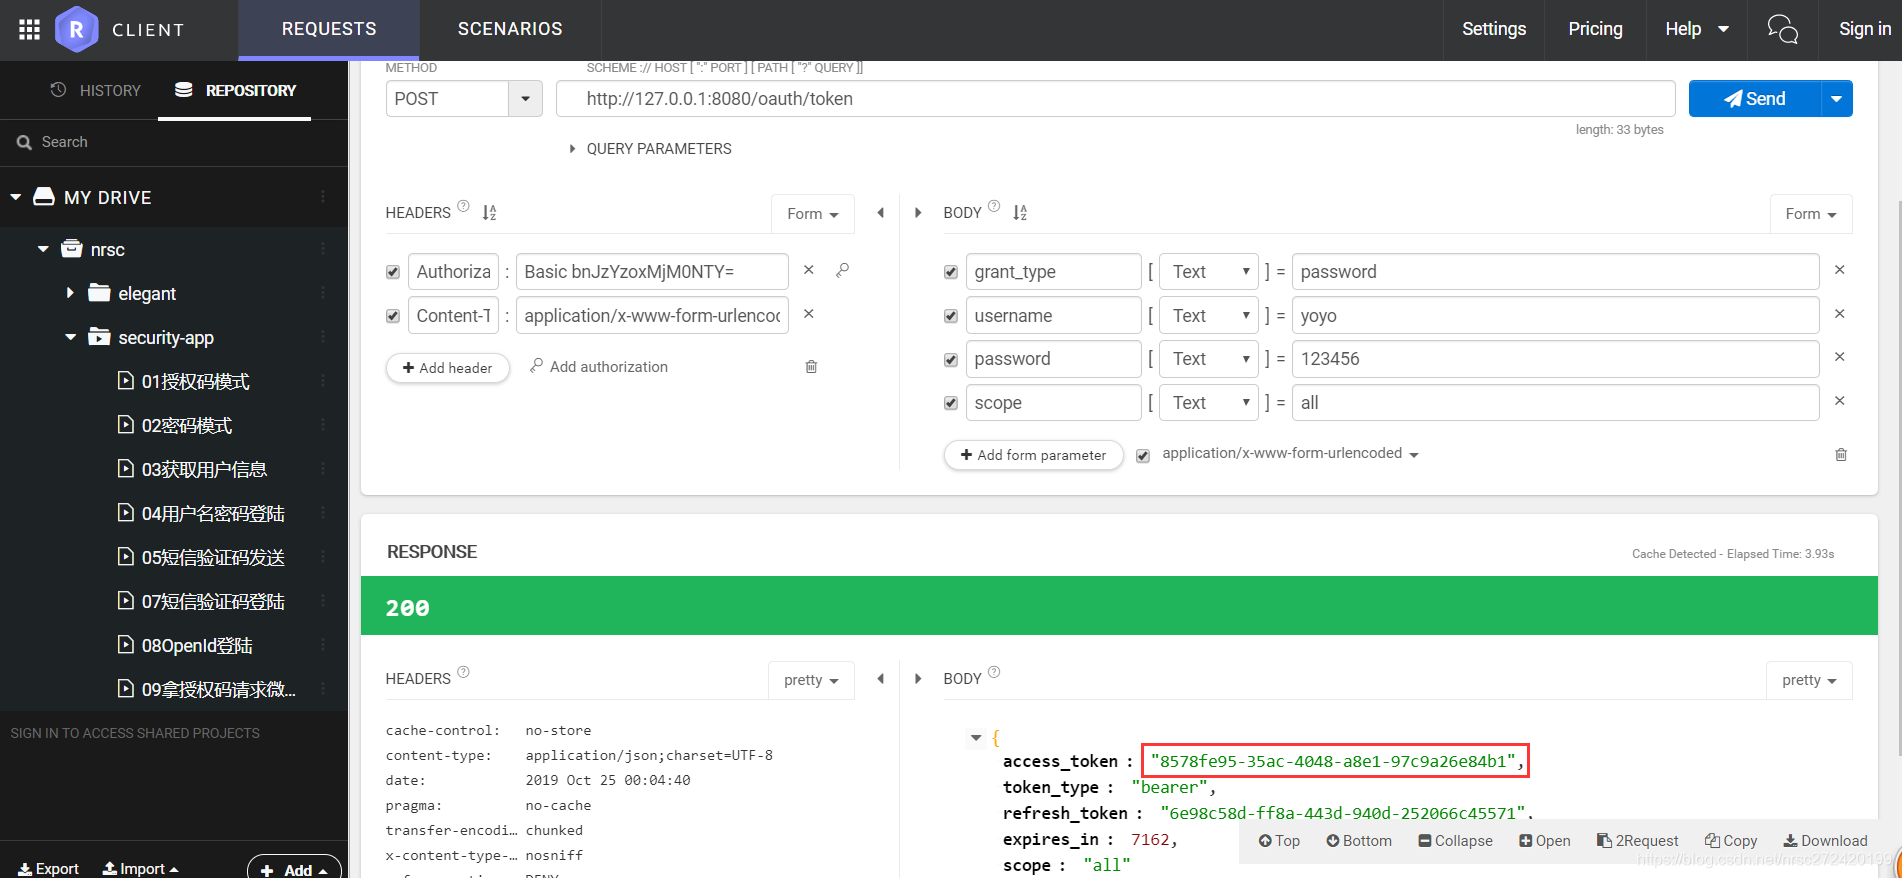
(1)以密码模式访问认证服务器进行认证请求,成功获得token
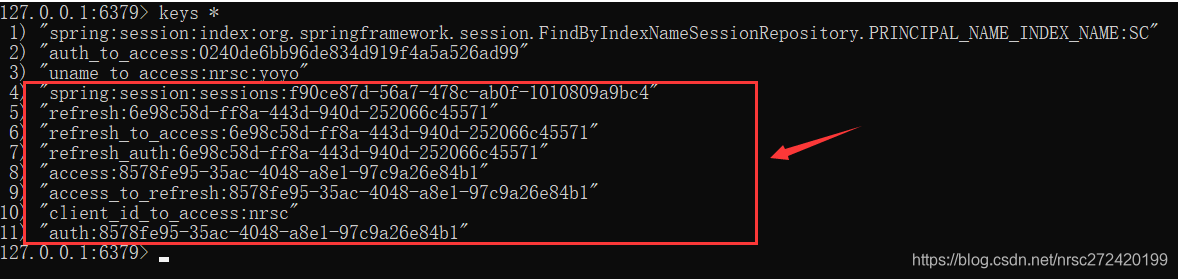
(2)redis库里已经存入了好些token的信息
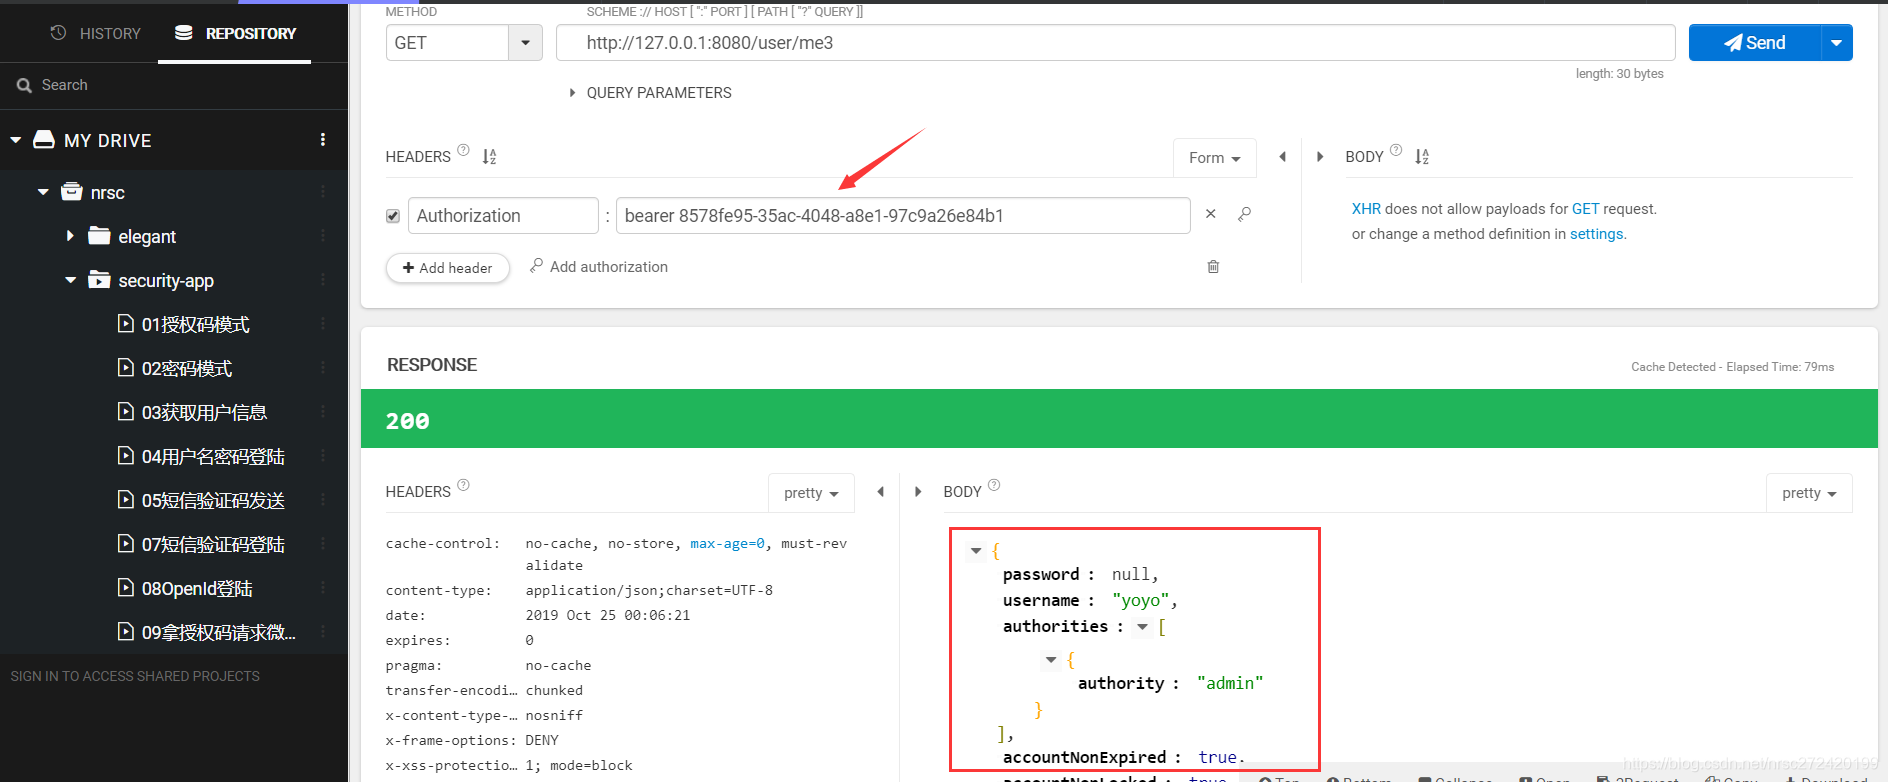
(3)拿着生成的token访问用户信息接口可以访问到数据
2 将客户端信息保存到mysql( 推荐)
2.1 建表+代码开发
- 建表sql — 具体字段含义可以去看这篇文章《OAuth2相关数据表字段的详细说明》
create table oauth_client_details (
  client_id VARCHAR(256) PRIMARY KEY,
  resource_ids VARCHAR(256),
  client_secret VARCHAR(256),
  scope VARCHAR(256),
  authorized_grant_types VARCHAR(256),
  web_server_redirect_uri VARCHAR(256),
  authorities VARCHAR(256),
  access_token_validity INTEGER,
  refresh_token_validity INTEGER,
  additional_information VARCHAR(4096),
  autoapprove VARCHAR(256)
);
- 数据库里做一些简单的配置

- 这样客户端的配置就由上面代码中的一坨变成了下面这样,且如果增加一个客户端或减少一个客户端并不用修改代码,直接删除或增加数据库里的一条数据就可以了
    /***
     * 第三方客户端相关的配置在这里进行配置 ,之前我们在yml配置文件里对客户端进行过简单的配置
     * 在这里进行配置会覆盖yml中的配置
     * @param clients
     * @throws Exception
     */
    @Override
    public void configure(ClientDetailsServiceConfigurer clients) throws Exception {
        //直接将dataSource给clients就行了 --- jdbc会直接去库里拿客户端信息
        clients.jdbc(dataSource);
    }
2.2 测试 — 同上
3 将token保存到mysql(不推荐放到mysql,推荐如1中放到redis)
3.1 建表+代码开发
- 建表sql — 具体字段含义可以去看这篇文章《OAuth2相关数据表字段的详细说明》
create table oauth_client_token (
  token_id VARCHAR(256),
  token BLOB,
  authentication_id VARCHAR(256) PRIMARY KEY,
  user_name VARCHAR(256),
  client_id VARCHAR(256)
);

create table oauth_access_token (
  token_id VARCHAR(256),
  token BLOB,
  authentication_id VARCHAR(256) PRIMARY KEY,
  user_name VARCHAR(256),
  client_id VARCHAR(256),
  authentication BLOB,
  refresh_token VARCHAR(256)
);

create table oauth_refresh_token (
  token_id VARCHAR(256),
  token BLOB,
  authentication BLOB
);

create table oauth_code (
  code VARCHAR(256), authentication BLOB
);

create table oauth_approvals (
	userId VARCHAR(256),
	clientId VARCHAR(256),
	scope VARCHAR(256),
	status VARCHAR(10),
	expiresAt DATETIME,
	lastModifiedAt DATETIME
);
- 配置JdbcTokenStore并利用JdbcTokenStore替换RedisTokenStore
注意: 这块代码我提交在了JdbcTokenStoreTest-2019/10/25这个分支上
    /***
     * 配置JdbcTokenStore
     * @return
     */
    @Bean
    public TokenStore tokenStore() {
        return new JdbcTokenStore(dataSource);
    }


    /***
     * 入口点相关配置  ---  token的生成,存储方式等在这里配置
     * @param endpoints
     * @throws Exception
     */
    @Override
    public void configure(AuthorizationServerEndpointsConfigurer endpoints) throws Exception {
        endpoints
                //指定使用的TokenStore,tokenStore用来存取token,默认使用InMemoryTokenStore
                //这里使用redis存储token
                //.tokenStore(redisTokenStore)
                .tokenStore(tokenStore())  //使用JdbcTokenStore存储token
                //下面的配置主要用来指定"对正在进行授权的用户进行认证+校验"的类
                //在实现了AuthorizationServerConfigurerAdapter适配器类后,必须指定下面两项
                .authenticationManager(authenticationManager)
                .userDetailsService(NRSCDetailsService);
    }
2.2 测试
(1)以密码模式访问认证服务器进行认证请求,成功获得token — 同上
(2)mysql库里已经存入了好些token的信息

(3)拿着生成的token访问用户信息接口可以访问到数据 — 同上
