文章目录
- 1 简单回顾
- 2 如何找到适用于当前对象的通知---源码追踪
- 2.1 findAdvisorsThatCanApply --- 入口
- 2.2 AopUtils.findAdvisorsThatCanApply
- 2.3 canApply --- 拿到当前类和当前类的接口,遍历接口和类中的方法看是否有适用于当前bean的通知
- 2.4 matches
- 2.5 getTransactionAttribute --- 拿着方法和类去找该方法的事务信息
- 2.6 computeTransactionAttribute --- @Transactional解析顺序解密
- 2.7 parseTransactionAnnotation--- 真正解析到我们@Transactional上标注的属性
- 2.8 parseTransactionAnnotation --- 将解析的属性转为事务属性对象
- 3 创建目标对象的代理增强对象
- 4 几个问题
1 简单回顾
上篇文章《spring源码】— spring-aop和spring事务前置处理方法》第5小结讲解的流程其实是spring事务核心后置处理器 — nfrastructureAdvisorAutoProxyCreator对所有的单实例业务bean创建过程中的拦截处理逻辑,也就是说上篇文章其实我已经介绍了spring事务核心后置处理器对目标对象进行增强的整体逻辑 :
(1)找到所有的事务通知对象 —> 入口5.14 —> 5.15、5.16、5.17为具体如何找
(2)找到适用于当前对象的通知 —> 5.14说本篇文章会细讲
(3)如果找到了适用于本对象的通知 —> 则回到5.13 —> 再回到5.12—> 调用5.12的createProxy(…)方法创建目标对象的代理对象 —> 本篇会讲。
按照约定,本篇文章将会讲一下如何找到适用于当前对象的通知 和 如何创建目标对象的代理增强对象。
2 如何找到适用于当前对象的通知—源码追踪
所谓找到适用于当前对象的通知其实有两层含义:
(1)确定前一步找到的所有事务通知哪个适用于当前对象;
(2)当前对象需不需要事务通知。
2.1 findAdvisorsThatCanApply — 入口
入口就是上篇文章5.14中的方法 — findAdvisorsThatCanApply(…) ,其源代码如下:
所在类AbstractAdvisorAutoProxyCreator
protected List<Advisor> findAdvisorsThatCanApply(
		List<Advisor> candidateAdvisors, Class<?> beanClass, String beanName) {
	//将当前对象的对象名放到ProxyCreationContext上下文对象
	ProxyCreationContext.setCurrentProxiedBeanName(beanName);
	try {//拿着上一步获取到的所有通知,去看看到底哪一个通知时候当前bean
		return AopUtils.findAdvisorsThatCanApply(candidateAdvisors, beanClass);
	}
	finally {//将当前对象的对象名从ProxyCreationContext上下文对象删除
		ProxyCreationContext.setCurrentProxiedBeanName(null);
	}
}
2.2 AopUtils.findAdvisorsThatCanApply
跟进源码,到如下方法:
所在类AopUtils
public static List<Advisor> findAdvisorsThatCanApply(List<Advisor> candidateAdvisors, Class<?> clazz) {
	//------------------------引介增强???这一块不细究了------------------------------------
	if (candidateAdvisors.isEmpty()) {
		return candidateAdvisors;
	}
	List<Advisor> eligibleAdvisors = new ArrayList<>();
	for (Advisor candidate : candidateAdvisors) {
		if (candidate instanceof IntroductionAdvisor && canApply(candidate, clazz)) {
			eligibleAdvisors.add(candidate);
		}
	}
	boolean hasIntroductions = !eligibleAdvisors.isEmpty();
	//遍历上一步获取到的所有通知
	for (Advisor candidate : candidateAdvisors) {
		if (candidate instanceof IntroductionAdvisor) {
			// already processed
			continue;
		}
	//------------------------引介增强???这一块不细究了------------------------------------
		//查看当前通知是否适合当前类
		//这里要注意canApply的结果其实为true或false,
		if (canApply(candidate, clazz, hasIntroductions)) {
			//如果找到适用于当前bean的通知,将其加入到eligibleAdvisors返回给调用者
			eligibleAdvisors.add(candidate);
		}
	}
	return eligibleAdvisors;
}
注意:这里的cancanApply方法的结果其实为true或false,这就有一个问题,canApply方法把当前通知作为了参数,它会不会改当前通知呢? —> 说的更直白一点,就是它会不会解析到到当前对象所有的事务注解,并把解析后的结果放到该通知里,然后应用于后续创建当前对象的代理增强对象的过程中呢???
2.3 canApply — 拿到当前类和当前类的接口,遍历接口和类中的方法看是否有适用于当前bean的通知
继续跟进代码可以走到如下方法(跳过了几个方法):
所在类AopUtils
//注意,这里的pc其实是事务通知的一个属性,它若改变有可能会引起事务通知改变
//这里我主要的疑问是它会不会把当前对象的所有的事务属性解析并加进去,
//然后在创建当前对象的代理增强对象时使用。。。。
public static boolean canApply(Pointcut pc, Class<?> targetClass, boolean hasIntroductions) {
	//---------------------------此块代码不细究了---------------------------------------------
	Assert.notNull(pc, "Pointcut must not be null");
	if (!pc.getClassFilter().matches(targetClass)) {
		return false;
	}

	MethodMatcher methodMatcher = pc.getMethodMatcher();
	if (methodMatcher == MethodMatcher.TRUE) {
		// No need to iterate the methods if we're matching any method anyway...
		return true;
	}

	IntroductionAwareMethodMatcher introductionAwareMethodMatcher = null;
	if (methodMatcher instanceof IntroductionAwareMethodMatcher) {
		introductionAwareMethodMatcher = (IntroductionAwareMethodMatcher) methodMatcher;
	}
   //---------------------------此块代码不细究了----------------------------------------------

   //---------------------------拿到当前类和当前类的接口--------------------------------------
	Set<Class<?>> classes = new LinkedHashSet<>();
	if (!Proxy.isProxyClass(targetClass)) {
		classes.add(ClassUtils.getUserClass(targetClass));
	}
	classes.addAll(ClassUtils.getAllInterfacesForClassAsSet(targetClass));
	//---------------------------拿到当前类和当前类的接口-------------------------------------
	//遍历当前类和当前类的接口组成的集合
	for (Class<?> clazz : classes) {
		//找到当前类或当前类的接口的所有方法
		Method[] methods = ReflectionUtils.getAllDeclaredMethods(clazz);
		//遍历当前类或当前类的接口的所有方法
		for (Method method : methods) {
			//判断当前方法是否需要 事务进行增强 --->实际走的是:methodMatcher.matches(method, targetClass))
			if (introductionAwareMethodMatcher != null ?
					introductionAwareMethodMatcher.matches(method, targetClass, hasIntroductions) :
					methodMatcher.matches(method, targetClass)) {
				//这里要注意,通过代码可以看出只要当前类或当前类的接口里有一个方法需要进行事务增强就直接返回true
				//也就是说在创建目标对象的代理对象的过程中根本不会解析出目标对象所有方法的事务属性,
				//只要找到一个就为该目标对象创建代理增强对象
				return true;
			}
		}
	}

	return false;
}
注意1: 通过代码可以看出,事务的核心后置处器在创建目标对象的代理增强对象时根本不会解析出目标对象所有方法的事务属性,而是只要找到一个方法具有事务属性就为该目标对象创建代理增强对象。
注意2:其实在目标对象被调用时,会重新解析事务属性,并拿着那时解析的事务属性来完成相应的事务能力,但是当前过程会对解析的结果做缓存 ---> 看2.5。 且当目标方法被调用时会使用该缓存!!!—> 下篇文章再进行探索。
2.4 matches
继续跟进代码可以走到如下方法:
所在类TransactionAttributeSourcePointcut
@Override
public boolean matches(Method method, Class<?> targetClass) {
	//----------------------------不细究了----------------------------------------
	if (TransactionalProxy.class.isAssignableFrom(targetClass) ||
			PlatformTransactionManager.class.isAssignableFrom(targetClass) ||
			PersistenceExceptionTranslator.class.isAssignableFrom(targetClass)) {
		return false;
	}
	//----------------------------不细究了----------------------------------------
	//获取事务属性源对象 --- 这个是@EnableTransactionManagement注解导入到IOC容器的一个组件
	TransactionAttributeSource tas = getTransactionAttributeSource();
	//查看当前类或当前类的接口里的当前method是否有事务属性,只要有事务属性就返回true
	return (tas == null || tas.getTransactionAttribute(method, targetClass) != null);
}
注意:1TransactionAttributeSource 的注入逻辑可以看我之前写的这篇文章《【spring事务源码学习】— spring事务核心组件创建过程》的2.3小结。
2.5 getTransactionAttribute — 拿着方法和类去找该方法的事务信息
继续跟进代码可以走到如下方法:
所在类AbstractFallbackTransactionAttributeSource
@Override
@Nullable
public TransactionAttribute getTransactionAttribute(Method method, @Nullable Class<?> targetClass) {
if (method.getDeclaringClass() == Object.class) {
return null;
}
// First, see if we have a cached value.
Object cacheKey = getCacheKey(method, targetClass);
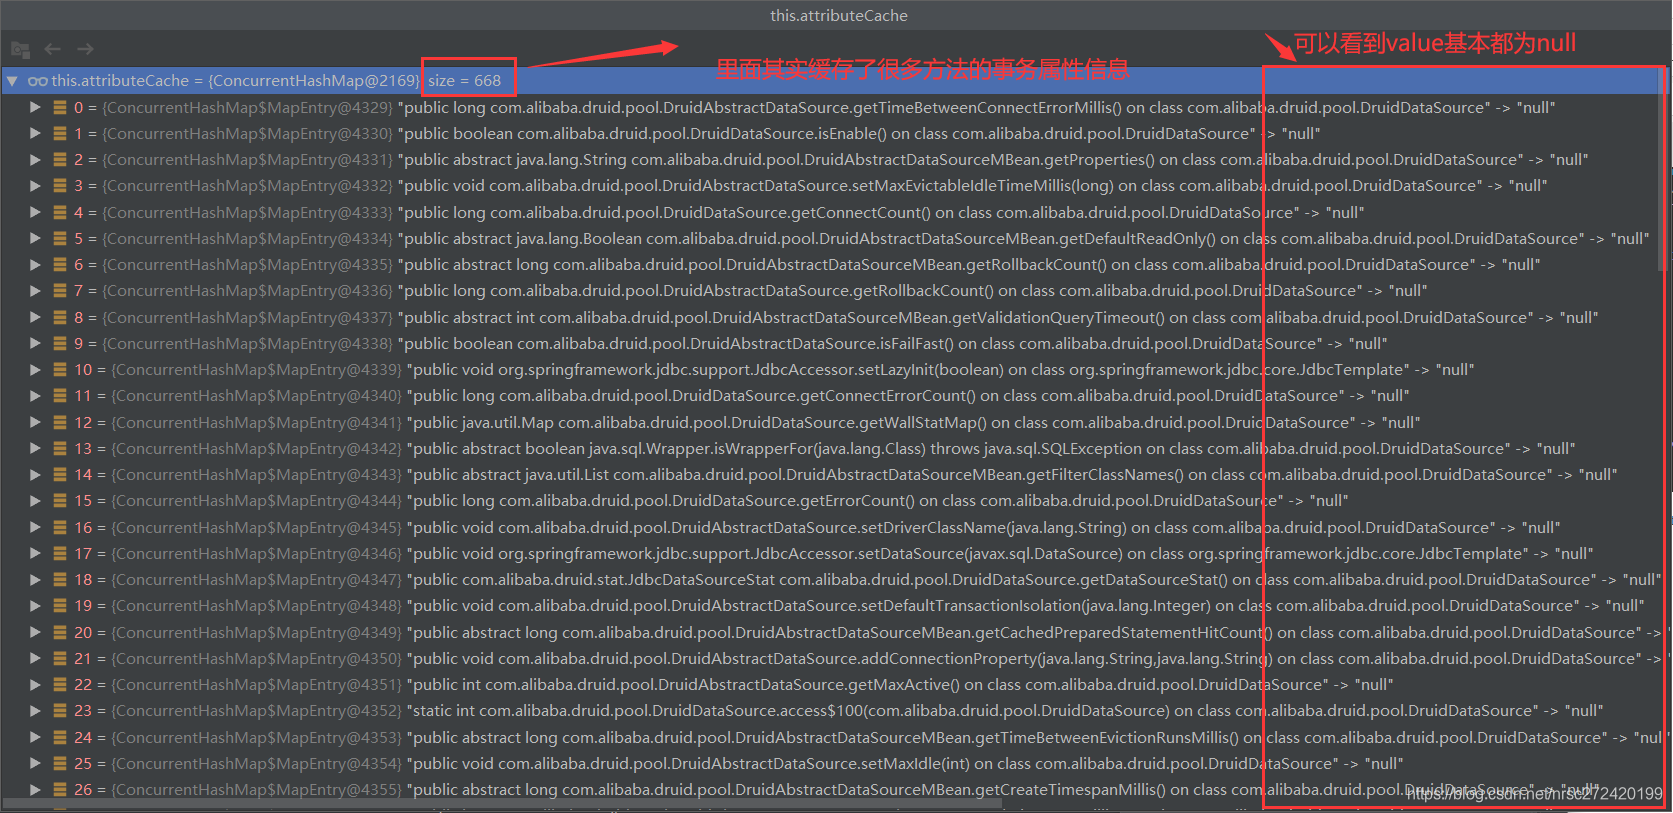
//this.attributeCache是一个Map缓存:Map<Object, TransactionAttribute>
//其实key是method和method对应的类组成的一个Object--->可以唯一确定某个类中的某个方法
//value是该类的该方法的事务属性对象信息
TransactionAttribute cached = this.attributeCache.get(cacheKey);
if (cached != null) {
// Value will either be canonical value indicating there is no transaction attribute,
// or an actual transaction attribute.
if (cached == NULL_TRANSACTION_ATTRIBUTE) {
return null;
}
else {
return cached;
}
}
else {
// We need to work it out. // 解析当前类或类的接口的当前方法的事务属性
TransactionAttribute txAttr = computeTransactionAttribute(method, targetClass);
// Put it in the cache.
if (txAttr == null) {
this.attributeCache.put(cacheKey, NULL_TRANSACTION_ATTRIBUTE);
}
else {
String methodIdentification = ClassUtils.getQualifiedMethodName(method, targetClass);
if (txAttr instanceof DefaultTransactionAttribute) {
((DefaultTransactionAttribute) txAttr).setDescriptor(methodIdentification);
}
if (logger.isTraceEnabled()) {
logger.trace("Adding transactional method '" + methodIdentification + "' with attribute: " + txAttr);
}
//将当前类的当前方法的事务属性放入Map缓存
this.attributeCache.put(cacheKey, txAttr);
}
return txAttr; //返回当前属性
}
}
简单看一下this.attributeCache这个大缓存Map:
2.6 computeTransactionAttribute — @Transactional解析顺序解密
继续跟进代码可以走到如下方法:
所在类AbstractFallbackTransactionAttributeSource
@Nullable
protected TransactionAttribute computeTransactionAttribute(Method method, @Nullable Class<?> targetClass) {
	// Don't allow no-public methods as required.
	if (allowPublicMethodsOnly() && !Modifier.isPublic(method.getModifiers())) {
		return null;
	}
	//找到当前方法的具体方法,如当前的targetClass为接口时,要找到该接口对应的具体方法
	//又比如targetClass有泛型时,找到具体的泛型方法
	// The method may be on an interface, but we need attributes from the target class.
	// If the target class is null, the method will be unchanged.
	Method specificMethod = AopUtils.getMostSpecificMethod(method, targetClass);

	// First try is the method in the target class. //首先解析目标类中方法上的@Transactional注解
	TransactionAttribute txAttr = findTransactionAttribute(specificMethod);
	if (txAttr != null) {
		return txAttr; //找到直接返回
	}

	// Second try is the transaction attribute on the target class.
	//如果目标类中的目标方法没有@Transactional注解再找当前类上有没有@Transactional注解
	txAttr = findTransactionAttribute(specificMethod.getDeclaringClass());
	if (txAttr != null && ClassUtils.isUserLevelMethod(method)) {
		return txAttr;//找到直接返回
	}

	if (specificMethod != method) {
		// Fallback is to look at the original method.
		//如果上面两处都没找到注解,则找当前类的接口方法上有没有@Transactional注解
		txAttr = findTransactionAttribute(method);
		if (txAttr != null) {
			return txAttr;
		}
		// Last fallback is the class of the original method.
		//如果上面三处都没找到,再查找当前类的接口上有没有@Transactional注解
		txAttr = findTransactionAttribute(method.getDeclaringClass());
		if (txAttr != null && ClassUtils.isUserLevelMethod(method)) {
			return txAttr;
		}
	}

	return null;
}
注意:由这里可知@Transactional不仅可以标注在方法上,还可以标注再类上、接口对应的方法上以及接口上,解析顺序正是:
目标类的目标方法上 —> 目标类上 —> 接口对应的目标方法上 —> 接口上。
2.7 parseTransactionAnnotation— 真正解析到我们@Transactional上标注的属性
继续跟进代码可以走到如下方法(跳过了几个方法):
所在类SpringTransactionAnnotationParser
@Override
@Nullable
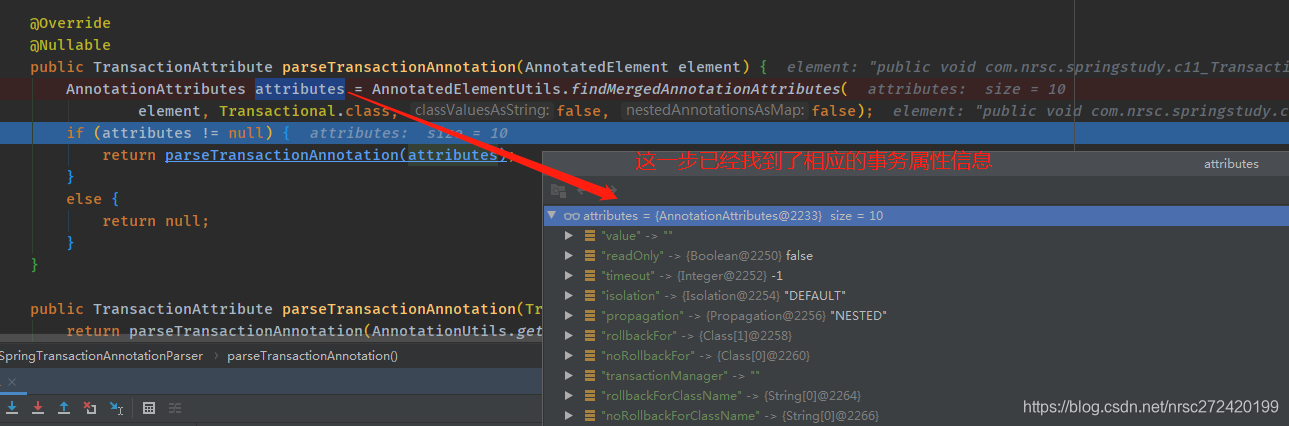
public TransactionAttribute parseTransactionAnnotation(AnnotatedElement element) {
//这一步其实就已经解析出了我们在@Transactional注解上标注的所有属性,不细讲了
AnnotationAttributes attributes = AnnotatedElementUtils.findMergedAnnotationAttributes(
element, Transactional.class, false, false);
if (attributes != null) {
//将解析到的属性由AnnotationAttributes类型转为TransactionAttribute类型即---->事务属性类型
return parseTransactionAnnotation(attributes);
}
else {
return null;
}
}
AnnotatedElementUtils.findMergedAnnotationAttributes方法已经找到了相应的事务属性信息:
2.8 parseTransactionAnnotation — 将解析的属性转为事务属性对象
继续跟进代码可以走到如下方法,可以看到该方法其实就是将解析的事务属性信息拿出来,然后封装成一个事务对象。
所在类SpringTransactionAnnotationParser
protected TransactionAttribute parseTransactionAnnotation(AnnotationAttributes attributes) {
	RuleBasedTransactionAttribute rbta = new RuleBasedTransactionAttribute();

	Propagation propagation = attributes.getEnum("propagation");
	rbta.setPropagationBehavior(propagation.value());
	Isolation isolation = attributes.getEnum("isolation");
	rbta.setIsolationLevel(isolation.value());
	rbta.setTimeout(attributes.getNumber("timeout").intValue());
	rbta.setReadOnly(attributes.getBoolean("readOnly"));
	rbta.setQualifier(attributes.getString("value"));

	List<RollbackRuleAttribute> rollbackRules = new ArrayList<>();
	for (Class<?> rbRule : attributes.getClassArray("rollbackFor")) {
		rollbackRules.add(new RollbackRuleAttribute(rbRule));
	}
	for (String rbRule : attributes.getStringArray("rollbackForClassName")) {
		rollbackRules.add(new RollbackRuleAttribute(rbRule));
	}
	for (Class<?> rbRule : attributes.getClassArray("noRollbackFor")) {
		rollbackRules.add(new NoRollbackRuleAttribute(rbRule));
	}
	for (String rbRule : attributes.getStringArray("noRollbackForClassName")) {
		rollbackRules.add(new NoRollbackRuleAttribute(rbRule));
	}
	rbta.setRollbackRules(rollbackRules);

	return rbta;
}
到此如何找到适用于当前对象的通知的大致过程就已经都讲解完了。
3 创建目标对象的代理增强对象
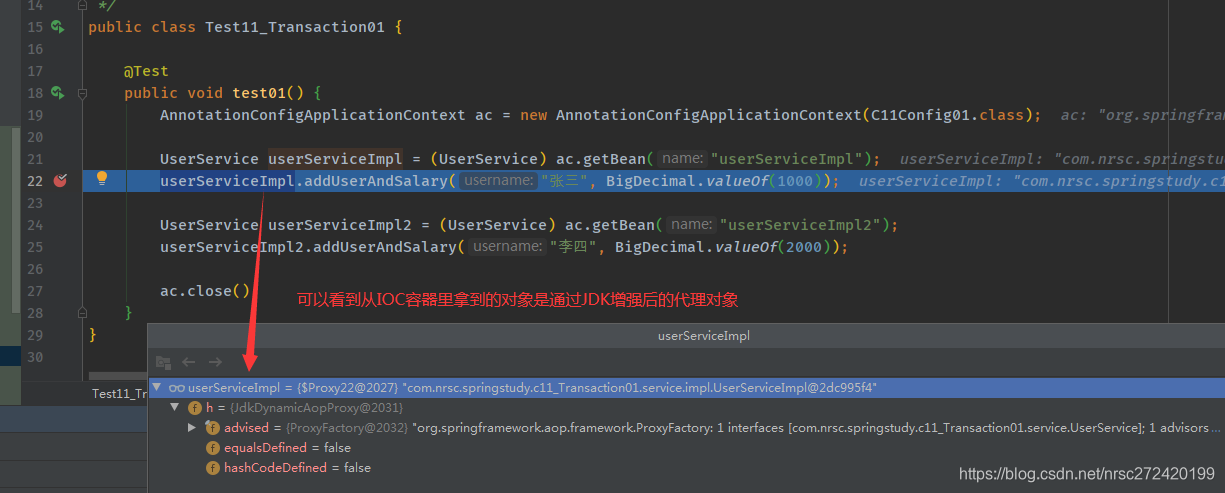
过程与AOP创建代理增强对象一样,有兴趣的可以看我这篇文章《【Spring - AOP】 — 目标对象增强核心源码解读》。 不过AOP大多是CGLIB代理,因为AOP代理的对象一般都没有实现接口。而事务代理的对象一般是XXXXServiceImpl对象,这些对象一般是XXXXService接口的具体实现,所以事务往往会用JDK的动态代理。
简单看一下事务核心后置处理器增强后的目标对象:
4 几个问题
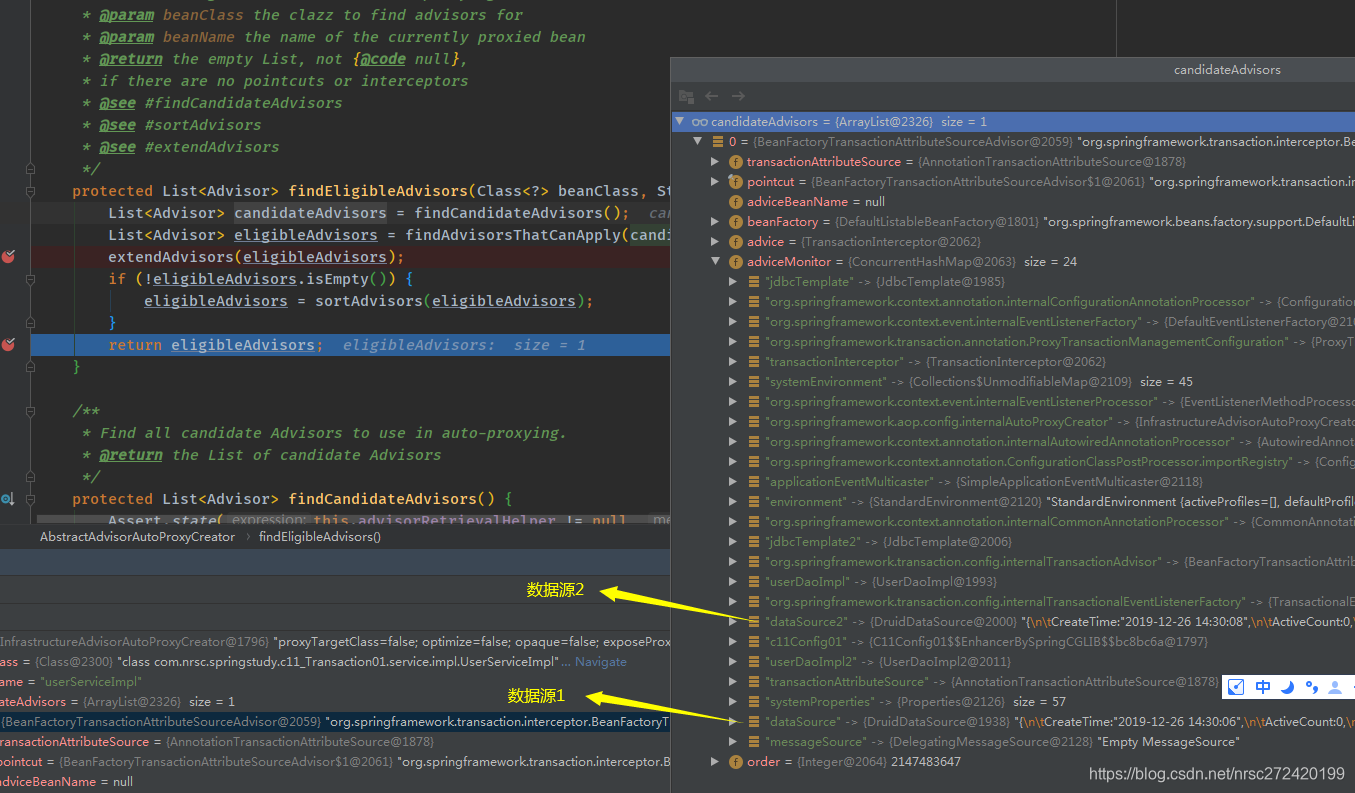
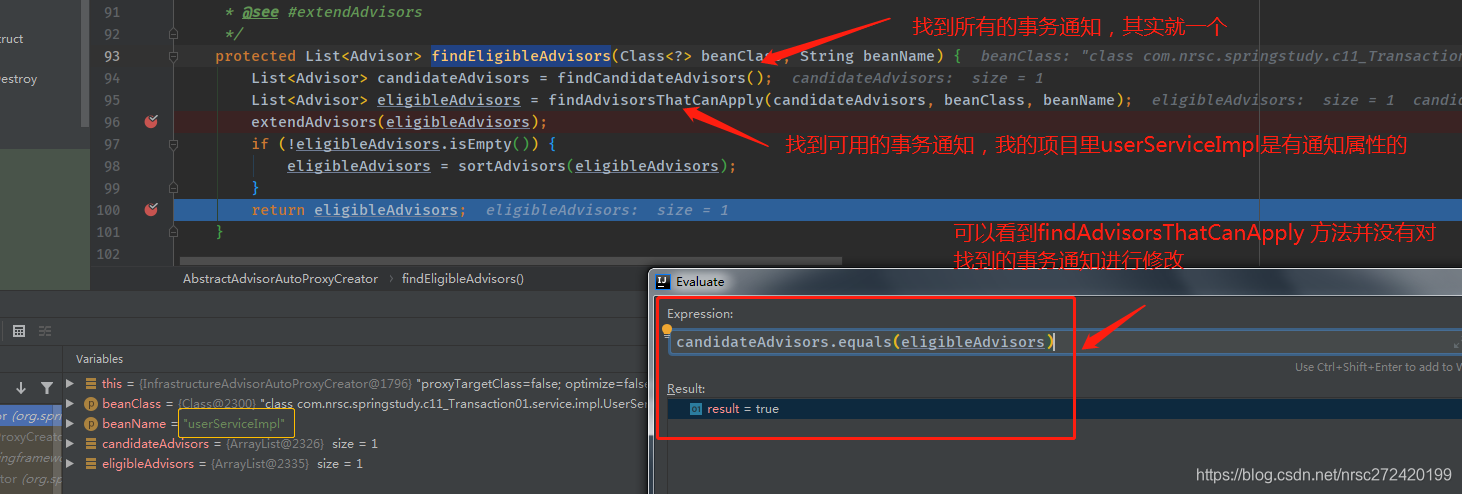
4.1 如何找到适用于当前对象的通知到底有没有对找到的通知进行修改???
答案是没有。
证明如下:
4.2 多数据源情况下会生成多个事务通知么???
我在项目里简单的配置了一下多数据源:
package com.nrsc.springstudy.c11_Transaction01.config;

import com.alibaba.druid.pool.DruidDataSource;
import org.springframework.context.annotation.Bean;
import org.springframework.context.annotation.ComponentScan;
import org.springframework.context.annotation.Configuration;
import org.springframework.jdbc.core.JdbcTemplate;
import org.springframework.jdbc.datasource.DataSourceTransactionManager;
import org.springframework.transaction.PlatformTransactionManager;
import org.springframework.transaction.annotation.EnableTransactionManagement;

import javax.sql.DataSource;

@Configuration
@ComponentScan(value = "com.nrsc.springstudy.c11_Transaction01")
@EnableTransactionManagement //开启事务注解功能
public class C11Config01 {
    //--------------------------------数据源1--------------------------------------------
    //创建数据源
    @Bean
    public DataSource dataSource() {
        DruidDataSource dataSource = new DruidDataSource();
        dataSource.setUsername("root");
        dataSource.setPassword("123456");
        dataSource.setDriverClassName("com.mysql.cj.jdbc.Driver");
        dataSource.setUrl("jdbc:mysql://127.0.0.1:3306/nrsc-transaction?characterEncoding=utf-8&serverTimezone=GMT&useSSL=false");
        return dataSource;
    }

    //注册事务管理器
    @Bean("platformTransactionManager")
    public PlatformTransactionManager platformTransactionManager() {
        return new DataSourceTransactionManager(dataSource());
    }

    //使用jdbcTemplate持久层框架~~~之后整理Mybatis的时候这里会换成Mybatis
    @Bean
    public JdbcTemplate jdbcTemplate() {
        return new JdbcTemplate(dataSource());
    }

    //--------------------------------数据源2--------------------------------------------
    //创建数据源
    @Bean
    public DataSource dataSource2() {
        DruidDataSource dataSource = new DruidDataSource();
        dataSource.setUsername("root");
        dataSource.setPassword("123456");
        dataSource.setDriverClassName("com.mysql.cj.jdbc.Driver");
        dataSource.setUrl("jdbc:mysql://127.0.0.1:3306/nrsc-transaction2?characterEncoding=utf-8&serverTimezone=GMT&useSSL=false");
        return dataSource;
    }

    //注册事务管理器
    @Bean("platformTransactionManager")
    public PlatformTransactionManager platformTransactionManager2() {
        return new DataSourceTransactionManager(dataSource2());
    }

    //使用jdbcTemplate持久层框架~~~之后整理Mybatis的时候这里会换成Mybatis
    @Bean
    public JdbcTemplate jdbcTemplate2() {
        return new JdbcTemplate(dataSource2());
    }
}
通过断点可以发现,多数据源情况下并不会生成多个事务通知对象。