好记星不如烂笔头,这里记录平时工作中用到的东西,不喜可以留言。
美国跨境支付stripe
测试说明,你需要办理至少一张国际信用卡,
比如visa、master、AE(American Express credit 卡)都可以,国内的银联卡不支持的。
eg: 已经隐藏卡号,部分内容,请不要测试。可以自己在国内办理。或者使用测试环境进行测试;说明,这些卡,国内信用卡都可以办理,之前如果有信用卡,开通这些行用卡非常过,基本上可以直接申请。
4984 5130 4437 185X    0X/23  XXX
3771 146143 9300X   0X/22 36XX
489592034960614X  1X/21  65X
3793 876350 2100X   1X/24  31X1
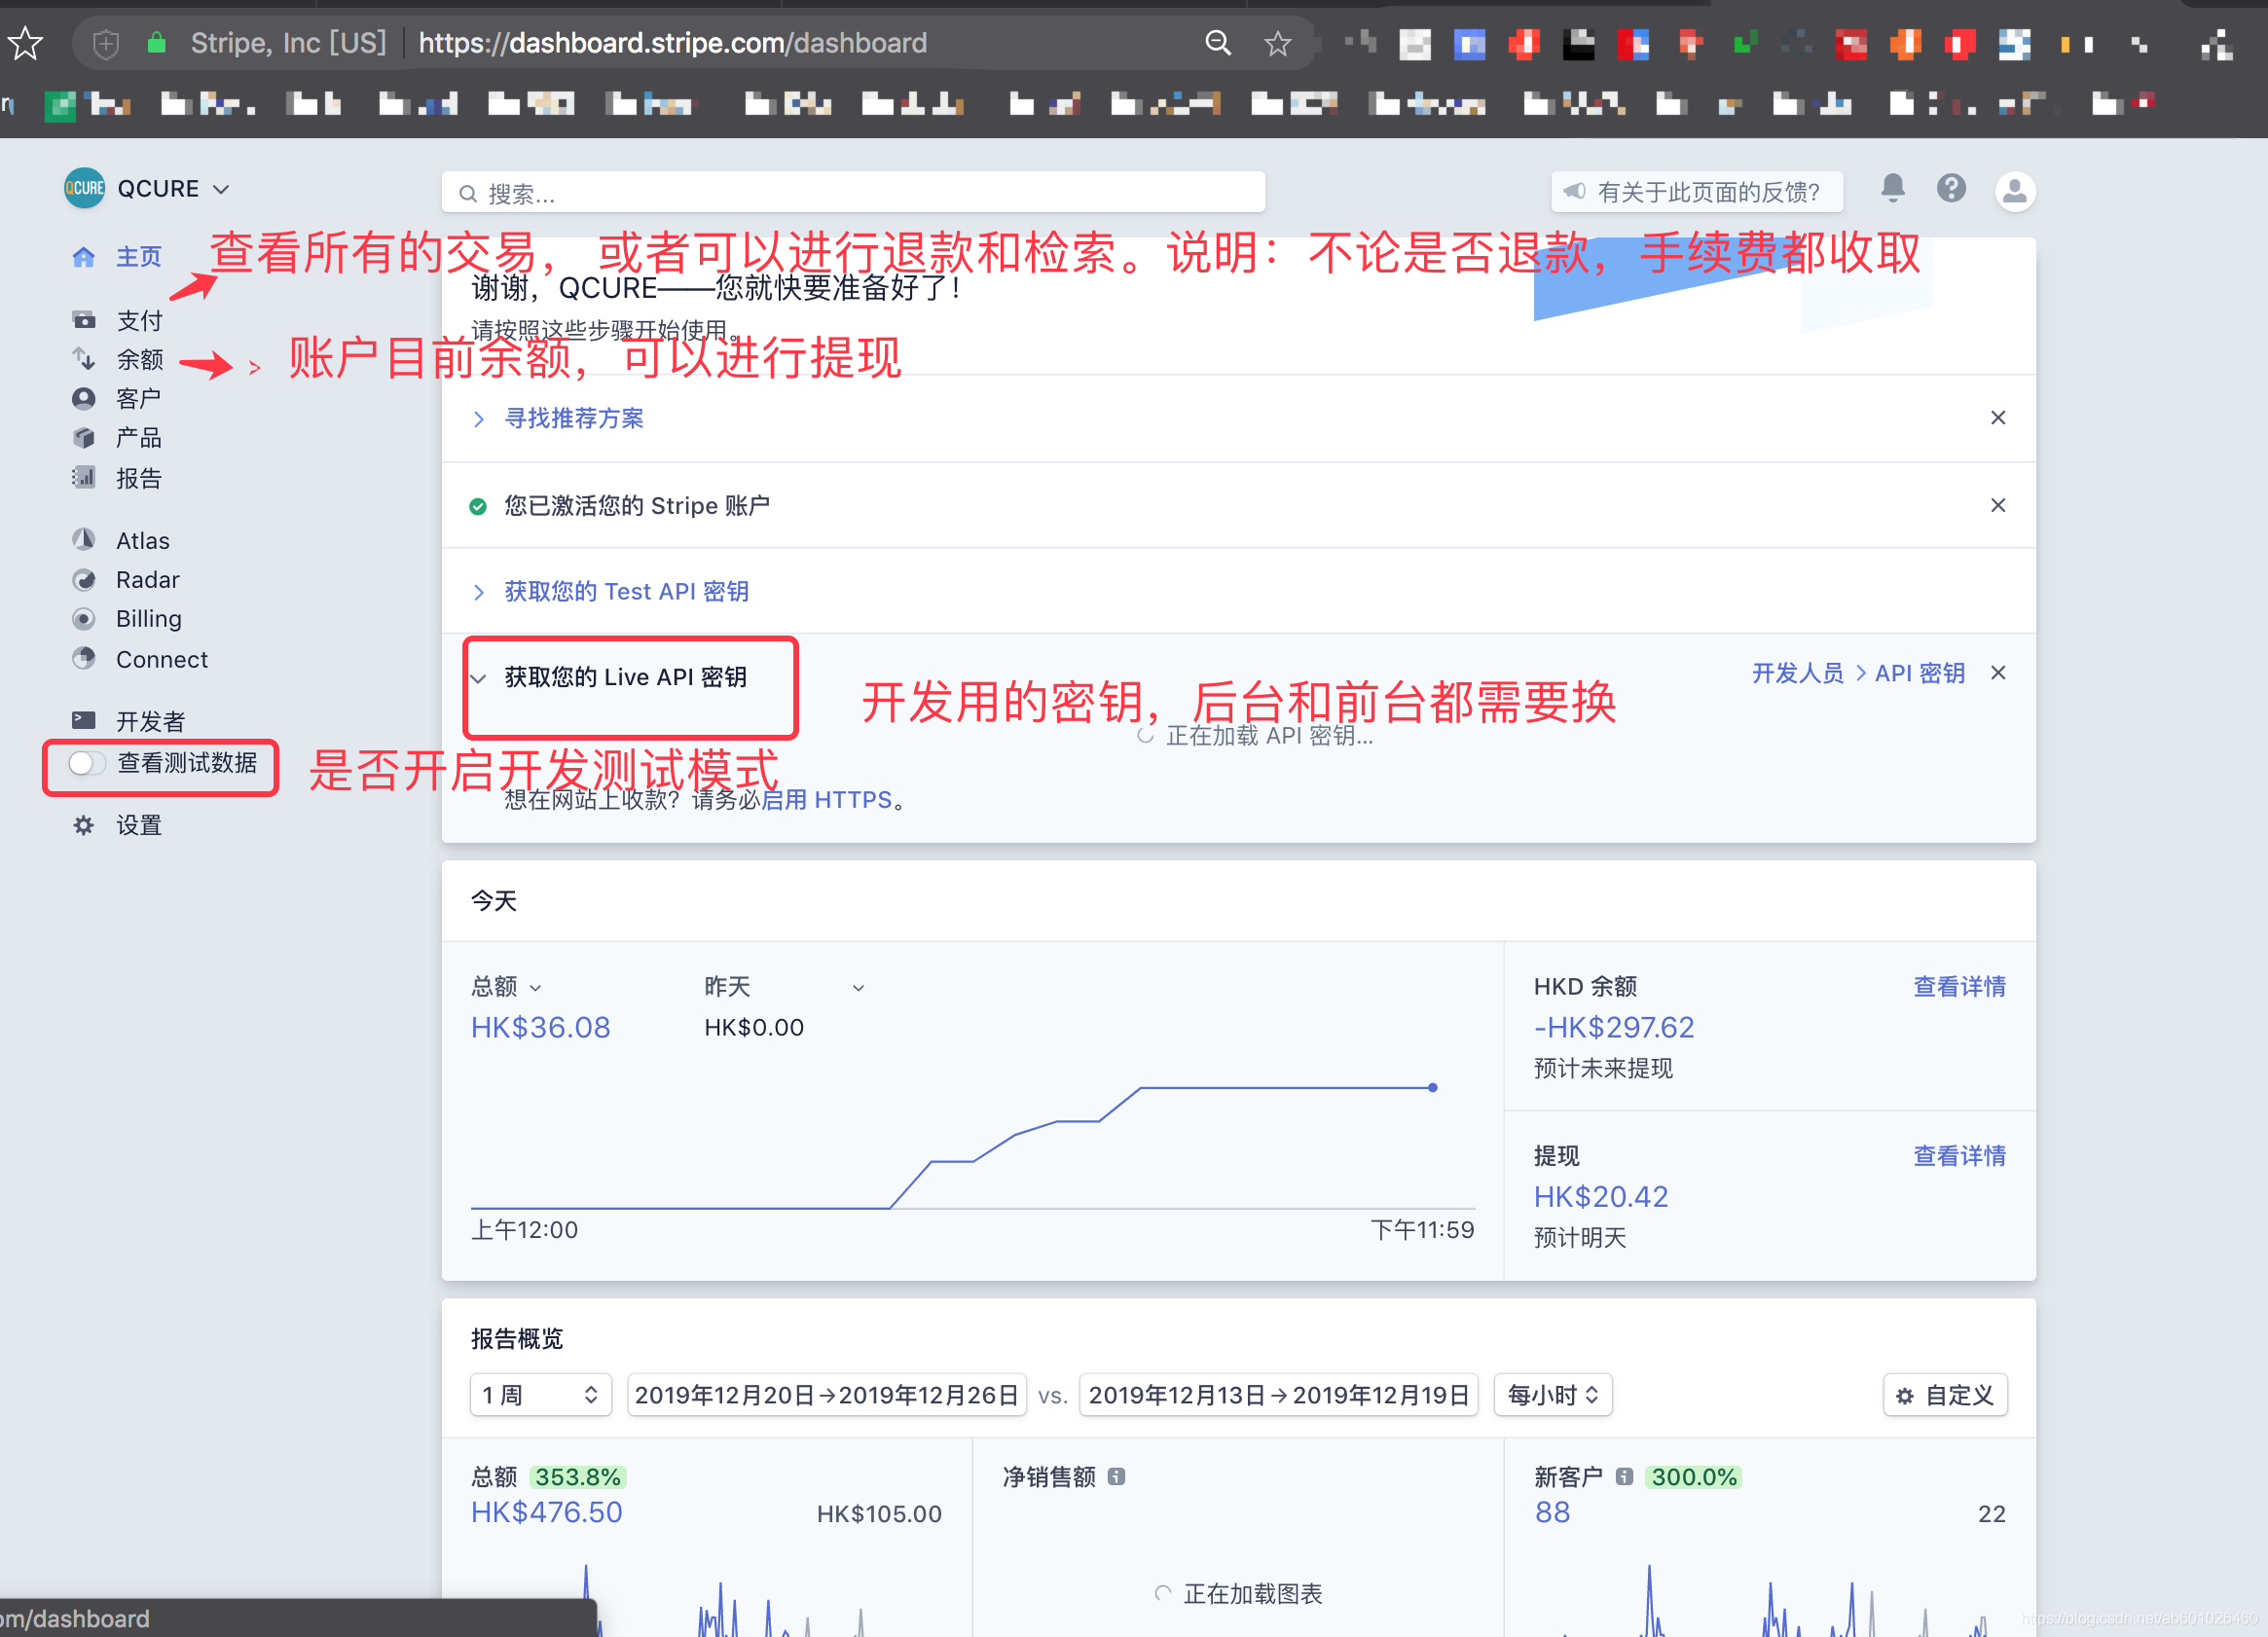
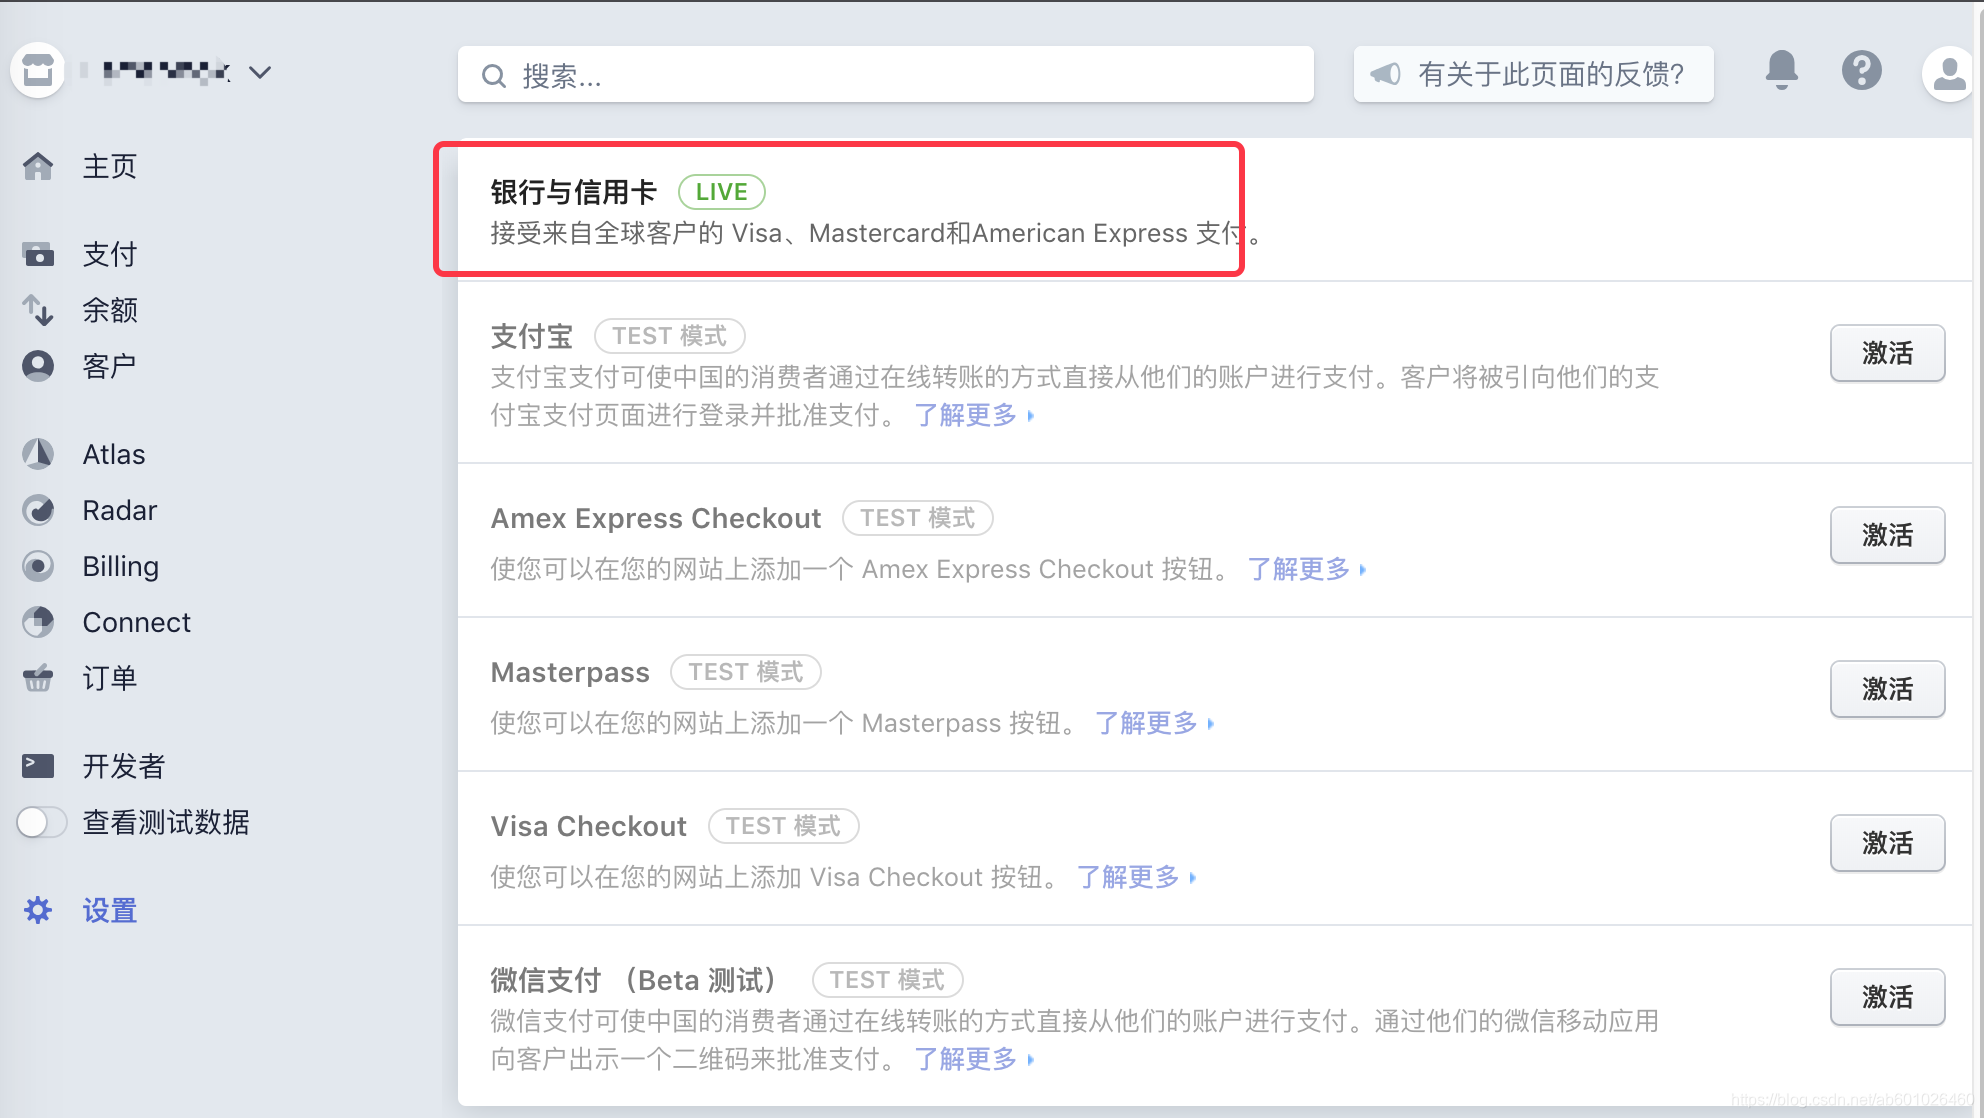
- stripe支付模式和国内的支付宝、微信完全不一样,支付金额全部是后台自己控制。
- 一个订单实付支付重复也需要自己进行判断,stripe不做重复性的判断。
- stripe的手续费:stripe支付,一般最低要求4 HK的手续费,还是非常贵的。
- JAVA后台代码
package com.ourslook.mall.api.pay;
package com.ourslook.mall.api.pay;
import com.ourslook.mall.util.DateUtils;
import com.ourslook.mall.util.RandomUtils;
import com.ourslook.mall.util.RrException;
import com.ourslook.mall.util.XaUtils;
import com.ourslook.mall.util.annotation.IgnoreAuthToken;
import com.ourslook.mall.util.distributedlock.DistributedLockUtil;
import com.ourslook.mall.util.distributedlock.IDistributedLock;
import com.ourslook.mall.util.pay.stripe.StripePayUtil;
import com.ourslook.mall.util.result.XaResult;
import com.ourslook.mall.util.validator.AbstractAssert;
import com.stripe.Stripe;
import com.stripe.exception.InvalidRequestException;
import com.stripe.exception.StripeException;
import com.stripe.model.BalanceTransaction;
import com.stripe.model.Charge;
import com.stripe.model.Customer;
import com.stripe.model.Refund;
import io.swagger.annotations.Api;
import io.swagger.annotations.ApiOperation;
import io.swagger.annotations.ApiParam;
import org.slf4j.Logger;
import org.slf4j.LoggerFactory;
import org.springframework.beans.factory.annotation.Autowired;
import org.springframework.data.redis.core.StringRedisTemplate;
import org.springframework.stereotype.Controller;
import org.springframework.web.bind.annotation.*;
import springfox.documentation.annotations.ApiIgnore;
import javax.servlet.http.HttpServletRequest;
import java.util.HashMap;
import java.util.Map;
import java.util.concurrent.TimeUnit;
/**
* @author dazr
* @version V1.0
* <p>
* 美国跨境支付stripe 支付相关接口
* @date 2019年6月10日 下午1:00:00
* <p>
* 卡支付:https://stripe.com/docs/sources/cards
* api首页:https://stripe.com/docs/api
* <p>
* mvn jar 搜索:com.stripe stripe-java 即可
* <p>
* [没有体验过stripe同学,可以使用modao体验](https://free.modao.cc/me/settings)
* <p>
* https://demo.mall.com.cn/
* https://www.qcurepay.co/
* https://chainmate.io/
* <p>
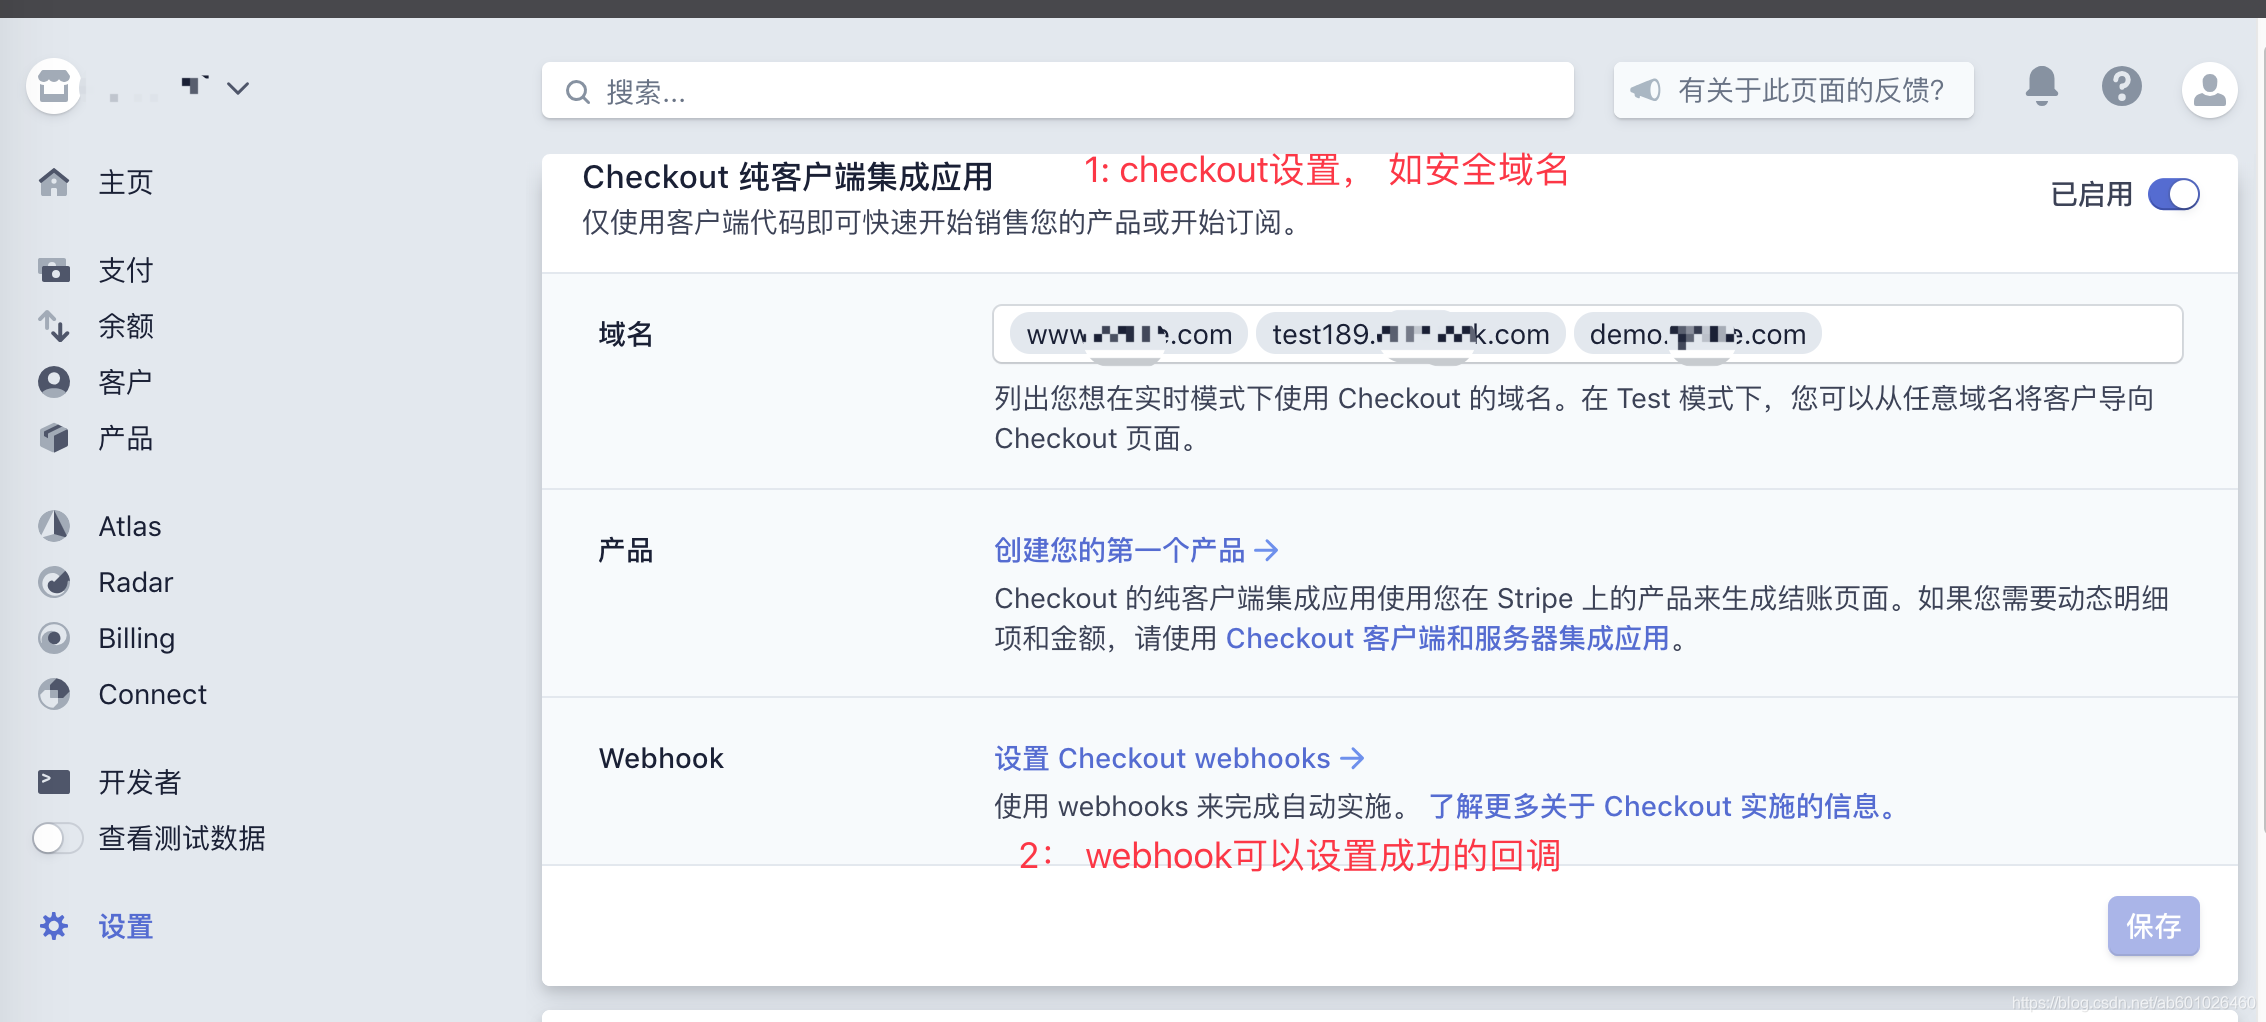
* 自定义stripe checkout 比如自定义语言 Customizing Checkout https://stripe.com/docs/payments/checkout/customization#null
* 自定义 elements 语言locate zh https://stripe.com/docs/stripe-js/reference#stripe-elements
* <p>
* 关于: 小程序使用stripe的说明,小程序没有dom元素。就无法直接生成stripe支付使用src原id: 见 小程序stripe https://segmentfault.com/q/1010000015548618
*/
@Api(value = "pay_stripe", description = "美国跨境支付strpe", position = 10)
@Controller
@CrossOrigin
@RequestMapping("/api/stripe")
public class ApiPayStripeController {
private Logger logger = LoggerFactory.getLogger(getClass());
@Autowired
private StringRedisTemplate redisTemplate;
/**
* 步骤一:客户端初始化代码 创建Source对象
* 文档路径 https://stripe.com/docs/sources/cards#create-source
* 代码片段 https://stripe.com/docs/stripe-js/elements/quickstart
* <p>
* <p>
* 步骤二 Charge the Source 【为Source支付】
* 2.1:Attaching the Source to a Customer 根据客户端source获取客户的详细信息Customer
* 文档路径/代码片段:https://stripe.com/docs/sources/cards#charge-request
* 2.2:Making a charge request to finalize the payment 提出收费要求以完成付款
* 文档路径/代码片段:https://stripe.com/docs/sources/cards#making-a-charge-request-to-finalize-the-payment
* <p>
* <p>
* <p>
* 步骤三 Step 3: Confirm that the charge has succeeded 可以通过自定义回调webhook事件确定是否支付成功
* https://stripe.com/docs/sources/cards#charge-confirmation
* EVENT:charge.succeeded
* EVENT:charge.failed
* <p>
* <p>
* http://127.0.0.1:8988/mall/api/stripe/creditCardCharges?stripeSourceId=src_1FtqeOJ8lGCmQwVAVvwlcIlx&[email protected]&orderNo=QC111111
* <p>
* 说明,stripe的手续费很高,2元+3%左右的一个手续费,并且退款了,这个手续费也收着的;
*/
@SuppressWarnings("all")
@ApiOperation(value = "信用卡支付", notes = "Charge the Source【为Source支付】 ,具体分为两步【1: 根据客户端创建的source获取顾客信息 Customer 2:支付成功】;针对:Visa、Mastercard和American Express 支付")
@ResponseBody
@IgnoreAuthToken
@RequestMapping(value = "creditCardCharges", method = RequestMethod.GET)
public XaResult<Charge> creditCardPay(
@ApiParam(value = "客户端输入了信用卡账号之后创建的source对象/token对象,详见 文档 【Step 1: Create a Source object】,字段名:stripeSourceId;这里是sourceId或者token都可以; token:tok_KPte7942xySKBKyrBu11yEpf", defaultValue = "src_18eYalAHEMiOZZp1l9ZTjSU0") @RequestParam(value = "stripeSourceId", required = true) String stripeSourceId,
@ApiParam(value = "email,字段名:email,请填写自己的email", defaultValue = "[email protected]") @RequestParam(value = "email", required = false) String email,
@ApiParam(value = "订单号,字段名:orderNo", defaultValue = "QC1234567890") @RequestParam(value = "orderNo", required = false) String orderNo,
HttpServletRequest request
) throws RrException {
orderNo = !XaUtils.isValid(orderNo) ? RandomUtils.getRandomOrderNo() + "__" + System.currentTimeMillis() : orderNo;
AbstractAssert.isOk(XaUtils.isValid(orderNo), "订单号不能为空, orderNo = " + orderNo);
XaResult<Charge> xr = new XaResult();
// 防止出现重复支付,这里使用分布式锁
// 分布式锁lock-1: 获取锁,超时15S; 锁过期使用2分钟; 锁解决高并发问题
IDistributedLock distributedLock = DistributedLockUtil.getDistributedLock("order:" + orderNo, 2 * 60 * 1000, 15 * 1000);
if (!distributedLock.acquire()) {
//超时,没有获取到分布式锁,这里直接拒绝
xr.error("正在支付,请稍等..(lock获取失败)");
return xr;
}
String redisKey = DistributedLockUtil.assembleKey("order:" + orderNo + ":data");
boolean isPaySucess = false;
try {
// 分布式锁lock-2: 前置条件判断
// 如果已经获取到锁,这里必须进行前置条件判断。解决重复执行
// (eg: 支付、下单、抽奖、等业务逻辑)【可能用户重复点击,但是执行很快,导致多次执行】
// 这里需要重数据库重新取值,才可以。
if (XaUtils.isNotEmpty(redisTemplate.opsForValue().get(redisKey))) {
xr.error("已经支付,请勿重复支付..");
return xr;
}
// 如果,没有支付过,这里设置一个标志
redisTemplate.opsForValue().set(redisKey, DateUtils.getCurrentDateAsFileName(), 15, TimeUnit.DAYS);
// Set your secret key: remember to change this to your live secret key in production
// See your keys here: https://dashboard.stripe.com/account/apikeys
Stripe.apiKey = StripePayUtil.API_KEY;
//======StripeStep1: 根据客户端source获取到customer对象
Map<String, Object> customerParams = new HashMap<String, Object>();
customerParams.put("email", XaUtils.getNutNullStr(email, "我是默认的邮箱[email protected]"));//选填:email
customerParams.put("name", "段大志(顾客姓名)");//选填: name 如,顾客的姓名
customerParams.put("description", "我是商品描述");//选填: description 如,商品的名称
customerParams.put("source", stripeSourceId);//soureZZZId: 类似 src_18eYalAHEMiOZZp1l9ZTjSU0 ,必须是客户端输入信用卡账号之后客户端获取的原对象的id
//下面三个参数都是可选参数这里可以添加可选自定义参数,如自定义:order_no
//描述,可以选; 参数名字,可以自己随便起
Map<String, String> metadata = new HashMap<>();
metadata.put("order_no", "88888888888");
metadata.put("email", "[email protected]");
metadata.put("tag", "活动付款");
customerParams.put("metadata", metadata);
Customer customer = null;
try {
// Customer 对象api https://stripe.com/docs/api/customers/object
customer = Customer.create(customerParams);
} catch (StripeException e) {
e.printStackTrace();
if (e instanceof InvalidRequestException && e.getLocalizedMessage().contains("The source you provided has already been attached to a customer")) {
throw new RrException("你已经支付过一次了,请不要重复点击;", e);
}
throw new RrException("stripe获取对象失败,详看日志:" + e.getMessage(), e);
}
//======StripeStep2: 根据customer对象进行支付
Map<String, Object> chargeParams = new HashMap<String, Object>();
// 港币:Amount must be at least 400 cents 美分 4港币; 港币目前至少是400
// 人民币:Amount must convert to at least 400 cents. ¥0.01 converts to approximately $0.01.; 人民币:355分
// 美元:最少 58 美分 US$
// 美元:最少 400 港分 HK$
// 最终都是依港币进行结算的
chargeParams.put("amount", 1001);//必须是整数
chargeParams.put("currency", "HKD");//USD 美元、CNY 人民币、HKD 港币
chargeParams.put("customer", customer.getId());//类似: cus_AFGbOSiITuJVDs
chargeParams.put("source", stripeSourceId);//类似:src_18eYalAHEMiOZZp1l9ZTjSU0
chargeParams.put("metadata", metadata);//描述,可以选
// Charge 对象api https://stripe.com/docs/api/charges/object
Charge charge = null;
try {
charge = Charge.create(chargeParams);
} catch (StripeException e) {
e.printStackTrace();
if (StripePayUtil.CODE_AMOUNT_TOO_SMALL.equalsIgnoreCase(e.getCode())) {
throw new RrException("stripe支付金额太小,至少400美分,注意实时汇率;详:" + e.getMessage(), e);
} else {
throw new RrException("stripe调用Charge失败,详看日志:" + e.getMessage(), e);
}
}
if (logger.isInfoEnabled()) {
logger.info("charge对象获取成功,但不一定表示支付成功,虽然大部分情况是支付成功的...");
}
xr.setObject(charge);
// 这里需要把 chargeid [支付id 方便退款] 和 balanceTransactionId[交易id方便查账单、手续费等] 保存起来, 方便退款。eg: ch_1FtlhDJ8lGCmQwVAyZ5Jjx1Z
//https://stripe.com/docs/api/charges/object#charge_object-status
if ("succeeded".equalsIgnoreCase(charge.getStatus())) {
//succeeded 支付成功
//======StripeStep3 获取交易的手续费
//这里获取本笔的校验信息 https://stripe.com/docs/api/balance_transactions/object
String balanceTransactionId = charge.getBalanceTransaction();
BalanceTransaction balanceTransaction = null;
try {
balanceTransaction = BalanceTransaction.retrieve(balanceTransactionId);
} catch (StripeException e) {
e.printStackTrace();
}
if (balanceTransaction != null) {
//交易总金额,单位美分
Long amount = balanceTransaction.getAmount();
//交易收取的手续费,单位美分
Long fee = balanceTransaction.getFee();
// 货币单位
String currency = balanceTransaction.getCurrency().toUpperCase();
logger.info("订单:{},交易总金额amount:{}{}, 其中手续费fee:{}{}", orderNo, amount, currency, fee, currency);
}
try {
//这里处理业务
// xxxService.xxxx
//
xr.setMsg("succeeded 支付成功");
isPaySucess = true;
} catch (Exception e) {
e.printStackTrace();
//======StripeStep4
//万一业务处理失败,抛出异常。这里需要进行退款,否则业务就出现问题了
if (charge != null && XaUtils.isNotEmpty(charge.getId())) {
// 万一,付款成功之后,执行失败了,这里进行退款
Map<String, Object> params = new HashMap<>();
params.put("charge", charge.getId());//eg: ch_IGZpZZVn6H47dNUC2VOU
//params.put("amount", 1000);//要退还部分费用,请提供一个amount参数,以整数美分(或收费货币的最小货币单位)
Refund refund = null;
try {
refund = Refund.create(params);
} catch (StripeException ee) {
e.printStackTrace();
}
}
throw new RrException("支付失败,请联系管理员!");
}
} else if ("pending".equalsIgnoreCase(charge.getStatus())) {
//pending 支付结果要继续进行等待
xr.setMsg("pending 支付结果要继续进行等待");
} else {
//failed 支付失败
xr.setMsg("failed 支付失败");
}
} finally {
// 分布式锁lock-3-1: 释放锁
if (distributedLock != null) {
distributedLock.release();
}
// 分布式锁lock-3-1: 如果执行失败,这里要删除key
if (!isPaySucess) {
redisTemplate.delete(redisKey);
}
}
return xr;
}
/**
* 退款
* 代码片段/文档:https://stripe.com/docs/refunds#refunds-charges
* <p>
* http://127.0.0.1:8001/qcure/api/stripe/refunds?chargeId=ch_1FRUuTEEsRhJ9o6lfcg1mmnq
*/
@ApiIgnore
@SuppressWarnings("all")
@ApiOperation(value = "refunds退款", notes = "refunds退款")
@ResponseBody
@IgnoreAuthToken
@RequestMapping(value = "refunds", method = RequestMethod.GET)
public XaResult<Refund> refunds(
@ApiParam(value = "charge对象id,字段名:chargeId,信用卡支付成功获取到的charge对象", defaultValue = "ch_1Elrq4EEsRhJ9o6ldDCqaS36") @RequestParam(value = "chargeId", required = false) String chargeId,
HttpServletRequest request
) throws Exception {
// Set your secret key: remember to change this to your live secret key in production
// See your keys here: https://dashboard.stripe.com/account/apikeys
Stripe.apiKey = StripePayUtil.API_KEY;
XaResult<Refund> xr = new XaResult<>();
Map<String, Object> params = new HashMap<>();
params.put("charge", chargeId);//eg: ch_IGZpZZVn6H47dNUC2VOU
//params.put("amount", 1000);//要退还部分费用,请提供一个amount参数,以整数美分(或收费货币的最小货币单位)
Refund refund = null;
try {
refund = Refund.create(params);
xr.setObject(refund);
if ("succeeded".equalsIgnoreCase(refund.getStatus())) {
xr.setMsg("退款成功");
} else {
xr.setMsg("退款失败");
}
} catch (StripeException e) {
if (StripePayUtil.CODE_CHARGE_ALREADY_REFUNDED.equalsIgnoreCase(e.getCode())) {
xr.setMsg("退款成功, 您已经退款过了,请不要重复退款!");
} else {
throw new RrException("退款申请失败:" + e.getMessage(), e);
}
e.printStackTrace();
}
return xr;
}
}
/**
* @author xy
*/
public class StripePayUtil {
/**
* apikey查看地方
* https://dashboard.stripe.com/apikeys
* 正式环境
*
* pk_live_4L75w76q0pJ9f9aCcuy0JuNw003XdosVg1 正式
* pk_test_TYooMQauvdEDq54NiTphI7jx 正式
*
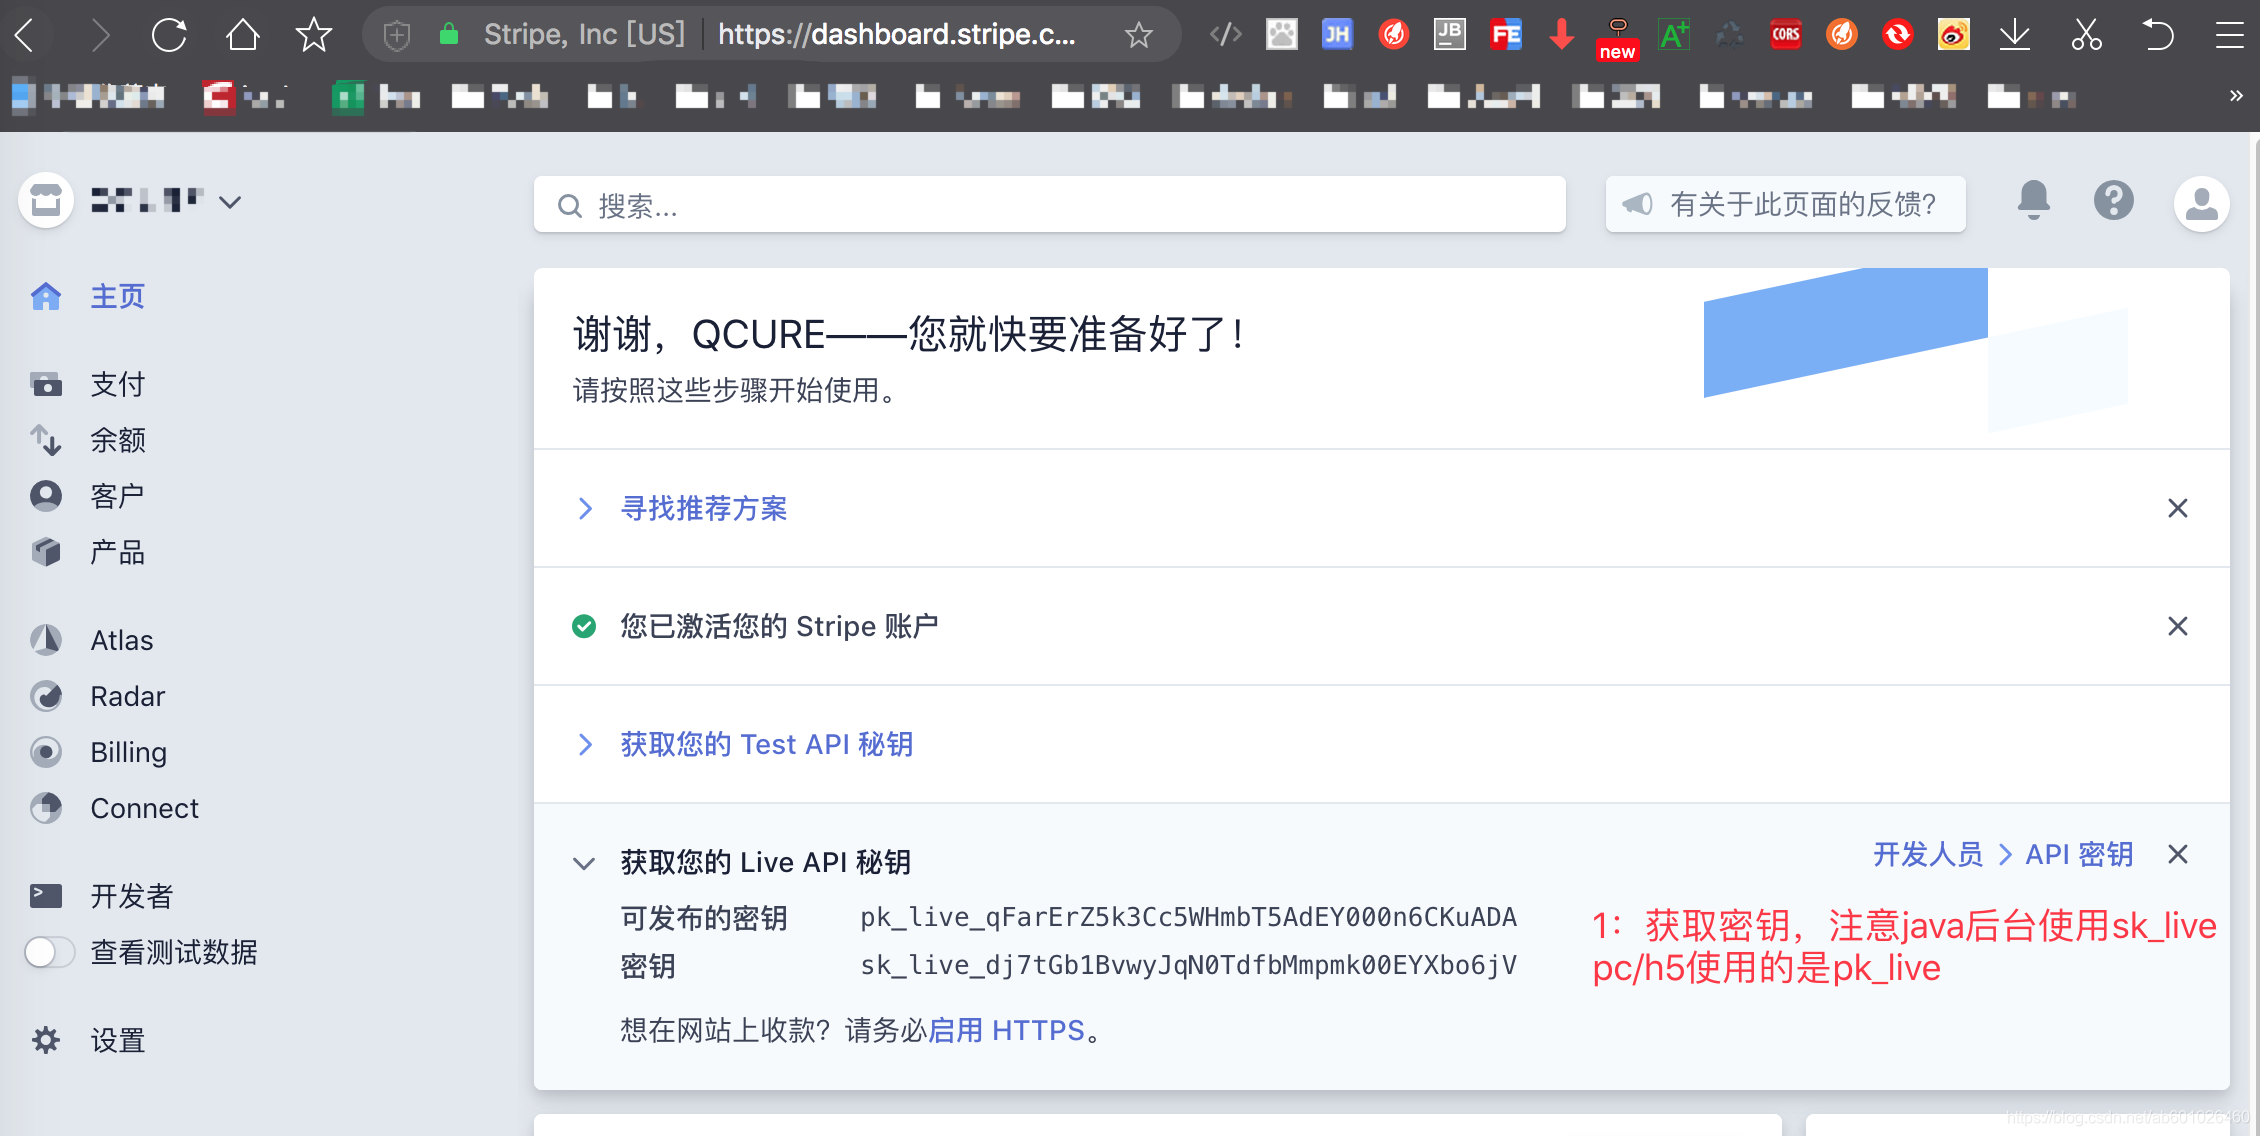
* SK:sk_live_dj7tGb1BvwyJqN0TdfbMmpmk00EYXbo6jV 密钥; 后台使用 【sk_live_】
* PK: pk_live_qFarErZ5k3Cc5WHmbT5AdEY000n6CKuADA 可以发布密钥; 前端使用: 【pk_live_】
*/
public static final String API_KEY = "sk_live_dj7tGb1BvwyJqN0TdfbMmpmk00EYXbo6jV";
/**测试环境*/
/* public static final String API_KEY = "sk_test_1M3fvX5yaujIJJgTHaN0dnSJ00fKueeTu1";*/
// public static final String API_KEY = "sk_test_4eC39HqLyjWDarjtT1zdp7dc";
/**支付金额太少,至少400美分*/
public static final String CODE_AMOUNT_TOO_SMALL = "amount_too_small";
/**
请勿重复退款
*/
public static final String CODE_CHARGE_ALREADY_REFUNDED = "charge_already_refunded";
/**
* 步骤一:客户端初始化代码 创建Source对象
* 文档路径 https://stripe.com/docs/sources/cards#create-source
* 代码片段 https://stripe.com/docs/stripe-js/elements/quickstart
* <p>
* <p>
* 步骤二 Charge the Source 【为Source支付】
* 2.1:Attaching the Source to a Customer 根据客户端source获取客户的详细信息Customer
* 文档路径/代码片段:https://stripe.com/docs/sources/cards#charge-request
* 2.2:Making a charge request to finalize the payment 提出收费要求以完成付款
* 文档路径/代码片段:https://stripe.com/docs/sources/cards#making-a-charge-request-to-finalize-the-payment
* <p>
* <p>
* <p>
* 步骤三 Step 3: Confirm that the charge has succeeded 可以通过自定义回调webhook事件确定是否支付成功
* https://stripe.com/docs/sources/cards#charge-confirmation
* EVENT:charge.succeeded
* EVENT:charge.failed
* <p>
* <p>
* http://127.0.0.1:8001/qcure/api/stripe/creditCardPay
*/
}
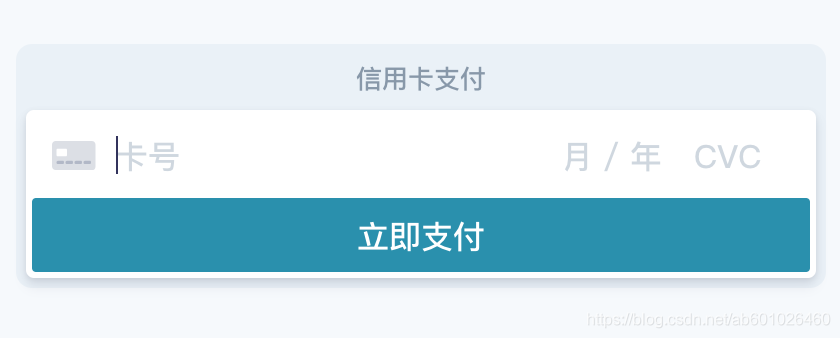
- stripe信用卡付款html前端代码
<html>
<!--文档路径 https://stripe.com/docs/sources/cards#create-source-->
<!--代码片段 https://stripe.com/docs/stripe-js/elements/quickstart -->
<!-- 如果需要自定义样式:https://stripe.com/docs/payments/checkout  https://stripe.dev/elements-examples/ -->
<!--Customizing Checkout 自定义设置checkout比如设置 语言 https://stripe.com/docs/payments/checkout/customization#null -->
<head>
    <script src="https://js.stripe.com/v3/"></script>

    <!--css样式-->
    <style type="text/css">
        /**
         * The CSS shown here will not be introduced in the Quickstart guide, but shows
         * how you can use CSS to style your Element's container.
         */
        .StripeElement {
            box-sizing: border-box;

            height: 40px;

            padding: 10px 12px;

            border: 1px solid transparent;
            border-radius: 4px;
            background-color: white;

            box-shadow: 0 1px 3px 0 #e6ebf1;
            -webkit-transition: box-shadow 150ms ease;
            transition: box-shadow 150ms ease;
        }

        .StripeElement--focus {
            box-shadow: 0 1px 3px 0 #cfd7df;
        }

        .StripeElement--invalid {
            border-color: #fa755a;
        }

        .StripeElement--webkit-autofill {
            background-color: #fefde5 !important;
        }
    </style>

    <script type="text/javascript" language="JavaScript">

        window.onload=function (){
            // Create a Stripe client.
            var stripe = Stripe('pk_live_4L75w76q0pJ9f9aCcuy0JuNw003XdosVg1');

            // Create an instance of Elements.
            // Create an instance of Elements.
            // 自定义 elements 语言  https://stripe.com/docs/stripe-js/reference#stripe-elements
            var elements = stripe.elements({locale:'zh'});

            // Custom styling can be passed to options when creating an Element.
            // (Note that this demo uses a wider set of styles than the guide below.)
            var style = {
                base: {
                    color: '#32325d',
                    fontFamily: '"Helvetica Neue", Helvetica, sans-serif',
                    fontSmoothing: 'antialiased',
                    fontSize: '16px',
                    '::placeholder': {
                        color: '#aab7c4'
                    }
                },
                invalid: {
                    color: '#fa755a',
                    iconColor: '#fa755a'
                }
            };

            // Create an instance of the card Element.
            var card = elements.create('card', {style: style});

            // Add an instance of the card Element into the `card-element` <div>.
            card.mount('#card-element');

            // Handle real-time validation errors from the card Element.
            card.addEventListener('change', function(event) {
                var displayError = document.getElementById('card-errors');
                if (event.error) {
                    displayError.textContent = event.error.message;
                } else {
                    displayError.textContent = '';
                }
            });

            // Handle form submission.
            var form = document.getElementById('payment-form');
            form.addEventListener('submit', function(event) {
                event.preventDefault();

                stripe.createSource(card).then(function(result) {
                    if (result.error) {
                        // Inform the user if there was an error.
                        var errorElement = document.getElementById('card-errors');
                        errorElement.textContent = result.error.message;
                    } else {
                        // Send the token to your server.
                        stripeTokenHandler(result.source);
                    }
                });
            });
        };

        // Submit the form with the token ID.
        function stripeTokenHandler(source) {
            // Insert the token ID into the form so it gets submitted to the server
            var form = document.getElementById('payment-form');
            var hiddenInput = document.createElement('input');
            hiddenInput.setAttribute('type', 'hidden');
            hiddenInput.setAttribute('name', 'stripeSourceId');
            hiddenInput.setAttribute('value', source.id);
            form.appendChild(hiddenInput);

            // Submit the form
            form.submit();
        }
    </script>
</head>
<body>

<form action="http://127.0.0.1:8001/qcure/api/stripe/creditCardCharges" method="GET" id="payment-form">
    <div class="form-row">
        <label for="card-element">
            Credit or debit card
        </label>
        <div id="card-element">
            <!-- A Stripe Element will be inserted here. -->
        </div>

        <!-- Used to display form errors. -->
        <div id="card-errors" role="alert"></div>
    </div>
    <button>Submit Payment</button>
</form>
</body>
</html>