Spring Boot makes it easy to create stand-alone, production-grade Spring based Applications that you can "just run".
We take an opinionated view of the Spring platform and third-party libraries so you can get started with minimum fuss. Most Spring Boot applications need very little Spring configuration.
上面这句话引用自SpringBoot官网,意思就是SpringBoot可以让一个应用程序的创建变得很简单,你只需要配置很少的配置文件就能运行一个程序。
从之前基于SSM的项目中可以看出,完成一个项目需要很多配置文件的配置,即使只是想实现一个简单的登陆功能,都需要配置SpringMVC,Mybatis等等,但是SpringBoot可以让整个流程都变得很简单。
最近的Idea版本均支持SpringBoot的搭建,选择new Project,选中Spring Initializer,其余可以使用默认配置:

根据自己的习惯修改Group和Artifact,点击next:

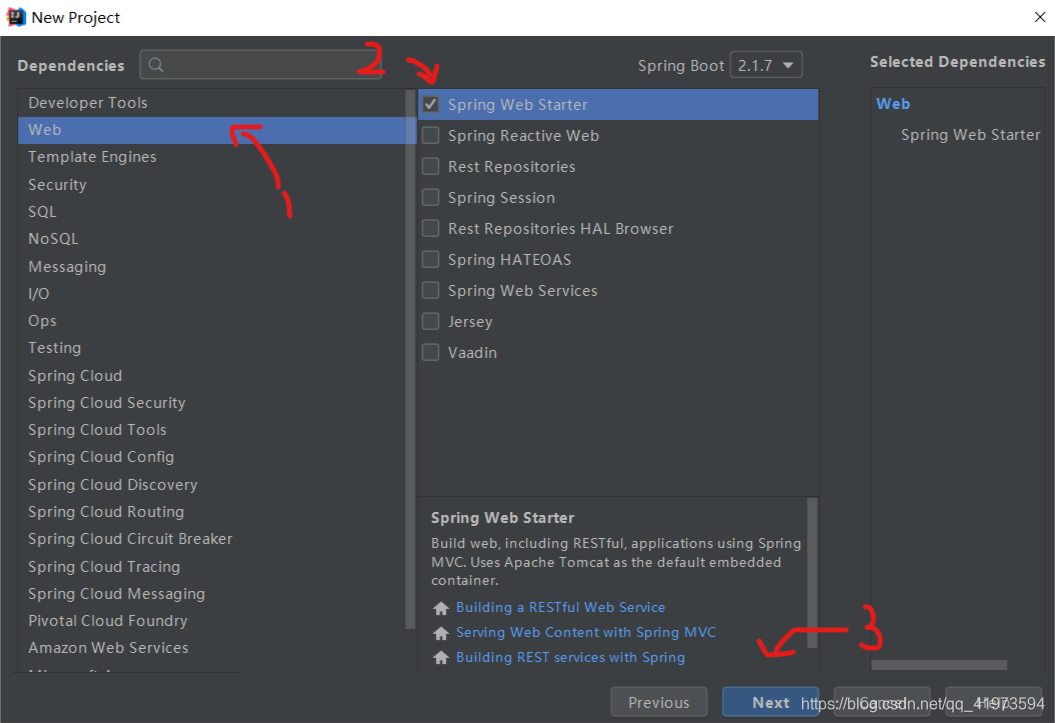
选中Web,勾选Spring Web Starter(这里有些人只有Web选项,一样选中就行),点击next:

第一次创建过程需要等待一段时间,创建成功后出现如下所示的项目结构:
- SpringbootexampleApplication:负责启动程序
- SpringbootexampleApplicationTests:一个空的测试程序
- application.properties:一个空的 properties 文件,可以根据需要添加配置属性
- pom.xml:maven配置文件

<?xml version="1.0" encoding="UTF-8"?>
<project xmlns="http://maven.apache.org/POM/4.0.0" xmlns:xsi="http://www.w3.org/2001/XMLSchema-instance"
         xsi:schemaLocation="http://maven.apache.org/POM/4.0.0 https://maven.apache.org/xsd/maven-4.0.0.xsd">
    <modelVersion>4.0.0</modelVersion>
<!--    用来提供相关的 Maven 默认依赖-->
    <parent>
        <groupId>org.springframework.boot</groupId>
        <artifactId>spring-boot-starter-parent</artifactId>
        <version>2.1.7.RELEASE</version>
        <relativePath/> <!-- lookup parent from repository -->
    </parent>
    <groupId>com.sdxb</groupId>
    <artifactId>springbootexample</artifactId>
    <version>0.0.1-SNAPSHOT</version>
    <name>springbootexample</name>
    <description>Demo project for Spring Boot</description>

    <properties>
        <java.version>1.8</java.version>
    </properties>

    <dependencies>
<!--        支持web模块-->
        <dependency>
            <groupId>org.springframework.boot</groupId>
            <artifactId>spring-boot-starter-web</artifactId>
        </dependency>
<!--        测试模块-->
        <dependency>
            <groupId>org.springframework.boot</groupId>
            <artifactId>spring-boot-starter-test</artifactId>
            <scope>test</scope>
        </dependency>
    </dependencies>

    <build>
        <plugins>
            <plugin>
                <groupId>org.springframework.boot</groupId>
                <artifactId>spring-boot-maven-plugin</artifactId>
            </plugin>
        </plugins>
    </build>
</project>
最初见到这个文件是在maven项目中,整合SSM框架时pom.xml配置文件需要把所有依赖全部写进去,十分繁琐;在Springboot中,<parent>标签下的spring-boot-starter-parent几乎整合了所有需要用到的默认依赖,具体用到了哪些可以去下面这个路径查看:
你的仓库地址\.m2\repository\org\springframework\boot\spring-boot-dependencies\2.1.7.RELEASE\spring-boot-dependencies-2.1.7.RELEASE.pom
第三步:创建实例
package com.sdxb.springbootexample;
import org.springframework.web.bind.annotation.RequestMapping;
import org.springframework.web.bind.annotation.RestController;

@RestController
public class HelloSpringBoot {
    @RequestMapping("/hello")
    public String hello(){
        return "Hello Spring Boot";
    }
}
这里用到了两个注解,RestController和RequestMapping,其中RequestMapping注解和SpringMVC中的效果相同,@RestController 的意思就是 Controller 里面的方法都以 json 格式输出,不用再写 jackjson 等配置。
接着运行SpringbootexampleApplication,在浏览器中输入http://localhost:8080/hello,即可看到最终结果。


这样一个简单的SpringBoot程序就完成了,几乎没有设置任何配置文件,这也正是SpringBoot想实现的一个目标。
