前记:
Ubuntu 从 17.10 开始,已放弃在 /etc/network/interfaces ⾥固定IP的配置,⽽是改成 netplan ⽅式, 配置⽂件是:/etc/netplan/01-netcfg.yaml
实验目标:
把eth0网卡IP地址192.168.1.100改为192.168.1.101
配置文件:
/etc/netplan/*.yaml
*注意:要严格遵循yaml格式的上下级缩进关系 否则配置可能会无法生效
实验步骤:
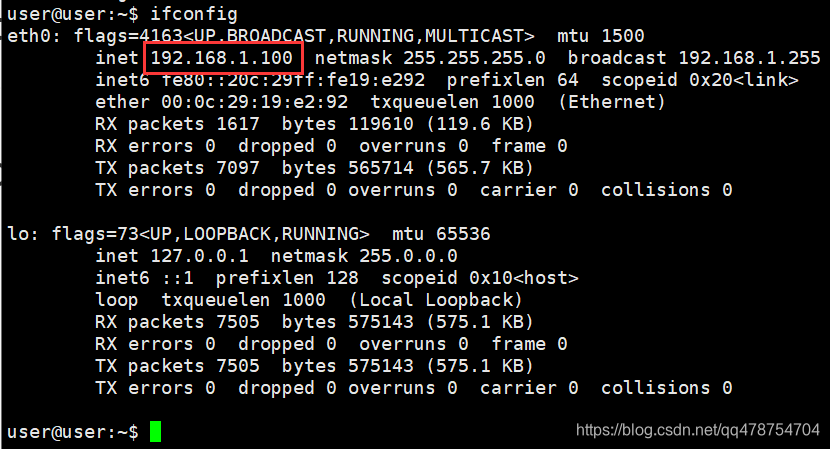
1、确认要修改的网卡号
以下以我的服务器eth0网卡为例
user@user:~$ ifconfig
我的服务器配置如下:
eth0: flags=4163<UP,BROADCAST,RUNNING,MULTICAST>  mtu 1500
        inet 192.168.1.100  netmask 255.255.255.0  broadcast 192.168.1.255
        inet6 fe80::20c:29ff:fe19:e292  prefixlen 64  scopeid 0x20<link>
        ether 00:0c:29:19:e2:92  txqueuelen 1000  (Ethernet)
        RX packets 1617  bytes 119610 (119.6 KB)
        RX errors 0  dropped 0  overruns 0  frame 0
        TX packets 7097  bytes 565714 (565.7 KB)
        TX errors 0  dropped 0 overruns 0  carrier 0  collisions 0

lo: flags=73<UP,LOOPBACK,RUNNING>  mtu 65536
        inet 127.0.0.1  netmask 255.0.0.0
        inet6 ::1  prefixlen 128  scopeid 0x10<host>
        loop  txqueuelen 1000  (Local Loopback)
        RX packets 7505  bytes 575143 (575.1 KB)
        RX errors 0  dropped 0  overruns 0  frame 0
        TX packets 7505  bytes 575143 (575.1 KB)
        TX errors 0  dropped 0 overruns 0  carrier 0  collisions 0
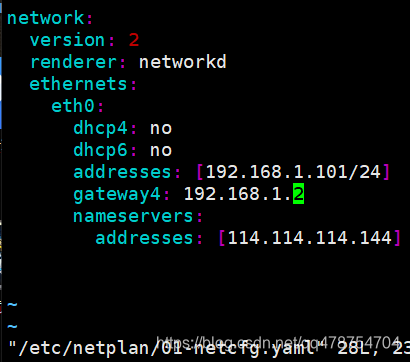
2、设置静态IP
ubuntu1804版本的静态网卡的ip配置文件为/etc/netplan/
user@user:~$ sudo vim /etc/netplan/01-netcfg.yaml
把eth0网卡IP地址192.168.1.100改为192.168.1.101
ip前缀24位
子网掩码:255.255.255.0
网关位:192.168.1.2
DNS:114.114.114.114
~#sudo vim /etc/netplan/01-netcfg.yaml
# This file describes the network interfaces available on your system
# For more information, see netplan(5).
network:
  version: 2
  renderer: networkd
  ethernets:
    eth0:
      dhcp4: no
      dhcp6: no
      addresses: [192.168.1.101/24]
      gateway4: 192.168.1.2
      nameservers:
        addresses: [114.114.114.114]

# sudo netplan apply   //应用新配置

# vim ~/.vimrc #取消vim ⾃动缩进功能
set paste
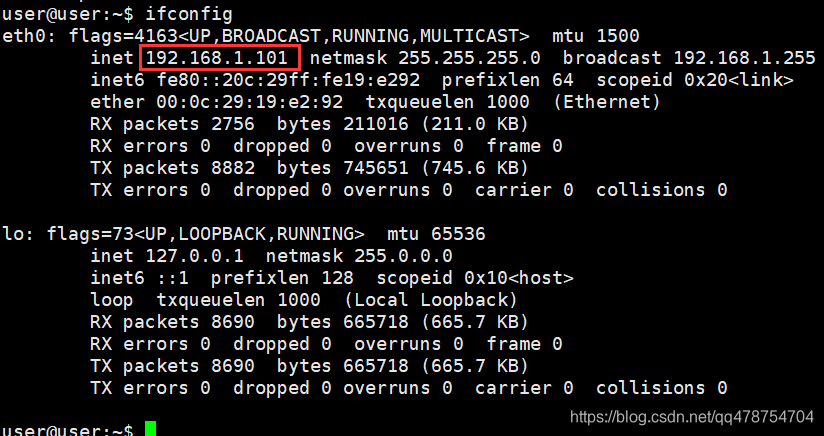
3、应用新的配置
user@user:~$ sudo netplan apply //应用当前修改配置
使用ifconfig检查新地址
user@user:~$ ifconfig
新的ip地址
eth0: flags=4163<UP,BROADCAST,RUNNING,MULTICAST>  mtu 1500
        inet 192.168.1.101  netmask 255.255.255.0  broadcast 192.168.1.255
        inet6 fe80::20c:29ff:fe19:e292  prefixlen 64  scopeid 0x20<link>
        ether 00:0c:29:19:e2:92  txqueuelen 1000  (Ethernet)
        RX packets 141  bytes 11412 (11.4 KB)
        RX errors 0  dropped 0  overruns 0  frame 0
        TX packets 1555  bytes 120688 (120.6 KB)
        TX errors 0  dropped 0 overruns 0  carrier 0  collisions 0

lo: flags=73<UP,LOOPBACK,RUNNING>  mtu 65536
        inet 127.0.0.1  netmask 255.0.0.0
        inet6 ::1  prefixlen 128  scopeid 0x10<host>
        loop  txqueuelen 1000  (Local Loopback)
        RX packets 2249  bytes 169961 (169.9 KB)
        RX errors 0  dropped 0  overruns 0  frame 0
        TX packets 2249  bytes 169961 (169.9 KB)
        TX errors 0  dropped 0 overruns 0  carrier 0  collisions 0

user@user:~$
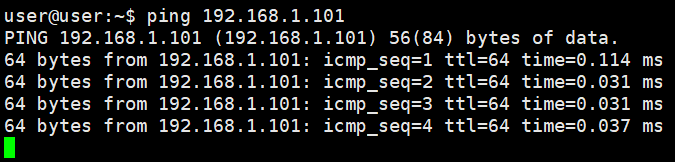
4、测试网络联通
user@user:~$ ping 192.168.1.101