fastDFS概述
FastDFS是一个开源的轻量级分布式文件系统,它对文件进行管理,功能包括:文件存储、文件同步、文件访问(文件上传、文件下载)等,解决了大容量存储和负载均衡的问题。特别适合以文件为载体的在线服务,如相册网站、视频网站等等。
FastDFS为互联网量身定制,充分考虑了冗余备份、负载均衡、线性扩容等机制,并注重高可用、高性能等指标,使用FastDFS很容易搭建一套高性能的文件服务器集群提供文件上传、下载等服务。
优势
(1)海量的存储:主从型分布式存储,存储空间方便拓展,
(2)fastDFS对文件内容做hash处理,避免出现重复文件
(3)然后fastDFS结合Nginx集成, 提供网站效率
组成结构
1、跟踪器(tracker):跟踪器主要做调度工作;
2、存储节点(storage):在访问上起负载均衡的作用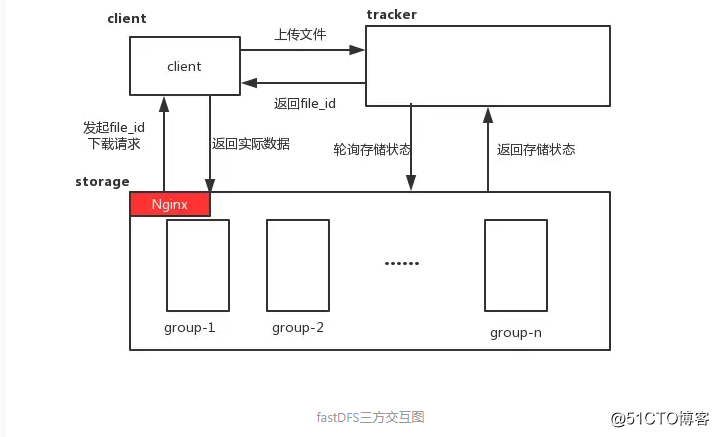
实验环境
tracker服务器 192.168.13.128(libfastcommon、fastd、)
storage+Nginx服务器 192.168.13.129(libfastcommon)
1,在所有节点服务器上安装libfastcommon服务
[root@tracker ~]# yum -y install libevent  \   ##安装环境必要的组件
libevent-devel perl  make gcc zlib  zlib-devel \
pcre pcre-devel  gcc-c++  openssl-devel
[root@tracker ~]# wget https://github.com/happyfish100/libfastcommon/archive/V1.0.38.tar.gz
##从网站中下载libfastcommon压缩包
[root@tracker ~]# tar zxvf V1.0.38.tar.gz -C /opt/  ##解压
[root@tracker ~]# cd /opt/libfastcommon-1.0.38/
[root@tracker libfastcommon-1.0.38]# ./make.sh && ./make.sh install  ##编译安装
##建立软连接便于系统识别
[root@tracker libfastcommon-1.0.38]# ln -s /usr/lib64/libfastcommon.so /usr/local/lib/libfastcommon.so
[root@tracker libfastcommon-1.0.38]# ln -s /usr/lib64/libfdfsclient.so /usr/local/lib/libfdfsclient.so
[root@tracker libfastcommon-1.0.38]# ln -s /usr/lib64/libfdfsclient.so /usr/lib/libfdfsclient.so
2,在所有节点服务器上安装fastDFS服务
[root@storage ~]# wget https://github.com/happyfish100/fastdfs/archive/V5.11.tar.gz
##从网站中下载压缩包
[root@storage ~]# tar zxf V5.11.tar.gz -C /opt/  ##解压
[root@storage ~]# cd /opt/fastdfs-5.11/
[root@storage fastdfs-5.11]# ./make.sh && ./make.sh install   ##编译安装
[root@storage fastdfs-5.11]# cd /etc/fdfs/              ##复制配置文件模板
[root@storage fdfs]# cp tracker.conf.sample tracker.conf
[root@storage fdfs]# cp storage.conf.sample storage.conf
[root@storage fdfs]# cp client.conf.sample client.conf
3,配置tracker服务器
[root@tracker fdfs]# mkdir -m 755 -p /opt/fastdfs  ##创建数据文件,日志文件存放目录
[root@tracker fdfs]# vim /etc/fdfs/tracker.conf   ##修改tracker配置文件
port=22122         //tracker服务默认端口22122即可
base_path=/opt/fastdfs      //tracker存储data和log的跟路径,必须提前创建好
http.server_port=8080 //tracker服务器上启动http服务进程,没装忽略
[root@tracker fdfs]# fdfs_trackerd /etc/fdfs/tracker.conf start ##开启服务
[root@tracker fdfs]# netstat -natp | grep 22122
tcp        0      0 0.0.0.0:22122           0.0.0.0:*               LISTEN      2678/fdfs_trackerd
[root@tracker fdfs]# vim /etc/rc.local ##设置开机自启
##末行添加
fdfs_trackerd   /etc/fdfs/tracker.conf start
[root@tracker fdfs]# systemctl stop firewalld.service    ##关闭防火墙
[root@tracker fdfs]# setenforce 0
4,配置storage服务器
[root@storage fdfs]# mkdir -m 755 -p /opt/fastdfs  ##创建数据和日志文件目录
[root@storage fdfs]# vim /etc/fdfs/storage.conf   ##修改storage配置文件
group_name=group1        //默认组名,根据实际情况修改
port=23000       //storge默认23000,同一个组的storage端口号必须一致
base_path=/opt/fastdfs          //storage日志文件的根路径
store_path_count=1              //与下面路径个数相同,默认为1
store_path0=/opt/fastdfs       //提供的存储路径(默认与日志文件存放在一起)
tracker_server=192.168.13.128:22122      //自己的tracker服务器IP(重点!!!)
http.server_port=80  //http访问文件的端口默认为8888,nginx中配置的监听端口保持一致
[root@storage fdfs]# fdfs_storaged /etc/fdfs/storage.conf start  ##开启服务
[root@storage fdfs]# netstat -ntap | grep 23000
tcp        0      0 0.0.0.0:23000           0.0.0.0:*               LISTEN      2687/fdfs_storaged
[root@storage fdfs]# echo "fdfs_storaged   /etc/fdfs/storage.conf start" >> /etc/rc.local
##开机自启
[root@storage fdfs]# systemctl stop firewalld.service   ##关闭防火墙
[root@storage fdfs]# setenforce 0
[root@storage fdfs]# fdfs_monitor /etc/fdfs/storage.conf  ##检查与tracker关联是否成功
Storage 1:
id = 192.168.13.129
ip_addr = 192.168.13.129 (storage)  ACTIVE
...
5,在storage服务器上安装Nginx
##这里为了减少虚拟机开启的数量,就在storage端进行nginx的安装
[root@storage fdfs]# wget https://github.com/happyfish100/fastdfs-nginx-module/archive/V1.20.tar.gz
##下载模块压缩包
[root@storage fdfs]# tar zxf V1.20.tar.gz -C /opt/   ##解压
[root@storage fdfs]# mount.cifs //192.168.100.3/LNMP-C7 /mnt/
Password for root@//192.168.100.3/LNMP-C7:
[root@storage fdfs]# cd /mnt/
[root@storage mnt]# tar zxvf nginx-1.12.2.tar.gz -C /opt/   ##解压
[root@storage mnt]# cd /opt/nginx-1.12.2
[root@storage nginx-1.12.2]# ./configure \
--prefix=/usr/local/nginx \
--add-module=/opt/fastdfs-nginx-module-1.20/src/          ##fastdfs-nginx-module模块
[root@storage nginx-1.12.2]# make && make install

##可能的报错##
/usr/include/fastdfs/fdfs_define.h:15:27: fatal error: common_define.h: No such file or directory
##解决方案##
修改fastdfs-nginx-module-1.20/src/config文件,然后重新配置编译安装即可
ngx_module_incs="/usr/include/fastdfs /usr/include/fastcommon/"
CORE_INCS="$CORE_INCS /usr/include/fastdfs /usr/include/fastcommon/"

[root@storage nginx-1.12.2]# cd ../fastdfs-nginx-module-1.20/src/
[root@storage src]# cp mod_fastdfs.conf /etc/fdfs/
[root@storage src]# cd /etc/fdfs/
[root@storage fdfs]# vim mod_fastdfs.conf  ##配置fastdfs-nginx-module模块
#检查一下配置
base_path=/opt/fastdfs         //存放数据文件、日志的路径
tracker_server=192.168.13.128:22122    //tracker端的地址(重点!!!)
url_have_group_name = true  //url是否包含group名称
storage_server_port=23000           //需要和storage配置的相同
store_path_count=1              //存储路径个数,需要和store_path个数匹配
store_path0=/opt/fastdfs               //文件存储的位置
[root@storage fdfs]# vim /usr/local/nginx/conf/nginx.conf  ##配置Nginx配置文件
#空行处添加,不做这步可能会导致报错
location ~/M00 {
                                root /opt/fastdfs/data;
                                ngx_fastdfs_module;
}
[root@storage fdfs]# cd /opt/fastdfs-5.11/conf/
[root@storage conf]# cp mime.types http.conf /etc/fdfs/
##拷贝fastdfs解压目录中的http.conf和mime.types
6,修改client客户端(此处在storage服务器上使用)
[root@storage ~]# vim /etc/fdfs/client.conf
#检查以下配置
base_path=/opt/fastdfs     ##tracker服务器文件路径
tracker_server=192.168.13.128:22122            ##tracker服务器IP地址和端口号
http.tracker_server_port=8080
##tracker服务器的http端口号,必须和tracker的设置对应起来
7,fastDFS常用命令
上传文件:
/usr/bin/fdfs_upload_file <config_file> <local_filename>下载文件:
/usr/bin/fdfs_download_file <config_file> <file_id> [local_filename]删除文件:
/usr/bin/fdfs_delete_file <config_file> <file_id>