操作背景:
前方有一台haproxy代理机器(115.100.120.57/192.168.1.7),后方两台realserver机器(192.168.1.150、192.168.1.151,没有公网ip,部署了很多站点)
将域名解析到haproxy机器的公网ip,在haproxy配置文件里,根据域名转发至后端realserver上。
haproxy代理配置:根据域名进行转发(即后端机器不管部署多少个域名,都可以直接在haproxy配置文件里通过域名对域名方式直接指定)
nginx代理配置:根据端口进行转发(即后端机器部署多个域名时,在前面nginx配置里通过upstream负载到不同的端口上)
----------------------------------------------------------------------------------------------------------
下面是haproxy代理服务器上的操作
(1)关闭SElinux、配置防火墙 (后端realserver机器的iptables防火墙可以限制只允许代理服务器访问)
[root@localhost ~]# vim /etc/config/selinux
SELINUX=disabled
[root@localhost ~]# setenforce 0
[root@localhost ~]# getenforce
[root@localhost ~]# vim /etc/sysconfig/iptables
.......
-A INPUT -s 115.100.120.0/24 -d 224.0.0.18 -j ACCEPT #允许组播地址通信(这里,我将机器的公网和私网地址都放了)
-A INPUT -s 192.168.1.0/24 -d 224.0.0.18 -j ACCEPT
-A INPUT -s 115.100.120.0/24 -p vrrp -j ACCEPT #允许 VRRP(虚拟路由器冗余协)通信
-A INPUT -s 192.168.1.0/24 -p vrrp -j ACCEPT
-A INPUT -p tcp -m state --state NEW -m tcp --dport 80 -j ACCEPT
-A INPUT -p tcp -m state --state NEW -m tcp --dport 443 -j ACCEPT
[root@localhost ~]# /etc/init.d/iptables restart
(2)安装haproxy
1)安装编译工具
[root@localhost ~]# yum install gcc gcc-c++ make openssl-devel kernel-devel
2)安装 haproxy
下载 haproxy,放到/usr/local/src目录下
haproxy-1.5.14.tar.gz下载:https://pan.baidu.com/s/1jI8qiyy
提取密码:u77d
[root@localhost ~]# cd /usr/local/src
[root@localhost src]# ls haproxy-1.5.14.tar.gz
[root@localhost ~]# tar zxvf haproxy-1.5.14.tar.gz
[root@localhost ~]# cd haproxy-1.5.14
接着进行haproxy的编译安装,haproxy编译没有configure,直接make->make install
[root@localhost haproxy-1.5.14]# make TARGET=linux26 CPU=x86_64 PREFIX=/usr/local/haprpxy USE_OPENSSL=1 ADDLIB=-lz
[root@localhost haproxy-1.5.14]# ldd haproxy | grep ssl
libssl.so.10 => /usr/lib64/libssl.so.10 (0x00007f06ae977000)
[root@localhost haproxy-1.5.14]# make install PREFIX=/usr/local/haproxy

编译参数说明:
TARGET=linux26 : 使用 uname -r 查看内核,如:2.6.18-371.el5,此时该参数就为linux26
CPU=x86_64 : 使用 uname -r 查看系统信息,如 x86_64 x86_64 x86_64 GNU/Linux,此时该参数就为 x86_64
PREFIX : 后面跟的是haprpxy的安装路径
USE_OPENSSL=1 ADDLIB=-lz : 支持ssl
3)设置 haproxy
[root@localhost src]# mkdir -p /usr/local/haproxy/conf
[root@localhost src]# mkdir -p /etc/haproxy
[root@localhost src]# cp /usr/local/src/haproxy-1.5.14/examples/haproxy.cfg /usr/local/haproxy/conf/haproxy.cfg
[root@localhost src]# ln -s /usr/local/haproxy/conf/haproxy.cfg /etc/haproxy/haproxy.cfg
[root@localhost src]# cp -r /usr/local/src/haproxy-1.5.14/examples/errorfiles /usr/local/haproxy/errorfiles
[root@localhost src]# ln -s /usr/local/haproxy/errorfiles /etc/haproxy/errorfiles
[root@localhost src]# mkdir -p /usr/local/haproxy/log
[root@localhost src]# touch /usr/local/haproxy/log/haproxy.log
[root@localhost src]# ln -s /usr/local/haproxy/log/haproxy.log /var/log/haproxy.log
[root@localhost src]# cp /usr/local/src/haproxy-1.5.14/examples/haproxy.init /etc/rc.d/init.d/haproxy
[root@localhost src]# chmod +x /etc/rc.d/init.d/haproxy
[root@localhost src]# chkconfig haproxy on
[root@localhost src]# ln -s /usr/local/haproxy/sbin/haproxy /usr/sbin
4)配置 haproxy.cfg 参数
[root@localhost src]# cp /usr/local/haproxy/conf/haproxy.cfg /usr/local/haproxy/conf/haproxy.cfg-bak
[root@localhost src]# vim /usr/local/haproxy/conf/haproxy.cfg #可以直接粘贴进去使用
# this config needs haproxy-1.1.28 or haproxy-1.2.1
global
log 127.0.0.1 local0 info #在本机记录日志
maxconn 65535 #每个进程可用的最大连接数
chroot /usr/local/haproxy #haproxy 安装目录
uid nobody #运行haproxy的用户uid(使用id号也行)
gid nobody #运行haproxy的组uid(使用id号也行)
daemon #以后台守护进程运行
defaults
log global
mode http #运行模式tcp、http、health
retries 3 #三次连接失败,则判断服务不可用
option redispatch #如果后端有服务器宕机,强制切换到正常服务器
stats uri /haproxy #统计页面 URL 路径
stats refresh 30s #统计页面自动刷新时间
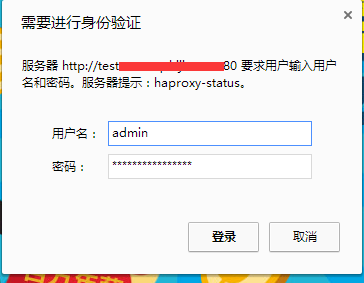
stats realm haproxy-status #统计页面输入密码框提示信息
stats auth admin:dxInCtFianKtL]36 #统计页面用户名和密码
stats hide-version #隐藏统计页面上 HAProxy 版本信息
maxconn 65535 #每个进程可用的最大连接数
timeout connect 5000 #连接超时
timeout client 50000 #客户端超时
timeout server 50000 #服务端超时
frontend http-in #自定义描述信息
mode http #运行模式tcp、http、health
maxconn 65535 #每个进程可用的最大连接数
bind :80 #监听80端口
log global
option httplog
option httpclose #每次请求完毕后主动关闭 http 通道
acl is_1 hdr_beg(host) -i testwww.huanqiu.com #规则设置,-i后面是要访问的域名;多个域名,就写多个规则,但is_1/2/...要与后面的use_backend 对应
acl is_2 hdr_beg(host) -i testchina.huanqiu.com
acl is_3 hdr_beg(host) -i testworld.huanqiu.com
acl is_4 hdr_beg(host) -i testgame.huanqiu.com
acl is_5 hdr_beg(host) -i testtech.huanqiu.com
acl is_6 hdr_beg(host) -i betawww.huanqiu.com
acl is_7 hdr_beg(host) -i betachina.huanqiu.com
acl is_8 hdr_beg(host) -i betaworld.huanqiu.com
acl is_9 hdr_beg(host) -i betagame.huanqiu.com
acl is_10 hdr_beg(host) -i betatech.huanqiu.com
use_backend test-server if is_1 #如果访问is_1设置的域名,就负载均衡到下面backend设置的对应test-server上,其他的域名同理
use_backend test-server if is_2
use_backend test-server if is_3
use_backend test-server if is_4
use_backend test-server if is_5
use_backend beta-server if is_6 #如果访问is_6设置的域名,就负载均衡到下面backend设置的对应beta-server上,其他的域名同理
use_backend beta-server if is_7
use_backend beta-server if is_8
use_backend beta-server if is_9
use_backend beta-server if is_10
backend test-server
mode http
balance roundrobin #设置负载均衡模式,source 保存 session 值,roundrobin 轮询模式
cookie SERVERID insert indirect nocache
option httpclose
option forwardfor
server web01 192.168.1.150:80 weight 1 cookie 3 check inter 2000 rise 2 fall 5 #由于后端同组的机器只有一台,这里就设置一台;如果后端是多台的话,就都加上,进行负载。
backend beta-server
mode http
balance roundrobin
cookie SERVERID insert indirect nocache
option httpclose
option forwardfor
server web01 192.168.1.151:80 weight 1 cookie 4 check inter 2000 rise 2 fall 5
---------------------------------------------------------
参数解释
#inter 2000 心跳检测时间;
rise 2 三次连接成功,表示服务器正常;
fall 5 三次连接失败,表示服务器异常;
weight 1 权重设置
---------------------------------------------------------
[root@localhost ~]#service haproxy start #启动
[root@localhost ~]#service haproxy stop #关闭
[root@localhost ~]#service haproxy restart #重启
[root@localhost ~]#service haproxy restart #查看状态
5)启动haproxy日志
haproxy日志配置好之后,如上haproxy日志路径是/var/log/haproxy.log,但是默认情况下,haproxy日志是没有记录的!
需要做如下设定:
[root@localhost ~]# vim /etc/rsyslog.conf
.............
$ModLoad imudp #去掉这行注释
$UDPServerRun 514 #去掉这会注释,rsyslog 默认情况下,需要在514端口监听UDP
local0.* /var/log/haproxy.log #添加这一行,这个日志文件是在上面设置的
重启rsyslog服务
[root@localhost ~]# /etc/init.d/rsyslog restart
Shutting down system logger: [ OK ]
Starting system logger: [ OK ]
访问网站,查看haproxy日志:
[root@kvm-server conf]# tail -f /var/log/haproxy.log
tail: inotify cannot be used, reverting to polling
Sep 21 15:17:22 localhost haproxy[85360]: 124.65.197.154:2546 [21/Sep/2016:15:17:22.719] http-in test-server/web01 0/0/1/130/131 200 2692 - - --VN 4/4/0/0/0 0/0 "GET / HTTP/1.1"
Sep 21 15:17:22 localhost haproxy[85360]: 124.65.197.154:2546 [21/Sep/2016:15:17:22.719] http-in test-server/web01 0/0/1/130/131 200 2692 - - --VN 4/4/0/0/0 0/0 "GET / HTTP/1.1"
Sep 21 15:17:24 localhost haproxy[85360]: 124.65.197.154:11482 [21/Sep/2016:15:17:22.719] http-in test-server/web01 1754/0/1/44/1799 404 615 - - --VN 3/3/0/0/0 0/0 "GET /upload/20160325/201603251450171458888617180-100.jpg HTTP/1.1"
Sep 21 15:17:24 localhost haproxy[85360]: 124.65.197.154:11482 [21/Sep/2016:15:17:22.719] http-in test-server/web01 1754/0/1/44/1799 404 615 - - --VN 3/3/0/0/0 0/0 "GET /upload/20160325/201603251450171458888617180-100.jpg HTTP/1.1"
Sep 21 15:17:40 localhost haproxy[85360]: 124.65.197.154:13161 [21/Sep/2016:15:17:22.719] http-in http-in/<NOSRV> -1/-1/-1/-1/17980 400 187 - - CR-- 2/2/0/0/0 0/0 "<BADREQ>"
Sep 21 15:17:40 localhost haproxy[85360]: 124.65.197.154:13161 [21/Sep/2016:15:17:22.719] http-in http-in/<NOSRV> -1/-1/-1/-1/17980 400 187 - - CR-- 2/2/0/0/0 0/0 "<BADREQ>"
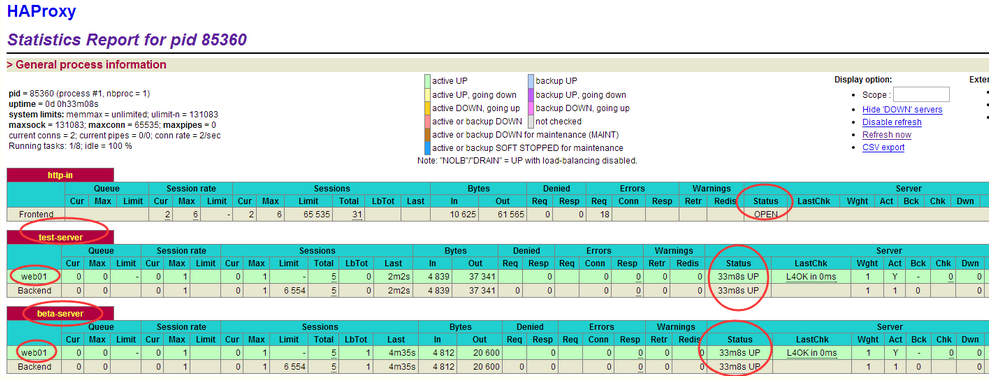
6)查看统计页面的情况
可以根据haproxy.cfg里面配置的url进行访问(用户名和密码也在配置文件里)
比如:
http://testwww.huanqiu.com/haproxy
到此,haproxy的反向代理配置就已经结束了。
只有后端realserver的nginx里对于域名配置ok,就可以直接访问域名,通过haproxy代理转发到后端realserver上了~~
*******************************************************************************************************************
上面配置的haproxy是针对http方式的代理
下面接着说下haproxy针对https方式的代理
由于前面提到haproxy在编译安装的时候,已经支持ssl了
现在就需要添加pem证书即可!
由于在其他服务器上已经有了在用的证书,购买的*通配符的证书,所以直接拿过来用即可
证书存放路径例如是/usr/local/haproxy/ssl
[root@localhost ~]# mkdir /usr/local/haproxy/ssl
[root@localhost ~]# cd /usr/local/haproxy/ssl
[root@localhost ssl]# ls
huanqiu.cer huanqiu.key
制作成pem证书
[root@localhost ssl]# cat huanqiu.cer huanqiu.key | tee huanqiu.pem
[root@localhost ssl]# ls
huanqiu.cer huanqiu.key huanqiu.pem
----------------------------------------------------------------------------------------------------
如果没有提前准备好的证书,就需要手动创建,创建方法如下:
[root@localhost ssl]# openssl genrsa -des3 -out huanqiu.key 1024
Generating RSA private key, 1024 bit long modulus
................................++++++
....................................++++++
e is 65537 (0x10001)
Enter pass phrase for huanqiu.key: #提示输入密码,比如这里我输入123456
Verifying - Enter pass phrase for huanqiu.key: #确认密码,继续输入123456
[root@localhost ssl]# ls #查看,已生成CSR(Certificate Signing Request)文件
huanqiu.key
[root@localhost ssl]# openssl req -new -key huanqiu.key -out huanqiu.csr
Enter pass phrase for huanqiu.key: #输入123456
You are about to be asked to enter information that will be incorporated
into your certificate request.
What you are about to enter is what is called a Distinguished Name or a DN.
There are quite a few fields but you can leave some blank
For some fields there will be a default value,
If you enter '.', the field will be left blank.
-----
Country Name (2 letter code) [XX]:cn #国家
State or Province Name (full name) []:beijing #省份
Locality Name (eg, city) [Default City]:beijing #地区名字
Organization Name (eg, company) [Default Company Ltd]:huanqiu #公司名
Organizational Unit Name (eg, section) []:Technology #部门
Common Name (eg, your name or your server's hostname) []:huanqiu #CA主机名
Email Address []:[email protected] #邮箱
Please enter the following 'extra' attributes
to be sent with your certificate request
A challenge password []:123456 #证书请求密钥,CA读取证书的时候需要输入密码
An optional company name []:huanqiu #-公司名称,CA读取证书的时候需要输入名称
[root@localhost ssl]# ls
huanqiu.csr huanqiu.key
[root@localhost ssl]# cp huanqiu.key huanqiu.key.bak
[root@localhost ssl]# openssl rsa -in huanqiu.key.bak -out huanqiu.key
Enter pass phrase for huanqiu.key.bak: #输入123456
writing RSA key
[root@linux-node1 ssl]# openssl x509 -req -days 365 -in huanqiu.csr -signkey huanqiu.key -out huanqiu.crt
Signature ok
subject=/C=cn/ST=beijing/L=beijing/O=huanqiu/OU=Technology/CN=huanqiu/[email protected]
Getting Private key
[root@linux-node1 ssl]# ll
total 24
-rw-r--r-- 1 root root 960 Sep 12 16:01 huanqiu.crt
-rw-r--r-- 1 root root 769 Sep 12 15:59 huanqiu.csr
-rw-r--r-- 1 root root 887 Sep 12 16:01 huanqiu.key
-rw-r--r-- 1 root root 963 Sep 12 16:01 huanqiu.key.bak
----------------------------------------------------------------------------------------------------
接着在haproxy.cfg里添加ssl代理的配置内容
比如:配置https://testwww.xqshijie.com和https://betawww.xqshijie.com的代理内容,分别转发到192.168.1.150和192.168.1.151上(如果是多个域名的https方式代理,同理,直接在下面对应区域添加配置即可)
[root@linux-node1 conf]# pwd
/usr/local/haproxy/conf
[root@linux-node1 conf]# cat haproxy.cfg
# this config needs haproxy-1.1.28 or haproxy-1.2.1
global
log 127.0.0.1 local0 info
maxconn 65535
chroot /usr/local/haproxy
uid nobody
gid nobody
daemon
defaults
log global
mode http
retries 3
option redispatch
stats uri /haproxy
stats refresh 30s
stats realm haproxy-status
stats auth admin:dxInCtFianKtL]36
stats hide-version
maxconn 65535
timeout connect 5000
timeout client 50000
timeout server 50000
frontend http-in
mode http
maxconn 65535
bind :80
log global
option httplog
option httpclose
acl is_1 hdr_beg(host) -i testwww.huanqiu.com
acl is_2 hdr_beg(host) -i testchina.huanqiu.com
acl is_3 hdr_beg(host) -i testworld.huanqiu.com
acl is_4 hdr_beg(host) -i testgame.huanqiu.com
acl is_5 hdr_beg(host) -i testtech.huanqiu.com
acl is_6 hdr_beg(host) -i betawww.huanqiu.com
acl is_7 hdr_beg(host) -i betachina.huanqiu.com
acl is_8 hdr_beg(host) -i betaworld.huanqiu.com
acl is_9 hdr_beg(host) -i betagame.huanqiu.com
acl is_10 hdr_beg(host) -i betatech.huanqiu.com
use_backend test-server if is_1
use_backend test-server if is_2
use_backend test-server if is_3
use_backend test-server if is_4
use_backend test-server if is_5
use_backend beta-server if is_6
use_backend beta-server if is_7
use_backend beta-server if is_8
use_backend beta-server if is_9
use_backend beta-server if is_10
use_backend test-server if is_11
listen TEST_APP_SSL
bind *:443 ssl crt /usr/local/haproxy/ssl/xqshijie.pem
reqadd X-Forwarded-Proto:\ https
mode http
acl is_a hdr_beg(host) -i testwww.huanqiu.com
acl is_b hdr_beg(host) -i betawww.huanqiu.com
use_backend test-server if is_a
use_backend beta-server if is_b
backend test-server
mode http
balance roundrobin
cookie SERVERID insert indirect nocache
option httpclose
option forwardfor
server web01 192.168.1.150:80 weight 1 cookie 3 check inter 2000 rise 2 fall 5
backend beta-server
mode http
balance roundrobin
cookie SERVERID insert indirect nocache
option httpclose
option forwardfor
server web01 192.168.1.151:80 weight 1 cookie 4 check inter 2000 rise 2 fall 5
重启haproxy服务
[root@linux-node1 conf]# service haproxy restart
这样,访问https://testwww.huanqiu.com和https://betawww.huanqiu.com的请求就会被haproxy代理转发到
后端192.168.1.150和192.168.1.151服务器上对应域名的443端口!
到此,haproxy的http和https方式的代理部署均已完成!
----------------------------------------------------------------------------------------------------------------------------------
下面说下haproxy代理非http/https方式的配置,比如代理mysql、ftp等其他端口~
当代理非80/443端口是,mode模式就是tcp了
所以要注释掉或去掉上面配置在haproxy.cnf里defaults局域的mode https的默认配置
[root@linux-node1 conf]# cat haproxy.cfg
# this config needs haproxy-1.1.28 or haproxy-1.2.1
global
log 127.0.0.1 local0 info
maxconn 65535
chroot /usr/local/haproxy
uid nobody
gid nobody
daemon
defaults
log global
# mode http
retries 3
option redispatch
stats uri /haproxy
stats refresh 30s
stats realm haproxy-status
stats auth admin:dxInCtFianKtL]36
stats hide-version
maxconn 65535
timeout connect 5000
timeout client 50000
timeout server 50000
frontend http-in
mode http
maxconn 65535
bind :80
log global
option httplog
option httpclose
acl is_1 hdr_beg(host) -i testwww.huanqiu.com
acl is_2 hdr_beg(host) -i testchina.huanqiu.com
acl is_3 hdr_beg(host) -i testworld.huanqiu.com
acl is_4 hdr_beg(host) -i testgame.huanqiu.com
acl is_5 hdr_beg(host) -i testtech.huanqiu.com
acl is_6 hdr_beg(host) -i betawww.huanqiu.com
acl is_7 hdr_beg(host) -i betachina.huanqiu.com
acl is_8 hdr_beg(host) -i betaworld.huanqiu.com
acl is_9 hdr_beg(host) -i betagame.huanqiu.com
acl is_10 hdr_beg(host) -i betatech.huanqiu.com
use_backend test-server if is_1
use_backend test-server if is_2
use_backend test-server if is_3
use_backend test-server if is_4
use_backend test-server if is_5
use_backend beta-server if is_6
use_backend beta-server if is_7
use_backend beta-server if is_8
use_backend beta-server if is_9
use_backend beta-server if is_10
use_backend test-server if is_11
listen TEST_APP_SSL
bind *:443 ssl crt /usr/local/haproxy/ssl/xqshijie.pem
reqadd X-Forwarded-Proto:\ https
mode http
acl is_a hdr_beg(host) -i testwww.huanqiu.com
acl is_b hdr_beg(host) -i betawww.huanqiu.com
use_backend test-server if is_a
use_backend beta-server if is_b
backend test-server
mode http
balance roundrobin
cookie SERVERID insert indirect nocache
option httpclose
option forwardfor
server web01 192.168.1.150:80 weight 1 cookie 3 check inter 2000 rise 2 fall 5
backend beta-server
mode http
balance roundrobin
cookie SERVERID insert indirect nocache
option httpclose
option forwardfor
server web01 192.168.1.151:80 weight 1 cookie 4 check inter 2000 rise 2 fall 5
listen mysql_73 0.0.0.0:33061 #代理mysql端口
mode tcp
option tcplog
balance roundrobin
option tcpka
option httpchk
option mysql-check user haproxy
server 10.68.250.73 10.68.250.73:3306 weight 1 check inter 1s rise 2 fall 2
listen mysql_164 0.0.0.0:33062
mode tcp
option tcplog
balance roundrobin
option tcpka
option httpchk
option mysql-check user haproxy
server 10.68.250.164 10.68.250.164:3306 weight 1 check inter 1s rise 2 fall 2
frontend ftp_service #代理ftp(被动模式,端口范围:40000-40003)
mode tcp
bind *:2021
default_backend ftp_server
frontend ftp
mode tcp
bind *:40000-40003
default_backend ftp_server_data
backend ftp_server
mode tcp
server ftp 10.68.250.198 check port 2021 inter 10s rise 1 fall 2
backend ftp_server_data
mode tcp
server ftp 10.68.250.198 check port 2021 inter 10s rise 1 fall 2
listen node1-9200 0.0.0.0:19200 #本机19200端口代理192.168.1.160的9200端口
mode tcp
option tcplog
balance roundrobin
server 192.168.1.160 192.168.1.160:9200 weight 1 check inter 1s rise 2 fall 2
listen node2-9200 0.0.0.0:19201 #本机19200端口代理192.168.1.160的9200端口
mode tcp
option tcplog
balance roundrobin
server 192.168.1.160 192.168.1.161:9200 weight 1 check inter 1s rise 2 fall 2
重启haproxy(重启时的WARNING不影响)
[root@kvm-server conf]# /etc/init.d/haproxy restart
对以上的开放端口要在防火墙iptables里开通
[root@linux-node1 conf]# cat /etc/sysconfig/iptables
.............
-A INPUT -p tcp -m state --state NEW -m tcp --dport 80 -j ACCEPT
-A INPUT -p tcp -m state --state NEW -m tcp --dport 443 -j ACCEPT
-A INPUT -p tcp -m state --state NEW -m tcp --dport 33061 -j ACCEPT
-A INPUT -p tcp -m state --state NEW -m tcp --dport 33062 -j ACCEPT
-A INPUT -p tcp -m state --state NEW -m tcp --dport 2021 -j ACCEPT
-A INPUT -p tcp -m state --state NEW -m tcp --dport 40000:40003 -j ACCEPT
-A INPUT -p tcp -m state --state NEW -m tcp --dport 19200 -j ACCEPT
-A INPUT -p tcp -m state --state NEW -m tcp --dport 19201 -j ACCEPT
以上就是haproxy代理mysql、ftp及其他端口的配置~~~
----------------------------------------------------------------------------------
|
1
2
3
4
5
6
7
8
9
10
11
12
13
14
15
16
17
18
19
20
21
22
23
24
25
26
27
28
29
30
31
32
|
如下设置,通过haproxy将本机8080和80端口分别反向代理到192.168.34.37的8080以及192.168.72.242的80端口。
[root@ha01 conf]
# cat haproxy.cfg
#
# demo config for Proxy mode
#
global
maxconn 20000
ulimit
-n 65535
log 127.0.0.1 local0
uid 99
gid 99
chroot
/var/empty
nbproc 4
daemon
listen wiki
bind :8080
mode tcp
timeout connect 10000ms
timeout client 5000ms
timeout server 5000ms
server t1 192.168.34.37:8080
listen caf
bind :81
mode http
timeout connect 10000ms
timeout client 5000ms
timeout server 5000ms
server t1 192.168.72.242:81
|