流的世界,有点乱,群雄逐鹿,流实在太多,看完这个马上又冒出一个,也不知哪个才是真正的牛,据说Flink是位重量级选手,能流计算,还能批处理,和其他伙伴关系也融洽的很,与HDFS/File/SQL/MQ往来都不在话下,今天我们就来实战一把。
环境:Idea2019.03/Gradle6.0.1/JDK11.0.4/Lambda/RHEL8.0/VMWare15.5/Springboot2.2.1.RELEASE/Mysql8.0.11/Kafka2.3.1/ShadowJar5.0/Flink1.9.1/Zookeeper3.5.5
难度:新手--战士--老兵--大师
目标:
- Zookeeper集群部署
- Kafka集群部署及AdminClient使用
- Flink Standalone集群部署
- Flink流计算程序设计
说明:
为了遇见各种问题,同时保持时效性,我尽量使用最新的软件版本。同时代码中大量使用注释,并尽量使用非链式写法,层次清晰。
代码地址:其中的day24,https://github.com/xiexiaobiao/dubbo-project.git
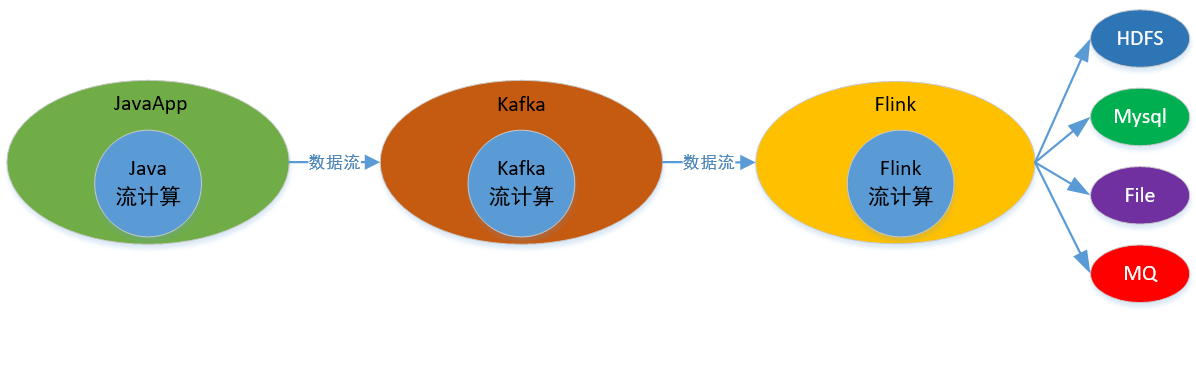
第一部分 部署图
1.1 整体部署图,注意本次我没使用Flink的HA模式,故只有一个Master节点:
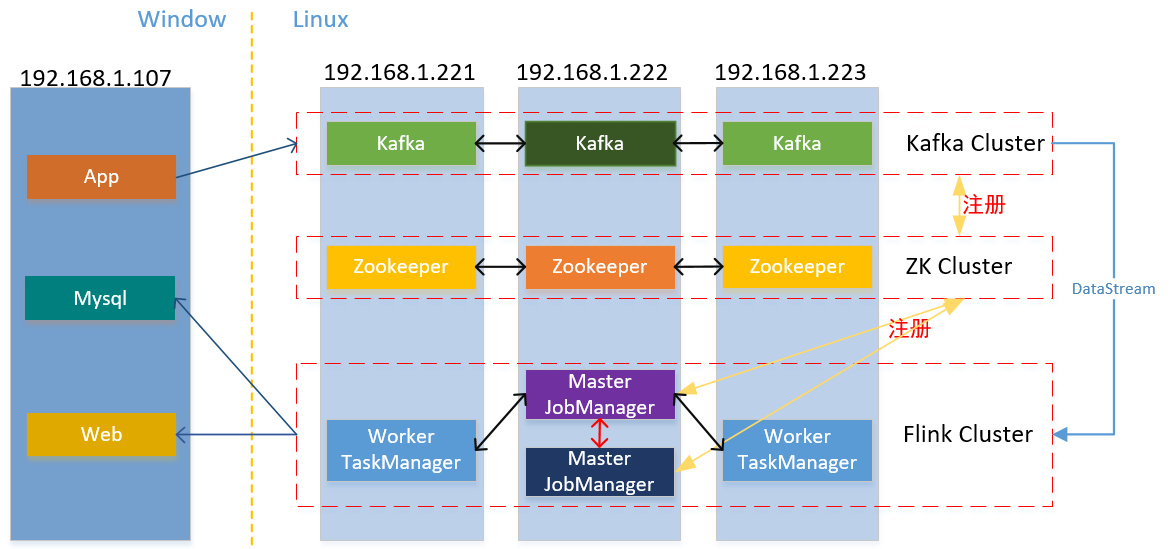
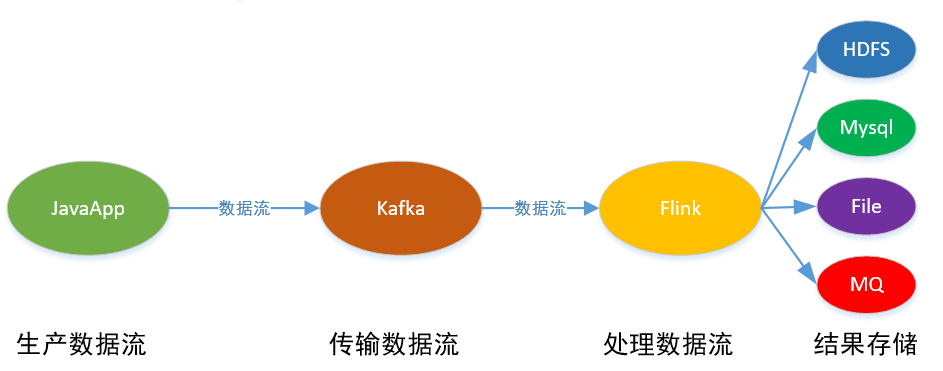
本次实现的整体逻辑:Java应用产生流数据,用kafka进行传输,在Flink中进行流计算,最后存储到文件和Mysql中:
第二部分 zk集群
2.1 Zookeeper(简写ZK)集群安装:我分别部署ZK到192.168.1.221,192.168.1.222,192.168.1.223 linux虚机上,这里只说一台,其他类似,下载apache-zookeeper-3.5.5-bin.tar.gz,解压到目录/usr/zookeeper3.5/apache-zookeeper-3.5.5-bin/修改ZK配置文件:
[root@localhost ~]# vim /usr/zookeeper3.5/apache-zookeeper-3.5.5-bin/conf/zoo.cfg
dataDir=/usr/zookeeper3.5/data
dataLogDir=/usr/zookeeper3.5/logs
#added for ZK cluster
server.1=192.168.1.221:2888:3888
server.2=192.168.1.222:2888:3888
server.3=192.168.1.223:2888:3888
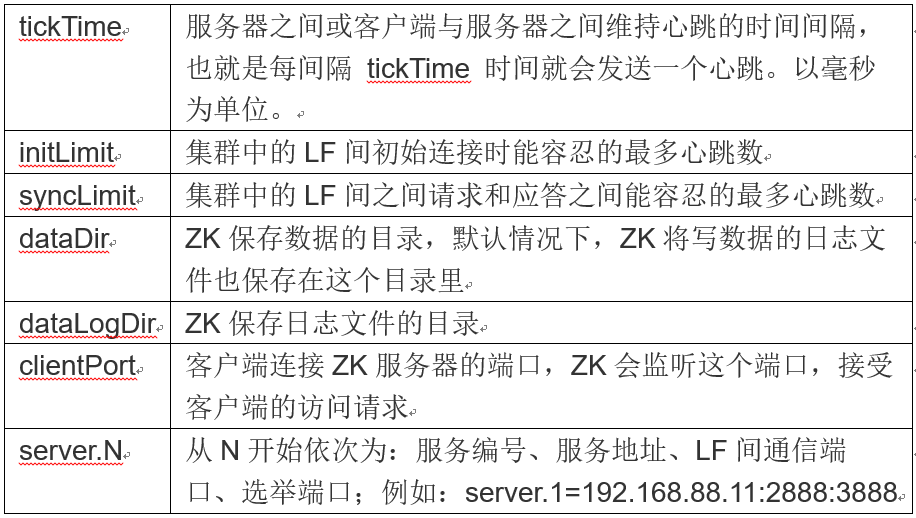
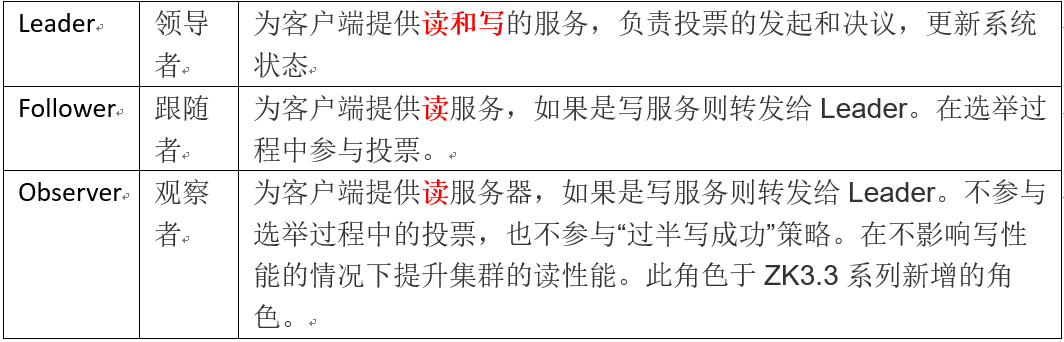
zk的配置说明:(LF指Leader/Follower)
打开firewall端口:
[root@localhost zookeeper3.5]# firewall-cmd --permanent --add-port=2181/tcp
[root@localhost zookeeper3.5]# firewall-cmd --permanent --add-port=2888/tcp
[root@localhost zookeeper3.5]# firewall-cmd --permanent --add-port=3888/tcp
[root@localhost zookeeper3.5]# firewall-cmd –reload
创建myid文件,也可使用touch或vim创建:
[root@localhost ~]# echo "2" > /usr/zookeeper3.5/data/myid
启动:
[root@localhost ~]# sh /usr/zookeeper3.5/apache-zookeeper-3.5.5-bin/bin/zkServer.sh start

查看节点角色:
[root@localhost ~]# sh $ZOOKEEPER_HOME/bin/zkServer.sh status

说明:
使用zkCli测试节点间连接,我在192.168.1.221上访问192.168.1.222:

第三部分 Kafka集群
3.1 Kafka集群,参考上一篇,这里以192.168.1.223为例,其他类似,修改/usr/kafka2.3/kafka_2.12-2.3.1/config/server.properties:
broker.id=2 #集群内此编号必须唯一
listeners=PLAINTEXT://192.168.1.223:9092 #Socket监听地址,没写hostname/IP即为listen所有IP
log.dirs=/usr/kafka2.3/kafka-logs  #kafka保存log目录
zookeeper.connect=192.168.1.221:2181,192.168.1.222:2181,192.168.1.223:2181 #ZK注册地址
注意开启kafka的访问端口,否则APP无法访问:
[root@localhost ~]# firewall-cmd --permanent --add-port=9092/tcp
[root@localhost ~]# firewall-cmd –reload
再分别启动kafka:[root@server223 kafka_2.12-2.3.1]# ./bin/kafka-server-start.sh config/server.properties
第四部分 Flink集群
4.1 Flink基础知识,因篇幅原因,略!
4.2 Flink Standalone集群(一个master多个worker)部署:必须先安装SSH,使得各集群节点机器间无密码进行SSH访问,并必须使用相同的flink安装目录结构,因master节点通过SSH使用脚本控制worker节点。Flink集群还有HA模式,即多个Master节点和多个worker节点,Master节点中一个为leader,其他Master节点为standby,故障时standby就转换为leader角色。
4.3 SSH开通:
我这里192.168.1.222为master,192.168.1.221/223为worker, 222到223的SSH,222到221的SSH类似,如linux上没有SSH,需先安装该service。以下为222到221的SSH开通,在222上:
[root@localhost ~]# ssh-keygen
[root@localhost ~]# ssh-copy-id 192.168.1.221
[root@localhost ~]# vim /etc/ssh/sshd_config
PasswordAuthentication no
[root@localhost ~]# systemctl restart sshd
[root@localhost ~]# ssh 192.168.1.221
[root@localhost ~]# exit
logout
Connection to 192.168.1.221 closed.
4.4 Flink安装:我下载的是编译后版本:flink-1.9.1-bin-scala_2.12.tgz,解压后在/usr/flink1.9/flink-1.9.1目录, 集群配置:
[root@localhost flink-1.9.1]# vim conf/flink-conf.yaml
#jobmanager.rpc.address key to point to your master node
jobmanager.rpc.address: 192.168.1.222
#The number of task slots that each TaskManager offers. Each slot runs one parallel pipeline.
conf/flink-conf.yaml  taskmanager.numberOfTaskSlots: 2
#java_home
env.java.home: /usr/jdk11/jdk-11.0.4/
worker节点配置:
[root@localhost flink-1.9.1]# vim conf/slaves
#all nodes in your cluster which shall be used as worker nodes
192.168.1.221
192.168.1.223
复制flink文件目录到各worker集群节点,这样flink目录结构确定一致:
[root@localhost flink-1.9.1]# scp -r /usr/flink1.9 root@192.168.1.223:/usr/flink1.9
4.5 启动集群,这里只需在master节点上操作,flink会通过SSH自动启动worker上的taskmanager:
[root@localhost flink-1.9.1]# ./bin/start-cluster.sh

显示如上因我设置了hostname分别为192.168.1.221 -> server221/ 192.168.1.222 -> server222/ 192.168.1.223 -> server223,可以看到221/223的worker节点被动启动了。
4.6 关闭集群:
[root@localhost flink-1.9.1]# ./bin/stop-cluster.sh

4.7 启动或关闭另一个jobmanager实例:
[root@server222 flink-1.9.1]# ./bin/jobmanager.sh stop-all

[root@server222 flink-1.9.1]# ./bin/jobmanager.sh start 192.168.1.222:8081

4.8 Web访问,先在222上开通端口号:
[root@localhost ~]# firewall-cmd --permanent --add-port=8081/tcp
[root@localhost ~]# firewall-cmd –reload
Windows上访问web UI:http://192.168.1.222:8081/

4.9 写flink处理逻辑:
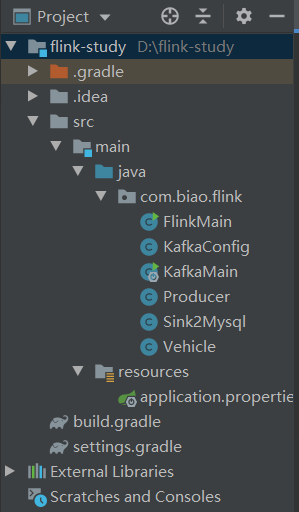
建立Gradle项目,模拟车流处理,结构如下:
依赖,再次建议按需逐步加入,了解各依赖的作用:
    flinkShadowJar group: 'org.apache.flink', name: 'flink-core', version: '1.9.1'
    flinkShadowJar group: 'org.apache.flink', name: 'flink-streaming-java_2.12', version: '1.9.1'
    flinkShadowJar group: 'org.apache.flink', name: 'flink-clients_2.12', version: '1.9.1'
    flinkShadowJar group: 'org.apache.flink', name: 'flink-java', version: '1.9.1'
    flinkShadowJar group: 'org.projectlombok', name: 'lombok', version: '1.18.10'
    flinkShadowJar group: 'org.apache.flink', name: 'flink-connector-kafka_2.12', version: '1.9.1'
    flinkShadowJar group: 'org.apache.kafka', name: 'kafka-streams', version: '2.3.1'
    flinkShadowJar group: 'com.alibaba', name: 'fastjson', version: '1.2.62'
    flinkShadowJar group: 'org.springframework.kafka', name: 'spring-kafka', version: '2.3.3.RELEASE'
    flinkShadowJar group: 'org.springframework.boot', name: 'spring-boot-starter', version: '2.2.1.RELEASE'
    flinkShadowJar group: 'com.alibaba', name: 'druid', version: '1.1.21'
    flinkShadowJar group: 'mysql', name: 'mysql-connector-java', version: '8.0.18'
车流当然得有车,先建个POJO类com.biao.flink.Vehicle,
@Data
@Getter
@Setter
publicclass Vehicle {
    // 类型:car/truck/suv/pickup/other
    private String type;
    // 车牌号:随机6位数字
    private Integer plate;
    // yellow/red/white/black
    private String color;
    // 车重: 1.5-2.5
    private Float weight;
    ...
}
com.biao.flink.Producer用于产生车流:
@Component
//@Slf4j
publicclass Producer {
    @Autowired
    private KafkaTemplate<String,String> kafkaTemplate;

    private Logger log = LoggerFactory.getLogger(Producer.class);
    private String time = LocalDateTime.now().toString();

    public void send() {
        log.info("send elements to kafka started at :{}",time);
        Random random = new Random();
        // kafkaTemplate.sendDefault() 为异步方法,返回 ListenerFuture<T>,
        // 如果运行到此前没有显示创建topic:vehicle,send方法会缺省创建复制因子为1的topic
        this.getVehicles()
                .forEach(item -> kafkaTemplate.send("vehicle",String.valueOf(random.nextInt(10)), JSON.toJSONString(item)));
    }

    // 使用随机方法产生车辆流
    public Stream<Vehicle> getVehicles(){
        List<Vehicle> vehicleList = new ArrayList<>(75);
        Random random = new Random();
        List<String> colors = Arrays.asList("red","yellow","black","white");
        List<String> types = Arrays.asList("car","truck","suv","pickup","other");
        List<Float> weights = Arrays.asList(1.0f,1.5f,2.0f,2.5f);
        // 使用Random生成IntStream流
        IntStream intStream1 = random.ints(25,100000,999999);
        intStream1.limit(25)
                .forEach(num -> {vehicleList.add(new Vehicle(types.get(random.nextInt(5)),num,
                        colors.get(random.nextInt(4)),weights.get(random.nextInt(4))));});
        // 使用 IntStream静态方法生成流
        IntStream intStream2 = IntStream.rangeClosed(100000,999999);
        intStream2.limit(25)
                .forEach(num -> {vehicleList.add(new Vehicle(types.get(random.nextInt(5)),num,
                        colors.get(random.nextInt(4)),weights.get(random.nextInt(4))));});
        // 使用Stream静态迭代器方法生成流
        Stream<Integer> intStream3 = Stream.iterate(100000, n->n+3);
        intStream3.limit(25)
                .forEach( t -> {vehicleList.add(new Vehicle(types.get(random.nextInt(5)),t,
                        colors.get(random.nextInt(4)),weights.get(random.nextInt(4))));});

        // 用于输出测试
        // vehicleList.stream().forEach(System.out::println);
        return vehicleList.stream();
    }
}
以上代码核心点:1.getVehicles生产车流,里面使用了3种模式生成java stream:Random类生成的无限IntStream;IntStream.rangeClosed静态方法生成范围流;Stream.iterate静态迭代器方法生成无限流。再结合随机Vehicle属性,最终生成Stream(Vehicle)流。2.Send方法中使用KafkaTemplate向Kafka集群发送流数据,但注意转为了String流。这里我也出个考题:String.valueof(Object) 和 Object.toString(),有何不同呢?检验下功力几层。
com.biao.flink.KafkaConfig配置类:
@Configuration
publicclass KafkaConfig {

    // 通过bean注入可以直接创建一个topic并指定topic的属性,也可使用AdminClient来创建
    @Bean
    NewTopic topic(){
        // NewTopic(String name, int numPartitions, short replicationFactor)
        returnnew NewTopic("vehicle",3,(short) 3);
    }

    // 使用AdminClient的静态create方法创建一个管理端,用于管理topic
    @Bean(name = "adminClient")
    AdminClient adminClient(){
        Properties properties = new Properties();
        properties.put(StreamsConfig.BOOTSTRAP_SERVERS_CONFIG,"192.168.1.221:9092,192.168.1.222:9092,192.168.1.223:9092");
        return AdminClient.create(properties);
    }
}
以上代码通过Springboot DI生成kafka的topic和AdminClient,为什么要这么生成topic?因为这种方式可以很好的指定replicationFactor,即partition的复制因子,虽然也可使用AdminClient来创建topic,但不可修改复制因子属性。另请注意,com.biao.flink.Producer中的send方法也能缺省创建numPartitions和replicationFactor为1的topic,这里就说了3中创建topic的方法了!
com.biao.flink.KafkaMain是Kafka应用入口类,也是记录发送者:
@SpringBootApplication
publicclass KafkaMain {
    public static void main(String[] args) throws ExecutionException, InterruptedException {
        System.out.println("Flink Application starting .........");
        ConfigurableApplicationContext context = SpringApplication.run(KafkaMain.class,args);

        // 使用kafka AdminClient示例
        AdminClient adminClient = (AdminClient) context.getBean("adminClient");
        // 批量创建kafka topic
        // adminClient.createTopics(...);
        // 打印输出所有的topic
        adminClient.listTopics().names().get().forEach(System.out::println);
        // 打印vehicle的topic信息
        System.out.println("info>>>" + adminClient.describeTopics(Collections.singletonList("vehicle")).values());
        // 删除vehicle2的topic,注意删除前要关闭所有consumer
        System.out.println("delete>>>" +adminClient.deleteTopics(Collections.singletonList("vehicle2")).values());
        // 修改partitions属性,仅对新Partitions起作用,原有Partitions状态不变,且replicationFactor不能修改
        // 以下例子设定原vehicle已有3个Partitions,replicationFactor为3,现增加到4个Partitions
        List<List<Integer>> lists = new ArrayList<>(Collections.emptyList());
        lists.add(Arrays.asList(0,1,2));
        NewPartitions newPartitions = NewPartitions.increaseTo(4,lists);
        Map<String, NewPartitions> map = new HashMap<>(Collections.emptyMap());
        map.put("vehicle",newPartitions);
        adminClient.createPartitions(map);

        // kafka生产者进行发送记录
        Producer producer = context.getBean(Producer.class);
        producer.send();
    }
}
以上代码重点是学习AdminClient,它来管理kafka的topic,可以批量创建createTopics、打印输出listTopics、删除deleteTopics和修改createPartitions。但修改numPartitions属性,仅对新Partitions起作用,原有Partitions状态不变,且replicationFactor不能修改。而且我使用发现createPartitions方法使用晦涩难懂,不推荐使用!
最后是com.biao.flink.FlinkMain ,flink的入口类,也是Flink的流计算逻辑实现:
publicclass FlinkMain {
    public static void main(String[] args) throws Exception {
        // 流式执行上下文,还有非流式的ExecutionEnvironment,缺省为Local模式,
        // 远程的使用RemoteStreamEnvironment可在远程Flink集群上运行jar
        // RemoteStreamEnvironment remoteStreamEnv = new RemoteStreamEnvironment(String host, int port, String... jarFiles);
        final StreamExecutionEnvironment environment = StreamExecutionEnvironment.getExecutionEnvironment();
        Properties props = new Properties();
        // StreamsConfig已经预定义了很多参数名称,运行时console会输出所有StreamsConfig values
        props.put(StreamsConfig.APPLICATION_ID_CONFIG,"Flink Application");
        props.put(StreamsConfig.BOOTSTRAP_SERVERS_CONFIG,"192.168.1.221:9092,192.168.1.222:9092,192.168.1.223:9092");
        // kafka流都是byte[],必须有序列化,不同的对象使用不同的序列化器
        props.put(StreamsConfig.DEFAULT_KEY_SERDE_CLASS_CONFIG, Serdes.String().getClass());
        props.put(StreamsConfig.DEFAULT_VALUE_SERDE_CLASS_CONFIG,Serdes.String().getClass());
        // 构造一个KafkaConsumer,使用kafka topic做源头
        // FlinkKafkaConsumer(topic,DeserializationSchema,properties),其中的DeserializationSchema可以自定义反序列化模式,但
        // 强烈建议使用通用序列化,自定义序列化迁移和维护困难
        FlinkKafkaConsumer<String> flinkKafkaConsumer = new FlinkKafkaConsumer<>("vehicle",new SimpleStringSchema(),props);
        // flink连接Kafka数据源,并生成流
        // 使用map计算将每个string元素转换为Vehicle对象,JSON -> Vehicle
        DataStream<Vehicle> stream = environment.addSource(flinkKafkaConsumer)
                .map(str -> JSONObject.parseObject(str,Vehicle.class))
                .setParallelism(2);
        // 保存到文件测试,写入mysql前可以用来测试数据,本地windows运行和上传到linux上运行,注意文件路径写法不用
        // stream.writeAsText("D:/flinkOutput01", FileSystem.WriteMode.OVERWRITE);
        stream.writeAsText("/usr/flink1.9/fileOutPut01", FileSystem.WriteMode.OVERWRITE);
        // 保存到mysql测试
        stream.addSink(new Sink2Mysql());
        /**计数式滑动窗口测试:countWindowAll(windowSize,slideSize),以下窗口大小10个记录,窗口一次滑动5个记录位置
         * ,特别注意 -> countWindowAll模式无法并行,因所有记录均需通过一个窗口*/
        SingleOutputStreamOperator<Vehicle> operator = stream
                .keyBy("type")
                .countWindowAll(5L,10L)
                .sum("weight");
        // operator.writeAsText("D:/flinkOutput02", FileSystem.WriteMode.OVERWRITE);
        operator.writeAsText("/usr/flink1.9/fileOutPut02", FileSystem.WriteMode.OVERWRITE);
        // Triggers the program execution.
        environment.execute();
    }
}
以上代码中,重点关注StreamExecutionEnvironment,它是Flink运行的流式执行上下文,可以指定全局时间处理特性,还有并行度(下篇再述)。还有非流式的ExecutionEnvironment,缺省为Local模式,远程的使用RemoteStreamEnvironment可在指定远程Flink集群上运行jar文件,每个flink pipeline代码最后都要environment.execute()来触发执行!
FlinkKafkaConsumer则构造一个KafkaConsumer,使用kafka topic做源头,注意序列化器的指定。然后就是对DataStream(Vehicle)流的系列操作了,其中涉及到了窗口(window)对象,因为流处理一般要处理无穷多个对象,不可能一次全处理完,如何每次选取一些想要的?那就是一个window框,要么框住一定数量的,要么框住一定时间段内的,然后再处理。Window的概念还是非常重要的!我后续再讲,或者看官君查查资料,此篇不展开。
com.biao.flink.Sink2Mysql存数据到mysql逻辑:
// 也可使用顶级接口 SinkFunction,RichSinkFunction也实现了SinkFunction
publicclass Sink2Mysql extends RichSinkFunction<Vehicle> {
    private PreparedStatement preparedStatement;
    private DruidDataSource dataSource;
    private Connection connection;

    // Initialization method for the function.
    @Override
    public void open(Configuration parameters) throws Exception {
        super.open(parameters);
        dataSource = new DruidDataSource();
        dataSource.setDriverClassName("com.mysql.jdbc.Driver");
        dataSource.setUsername("root");
        dataSource.setPassword("123456");
        dataSource.setUrl("jdbc:mysql://192.168.1.107:3306/data_center?characterEncoding=UTF-8&serverTimezone=UTC");
        connection = dataSource.getConnection();
        preparedStatement = connection.prepareStatement("insert into vehicle(type, plate, color, weight) values(?, ?, ?, ?);");

    }

    // Tear-down method for the user code. It is called after the last call to the main working methods
    @Override
    public void close() throws Exception {
        super.close();
        // 需try-catch,我直接简写了
        preparedStatement.close();
        connection.close();
        dataSource.close();
    }

    // Writes the given value to the sink. This function is called for every record.
    @Override
    public void invoke(Vehicle value, Context context) throws Exception {
        preparedStatement.setString(1,value.getType());
        preparedStatement.setInt(2,value.getPlate());
        preparedStatement.setString(3,value.getColor());
        preparedStatement.setFloat(4,value.getWeight());
        boolean result = preparedStatement.execute();
        System.out.println("DB saved record success >>>>> " );
        /*preparedStatement.addBatch();
        int[] updateNums = preparedStatement.executeBatch();
        System.out.println("DB saved items >>>>> " + updateNums.length);*/
    }
}
以上就是保存到Mysql的方法单独实现:使用DruidDataSource来了一套JDBC标准写法。
第五部分 运行部署
5.1 本地运行:
- 启动各linux上的zookeeper和Kafka,
- 先运行com.biao.flink.FlinkMain,注意本地要修改下文件保存路径的String,
- 再运行com.biao.flink.KafkaMain,即可查看文件和Mysql的写入情况:
贴图略!略!略!可参考5.2的图。
5.2 部署到Flink上运行:
启动各linux上的zookeeper和Kafka,
使用shadowJar插件打包jar文件,这里需要注意下build.gradle文件的编写,特别是shadowJar如何打包依赖。注意指定jar内main函数入口。
Gradle命令:gradle clean shadowJar
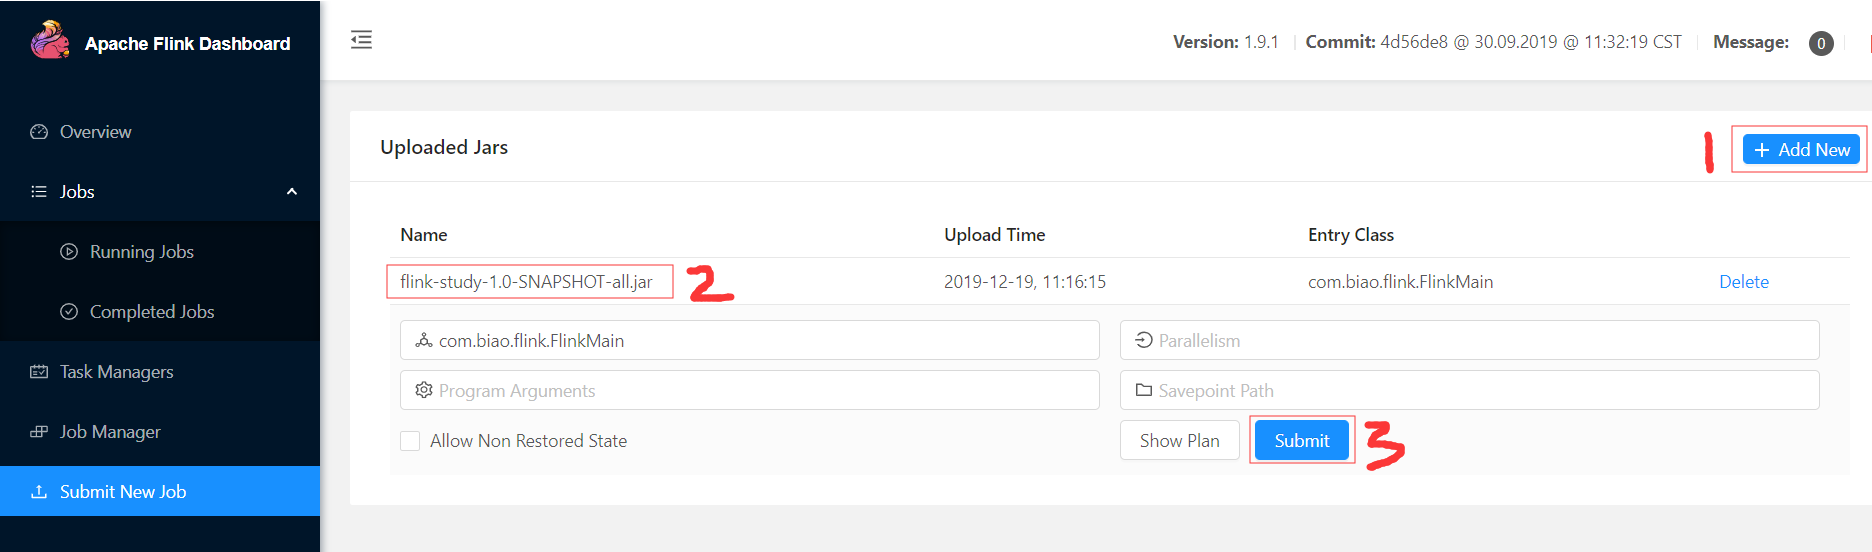
然后通过web UI可以上传jar包运行,或者在flink server中使用命令行,或者还可以使用Rest API方式,我这里使用web UI上传,最后submit一下:
点击plan,可以看到我们的前面代码的Flink计算逻辑数据流向图:

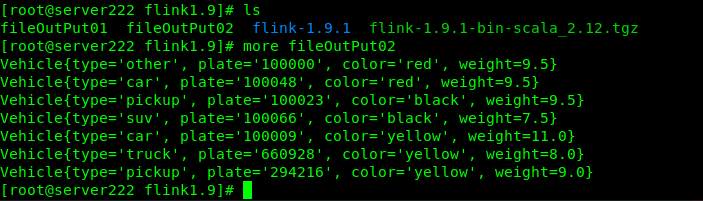
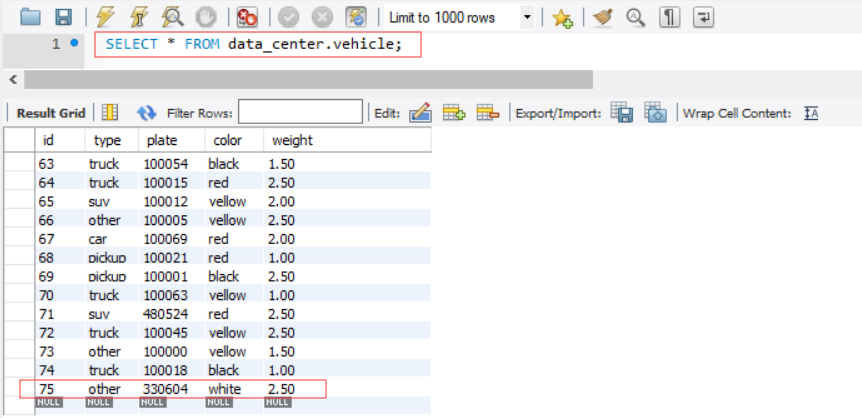
然后运行com.biao.flink.KafkaMain产生流,再去文件和Mysql查看下数据写入情况。可以验证KafkaMain每运行一次,车流有75辆,多次则为75*N辆:

文件写入情况,这里以sum sink的结果output02为例:
Mysql写入情况:
总结::Java Stream,Kafka Stream和 Flink Stream各有特点,应注意区分和理解,Java Stream侧重在对集合类数据局部处理,Kafka Stream流则可在流传输过程中做轻量级预处理,而Flink Stream则是重量级流计算框架,需依照业务需求量体裁衣。
问题解决:
1.RHEL8.0设置静态和临时主机名,主机名分为三类:静态static、个性pretty和临时transient:
[root@localhost ~]# hostnamectl status
[root@localhost ~]# hostnamectl set-hostname "Your Pretty HostName" --pretty
[root@localhost ~]# hostnamectl set-hostname host.example.com --static
[root@localhost ~]# hostnamectl set-hostname host.example.com --transient
[root@localhost ~]# hostnamectl
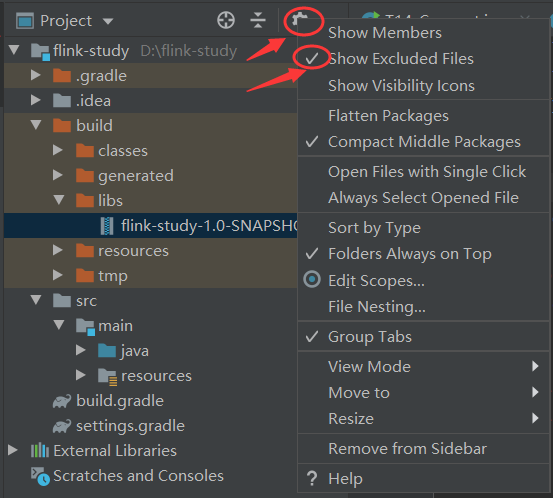
2.Build后找不到jar文件,确认项目文件显示选项开启:
3.Springboot和shadowJar打包模式的区别:compile语句是springboot打包fatJar用的,flinkShadowJar语句是shadow打包进fatJar用的,而且shadowJar打包是将其他依赖jar拆分成类文件放入fatJar,而springboot是直接引入依赖jar。
4.Flink的窗口:基于时间的tumbling time windows(翻滚时间窗口) 和 sliding time windows(滑动时间窗口),还有基于count/session 的窗口,当然还可以自定义窗口。
5.每个流元素都有三个不同的时间概念,即 processing time被处理时刻戳, event time元素自带事件时间戳 和 ingestion time进入Flink的时间戳,Flink可以通过StreamExecutionEnvironment设置按照哪个timestamp处理。
6.submit任务后,出现异常:org.apache.flink.runtime.jobmanager.scheduler.NoResourceAvailableException: No pooled slot available 这是因为worker的Task Slots数量不够,可以通过加大修改conf/flink-conf.yaml的参数taskmanager.numberOfTaskSlots来满足,一般设置为cpu核心整数倍。
7.mysql写入失败,检查DB:mysql中User表的网络访问权限设置,localhost表示只能本地访问,连接串中是"jdbc:mysql://192.168.1.107:3306/…",flink运行时是从其他linux IP访问107:3306,所以要改为接受全部的 “ % ”,记得再重启mysql服务才能生效!

8.文件可以写入但mysql未写入,查看日志:Caused by: com.mysql.cj.exceptions.CJCommunicationsException: Communications link failure 研究得出是windows防火墙阻止3306端口访问,新建一个入口规则可搞定:

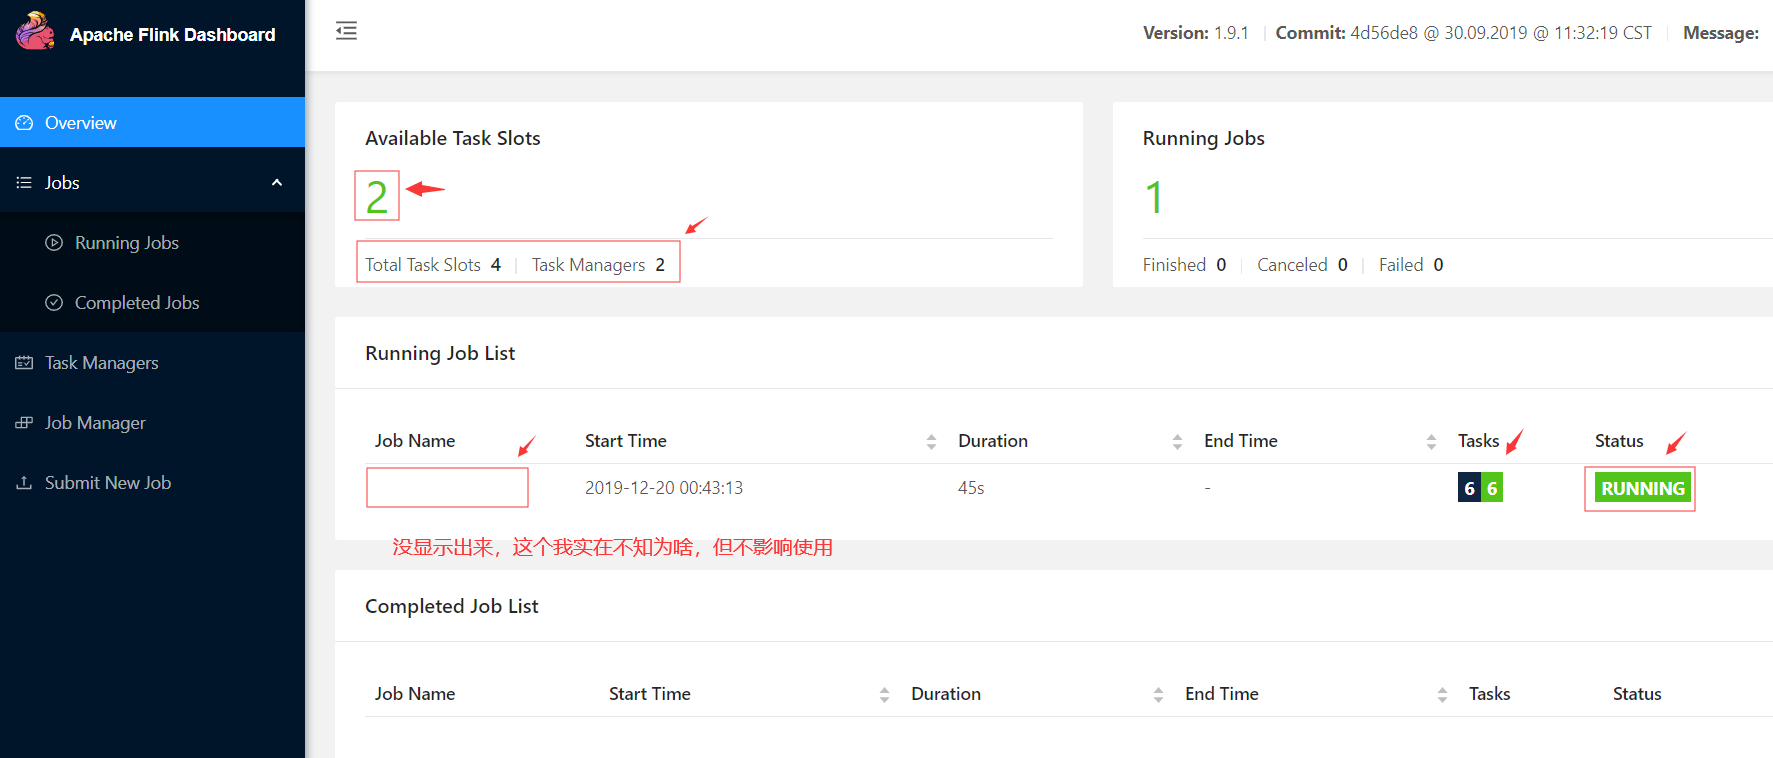
9.Task Managers下面没有全部的worker节点,且Overview中Available Task Slots一直是0,即standalone集群部署失败,解决办法,此问题我研究了整整一天才解决,因为没报任何错误,且每个节点可独立启动,只能全部重装加删日志试出来的:
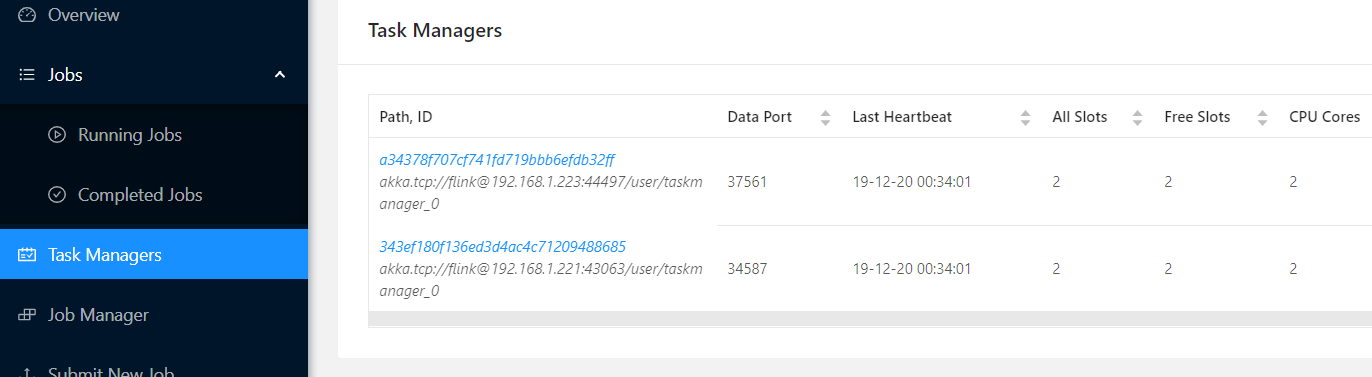
上述问题药方:把222 master节点上/usr/flink1.9/flink-1.9.1/log目录下文件全部删掉!再重启集群即可。
10.运行集群模式时查看Running job的详细信息,很久后还一直转圈,flink的 log 日志显示:java.net.NoRouteToHostException: No route to host ,请关闭linux的防火墙!
[root@server221 ~]# systemctl stop firewalld
[root@server221 ~]# systemctl status firewalld
我的往期文章:
- 流式计算(二)-Kafka Stream
- 流式计算(一)-Java8Stream
- Dubbo学习系列之十六(ELK海量日志分析)
- Linux下Redis集群
- Dubbo学习系列之十五(Seata分布式事务方案TCC模式)

此篇完!