转载:https://blog.csdn.net/itcats_cn/article/details/81149232
目录
1、继承Thread类,重写run()方法
2、实现Runnable接口,重写run()
3、匿名内部类的方式
4、带返回值的线程(实现implements Callable<返回值类型>)————以上3种方式,都没有返回值且都无法抛出异常。
5、定时器(java.util.Timer)
6、线程池的实现(java.util.concurrent.Executor接口)
7、Lambda表达式的实现
8、Spring实现多线程
继承Thread类,重写run()方法
//方式1
package cn.itcats.thread.Test1;

public class Demo1 extends Thread{

    //重写的是父类Thread的run()
    public void run() {
        System.out.println(getName()+"is running...");
    }


    public static void main(String[] args) {
        Demo1 demo1 = new Demo1();
        Demo1 demo2 = new Demo1();
        demo1.start();
        demo2.start();
    }
}
实现Runnable接口,重写run()
——实现Runnable接口只是完成了线程任务的编写
若要启动线程,需要new Thread(Runnable target),再有thread对象调用start()方法启动线程
此处我们只是重写了Runnable接口的Run()方法,并未重写Thread类的run(),让我们看看Thread类run()的实现
本质上也是调用了我们传进去的Runnale target对象的run()方法
//Thread类源码中的run()方法
//target为Thread 成员变量中的 private Runnable target;

@Override
public void run() {
    if (target != null) {
        target.run();
    }
}
所以第二种创建线程的实现代码如下:
package cn.itcats.thread.Test1;

/**
 * 第二种创建启动线程的方式
 * 实现Runnale接口
 * @author fatah
 */
public class Demo2 implements Runnable{

    //重写的是Runnable接口的run()
    public void run() {
        System.out.println("implements Runnable is running");
    }

    public static void main(String[] args) {
        Thread thread1 = new Thread(new Demo2());
        Thread thread2 = new Thread(new Demo2());
        thread1.start();
        thread2.start();
    }

}
实现Runnable接口相比第一种继承Thread类的方式,使用了面向接口,将任务与线程进行分离,有利于解耦
匿名内部类的方式
适用于创建启动线程次数较少的环境,书写更加简便
具体代码实现:
package cn.itcats.thread.Test1;
/**
 * 创建启动线程的第三种方式————匿名内部类
 * @author fatah
 */
public class Demo3 {
  public static void main(String[] args) {
      //方式1:相当于继承了Thread类,作为子类重写run()实现
      new Thread() {
        public void run() {
          System.out.println("匿名内部类创建线程方式1...");
        };
      }.start();

        //方式2:实现Runnable,Runnable作为匿名内部类
        new Thread(new Runnable() {
          public void run() {
            System.out.println("匿名内部类创建线程方式2...");
          }
        } ).start();
    }
}
带返回值的线程(实现implements Callable<返回值类型>)
以上两种方式,都没有返回值且都无法抛出异常。
Callable和Runnbale一样代表着任务,只是Callable接口中不是run(),而是call()方法,但两者相似,即都表示执行任务,call()方法的返回值类型即为Callable接口的泛型
具体代码实现:
package cn.itcats.thread.Test1;

import java.util.concurrent.Callable;
import java.util.concurrent.ExecutionException;
import java.util.concurrent.Future;
import java.util.concurrent.FutureTask;
import java.util.concurrent.RunnableFuture;

/**
* 方式4:实现Callable<T> 接口
* 含返回值且可抛出异常的线程创建启动方式
* @author fatah
*/
public class Demo5 implements Callable<String>{

    public String call() throws Exception {
        System.out.println("正在执行新建线程任务");
        Thread.sleep(2000);
        return "新建线程睡了2s后返回执行结果";
    }

    public static void main(String[] args) throws InterruptedException, ExecutionException {
        Demo5 d = new Demo5();
        /*    call()只是线程任务,对线程任务进行封装
        class FutureTask<V> implements RunnableFuture<V>
        interface RunnableFuture<V> extends Runnable, Future<V>
        */
        FutureTask<String> task = new FutureTask<>(d);
        Thread t = new Thread(task);
        t.start();
        System.out.println("提前完成任务...");
        //获取任务执行后返回的结果
        String result = task.get();
        System.out.println("线程执行结果为"+result);
    }

}
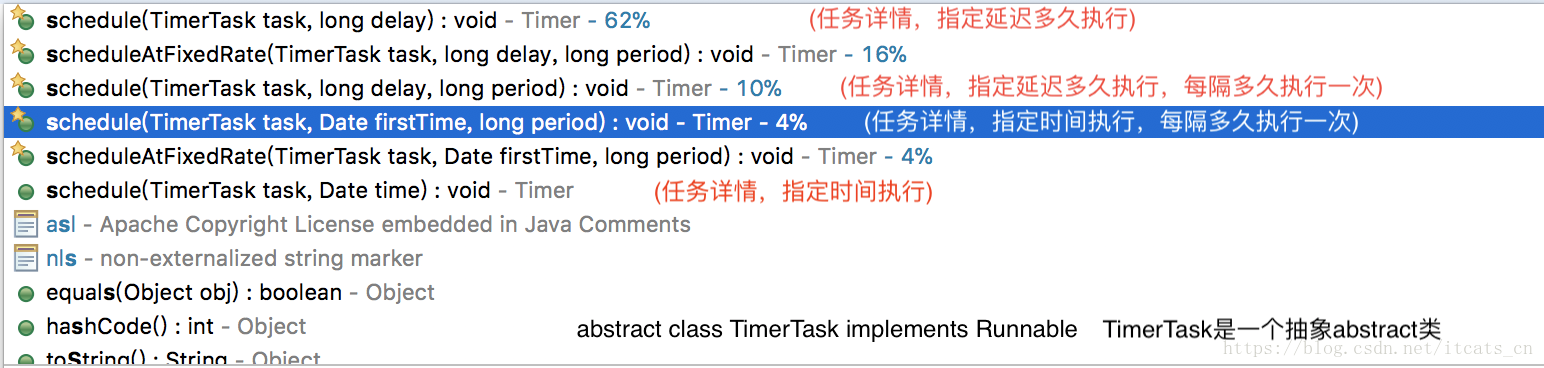
定时器(java.util.Timer)
关于Timmer的几个构造方法

执行定时器任务使用的是schedule方法:
具体代码实现:
package cn.itcats.thread.Test1;

import java.util.Timer;
import java.util.TimerTask;

/**
 * 方法5:创建启动线程之Timer定时任务
 * @author fatah
 */
public class Demo6 {
    public static void main(String[] args) {
        Timer timer = new Timer();
        timer.schedule(new TimerTask() {
            @Override
            public void run() {
                System.out.println("定时任务延迟0(即立刻执行),每隔1000ms执行一次");
            }
        }, 0, 1000);
    }

}
我们发现Timer有不可控的缺点,当任务未执行完毕或我们每次想执行不同任务时候,实现起来比较麻烦。这里推荐一个比较优秀的开源作业调度框架“quartz”。
线程池的实现(java.util.concurrent.Executor接口)
降低了创建线程和销毁线程时间开销和资源浪费
具体代码实现:
package cn.itcats.thread.Test1;

import java.util.concurrent.Executor;
import java.util.concurrent.Executors;

public class Demo7 {
    public static void main(String[] args) {
        //创建带有5个线程的线程池
        //返回的实际上是ExecutorService,而ExecutorService是Executor的子接口
        Executor threadPool = Executors.newFixedThreadPool(5);
        for(int i = 0 ;i < 10 ; i++) {
            threadPool.execute(new Runnable() {
                public void run() {
                    System.out.println(Thread.currentThread().getName()+" is running");
                }
            });
        }
    }
}
运行结果:
pool-1-thread-3 is running
pool-1-thread-1 is running
pool-1-thread-4 is running
pool-1-thread-3 is running
pool-1-thread-5 is running
pool-1-thread-2 is running
pool-1-thread-5 is running
pool-1-thread-3 is running
pool-1-thread-1 is running
pool-1-thread-4 is running
运行完毕,但程序并未停止,原因是线程池并未销毁,若想销毁调用threadPool.shutdown(); 注意需要把我上面的
Executor threadPool = Executors.newFixedThreadPool(10); 改为
ExecutorService threadPool = Executors.newFixedThreadPool(10); 否则无shutdown()方法
若创建的是CachedThreadPool则不需要指定线程数量,线程数量多少取决于线程任务,不够用则创建线程,够用则回收。
Lambda表达式的实现(parallelStream)
package cn.itcats.thread.Test1;

import java.util.ArrayList;
import java.util.Arrays;
import java.util.List;

/**
 * 使用Lambda表达式并行计算
 * parallelStream
 * @author fatah
 */
public class Demo8 {
    public static void main(String[] args) {
        List<Integer> list = Arrays.asList(1,2,3,4,5,6);
        Demo8 demo = new Demo8();
        int result = demo.add(list);
        System.out.println("计算后的结果为"+result);
    }

    public int add(List<Integer> list) {
        //若Lambda是串行执行,则应顺序打印
        list.parallelStream().forEach(System.out :: println);
        //Lambda有stream和parallelSteam(并行)
        return list.parallelStream().mapToInt(i -> i).sum();
    }
}
运行结果:
4
1
3
5
6
2
计算后的结果为21
事实证明是并行执行
Spring实现多线程
1、新建Maven工程导入spring相关依赖
2、新建一个java配置类(注意需要开启@EnableAsync注解——支持异步任务)
package cn.itcats.thread;

import org.springframework.context.annotation.ComponentScan;
import org.springframework.context.annotation.Configuration;
import org.springframework.scheduling.annotation.EnableAsync;

@Configuration
@ComponentScan("cn.itcats.thread")
@EnableAsync
public class Config {

}
3、书写异步执行的方法类(注意方法上需要有@Async——异步方法调用)
package cn.itcats.thread;

import org.springframework.scheduling.annotation.Async;
import org.springframework.stereotype.Service;

@Service
public class AsyncService {

    @Async
    public void Async_A() {
        System.out.println("Async_A is running");
    }

    @Async
    public void Async_B() {
        System.out.println("Async_B is running");
    }
}
4、创建运行类
package cn.itcats.thread;

import org.springframework.context.annotation.AnnotationConfigApplicationContext;

public class Run {
    public static void main(String[] args) {
        //构造方法传递Java配置类Config.class
        AnnotationConfigApplicationContext ac = new AnnotationConfigApplicationContext(Config.class);
        AsyncService bean = ac.getBean(AsyncService.class);
        bean.Async_A();
        bean.Async_B();
    }
}