| 项目 |
内容 |
| 这个作业属于哪个课程 |
<任课教师博客主页链接> https://www.cnblogs.com/nwnu-daizh/ |
| 这个作业的要求在哪里 |
<作业链接地址> https://www.cnblogs.com/nwnu-daizh/p/12031970.html |
| 作业学习目标 |
(1) 掌握Java应用程序的打包操作; (2) 掌握线程概念; (3) 掌握线程创建的两种技术。 |
第一部分:总结教材14.1-14.3知识内容(20分)
(1) 线程:
多线程是进程执行过程中产生的多条执行线索,线程是比进程执行更小的单位。
线程不能独立存在,必须存在于进程中,同一进程的各线程间共享进程空间的数据。
每个线程有它自身的产生、存在和消亡的过程,是一个动态的概念。
多线程意味着一个程序的多行语句可以看上去几乎在同一时间内同时运行。
线程创建、销毁和切换的负荷远小于进程,又称为轻量级进程。
(2) 线程创建的两种技术;
①创建Thread类的子类
首先须从Thread类派生出一个子类,在该子类中重写run方法。
例:
class hand extends Thread
{
public void run()
{……}
}
然后创建该子类的对象
Lefthand left = new Lefthand();
Righthand left = new Righthand();
最后用start()方法启动线程
left.start();
Right.start();
②在程序中定义实现Runnable接口的类
首先设计一个实现Runnable接口的类;
然后在类中根据需要重写run方法;
在创建该类对象,以此对象为参数建立Thread类的对象;
(3). 实现多线程的两种方法的差别:
java不允许多继承,那么我们集成Runnable接口实现多集成就能够很好的避免这个限制.
集成Runnable接口实现多线程有利于程序操作共享资源(后面会提到)
我们继承了Thread类实现run方法之后我们可以发现这样一个问题,我们再进行线程实例化之后我们必须分别启动线程任务.
而我们实现Runnable接口的话,我们可以实例化多个Thread类来运行这个任务.
当然集成Thread类也并不是不能完成共享资源的分发,而是比较费劲.
(4) 实例化:我们在初始化Thread类的时候会调用Thread内部的init方法,即便是我们不提供任何参数.init函数的结构:
private void init(ThreadGroup g, Runnable target, String name,long stackSize)
参数有:ThreadGroup,Target,name.stackSize,
其中ThreadGroup会递归去调用父类的getThreadGroup来进行初始化,
等待初始化完成之后我们会通过ThreadGroup调用checkAccess()方法来检查当前线程是否有权限操作此线程.
(5)Thread类中的方法:
Thread.sleep(): sleep方法是使当前线程休眠
Thread.start: Thread.start方法会启动线程,并且执行run方法中的内容。如果我们调用Thread.run来执行的话,jvm并不会真正的启动一个线程,而是将其当做一个普通的方法执行。而调用start的话,在start内部会调用start0方法来新建一个线程。
第二部分:实验部分
实验1:测试程序1(10分)
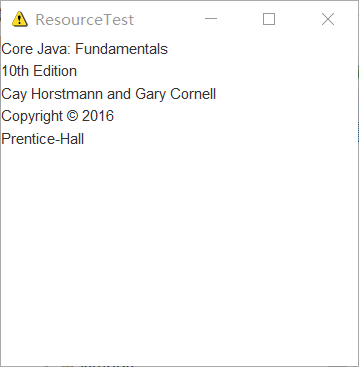
在elipse IDE中调试运行教材585页程序13-1,结合程序运行结果理解程序;
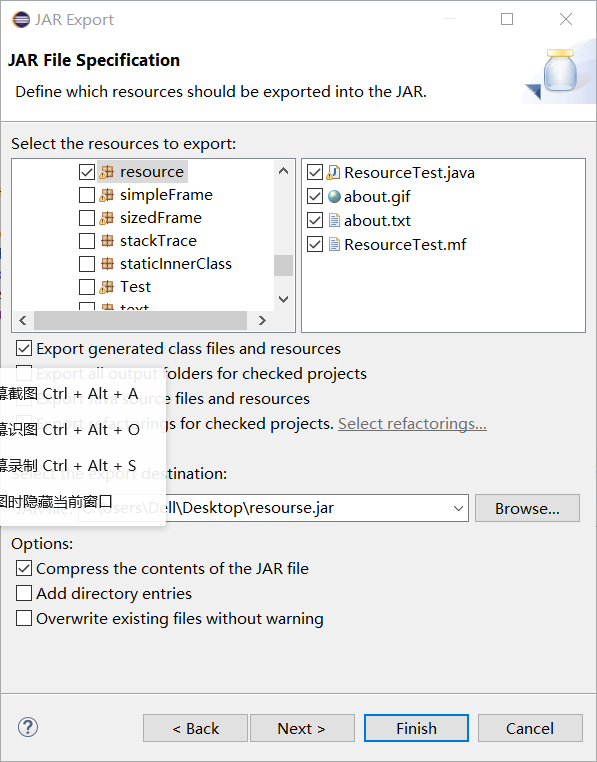
将所生成的JAR文件移到另外一个不同的目录中,再运行该归档文件,以便确认程序是从JAR文件中,而不是从当前目录中读取的资源。
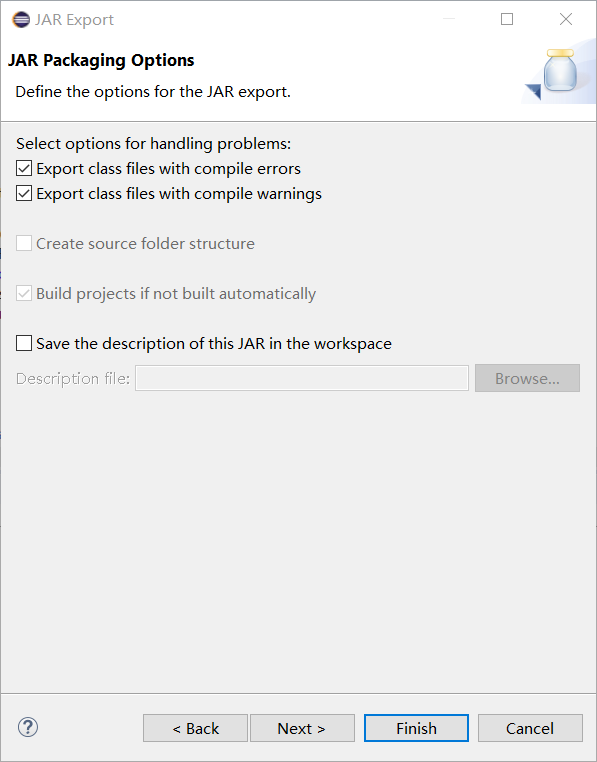
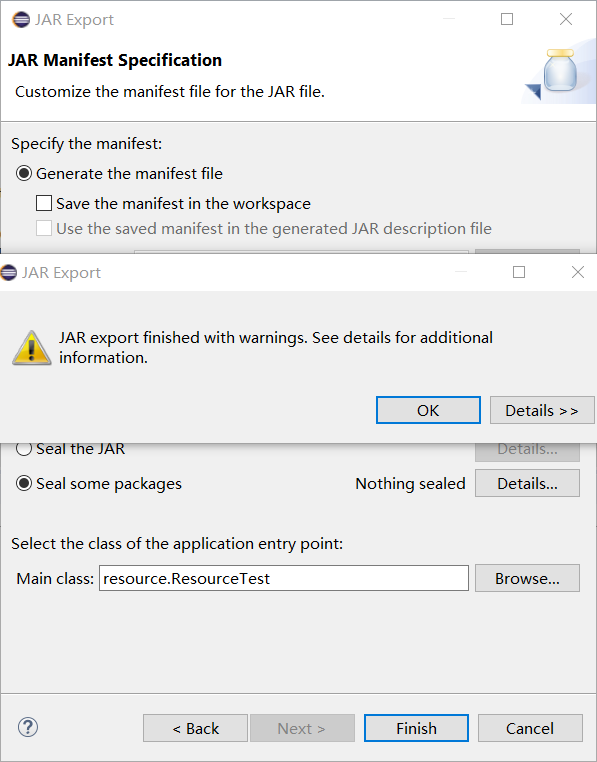
掌握创建JAR文件的方法;
package resource;

import java.awt.*;
import java.io.*;
import java.net.*;
import java.util.*;
import javax.swing.*;

/**
 * @version 1.41 2015-06-12
 * @author Cay Horstmann
 */
public class ResourceTest
{
   public static void main(String[] args)
   {
      EventQueue.invokeLater(() -> {
         JFrame frame = new ResourceTestFrame();
         frame.setTitle("ResourceTest");
         frame.setDefaultCloseOperation(JFrame.EXIT_ON_CLOSE);
         frame.setVisible(true);
      });
   }
}

/**
 * A frame that loads image and text resources.
 */
class ResourceTestFrame extends JFrame
{
   private static final int DEFAULT_WIDTH = 300;
   private static final int DEFAULT_HEIGHT = 300;

   public ResourceTestFrame()
   {
      setSize(DEFAULT_WIDTH, DEFAULT_HEIGHT);
      URL aboutURL = getClass().getResource("about.gif");//找到指定位置的图像文件,返回一个可以加载资源的URL
      Image img = new ImageIcon(aboutURL).getImage();//将加载的about.gif图像设置为图标
      setIconImage(img);

      JTextArea textArea = new JTextArea();
      InputStream stream = getClass().getResourceAsStream("about.txt");//读取about.txt文本文件内容
      try (Scanner in = new Scanner(stream, "UTF-8"))//将读取到的about.txt文本文件里内容显示到文本区
      {
         while (in.hasNext())//读取文本文件
            textArea.append(in.nextLine() + "\n");
      }
      add(textArea);
   }
}
归档:


实验1:测试程序2(10分)
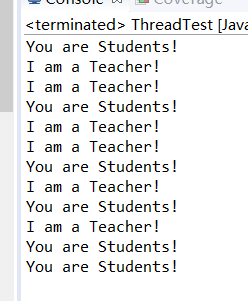
在elipse IDE中调试运行ThreadTest,结合程序运行结果理解程序;
掌握线程概念;
掌握用Thread的扩展类实现线程的方法;
利用Runnable接口改造程序,掌握用Runnable接口创建线程的方法。
package hi;
//创建Thread类的子类实现多线程
class Lefthand extends Thread {
	   public void run()
	   {
	       for(int i=0;i<=5;i++)
	       {  System.out.println("You are Students!");
	           try{   sleep(500);    }//给定休眠的500毫秒,500毫秒打印一次输出语句
	           catch(InterruptedException e)//中断异常情况
	           { System.out.println("Lefthand error.");}
	       }
	  }
	}
	class Righthand extends Thread {
	    public void run()
	    {
	         for(int i=0;i<=5;i++)
	         {   System.out.println("I am a Teacher!");
	             try{  sleep(300);  }//给定休眠的300毫秒,300毫秒打印一次输出语句
	             catch(InterruptedException e)
	             { System.out.println("Righthand error.");}
	         }
	    }
	}
	public class ThreadTest
	{
	     static Lefthand left;
	     static Righthand right;
	     public static void main(String[] args)
	     {     left=new Lefthand();
	           right=new Righthand();
	           left.start();
	           right.start();//启动线程,调用run()方法,此方法立即返回,新线程并发运行
	     }
	}
package h;
//实现Runnable接口的类实现多线程
class Lefthand implements Runnable{
   public void run()
   {

       for(int i=0;i<=5;i++)
       {  System.out.println("You are Students!");
           try{ Thread.sleep(500);   }//500毫秒打印一次
           catch(InterruptedException e)//中断异常
           { System.out.println("Lefthand error.");}
       }
  }
}
class Righthand implements Runnable {
    public void run()
    {
        for(int i=0;i<=5;i++)
         {   System.out.println("I am a Teacher!");
             try{  Thread.sleep(300);  }//300毫秒打印一次
             catch(InterruptedException e)
             { System.out.println("Righthand error.");}
         }
    }
}
public class ThreadTest
{
     static Thread left;
     static Thread right;
     public static void main(String[] args)
     {
           Runnable lefthand = new Lefthand();
           left=new Thread(lefthand);
           left.start();
           Runnable righthand = new Righthand();
           right=new Thread(righthand);
           right.start();

     }
}
实验1:测试程序2(10分)
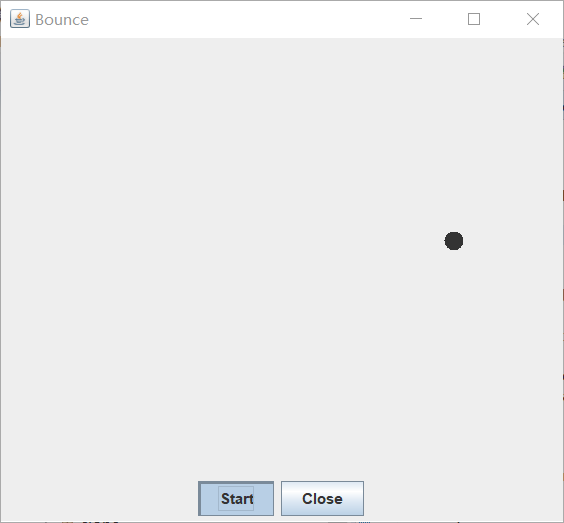
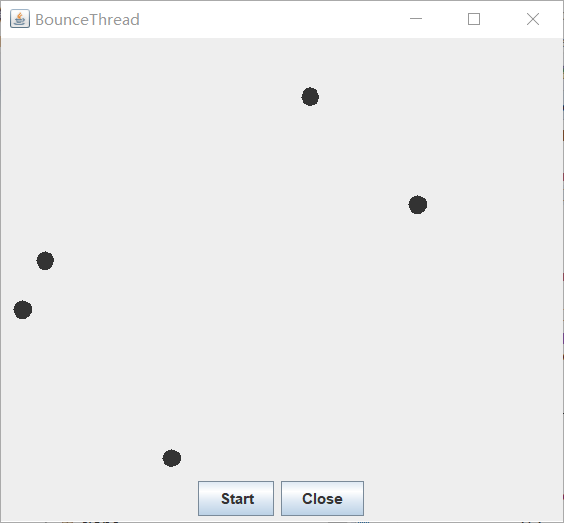
在Elipse环境下调试教材625页程序14-1、14-2 、14-3,结合程序运行结果理解程序;
在Elipse环境下调试教材631页程序14-4,结合程序运行结果理解程序;
对比两个程序,理解线程的概念和用途;
掌握线程创建的两种技术。
package bounce;

import java.awt.*;
import java.awt.event.*;
import javax.swing.*;

/**
 * 显示了一个滚动的小球
 * @version 1.34 2015-06-21
 * @author Cay Horstmann
 */
public class Bounce
{
   public static void main(String[] args)
   {
      EventQueue.invokeLater(() -> {
         JFrame frame = new BounceFrame();
         frame.setDefaultCloseOperation(JFrame.EXIT_ON_CLOSE);
         frame.setVisible(true);
      });
   }
}

/**
 *建立有按钮和小球的面板
 */
class BounceFrame extends JFrame
{
   private BallComponent comp;
   public static final int STEPS = 1000;
   public static final int DELAY = 3;

   /**
    * 创建面板容器显示滚动的小球和两个按钮
    */
   public BounceFrame()
   {
      setTitle("Bounce");
      comp = new BallComponent();
      add(comp, BorderLayout.CENTER);
      JPanel buttonPanel = new JPanel();
      addButton(buttonPanel, "Start", event -> addBall());
      addButton(buttonPanel, "Close", event -> System.exit(0));
      add(buttonPanel, BorderLayout.SOUTH);
      pack();
   }

   /**
    * 添加按钮
    * @param 容器c
    * @param 按钮标题
    * @param 按钮动作相应
    */
   public void addButton(Container c, String title, ActionListener listener)
   {
      JButton button = new JButton(title);
      c.add(button);
      button.addActionListener(listener);
   }

   /**
    *在面板上添加一个滚动的小球并使它滚动1000次
    */
   public void addBall()
   {
      try
      {
         Ball ball = new Ball();
         comp.add(ball);

         for (int i = 1; i <= STEPS; i++)
         {
            ball.move(comp.getBounds());//小球每一次移动的尺寸
            comp.paint(comp.getGraphics());
Thread.sleep(DELAY);//3毫秒移动一次 } } catch (InterruptedException e) { } } }
package bounce;

import java.awt.*;
import java.util.*;
import javax.swing.*;

/**
 * The component that draws the balls.
 * @version 1.34 2012-01-26
 * @author Cay Horstmann
 */
public class BallComponent extends JPanel
{
   private static final int DEFAULT_WIDTH = 450;
   private static final int DEFAULT_HEIGHT = 350;

   private java.util.List<Ball> balls = new ArrayList<>();

   /**
    * 在容器上添加一个球
    * @param b the ball to add
    */
   public void add(Ball b)
   {
      balls.add(b);
   }

   public void paintComponent(Graphics g)
   {
      super.paintComponent(g);//清除背景
      Graphics2D g2 = (Graphics2D) g;
      for (Ball b : balls)
      {
         g2.fill(b.getShape());
      }
   }

   public Dimension getPreferredSize() { return new Dimension(DEFAULT_WIDTH, DEFAULT_HEIGHT); }
}
package bounce;

import java.awt.geom.*;

/**
 * A ball that moves and bounces off the edges of a rectangle
 * @version 1.33 2007-05-17
 * @author Cay Horstmann
 */
public class Ball
{
   private static final int XSIZE = 15;
   private static final int YSIZE = 15;
   private double x = 0;
   private double y = 0;
   private double dx = 1;
   private double dy = 1;

   /**
    * 将小球移向像一个方向,若打到任何一条边,就颠倒方向
    */
   public void move(Rectangle2D bounds)
   {
      x += dx;
      y += dy;
      if (x < bounds.getMinX())
      {
         x = bounds.getMinX();
         dx = -dx;
      }
      if (x + XSIZE >= bounds.getMaxX())
      {
         x = bounds.getMaxX() - XSIZE;
         dx = -dx;
      }
      if (y < bounds.getMinY())
      {
         y = bounds.getMinY();
         dy = -dy;
      }
      if (y + YSIZE >= bounds.getMaxY())
      {
         y = bounds.getMaxY() - YSIZE;
         dy = -dy;
      }
   }

   /**
    *在当前位置得到小球的形状
    */
//定义球外形
public Ellipse2D getShape() { return new Ellipse2D.Double(x, y, XSIZE, YSIZE); } }
package bounceThread;

import java.awt.*;
import java.awt.event.*;

import javax.swing.*;

/**
 * Shows animated bouncing balls.
 * @version 1.34 2015-06-21
 * @author Cay Horstmann
 */
public class BounceThread
{
   public static void main(String[] args)
   {
      EventQueue.invokeLater(() -> {
         JFrame frame = new BounceFrame();
         frame.setTitle("BounceThread");
         frame.setDefaultCloseOperation(JFrame.EXIT_ON_CLOSE);
         frame.setVisible(true);
      });
   }
}

/**
 *  框架与球组件和按钮
 */
class BounceFrame extends JFrame
{
   private BallComponent comp;
   public static final int STEPS = 1000;
   public static final int DELAY = 5;


   /**
    * Constructs the frame with the component for showing the bouncing ball and
    * Start and Close buttons
    */
   //用显示弹跳球以及开始和关闭按钮的组件构建框架
   public BounceFrame()
   {
      comp = new BallComponent();
      add(comp, BorderLayout.CENTER);
      JPanel buttonPanel = new JPanel();
      addButton(buttonPanel, "Start", event -> addBall());
      addButton(buttonPanel, "Close", event -> System.exit(0));
      add(buttonPanel, BorderLayout.SOUTH);
      pack();
   }
   // 添加按钮
   /**
    * Adds a button to a container.
    * @param c the container
    * @param title the button title
    * @param listener the action listener for the button
    */
   public void addButton(Container c, String title, ActionListener listener)
   {
      JButton button = new JButton(title);
      c.add(button);
      button.addActionListener(listener);
   }

   /**
    * Adds a bouncing ball to the canvas and starts a thread to make it bounce
    */
   //在画布上添加一个弹跳球,并启动一个线程使其弹跳
   public void addBall()
   {
      Ball ball = new Ball();
      comp.add(ball);
      //多线程
      Runnable r = () -> {
         try
         {
            for (int i = 1; i <= STEPS; i++)
            {
               ball.move(comp.getBounds());//将球移动到下一个位置,如果碰到其中一个边缘则反转方向
               comp.repaint();//重绘此组件
               Thread.sleep(DELAY);//在指定的毫秒数内让当前正在执行的线程休眠
            }
         }
         catch (InterruptedException e)
         {
         }
      };
      Thread t = new Thread(r);
      t.start();
   }
}
实验总结:(15分)
本周学习了JAR文件相关的知识,还学习了有关线程的知识,可通过创建Thread类的子类,在程序中定义实现Runnable接口的类的方法实现多线程问题。了解了什么是多线程及其好处。还有很多还有不太理解的地方,之后会慢慢地弄懂,希望在之后的学习中能学到更多。
继承Thread类:创建的线程类继承Thread类,重写其中的run方法,若在主类中调用线程的话,则new出线程类,调用它的start方法即可,这里的start方法完成了两个工作:启动子线程,调用子线程的run方法;
实现Runnable接口:即创建的线程类实现Runnable接口,实现其中的run方法,若在主类中调用线程的话,则new出线程类,这里注意不能直接调用它的start方法,而是通过Thread 线程名 = new Thread(new出来的类),然后调用这个线程的start的方法才能启动线程,反之线程的启动该必须调用start方法!比extends Thread类的方法略微复杂,但这种方式更具优势。