![]()
191214-SpringBoot 系列教程自动配置选择生效
写了这么久的 Spring 系列博文,发现了一个问题,之前所有的文章都是围绕的让一个东西生效;那么有没有反其道而行之的呢?
我们知道可以通过@ConditionOnXxx来决定一个配置类是否可以加载,那么假设有这么个应用场景
- 有一个 Print 的抽象接口,有多个实现,如输出到控制台的 ConsolePrint, 输出到文件的 FilePrint, 输出到 db 的 DbPrint
- 我们在实际使用的时候,根据用户的选择,使用其中的一个具体实现
针对上面的 case,当然也可以使用@ConditionOnExpression来实现,除此之外推荐一种更优雅的选择注入方式ImportSelector
I. 配置选择
本文使用的 spring boot 版本为 2.1.2.RELEASE
接下来我们使用 ImportSelector 来实现上面提出的 case
1. Print 类
一个接口类,三个实现类
public interface IPrint {
    void print();
}

public class ConsolePrint implements IPrint {
    @Override
    public void print() {
        System.out.println("控制台输出");
    }
}

public class DbPrint implements IPrint {
    @Override
    public void print() {
        System.out.println("db print");
    }
}

public class FilePrint implements IPrint {
    @Override
    public void print() {
        System.out.println("file print");
    }
}
2. 选择类
自定义一个 PrintConfigSelector 继承 ImportSelector,主要在实现类中,通过我们自定义的注解来选择具体加载三个配置类中的哪一个
public class PrintConfigSelector implements ImportSelector {
    @Override
    public String[] selectImports(AnnotationMetadata annotationMetadata) {
        AnnotationAttributes attributes =
                AnnotationAttributes.fromMap(annotationMetadata.getAnnotationAttributes(PrintSelector.class.getName()));

        Class config = attributes.getClass("value");
        return new String[]{config.getName()};
    }

    public static class ConsoleConfiguration {
        @Bean
        public ConsolePrint consolePrint() {
            return new ConsolePrint();
        }
    }

    public static class FileConfiguration {
        @Bean
        public FilePrint filePrint() {
            return new FilePrint();
        }
    }

    public static class DbConfiguration {
        @Bean
        public DbPrint dbPrint() {
            return new DbPrint();
        }
    }
}
3. PrintSelector 注解
主要用来注入PrintConfigSelector来生效,其中 value 属性,用来具体选择让哪一个配置生效,默认注册ConsolePrint
@Target({ElementType.TYPE})
@Retention(RetentionPolicy.RUNTIME)
@Documented
@Import(PrintConfigSelector.class)
public @interface PrintSelector {
    Class<?> value() default PrintConfigSelector.ConsoleConfiguration.class;
}
4. 测试
//@PrintSelector(PrintConfigSelector.FileConfiguration .class)
//@PrintSelector(PrintConfigSelector.DbConfiguration .class)
@PrintSelector
@SpringBootApplication
public class Application {

    public Application(IPrint print) {
        print.print();
    }

    public static void main(String[] args) {
        SpringApplication.run(Application.class);
    }
}在实际的测试中,通过修改@PrintSelector的 value 来切换不同的 Print 实现类
II. 扩展
虽然上面通过一个实际的 case 实现来演示了ImportSelector的使用姿势,可以用来选择某些配置类生效。但还有一些其他的知识点,有必要指出一下
通过 ImportSelector 选择的配置类中的 bean 加载顺序,在不强制指定依赖的情况下是怎样的呢?
1. demo 设计
在默认的加载条件下,包下面的 bean 加载顺序是根据命名的排序来的,接下来让我们来创建一个用来测试 bean 加载顺序的 case
- 同一个包下,创建 6 个 bean:
Demo0,DemoA,DemoB,DemoC,DemoD,DemoE - 其中
Demo0DemoE为普通的 bean - 其中
DemoA,DemoC由配置类 1 注册 - 其中
DemoB,DemoD有配置类 2 注册
具体代码如下
@Component
public class Demo0 {
    private String name = "demo0";
    public Demo0() {
        System.out.println(name);
    }
}
public class DemoA {
    private String name = "demoA";
    public DemoA() {
        System.out.println(name);
    }
}
public class DemoB {
    private String name = "demoB";
    public DemoB() {
        System.out.println(name);
    }
}
public class DemoC {
    private String name = "demoC";
    public DemoC() {
        System.out.println(name);
    }
}
public class DemoD {
    private String name = "demoD";
    public DemoD() {
        System.out.println(name);
    }
}
@Component
public class DemoE {
    private String name = "demoE";
    public DemoE() {
        System.out.println(name);
    }
}
对应的配置类
public class ToSelectorAutoConfig1 {
    @Bean
    public DemoA demoA() {
        return new DemoA();
    }
    @Bean
    public DemoC demoC() {
        return new DemoC();
    }
}

public class ToSelectorAutoConfig2 {
    @Bean
    public DemoB demoB() {
        return new DemoB();
    }
    @Bean
    public DemoD demoD() {
        return new DemoD();
    }
}

@Target({ElementType.TYPE})
@Retention(RetentionPolicy.RUNTIME)
@Documented
@Import(ConfigSelector.class)
public @interface DemoSelector {
    String value() default "all";
}
public class ConfigSelector implements ImportSelector {
    @Override
    public String[] selectImports(AnnotationMetadata annotationMetadata) {
        AnnotationAttributes attributes =
                AnnotationAttributes.fromMap(annotationMetadata.getAnnotationAttributes(DemoSelector.class.getName()));

        String config = attributes.getString("value");
        if ("config1".equalsIgnoreCase(config)) {
            return new String[]{ToSelectorAutoConfig1.class.getName()};
        } else if ("config2".equalsIgnoreCase(config)) {
            return new String[]{ToSelectorAutoConfig2.class.getName()};
        } else {
            return new String[]{ToSelectorAutoConfig2.class.getName(), ToSelectorAutoConfig1.class.getName()};
        }
    }
}注意一下ConfigSelector,默认的DemoSelector注解表示全部加载,返回的数组中,包含两个配置类,其中 Config2 在 Confgi1 的前面
2. 加载顺序实测
稍微修改一下前面的启动类,加上@DemoSelector注解
PrintSelector(PrintConfigSelector.FileConfiguration .class)
//@PrintSelector(PrintConfigSelector.DbConfiguration .class)
//@PrintSelector
@DemoSelector
@SpringBootApplication
public class Application {
    public Application(IPrint print) {
        print.print();
    }

    public static void main(String[] args) {
        SpringApplication.run(Application.class);
    }
}
上面的 case 中,我们定义的六个 bean 都会被加载,根据输出结果来判断默认的加载顺序
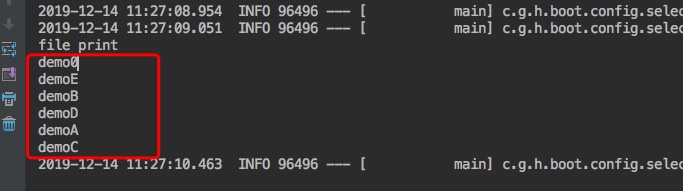
从输出结果来看,先加载普通的 bean 对象;然后再加载 Config2 中定义的 bean,最后则是 Config1 中定义的 bean;
接下来调整一下 ImportSelector 返回的数组对象中,两个配置类的顺序,如果最终输出是 Config1 中定义的 bean 先被加载,那么就可以说明返回的顺序指定了这些配置类中 bean 的加载顺序
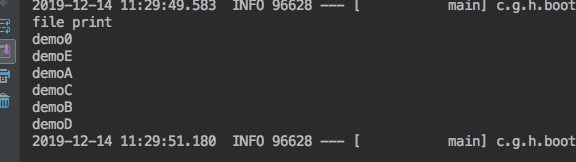
输出的结果印证了我们的猜想
最后一个疑问,在默认的 bean 初始化顺序过程中,普通的 bean 对象加载顺序是否是优于我们通过ImportSelector来注册的 bean 呢?
- 从输出结果好像是这样的,但是这个 case 并不充分,没法完全验证这个观点,想要确切的搞清楚这一点,还是得通过源码分析(虽然实际上是这样的)
注意
上面的分析只是考虑默认的 bean 初始化顺序,我们依然是可以通过构造方法引入的方式或者@DependOn注解来强制指定 bean 的初始化顺序的
小结
最后小结一下 ImportSelector 的用法
- 实现接口,返回 String 数组,数组成员为配置类的全路径
- 在配置类中定义 bean
- 返回数组中配置类的顺序,指定了配置类中 bean 的默认加载顺序
- 通过
@Import直接来使ImportSelector接口生效
此外还有一个类似的接口DeferredImportSelector,区别在于实现DeferredImportSelector的类优先级会低与直接实现ImportSelector的类,而且可以通过@Order决定优先级;优先级越高的越先被调用执行
II. 其他
0. 项目
- 工程:https://github.com/liuyueyi/spring-boot-demo
- 项目: https://github.com/liuyueyi/spring-boot-demo/tree/master/spring-boot/005-config-selector
1. 一灰灰 Blog
尽信书则不如,以上内容,纯属一家之言,因个人能力有限,难免有疏漏和错误之处,如发现 bug 或者有更好的建议,欢迎批评指正,不吝感激
下面一灰灰的个人博客,记录所有学习和工作中的博文,欢迎大家前去逛逛
- 一灰灰 Blog 个人博客 https://blog.hhui.top
- 一灰灰 Blog-Spring 专题博客 http://spring.hhui.top
