服务端发现新连接
在服务端启动过程中,ServerBootstrap通过反射的方式创建了一个NioServerSocketChannel,并且绑定了OP_ACCEPT感兴趣事件。启动之后,bossGroup中的NioEventLoop线程不断轮询这些事件,并进行处理。
前一节已经简述了一下processSelectedKey方法的代码,这里单独抽出处理OP_ACCEPT的相关代码
if ((readyOps & (SelectionKey.OP_READ | SelectionKey.OP_ACCEPT)) != 0 || readyOps == 0) {
    unsafe.read();
}
netty将OP_ACCEPT和OP_READ统一视为read事件,所以这里两种事件一起判断。继续跟进unsafe.read,这里是NioMessageUnsafe对象
private final List<Object> readBuf = new ArrayList<Object>();

public void read() {
    assert eventLoop().inEventLoop();
    final ChannelConfig config = config();
    final ChannelPipeline pipeline = pipeline();
    final RecvByteBufAllocator.Handle allocHandle = unsafe().recvBufAllocHandle();
    allocHandle.reset(config);
    try {
        do {
            int localRead = doReadMessages(readBuf);
            if (localRead == 0) {
                break;
            }
            if (localRead < 0) {
                break;
            }
            allocHandle.incMessagesRead(localRead);
        } while (allocHandle.continueReading());
        int size = readBuf.size();
        for (int i = 0; i < size; i++) {
            readPending = false;
            pipeline.fireChannelRead(readBuf.get(i));
        }
        readBuf.clear();
        allocHandle.readComplete();
        pipeline.fireChannelReadComplete();
    } finally {
        if (!readPending && !config.isAutoRead()) {
            removeReadOp();
        }
    }
}
read代码比较长,可以分为如下几部分
- 检测是否为nioEventLoop线程
- 拿到config和pipeline
- 创建并初始化一个ByteBufAllocator.Handle,这个Handle可以动态变更缓冲区的容量。
- 循环读取read事件
- 将新连接交给pipeline处理
- 收尾工作
- 若不满足条件,移除感兴趣事件
循环读取read事件
前两个步骤无需多言,步骤3不是本章重点,略过。于是来到步骤4,先看一下doReadMessage方法
protected int doReadMessages(List<Object> buf) throws Exception {
    SocketChannel ch = SocketUtils.accept(javaChannel());
    if (ch != null) {
        buf.add(new NioSocketChannel(this, ch));
        return 1;
    }
    return 0;
}
在这个方法里,netty调用底层的ServerSocketChannel去接受一个新连接,并将它放入临时的readBuf容器内。出方法后,若接收到了新连接,allocateHandle记录一下连接数。循环的判断出口是一个比较复杂的逻辑关系,在接入新连接时,totalMessages为1,而maxMessagePerRead默认为16,所以这里返回false,也就不会继续循环。
// 继承于MaxMessageHandle的方法
public boolean continueReading() {
    return continueReading(defaultMaybeMoreSupplier);
}

public boolean continueReading(UncheckedBooleanSupplier maybeMoreDataSupplier) {
    return config.isAutoRead() && (!respectMaybeMoreData || maybeMoreDataSupplier.get()) &&
        totalMessages < maxMessagePerRead && totalBytesRead > 0;
}
将新连接交给pipeline处理
对每一个readBuf容器内的新连接事件,都调用pipeline的fireChannelRead事件。pipeline首先会交给headContext,由headContext调用channelRead方法向下传递。在服务端启动过程中,ServerBootStrap将一个ServerBootstrapAcceptor设置在了pipeline中,先来回顾一下它。
// ServerBootstrap的init方法截取
pipeline.addLast(new ServerBootstrapAcceptor(ch, currentChildGroup, currentChildHandler, currentChildOptions, currentChildAttrs));
ServerBootstrapAcceptor将ServerSocketChannel及用户设置的多个属性都添加了进来,并将自身添加到pipeline中。也因此,head传播read事件时,会调用ServerBootstrapAcceptor的channelRead方法,channelRead方法将客户端相关的childHandler、childOptions、childAttributes都设置到NioSocketChannel上,除了handler外,都是使用netty时用户自定义的部分。而handler是一个HandlerInitializer,在完成它的initChannel方法后,会将自身从pipeline删除,而用户在initChannel方法中添加的handler则会保留,从而在新连接接入时服务。
public void channelRead(ChannelHandlerContext ctx, Object msg) {
    final Channel child = (Channel) msg;
    child.pipeline().addLast(childHandler);
    setChannelOptions(child, childOptions, logger);
    setAttributes(child, childAttrs);
    childGroup.register(child).addListener(new ChannelFutureListener() {
        @Override
        public void operationComplete(ChannelFuture future) throws Exception {
            if (!future.isSuccess()) {
                forceClose(child, future.cause());
            }
        }
    });
}
在添加完成后,从workerGroup中挑选一个NioEventLoop,将NioSocketChannel注册到上面。这部分代码与服务端几乎相同。
时序图如下

与服务端稍有不同的是unsafe的register0方法中。在服务端启动时,因为还只是注册而没有绑定端口,isActive为false,从而不会启动,而到了bind完成后,服务端才会调用pipeline.fireChannelActive,从而开始各自的读事件。
if (isActive()) {
    if (firstRegistration) {
        pipeline.fireChannelActive();
    } else if (config().isAutoRead()) {
        beginRead();
    }
}
收尾工作
从代码上可以看出收尾工作一共3步
- 清空readBuf容器
- 调用Allocator.Handle的readComplete方法
- 调用pipeline.fireChannelReadComplete方法
步骤1很简单,步骤2调用了AdaptiveRecvByteBufAllocator.Handle的record(int actualReadBytes)方法,它可以根据本次接受的数据量动态预测下一个缓冲区容量大小。步骤3传播readComplete事件,若没有进行重写的话,会再次调用channel.read方法, 进而调用unsafe.read方法。
清除感兴趣事件
当readPengind为false且channel设置了非自动读时,清除感兴趣事件,具体实现是将readInterestOp取反后,与selectionKey的interestop取与。
两种Channel的类比关系
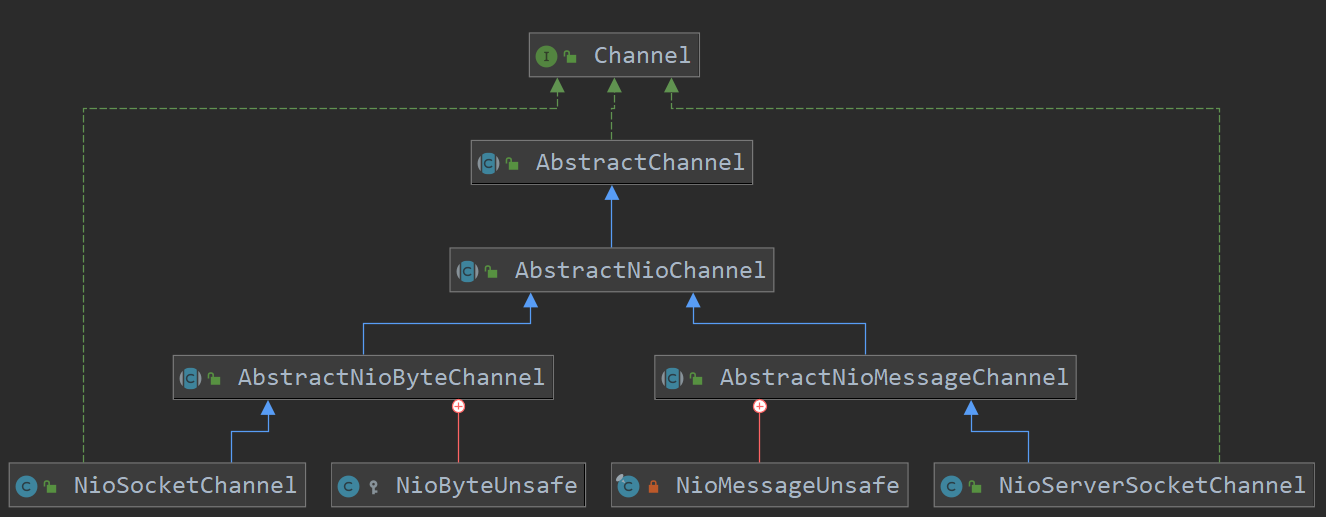
在这张图上可以看出来NioServerSocketChannel与NioSocketChannel呈现出轴对称的倾向。这种良好的类继承关系使得netty服务端与客户端的代码复用性很高。我们看一下AbstractChannel与AbstractNioChannel的构造方法
protected AbstractChannel(Channel parent) {
    this.parent = parent;
    id = newId();
    unsafe = newUnsafe();
    pipeline = newChannelPipeline();
}

protected AbstractNioChannel(Channel parent, SelectableChannel ch, int readInterestOp) {
    super(parent);
    this.ch = ch;
    this.readInterestOp = readInterestOp;
    try {
        ch.configureBlocking(false);
    } catch (IOException e) {
        try {
            ch.close();
        } catch (IOException e2) {
            logger.warn(
                        "Failed to close a partially initialized socket.", e2);
        }
        throw new ChannelException("Failed to enter non-blocking mode.", e);
    }
}
AbstractChannel中的newUnsafe方法是抽象的,其主要实现类就是图中的NioMessageUnsafe和NioByteUnsafe,分别对应服务端和客户端。Channel对于IO事件的读写在底层都会委托给Unsafe对象。netty将OP_ACCEPT和OP_READ都视为读事件也是为了尽可能复用代码。关于pipeline,将在下一小节讲述。AbstractNioChannel的入参也会根据服务端与客户端有所不同,其中NioServerSocketChannel的parent为null,NioSocketChannel的parent为创建它的NioServetSocketChannel。channel分别是jdk的ServerSocketchannel和SocketChannel,readInterestOp分别是OP_ACCEPT和OP_READ。此外两者均设置了非阻塞模式。
感想
在服务端接入新连接这里,可以看到netty通过良好的继承关系实现了多态,这带来了良好的代码复用性,但也给源码阅读带来了很大的困扰。可以与服务端启动一节多多类比,才能更好的体会netty封装的目的。