1、首先是准备编译需要的库
我用163网易的yum源。
yum -y install libevent
yum -y install zlib zlib-devel pcre pcre-devel gcc gcc-c++ openssl openssl-devel libevent libevent-devel perl unzip net-tools wget
准备好需要的文件。

2、开始安装
2.1 安装libfastcommon
[root@master libfastcommon-1.0.7]# ls
HISTORY  INSTALL  libfastcommon.spec  make.sh  README  src
[root@master libfastcommon-1.0.7]#
进行编译 ./make.sh
安装 ./make.sh install
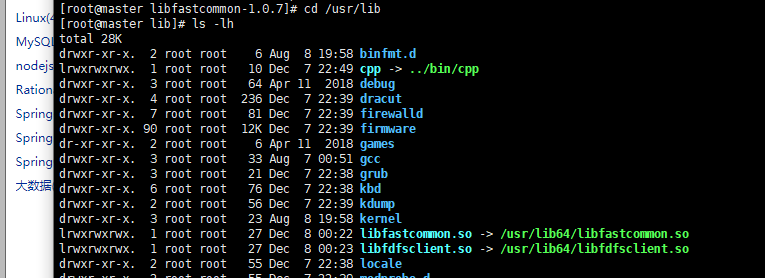
libfastcommon安装好后会自动将库文件拷贝至/usr/lib64下,由于FastDFS程序引用usr/lib目录,自己做软连接。
ln -s /usr/lib64/libfastcommon.so /usr/lib/

2.2 安装 FastDFS_v5.05
2.2.1 先做 tracker
[root@master lib]# cd /mnt/FastDFS/
[root@master FastDFS]# ls
client  conf             fastdfs.spec  init.d   make.sh     README.md   stop.sh  test
common  COPYING-3_0.txt  HISTORY       INSTALL  php_client  restart.sh  storage  tracker
[root@master FastDFS]#
./make.sh
./make.sh install
安装成功之后,自动生成/etc/fdfs/。
去掉 sample后缀。
修改tracker.conf
base_path=/opt/fastdfs
自己新建目录 mkdir /opt/fastdfs。
启动tracker
fdfs_trackerd /etc/fdfs/tracker.conf
查看进程
ps -ef | grep fdfs
2.2.2 再做storage
vim /etc/fdfs/storage.conf
修改以下的内容。
base_path=/opt/fastdfs
store_path0=/opt/fastdfs/storage
tracker_server=master:22122
启动storage
fdfs_storaged /etc/fdfs/storage.conf
[root@master fdfs]# ps -ef | grep fdfs
root       4127      1  0 11:51 ?        00:00:00 fdfs_trackerd /etc/fdfs/tracker.conf
root       4136      1  0 11:51 ?        00:00:01 fdfs_storaged /etc/fdfs/storage.conf
root       4349   1253  0 12:47 pts/0    00:00:00 grep --color=auto fdfs
2.2.3 上传测试
[root@master fdfs]# fdfs_upload_file /etc/fdfs/client.conf /mnt/winteriscoming.jpg
group1/M00/00/00/wKjxgF3r2XuAHmqvAAE2TibrR2c044.jpg
2.3 fastdfs整合nginx
[root@master src]# pwd
/mnt/fastdfs-nginx-module/src
[root@master src]# ls
common.c  common.h  config  mod_fastdfs.conf  ngx_http_fastdfs_module.c
[root@master src]# vim config
修改内容如下:
CORE_INCS="$CORE_INCS /usr/include/fastdfs /usr/include/fastcommon/"
CORE_LIBS="$CORE_LIBS -L/usr/lib -lfastcommon -lfdfsclient"
自己做软连接 ln -s /usr/lib64/libfdfsclient.so /usr/lib/

将 fastdfs-nginx-module/src 下的mod_fastdfs.conf 拷贝至/etc/fdfs/下。
[root@master fdfs]# cd /mnt/fastdfs-nginx-module/src/
[root@master src]# ls
common.c  common.h  config  mod_fastdfs.conf  ngx_http_fastdfs_module.c
[root@master src]#
vim /etc/fdfs/mod_fastdfs.conf
修改以下内容。
base_path=/opt/fastdfs
tracker_server=master:22122
url_have_group_name = true
store_path0=/opt/fastdfs/storage
开始安装nginx
mkdir -p /var/temp/nginx/client
cd 到 nginx目录下。
./configure \
--prefix=/usr/local/nginx \
--pid-path=/var/run/nginx/nginx.pid \
--lock-path=/var/lock/nginx.lock \
--error-log-path=/var/log/nginx/error.log \
--http-log-path=/var/log/nginx/access.log \
--with-http_gzip_static_module \
--http-client-body-temp-path=/var/temp/nginx/client \
--http-proxy-temp-path=/var/temp/nginx/proxy \
--http-fastcgi-temp-path=/var/temp/nginx/fastcgi \
--http-uwsgi-temp-path=/var/temp/nginx/uwsgi \
--http-scgi-temp-path=/var/temp/nginx/scgi \
--add-module=/mnt/fastdfs-nginx-module/src
make
make install
编辑nginx.conf
vim /usr/local/nginx/conf/nginx.conf
        listen       80;
        server_name  192.168.241.128;

        #charset koi8-r;

        #access_log  logs/host.access.log  main;

        location /group1/M00/ {
         #   root   html;
         #   index  index.html index.htm;
         ngx_fastdfs_module;
        }
启动nginx
[root@master nginx]# ./sbin/nginx
ngx_http_fastdfs_set pid=4228
2.4 测试
[root@master nginx]# fdfs_test /etc/fdfs/client.conf upload /mnt/winteriscoming.jpg
This is FastDFS client test program v5.05

Copyright (C) 2008, Happy Fish / YuQing

FastDFS may be copied only under the terms of the GNU General
Public License V3, which may be found in the FastDFS source kit.
Please visit the FastDFS Home Page http://www.csource.org/
for more detail.

[2019-12-08 12:00:34] DEBUG - base_path=/opt/fastdfs, connect_timeout=30, network_timeout=60, tracker_server_count=1, anti_steal_token=0, anti_steal_secret_key length=0, use_connection_pool=0, g_connection_pool_max_idle_time=3600s, use_storage_id=0, storage server id count: 0

tracker_query_storage_store_list_without_group:
	server 1. group_name=, ip_addr=192.168.241.128, port=23000

group_name=group1, ip_addr=192.168.241.128, port=23000
storage_upload_by_filename
group_name=group1, remote_filename=M00/00/00/wKjxgF3sdWKAWsR4AAE2TibrR2c159.jpg
source ip address: 192.168.241.128
file timestamp=2019-12-08 12:00:34
file size=79438
file crc32=652953447
example file url: http://192.168.241.128/group1/M00/00/00/wKjxgF3sdWKAWsR4AAE2TibrR2c159.jpg
storage_upload_slave_by_filename
group_name=group1, remote_filename=M00/00/00/wKjxgF3sdWKAWsR4AAE2TibrR2c159_big.jpg
source ip address: 192.168.241.128
file timestamp=2019-12-08 12:00:34
file size=79438
file crc32=652953447
example file url: http://192.168.241.128/group1/M00/00/00/wKjxgF3sdWKAWsR4AAE2TibrR2c159_big.jpg

如果fastdfs上传图片是成功的,但是 浏览器访问失败。那就是nginx的问题。
/etc/fdfs/下的mine.types 和 http.conf 要存在,再检查下 mod_fastdfs.conf 。