前言
Logos是CydiaSubstruct框架中提供的一组宏定义。利于开发者使用宏进行Hook操作,其语法简单,功能是非常强大且稳定。
详细内容logos语法为http://iphonedevwiki.net/index.php/Logos
语法
1. 全局
Logos语法分为三大类:
- Block level:这类型的指令会开辟一个代码块,以%end结束。%group、%hook、%subclass、%end
- Top level:TopLevel指令不放在BlockLevel中。%config、%hookf、%ctor、%dtor
- Function level:这块指令放在方法中。%init、%class、%c、%orig、%log
2. 详解
2.1 %hook
指定需要hook住的class,必须要以%end结尾
%hook SpringBoard
- (void)_menuButtonDown:(id)down {
    NSLog(@"你好");
    %orig; // call the original __menuButtonDown
}
%end
意思是勾住(Hook)SpringBoard类中的_menuButtonDown,先打印下,再执行函数原本的操作。
2.2 %log
指令再%hook内部去使用,将函数的类名和参数等信息写入syslog。
%hoot SpringBoard
- (void)_menubuttonDown:(id)down
{
    %log((NSString *)@"iOSRE",(NSString *)@"Debug");
    %orig;//call the original _menuButtonDown;
}
%end
2.3 %orig
指令在%hook内部中使用,执行被hook住的函数原始代码
%hook SpringBoard
- (void)_menuButtonDown:(id)down
{
    NSLog(@"你好");
    %orig; //
}
%end
如果去掉了%orig,原始函数就不会被执行
hook SpringBoard
- (void)_menuButtonDown:(id)down
{
    NSLog(@"你好");
}
%end
还可以利用%orig更改原始行数的参数。
%hook SBLockScreenDateViewController
- (void)setCustomSubtitleText:(id)arg1 withColor:(id)arg2
{
    %orig(@"Red",arg2);
}
%end
2.4 %group
指令用于%hook分组,便于代码管理以及按条件初始化分组,也是必须要以%end结尾;%group中可以包含很多个%hook,所有不属于某一个自定义group中的%hook也将会被归类到%group_ungroupes中。
%group iOS11Hook
%hook iOS12Class
- (id)iOS11Method {
     id result = %orig;
     NSLog(@"This class & method only exist in iOS 11.");
     return result;
 } %end
%end // iOS11Hook

%group iOS12Hook
%hook iOS12Class
- (id)iOS8Method {
   id result = %orig;
   NSLog(@"This class & method only exist in iOS 12."); return result;
 }
%end
%end // iOS12Hook
2.5 %init
指令用于初始化某个%group,必须在%hook或者%ctor内调用;如果需要带参数,则初始化指定的group,如果不带参数时,就会初始化_ungrouped。只有调用了%init,其对应的%group才能够起到作用。
#ifndef kCFCoreFoundationVersionNumber_iOS_11_0
#define kCFCoreFoundationVersionNumber_iOS_11_0 1140.10 #endif
%hook SpringBoard
- (void)applicationDidFinishLaunching:(id)application {
    %orig;
    %init; // Equals to %init(_ungrouped)
    if (kCFCoreFoundationVersionNumber >= kCFCoreFoundationVersionNumber_iOS_12_0 && kCFCoreFoundationVersionNumber < kCFCoreFoundationVersionNumber_iOS_11_0)
      %init(iOS12Hook);
    if (kCFCoreFoundationVersionNumber >= kCFCoreFoundationVersionNumber_iOS_11_0)
      %init(iOS11Hook);
}
%end
2.6 %ctor
该指令完成初始化工作,如果不显示其定义,theos自动会生成%ctor,也会调用%init
%hook SpringBoard
- (void)reboot {
    NSLog(@"If rebooting doesn't work then I'm screwed.");
    %orig;
}
%end
成功生效,Theos隐式调用了内容如下
%ctor
{
    %init(_ungrouped);
}
而
%hook SpringBoard
- (void)reboot{
     NSLog(@"If rebooting doesn't work then I'm screwed.");
     %orig;
}
%end

%ctor
{
    // Need to call %init explicitly!
}
其中的%hook无法生效,因显示定义了%ctor,却没有定义%ctor,不需要以%end结尾。一般用于初始化%group。
2.7 %new
在%hook内部中使用,给现有class增新函数,功能与class_addMethod意义相同。
%hook SpringBoard
%new
- (void)namespaceNewMethod {
     NSLog(@"We've added a new method to SpringBoard.");
}
%end
%c
指令和objc_getClass或者NSClassFromString,动态获取一个类的定义。用于%hook和%ctor中使用。
总结如下

Demo
3.1 新建Logos工程

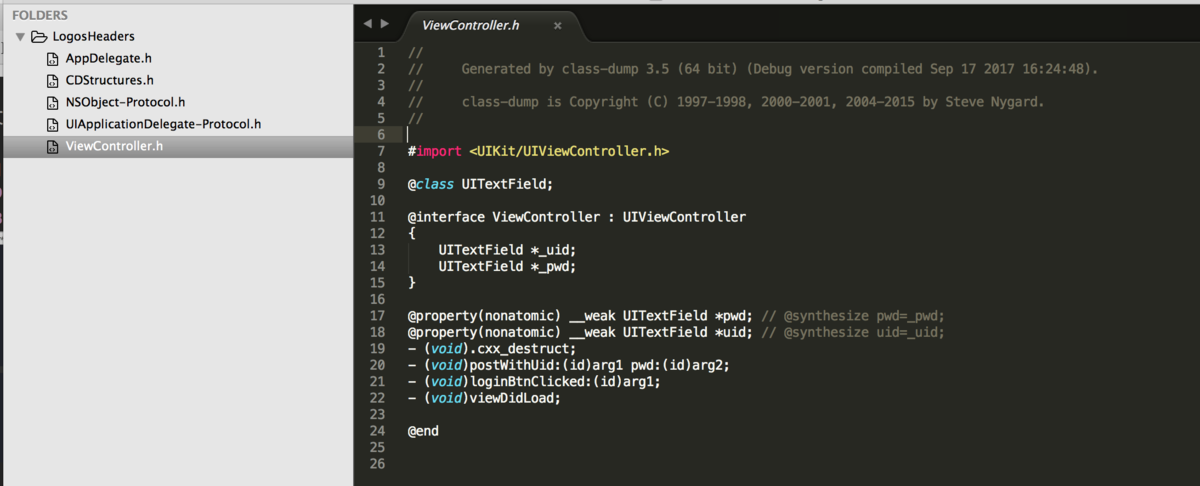
3.2 用class-dump来导出头文件
$class-dump -H 001-LogosDemo -o /Users/yaoqi/Desktop/LogosHeaders
3.3 新建MonkeyDev工程,将LogosDemo重签名
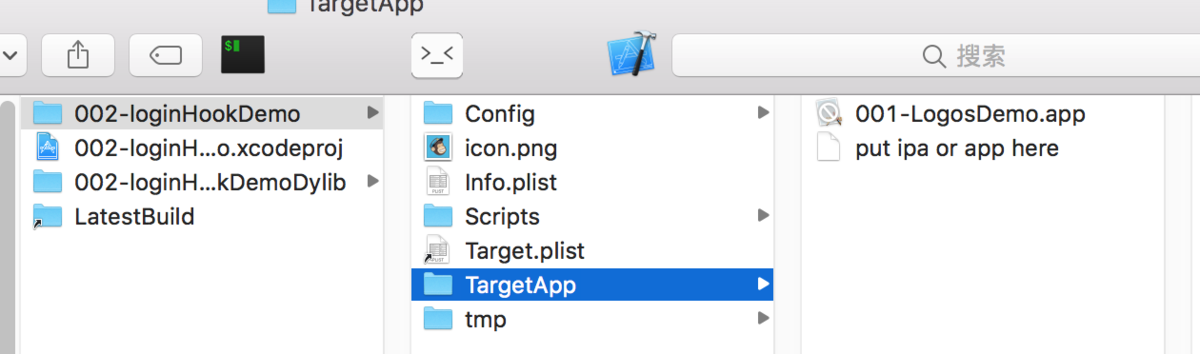
此时MonkeyDev工程将libsubstrate.dylib和RevealServer.framework注入了工程,里面有libsubstrate.dylib就可以利用logos语法了。
3.4 MonkeyDev中logos文件夹中的.xm写入Logos语法
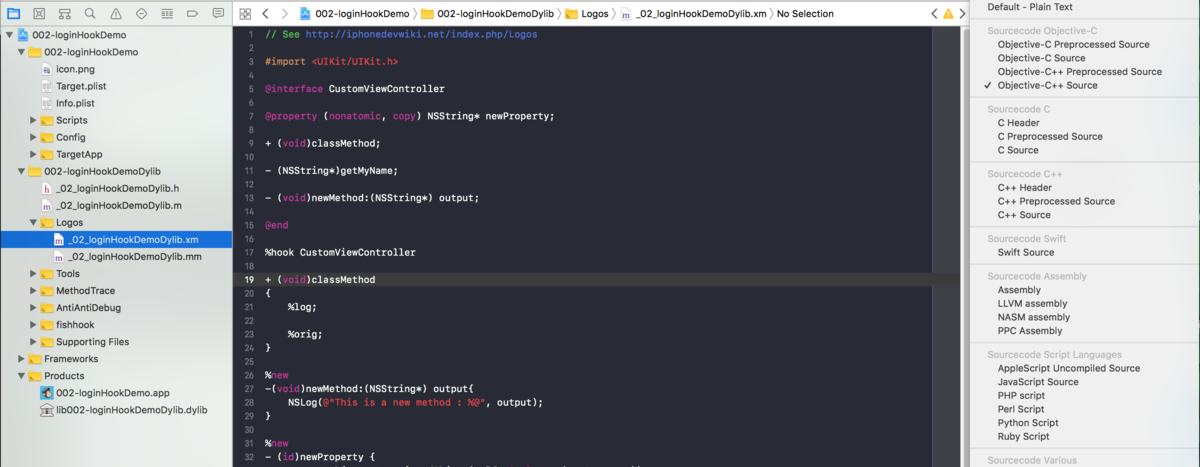
_02_loginHookDemoDylib.xm
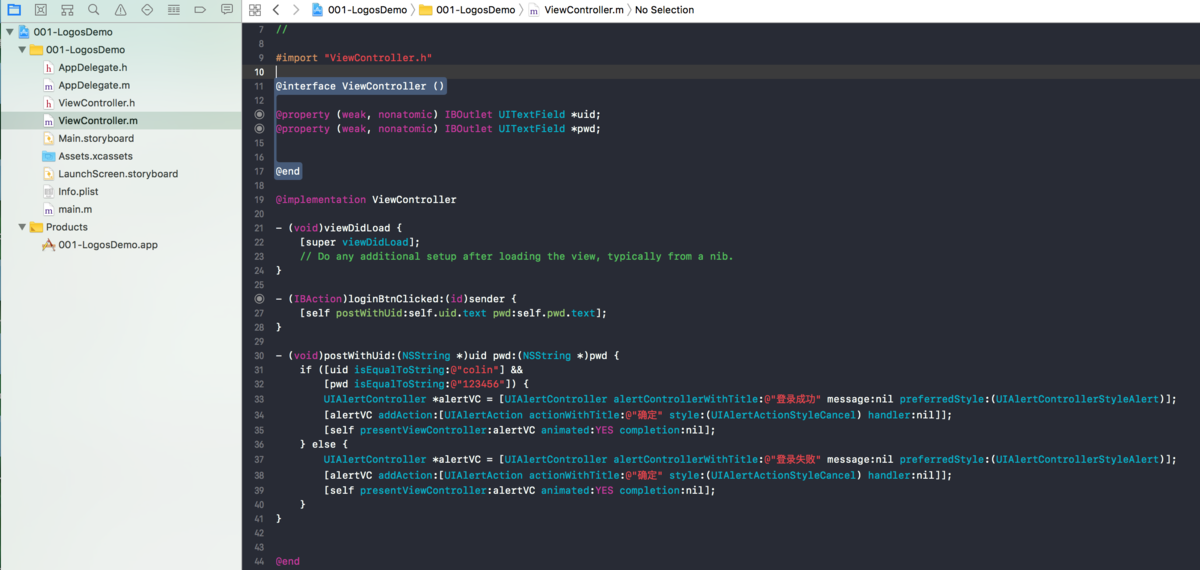
// See http://iphonedevwiki.net/index.php/Logos

#import <UIKit/UIKit.h>

@interface ViewController: UIViewController

- (void)presentViewController:(UIViewController *)viewControllerToPresent animated: (BOOL)flag completion:(void (^ __nullable)(void))completion NS_AVAILABLE_IOS(5_0);
+ (void)CL_classMethod;

@end

%hook ViewController

- (void)loginBtnClicked:(id)arg1 {
    %log;
    UIAlertController *alertVC = [UIAlertController alertControllerWithTitle:@"Hook成功了!!!" message:nil preferredStyle:(UIAlertControllerStyleAlert)];
    [alertVC addAction:[UIAlertAction actionWithTitle:@"确定" style:(UIAlertActionStyleCancel) handler:nil]];
    [self presentViewController:alertVC animated:YES completion:nil];
}

%new
- (void)touchesBegan:(NSSet<UITouch *> *)touches withEvent:(UIEvent *)event {
    [self.view endEditing:YES];
    [self.class CL_classMethod];
}

%new
+ (void)CL_classMethod {
    NSLog(@"这是一个类方法!!!");
}

%end
3.5 运行,MonkeyDev工程能Hook到LogosDemo的loginBtnClicked

FLEX库
4.1 在MonkeyDev的Dylib动态库注入Flex库
在MonkeyDev根目录添加Podfile文件,Target为Monkey动态库的Target
platform :ios, '9.0'

target '002-loginHookDemoDylib' do
  use_frameworks!
  pod 'FLEX'
end
4.2 界面展示
FlEX可以查看App的文件、数据库、界面层级以及沙盒


实例练习
要求:微信首页加个“+”按钮,左边按钮和右边的效果一样。
5.1 新建MonkeyDev工程,重签名韦小宝,将FLEX加入到动态库
5.2 Xcode界面调试,Class-dump,找到界面NewMainFrameViewController控制器

5.3 Xcode界面调试,找到右边按钮的showRightTopMenuBtn方法
Target <NewMainFrameRightTopMenuBtn: 0x104dd99d0>
Action showRightTopMenuBtn


5.4 内存中查找导航栏右边按钮的视图

5.5 代码实现需求
#import <UIKit/UIKit.h>

@interface NewMainFrameViewController :UIViewController
@end

@interface NewMainFrameRightTopMenuBtn: UIView
- (void)showRightTopMenuBtn;
@end

@interface MMBarButtonItem: UIBarButtonItem
@property(nonatomic,weak)NewMainFrameRightTopMenuBtn *view;
@end

%hook NewMainFrameViewController

-(UINavigationItem *)navigationItem{
    //    NSLog(@"\n\n\n-------------navigationItem-----");
    //方法交换! 调用自己!
    return %orig;
}

- (void)viewDidAppear:(_Bool)arg1{
    %orig;
    UIButton * leftBtn = [UIButton buttonWithType:(UIButtonTypeContactAdd)];
    [leftBtn addTarget:self action:@selector(CL_leftClick) forControlEvents:(UIControlEventTouchUpInside)];
    [self.navigationItem setLeftBarButtonItem: [[UIBarButtonItem alloc] initWithCustomView:leftBtn]];
}

- (void)viewDidLoad{
    %orig;
    //    NSLog(@"\n\n\n-----viewDidLoad-----------");
}

%new
-(void)CL_leftClick
{
    /**
     从内存中能查到调用该方法:[self.navigationItem.rightBarButtonItem.view showRightTopMenuBtn]
     self:代表NewMainFrameViewController控制器

     */
    MMBarButtonItem *btn = self.navigationItem.rightBarButtonItem;
    [btn.view showRightTopMenuBtn];
}

%end
5.6 实现结果

总结
上面就是Logos语法及讲解,如果对大家有所帮助,希望大家关注,也可以点个喜欢,下一篇我们将讲解越狱的相关知识,请大家准备好越狱手机和PP助手!!!