这一章我们开始设计串口应用程序,对于串口的设计,之前我们有讲解过,但那时是用C++进行设计的。个人感觉C++设计起来,虽然复杂一些,但灵活性更好。特别是数据处理方面,指针的运用就发挥了很大的作用。当然这并不是说C#就不能做到这一点,下面我们就一步步和大家分享一下:
- New Project--WPF Application---ProjectName....创建工程
- UI Design窗口设计,这里我们简单实现串口配置接收功能,所以只需设计一个编辑框和一个按键即可:
 1 <Window x:Class="SearilPort.MainWindow"
 2         xmlns="http://schemas.microsoft.com/winfx/2006/xaml/presentation"
 3         xmlns:x="http://schemas.microsoft.com/winfx/2006/xaml"
 4         Title="MainWindow" Height="350" Width="525">
 5     <Grid>
 6         <Button Name="myBtn" Content="Open" HorizontalAlignment="Right" VerticalAlignment="Bottom" Width="75" Click="Btn1_Click"/>
 7         <TextBox HorizontalAlignment="Left" VerticalAlignment="Top" Width="400" Height="260" Name="m_textBox1"/>
 8
 9     </Grid>
10 </Window>
- 因为C#可以直接对button类内容定义,所以我们就不用像C++那样定义两个按键,一个是Open另一个是Closed,我们只需对按键name类进行操作即可: myBtn.Content = "Closed"; 或者 myBtn.Content = "Open"; ,这样就大大减少了我们的编码时间了。
- 串口开启由按键操作来实现,所以我们需要添加按键点击事件处理函数 Click="Btn1_Click"/> ,当然在使用串口类之前需要使用控制串口端口的类,该类包含在命名空间 System.IO.Ports; 中,所以在使用有关串口类之前需先使用该命名空间 using System.IO.Ports;
- 代码:
 View Code
 1  private void Btn1_Click(object sender, RoutedEventArgs e)
 2         {
 3             try
 4             {
 5                 m_textBox1.Text = "reeivcing...\r\n";
 6                 myPort.BaudRate = 9600;
 7                 myPort.DataBits = 8;
 8                 myPort.PortName = "COM1";
 9                 myPort.Open();
10                 if (myPort.IsOpen==true)
11                 {
12                     myBtn.Content = "Closed";
13                 }
14                 myPort.DataReceived += new SerialDataReceivedEventHandler(DataReceived);
15             }
16             catch(Exception ex)
17             {
18                 myPort.Close();
19                 myBtn.Content = "Open";
20                 MessageBox.Show(ex.Message+"SearilPort is Closed.");
21             }
22         }
代码中 myPort.DataReceived += new SerialDataReceivedEventHandler(DataReceived); 指的是创建一个自定义的接收函数,其中 DataReceived 为自定义接收函数的名称。当然也可以直接对在数据接收类赋值自定义函数名称,即: myPort.DataReceived += DataReceived; 注意这里的运算符为+=,代表为该类创建自定义函数。对于该事件类,官方也给出了一个例程,这里供大家参考一下:
SerialPort.DataReceived 事件1 using System; 2 using System.IO.Ports; 3 4 class PortDataReceived 5 { 6 public static void Main() 7 { 8 SerialPort mySerialPort = new SerialPort("COM1"); 9 10 mySerialPort.BaudRate = 9600; 11 mySerialPort.Parity = Parity.None; 12 mySerialPort.StopBits = StopBits.One; 13 mySerialPort.DataBits = 8; 14 mySerialPort.Handshake = Handshake.None; 15 mySerialPort.RtsEnable = true; 16 17 mySerialPort.DataReceived += new SerialDataReceivedEventHandler(DataReceivedHandler); 18 19 mySerialPort.Open(); 20 21 Console.WriteLine("Press any key to continue..."); 22 Console.WriteLine(); 23 Console.ReadKey(); 24 mySerialPort.Close(); 25 } 26 27 private static void DataReceivedHandler( 28 object sender, 29 SerialDataReceivedEventArgs e) 30 { 31 SerialPort sp = (SerialPort)sender; 32 string indata = sp.ReadExisting(); 33 Console.WriteLine("Data Received:"); 34 Console.Write(indata); 35 } 36 }
- 对于自定义接收事件处理函数,我们定义为当接收到8个字节时,将8个字节按16进制格式打印到编辑框内,代码:
DataReceived
 1 private void DataReceived(object sender,SerialDataReceivedEventArgs e)
 2         {
 3             try
 4             {
 5                 byte[] inbuf = new byte[8];
 6                 myPort.Read(inbuf, 0, inbuf.Length);
 7                 string str = System.Text.Encoding.Default.GetString(inbuf);
 8                 this.Dispatcher.Invoke(new Action(() =>
 9                     {
10                         foreach (byte i in inbuf)
11                         {
12                             m_textBox1.Text += i.ToString("X2");
13                         }
14                         m_textBox1.Text += "\r\n";
15                     }));
16             }
17             catch(Exception ex)
18             {
19                 MessageBox.Show(ex.Message);
20             }
21         }
因为我们需要在事件线程中需要处理将字符串打印到编辑框,所以这里我们需要将此操作委托给线程处理 Dispatcher.Invoke(new Action(() =>{.....}));
- 完整代码:
View Code
 1 using System;
 2 using System.Collections.Generic;
 3 using System.Linq;
 4 using System.Text;
 5 using System.Threading.Tasks;
 6 using System.Windows;
 7 using System.Windows.Controls;
 8 using System.Windows.Data;
 9 using System.Windows.Documents;
10 using System.Windows.Input;
11 using System.Windows.Media;
12 using System.Windows.Media.Imaging;
13 using System.Windows.Navigation;
14 using System.Windows.Shapes;
15 using System.IO.Ports;
16
17 namespace SearilPort
18 {
19     /// <summary>
20     /// Interaction logic for MainWindow.xaml
21     /// </summary>
22     public partial class MainWindow : Window
23     {
24         SerialPort myPort = new SerialPort();
25         public MainWindow()
26         {
27             InitializeComponent();
28         }
29
30         private void Btn1_Click(object sender, RoutedEventArgs e)
31         {
32             try
33             {
34                 m_textBox1.Text = "reeivcing...\r\n";
35                 myPort.BaudRate = 9600;
36                 myPort.DataBits = 8;
37                 myPort.PortName = "COM1";
38                 myPort.Open();
39                 if (myPort.IsOpen==true)
40                 {
41                     myBtn.Content = "Closed";
42                 }
43                 myPort.DataReceived += DataReceived;
44             }
45             catch(Exception ex)
46             {
47                 myPort.Close();
48                 myBtn.Content = "Open";
49                 MessageBox.Show(ex.Message+"SearilPort is Closed.");
50             }
51         }
52         private void DataReceived(object sender,SerialDataReceivedEventArgs e)
53         {
54             try
55             {
56                 byte[] inbuf = new byte[8];
57                 myPort.Read(inbuf, 0, inbuf.Length);
58                 string str = System.Text.Encoding.Default.GetString(inbuf);
59                 this.Dispatcher.Invoke(new Action(() =>
60                     {
61                         foreach (byte i in inbuf)
62                         {
63                             m_textBox1.Text += i.ToString("X2");
64                         }
65                         m_textBox1.Text += "\r\n";
66                     }));
67             }
68             catch(Exception ex)
69             {
70                 MessageBox.Show(ex.Message);
71             }
72         }
73     }
74 }
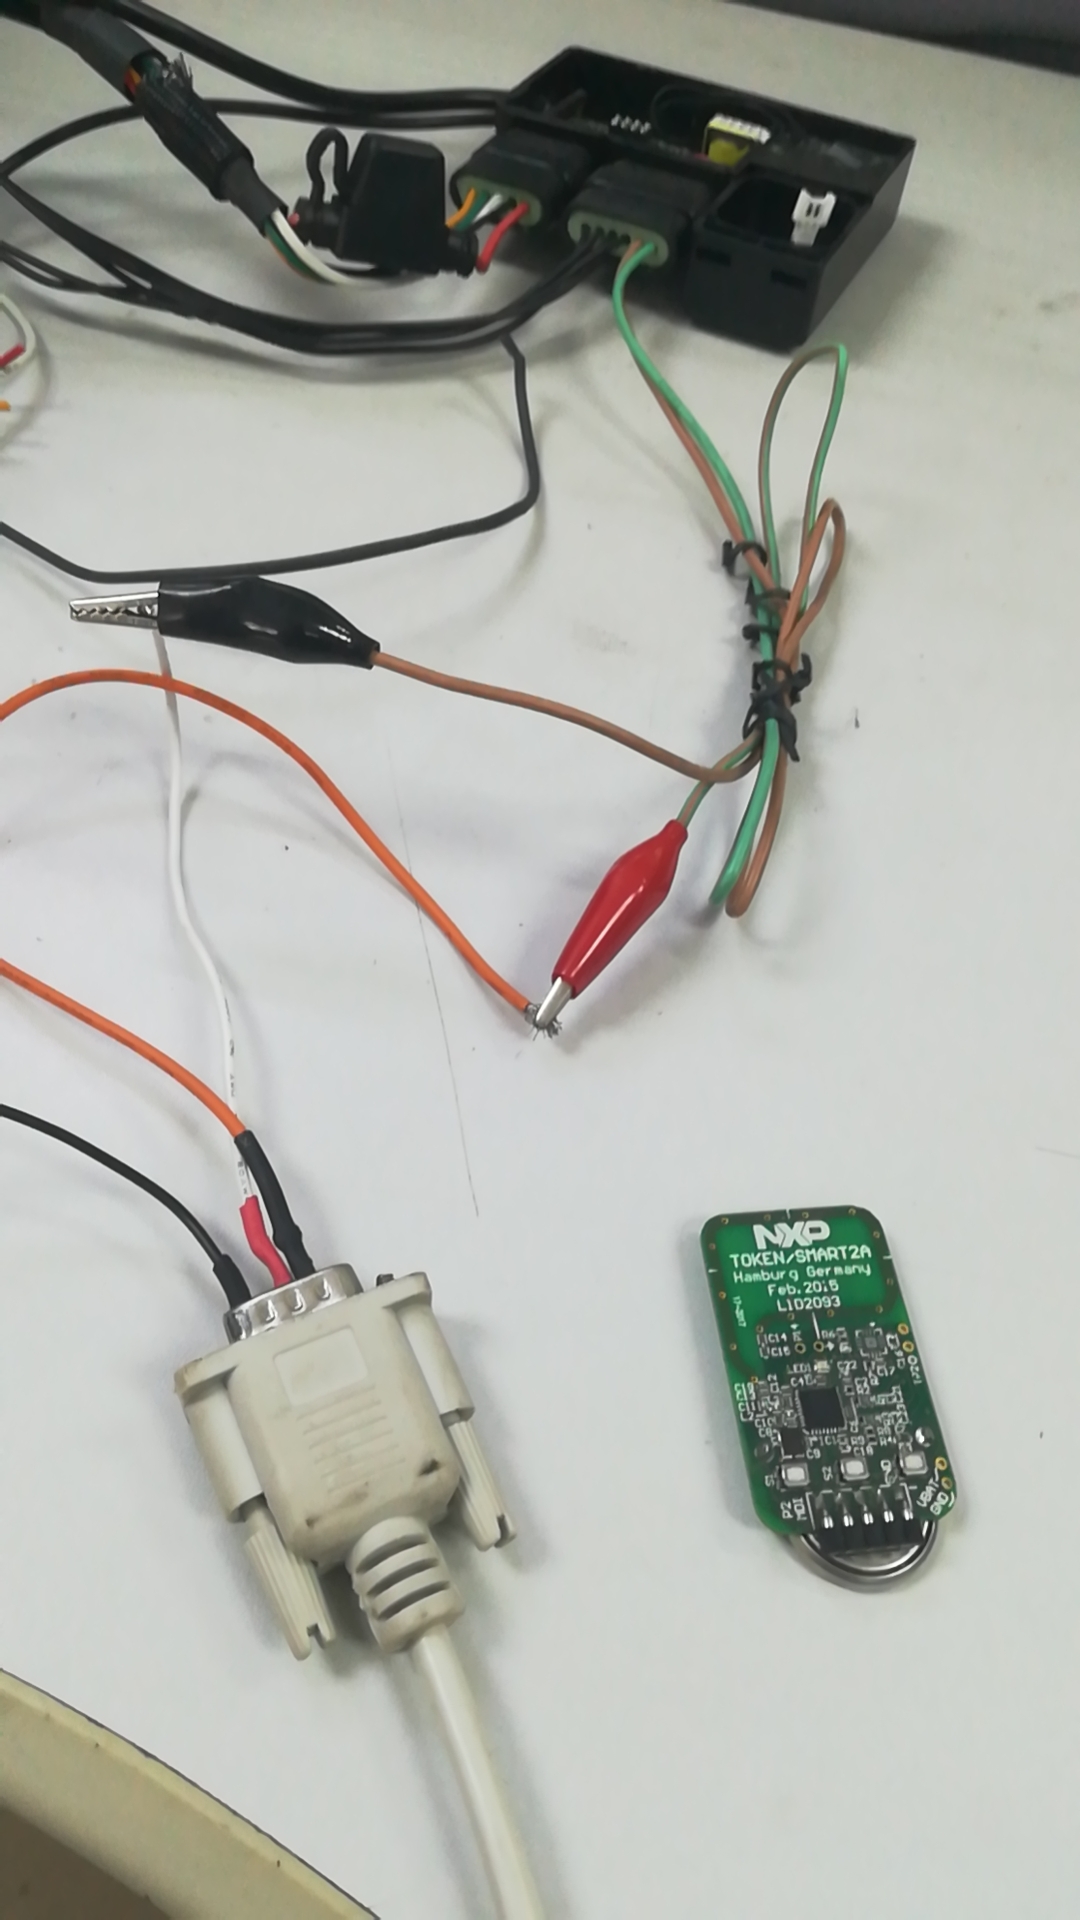
外边设备连接:
- 编译运行:
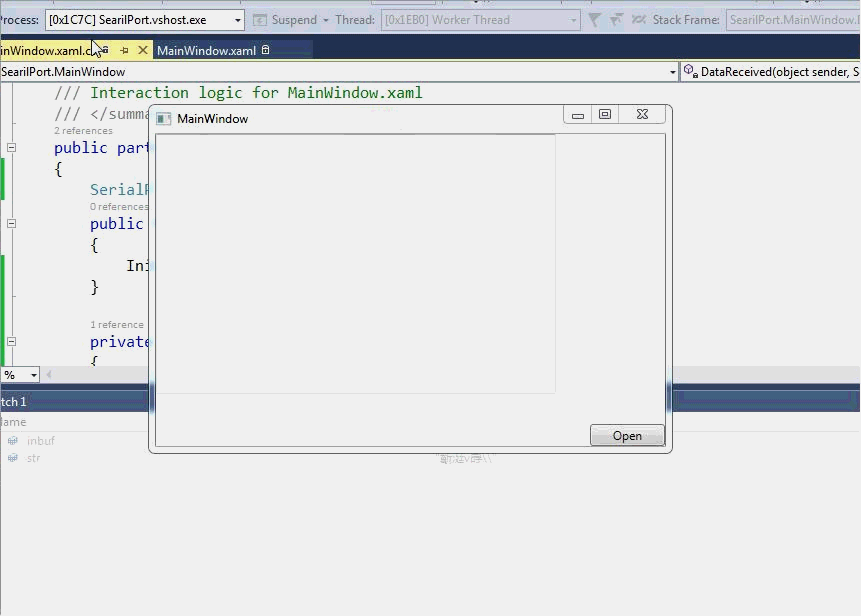

自此,我们就完成了由NXP传送的序列码经主机解码后通过串口发送到我们的应用程序单向的基本操作。
在接下来的章节中,我们将进一步完善该程序,实现双向通行,同时调用aes加密书法,生成我们加密后的序列号。
End.
谢谢.