HSRP热备份路由协议
1 案例1:HSRP配置
1.1 问题
在企业网络到外部的连接方案中,要求不高的条件下可以是单出口。一旦该出口线路出现问题,整个企业网络就不能连接到外网了。为了使得企业网络到外网连接的高可用性,可以设置两个以上的出口,然而多个出口对于内网主机意味着我个网关。主机不能同时使用多个网关,当主机所使用的网关出现故障时,它不能实现网关的自动切换。
- 配置热备份路由协议
1.2 方案
在出口设备上配置热备份路由协议(HSRP),组成一个HSRP组,组内两个出口设备共享一个虚拟IP地址,该IP地址作为内网主机的网关。
HSRP组成员有主备之分,虚拟IP地址被附加到主设备上。如果主设备线路出故障,备份设备会成为主设备,虚拟IP地址也会迁移过来。这样,不管哪一个出口设备出现问题,不管哪个出口设备在提供外网接入,内网主机的网关都不需要改变。
网络拓扑图如图-1所示:

图-1
1.3 步骤
实现此案例需要按照如下步骤进行。
步骤一:分别在三台路由器上配置端口IP地址
- tarena-R1(config)# interface f0/0
- tarena-R1(config-if)#ip address 192.168.1.252 255.255.255.0
- tarena-R1(config-if)#no shutdown
- tarena-R1(config-if)#interface f0/1
- tarena-R1(config-if)#ip address 192.168.2.1 255.255.255.0
- tarena-R1(config-if)#no shutdown
- tarena-R2(config)#interface f0/0
- tarena-R2(config-if)#ip address 192.168.1.253 255.255.255.0
- tarena-R2(config-if)#no shutdown
- tarena-R2(config-if)#interface f0/1
- tarena-R2(config-if)#ip address 192.168.3.1 255.255.255.0
- tarena-R2(config-if)#no shutdown
- tarena-R3(config)#interface f0/0
- tarena-R3(config-if)#ip address 192.168.2.2 255.255.255.0
- tarena-R3(config-if)#no shutdown
- tarena-R3(config-if)#interface f0/1
- tarena-R3(config-if)#ip address 192.168.3.2 255.255.255.0
- tarena-R3(config-if)#no shutdown
- tarena-R3(config-if)#interface f1/0
- tarena-R3(config-if)#ip address 192.168.4.254 255.255.255.0
- tarena-R3(config-if)#no shutdown
步骤二:在R1和R2上配置到外网的默认路由
- tarena-R1(config)#ip route 0.0.0.0 0.0.0.0 192.168.2.2
- tarena-R1(config)#end
- tarena-R1#show ip route
- Codes: C - connected, S - static, I - IGRP, R - RIP, M - mobile, B - BGP
- D - EIGRP, EX - EIGRP external, O - OSPF, IA - OSPF inter area
- N1 - OSPF NSSA external type 1, N2 - OSPF NSSA external type 2
- E1 - OSPF external type 1, E2 - OSPF external type 2, E - EGP
- i - IS-IS, L1 - IS-IS level-1, L2 - IS-IS level-2, ia - IS-IS inter area
- * - candidate default, U - per-user static route, o - ODR
- P - periodic downloaded static route
- Gateway of last resort is 192.168.1.2 to network 0.0.0.0
- C 192.168.1.0/24 is directly connected, FastEthernet0/0
- C 192.168.2.0/24 is directly connected, FastEthernet0/1
- S* 0.0.0.0/0 [1/0] via 192.168.2.2
- tarena-R1#
- tarena-R2(config)#ip route 0.0.0.0 0.0.0.0 192.168.3.2
- tarena-R2(config)#exit
- tarena-R2#show ip route
- Codes: C - connected, S - static, I - IGRP, R - RIP, M - mobile, B - BGP
- D - EIGRP, EX - EIGRP external, O - OSPF, IA - OSPF inter area
- N1 - OSPF NSSA external type 1, N2 - OSPF NSSA external type 2
- E1 - OSPF external type 1, E2 - OSPF external type 2, E - EGP
- i - IS-IS, L1 - IS-IS level-1, L2 - IS-IS level-2, ia - IS-IS inter area
- * - candidate default, U - per-user static route, o - ODR
- P - periodic downloaded static route
- Gateway of last resort is 192.168.2.2 to network 0.0.0.0
- C 192.168.1.0/24 is directly connected, FastEthernet0/0
- C 192.168.3.0/24 is directly connected, FastEthernet0/1
- S* 0.0.0.0/0 [1/0] via 192.168.3.2
步骤三:在R3上配置到企业内网的静态路由
- tarena-R3(config)#ip route 192.168.1.0 255.255.255.0 192.168.2.1
- tarena-R3(config)#ip route 192.168.1.0 255.255.255.0 192.168.3.1
- tarena-R3(config)#end
- tarena-R3#show ip route
- Codes: C - connected, S - static, I - IGRP, R - RIP, M - mobile, B - BGP
- D - EIGRP, EX - EIGRP external, O - OSPF, IA - OSPF inter area
- N1 - OSPF NSSA external type 1, N2 - OSPF NSSA external type 2
- E1 - OSPF external type 1, E2 - OSPF external type 2, E - EGP
- i - IS-IS, L1 - IS-IS level-1, L2 - IS-IS level-2, ia - IS-IS inter area
- * - candidate default, U - per-user static route, o - ODR
- P - periodic downloaded static route
- Gateway of last resort is not set
- S 192.168.1.0/24 [1/0] via 192.168.2.1
- [1/0] via 192.168.3.1
- C 192.168.2.0/24 is directly connected, FastEthernet0/0
- C 192.168.3.0/24 is directly connected, FastEthernet0/1
- C 192.168.4.0/24 is directly connected, FastEthernet1/0
- tarena-R3#
步骤四:在R1上配置HSRP,指定其优先级为200
HSRP的默认优先级为100,路由器启动后,根据优先级决定谁可以成为活跃路由器,优先级高的将胜出。如果路由器优先级相同,再比较端口IP地址,IP地址大的成为活路跃路由器。
另外,如果优先级低的路由器先启动了,它将成为活跃路由器。优先级高的路由器启动后,发现已有活跃路由器存在,它将接受现状,直到活跃路由器出现故障它才会在重新选举时成为活跃角色。
- tarena-R1(config)#interface f0/0
- tarena-R1(config-if)#standby 1 ip 192.168.1.254
- tarena-R1(config-if)#standby 1 priority 200
- %HSRP-6-STATECHANGE: FastEthernet0/0 Grp 1 state Speak -> Standby
- %HSRP-6-STATECHANGE: FastEthernet0/0 Grp 1 state Standby -> Active
配置HSRP后,通过输出日志可以观察到路由器角色的改变。
步骤五:在R2上配置HSRP,指定其优先级为195
- tarena-R2(config)#interface f0/0
- tarena-R2(config-if)#standby 1 ip 192.168.1.254
- tarena-R2(config-if)#standby 1 priority 195
- %HSRP-6-STATECHANGE: FastEthernet0/0 Grp 1 state Speak -> Standby
步骤六:分别在R1和R2上查看HSRP信息
- tarena-R1#show standby brief
- P indicates configured to preempt.
- |
- Interface Grp Pri P State Active Standby Virtual IP
- Fa0/0 1 200 Active local 192.168.1.253 192.168.1.254
- tarena-R2#show standby brief
- P indicates configured to preempt.
- |
- Interface Grp Pri P State Active Standby Virtual IP
- Fa0/0 1 195 Standby 192.168.2.252 local 192.168.1.254
步骤七:在内部主机上测试到外网主机的连通性
- SERVER>ipconfig
- FastEthernet0 Connection:(default port)
- Link-local IPv6 Address.........: FE80::207:ECFF:FE80:557D
- IP Address......................: 192.168.1.1
- Subnet Mask.....................: 255.255.255.0
- Default Gateway.................: 192.168.1.254
- PC>ping 192.168.4.1
- Pinging 192.168.4.1 with 32 bytes of data:
- Reply from 192.168.4.1: bytes=32 time=0ms TTL=126
- Reply from 192.168.4.1: bytes=32 time=0ms TTL=126
- Reply from 192.168.4.1: bytes=32 time=0ms TTL=126
- Reply from 192.168.4.1: bytes=32 time=1ms TTL=126
- Ping statistics for 192.168.4.1
- Packets: Sent = 4, Received = 4, Lost = 0 (0% loss),
- Approximate round trip times in milli-seconds:
- Minimum = 0ms, Maximum = 1ms, Average = 0ms
步骤八:在R1配置端口跟踪、R2配置占先权
- tarena-R1(config)#interface fastEthernet 0/0
- tarena-R1(config-if)#standby 1 track f0/1
- tarena-R2(config)#interface fastEthernet 0/0
- tarena-R2(config-if)#standby 1 preempt
步骤九:关闭R1的f0/1接口,模拟设备故障,查看R2的HSRP信息
- tarena-R1(config)#interface fastEthernet 0/1
- tarena-R1(config-if)#shutdown
- tarena-R2#show standby brief
- P indicates configured to preempt.
- |
- Interface Grp Pri P State Active Standby Virtual IP
- Fa0/0 1 195 Active local unknown 192.168.1.254
结果显示R2已成为活跃路由器,而备份路由器状态未知。虚拟路由器的IP地址192.168.1.254/24也已迁移到R2上了。
步骤十:在R1配置占先权,并激活R1的f0/1接口并查状态
备份路由器成为活跃路由器后,原来的活跃路由器R1即使线路修复也不会重新成为进入活跃状态。
为了使路由器完全根据优先级来决定其状态,需要配置占先权。占先权保证了严格根据优先级来决定哪台设备进入活跃状态。
- tarena-R1(config)#interface f0/0
- tarena-R1(config-if)#standby 1 preempt
- tarena-R1(config)#interface f0/1
- tarena-R1(config-if)#no shutdown
- tarena-R1#show standby brief
- P indicates configured to preempt.
- |
- Interface Grp Pri P State Active Standby Virtual IP
- Fa0/0 1 200 Active local 192.168.1.253 192.168.1.254
2 案例2:三层交换配置HSRP
2.1 问题
以三层交换机代替路由器作为网关设备。
2.2 方案
以三层交换机代替路由器作为网关设备,以vlan1作为网关接口
网络拓扑如图-2所示:
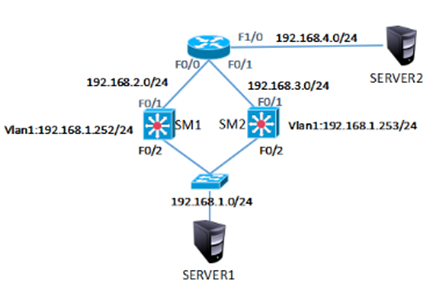
图-2
2.3 步骤
实现此案例需要按照如下步骤进行。
步骤一:分别为三层交换机和路由器配置IP并开启三层交换机路由功能。
- SM1(config)#ip routing
- SM1(config)#interface vlan 1
- SM1(config-if)#ip address 192.168.1.252 255.255.255.0
- SM1(config-if)#no shutdown
- SM1(config-if)#eixt
- SM1(config)#interface fastEthernet 0/1
- SM1(config-if)#no switchport
- SM1(config-if)#ip address 192.168.2.1 255.255.255.0
- SM1(config-if)#no shutdown
- SM2(config)#ip routing
- SM2(config)#interface vlan 1
- SM2(config-if)#ip add 192.168.1.253 255.255.255.0
- SM2(config-if)#no shutdown
- SM2(config-if)#exit
- SM2(config)#interface f0/1
- SM2(config-if)#no switchport
- SM2(config-if)#ip address 192.168.3.1 255.255.255.0
- Router(config)#interface fastEthernet 0/0
- Router(config-if)#ip address 192.168.2.2 255.255.255.0
- Router(config-if)#no shutdown
- Router(config-if)#exit
- Router(config)#interface fastEthernet 0/1
- Router(config-if)#ip address 192.168.3.2 255.255.255.0
- Router(config-if)#no shutdown
- Router(config-if)#exit
- Router(config)#interface fastEthernet 1/0
- Router(config-if)#ip address 192.168.4.254 255.255.255.0
- Router(config-if)#no shutdown
步骤二:在三层交换机和路由器上配置动态路由,在路由器上查看路由表。
- SM1(config)#router rip
- SM1(config-router)#version 2
- SM1(config-router)#no auto-summary
- SM1(config-router)#network 192.168.1.0
- SM1(config-router)#network 192.168.2.0
- SM2(config)#router rip
- SM2(config-router)#version 2
- SM2(config-router)#no auto-summary
- SM2(config-router)#network 192.168.1.0
- SM2(config-router)#network 192.168.3.0
- Router(config)#router rip
- Router(config-router)#version 2
- Router(config-router)#no auto-summary
- Router(config-router)#network 192.168.2.0
- Router(config-router)#network 192.168.3.0
- Router(config-router)#network 192.168.4.0
- Router#show ip route
- Codes: C - connected, S - static, I - IGRP, R - RIP, M - mobile, B - BGP
- D - EIGRP, EX - EIGRP external, O - OSPF, IA - OSPF inter area
- N1 - OSPF NSSA external type 1, N2 - OSPF NSSA external type 2
- E1 - OSPF external type 1, E2 - OSPF external type 2, E - EGP
- i - IS-IS, L1 - IS-IS level-1, L2 - IS-IS level-2, ia - IS-IS inter area
- * - candidate default, U - per-user static route, o - ODR
- P - periodic downloaded static route
- Gateway of last resort is not set
- R 192.168.1.0/24 [120/1] via 192.168.3.1, 00:00:10, FastEthernet0/1
- [120/1] via 192.168.2.1, 00:00:04, FastEthernet0/0
- C 192.168.2.0/24 is directly connected, FastEthernet0/0
- C 192.168.3.0/24 is directly connected, FastEthernet0/1
- C 192.168.4.0/24 is directly connected, FastEthernet1/0
步骤三:在三层交换机vlan1中配置虚拟网关并设置优先级和占先权
- SM1(config)#interface vlan 1
- SM1(config-if)#standby 1 ip 192.168.1.254
- SM1(config-if)#standby 1 priority 200
- SM1(config-if)#standby 1 preempt
- %HSRP-6-STATECHANGE: Vlan1 Grp 1 state Speak -> Standby
- %HSRP-6-STATECHANGE: Vlan1 Grp 1 state Standby -> Active
- SM2(config)#interface vlan 1
- SM2(config-if)#standby 1 ip 192.168.1.254
- %HSRP-6-STATECHANGE: Vlan1 Grp 1 state Speak -> Standby
- SM2(config-if)#standby 1 priority 195
- SM2(config-if)#standby 1 preempt
步骤四:在三层交换机vlan1中配置端口跟踪,关闭被跟踪接口并查看SM1的HSRP状态
当三层交换机SM1并没有故障,而是上连端口f0/1接口线路损坏时主备无法快速切换,所以要在主设备上配置端口跟踪,确保当主设备线路出现问题时备份设备可以快速切换身份
- SM1(config)#interface vlan 1
- SM1(config-if)#standby 1 track f0/1
- SM1(config)#interface f0/1
- SM1(config-if)#shutdown
- SM1(config-if)#end
- SM1#show standby brief
- P indicates configured to preempt.
- Interface Grp Pri P State Active Standby Virtual IP
- Vl1 1 1 190 P Standby 192.168.1.253 local 192.168.1.254
- SM1#
步骤五:测试网路连通性
模拟主设备故障或被跟踪的端口故障时测试网络的连通性,确保备份设备被启用
- server>ping 192.168.4.1
- Pinging 192.168.4.1 with 32 bytes of data:
- Reply from 192.168.4.1: bytes=32 time=1ms TTL=126
- Reply from 192.168.4.1: bytes=32 time=1ms TTL=126
- Reply from 192.168.4.1: bytes=32 time=14ms TTL=126
- Reply from 192.168.4.1: bytes=32 time=15ms TTL=126
- Ping statistics for 192.168.4.1:
- Packets: Sent = 4, Received = 4, Lost = 0 (0% loss),
- Approximate round trip times in milli-seconds:
- Minimum = 1ms, Maximum = 15ms, Average = 7ms
3 案例3:STP的配置
3.1 问题
二层网络中有可能出现因为线路故障而导致的通信故障,通过冗余线路可以消除因为某一线路故障而导致的网络中断。
但是因为冗余线路的存在,又可能会出现广播风暴、相同帧的不断复制和MAC地址表不稳定。
- 配置Switch1为vlan1的主根,Switch2为vlan1的次根
3.2 方案
为了保证在冗余环境下不会出广播风暴等问题,引入了生成树(STP)协议。通过生成树协议可以把冗余线路上的某一个端口置为阻塞(BLOCKING)状态,防止广播风暴的产生,当某一线路出现故障时,被阻塞的端口自动进入转发(FORWARDING)状态,保证网络的畅通性。
网络拓扑如图-3所示:

图-3
3.3 步骤
实现此案例需要按照如下步骤进行。
步骤一:将三台交换机相连的端口配置为中继端口
- tarena-sw1(config)#interface range f0/12 -13
- tarena-sw1(config-if-range)#switchport mode trunk
- tarena-sw2(config)#interface range f0/12, f0/23
- tarena-sw2(config-if-range)#switchport mode trunk
- tarena-sw3(config)#interface range f0/13 ,f0/23
- tarena-sw3(config-if-range)#switchport mode trunk
步骤二:调整优先级设置tarena-sw1为根网桥
根网桥唯一的依据是BID最小。BID分为两个部分:优先级+MAC地址。比较BID时,先比较优先级,如果优先级相同才比较MAC地址。
优先级取值范围是0到65535,默认值为32768。在查看优先级时,即使是默认值看到的也不是32768,因为交换机的优先级采用系统优先级+VLAN编号的方式,所以查看到的VLAN1默认优先级是32769(系统优先级32768+VLAN编号1)。
- tarena-sw1(config)# spanning-tree vlan 1 priority 28672
- tarena-sw1(config)#exit
- tarena-sw1#show spanning-tree
- VLAN0001
- Spanning tree enabled protocol ieee
- Root ID Priority 28673 //默认优先级为32768
- Address 0060.478B.607B
- This bridge is the root
- Hello Time 2 sec Max Age 20 sec Forward Delay 15 sec
- Bridge ID Priority 28673 (priority 24576 sys-id-ext 1)
- Address 0060.478B.607B
- Hello Time 2 sec Max Age 20 sec Forward Delay 15 sec
- Aging Time 20
- Interface Role Sts Cost Prio.Nbr Type
- ----------- ------ --- -------- -------- ----------------------
- Fa0/13 Desg FWD 19 128.13 P2p
- Fa0/12 Desg FWD 19 128.12 P2p
查看到的结果,Root ID部分指的是根网桥信息,Bridge ID部分是当前所操作的交换机信息,如果二者一致表示当前操作的交换机就是根网桥。
4 案例4:三层交换配置STP
4.1 问题
配置Switch1为vlan1的次根,Switch2为vlan1的次根。
配置Switch1为vlan2的次根,Switch2为vlan2的次根
4.2 方案
如图网络拓扑如图-4所示:

图-4
4.3 步骤
实现此案例需要按照如下步骤进行。
步骤一:将四台交换机相连的端口配置为中继端口,分别创建vlan2
- SM1(config)#vlan 2
- SM1(config)#exit
- SM1(config)#interface range fastEthernet 0/1-3
- SM1(config-if-range)#switchport trunk encapsulation dot1q
- SM1(config-if-range)#switchport mode trunk
- SM2(config)#vlan 2
- SM2(config)#exit
- SM2(config)#interface range fastEthernet 0/1-3
- SM2(config-if-range)#switchport trunk encapsulation dot1q
- SM2(config-if-range)#switchport mode trunk
- Switch1(config)#vlan 2
- Switch1(config)#exit
- Switch1(config)#interface range fastEthernet 0/1-2
- Switch1(config-if-range)#switchport mode trunk
- Switch2(config)#vlan 2
- Switch2(config)#exit
- Switch2(config)#interface range fastEthernet 0/1-2
- Switch2(config-if-range)#switchport mode trunk
步骤二:设置SM1为vlan1的主根vlan2的次根,设置SM2为vlan2的主根vlan1的次根并查看
- SM1(config)#spanning-tree vlan 1 root primary
- SM1(config)#spanning-tree vlan 2 root secondary
- SM1#show spanning-tree
- VLAN0001
- Spanning tree enabled protocol ieee
- Root ID Priority 24577
- Address 00D0.972A.43E5
- This bridge is the root
- Hello Time 2 sec Max Age 20 sec Forward Delay 15 sec
- Bridge ID Priority 24577 (priority 24576 sys-id-ext 1)
- Address 00D0.972A.43E5
- Hello Time 2 sec Max Age 20 sec Forward Delay 15 sec
- Aging Time 20
- Interface Role Sts Cost Prio.Nbr Type
- ---------------- ---- --- --------- -------- --------------------------------
- Fa0/2 Desg FWD 19 128.2 P2p
- Fa0/3 Desg FWD 19 128.3 P2p
- Fa0/1 Desg FWD 19 128.1 P2p
- VLAN0002
- Spanning tree enabled protocol ieee
- Root ID Priority 24578
- Address 00E0.F9CE.7424
- Cost 19
- Port 3(FastEthernet0/3)
- Hello Time 2 sec Max Age 20 sec Forward Delay 15 sec
- Bridge ID Priority 28674 (priority 28672 sys-id-ext 2)
- Address 00D0.972A.43E5
- Hello Time 2 sec Max Age 20 sec Forward Delay 15 sec
- Aging Time 20
- Interface Role Sts Cost Prio.Nbr Type
- ---------------- ---- --- --------- -------- --------------------------------
- Fa0/2 Desg FWD 19 128.2 P2p
- Fa0/3 Root FWD 19 128.3 P2p
- Fa0/1 Desg FWD 19 128.1 P2p
- SM2(config)#spanning-tree vlan 1 root secondary
- SM2(config)#spanning-tree vlan 2 root primary
- SM2#show spanning-tree
- VLAN0001
- Spanning tree enabled protocol ieee
- Root ID Priority 24577
- Address 00D0.972A.43E5
- Cost 19
- Port 3(FastEthernet0/3)
- Hello Time 2 sec Max Age 20 sec Forward Delay 15 sec
- Bridge ID Priority 28673 (priority 28672 sys-id-ext 1)
- Address 00E0.F9CE.7424
- Hello Time 2 sec Max Age 20 sec Forward Delay 15 sec
- Aging Time 20
- Interface Role Sts Cost Prio.Nbr Type
- ---------------- ---- --- --------- -------- --------------------------------
- Fa0/2 Desg FWD 19 128.2 P2p
- Fa0/1 Desg FWD 19 128.1 P2p
- Fa0/3 Root FWD 19 128.3 P2p
- VLAN0002
- Spanning tree enabled protocol ieee
- Root ID Priority 24578
- Address 00E0.F9CE.7424
- This bridge is the root
- Hello Time 2 sec Max Age 20 sec Forward Delay 15 sec
- Bridge ID Priority 24578 (priority 24576 sys-id-ext 2)
- Address 00E0.F9CE.7424
- Hello Time 2 sec Max Age 20 sec Forward Delay 15 sec
- Aging Time 20
- Interface Role Sts Cost Prio.Nbr Type
- ---------------- ---- --- --------- -------- --------------------------------
- Fa0/2 Desg FWD 19 128.2 P2p
- Fa0/1 Desg FWD 19 128.1 P2p
- Fa0/3 Desg FWD 19 128.3 P2p
查看到的结果,Root ID部分指的是根网桥信息,Bridge ID部分是当前所操作的交换机信息,如果二者一致表示当前操作的交换机就是根网桥。