浮动基本介绍#
- 在标准文档流中元素分为2种,
块级元素和行内元素,如果想让一些元素既要有块级元素的特点也同时保留行内元素特点,只能让这些元素脱离标准文档流即可。 - 浮动可以让元素脱离标准文档流,可以实现让多个元素排在同一行,并且可以设置宽高度。
- 其实浮动是通过
float属性来实现的。 float属性值说明表:
| 属性值 | 描述 |
|---|---|
| left | 设置元素向左浮动。 |
| right | 设置元素向右浮动。 |
右浮动实践#
- 让我们进入右浮动的实践,实践内容如:将
class属性值为.box1元素设置为右浮动。 - 在进入有浮动实践之前我们先看看要浮动元素结构是什么。
-
代码块
<!DOCTYPE html>
<html lang="en">
<head>
<meta charset="UTF-8">
<meta name="viewport" content="width=device-width, initial-scale=1.0">
<meta http-equiv="X-UA-Compatible" content="ie=edge">
<title>浮动</title>
<style>
.box{
width: 600px;
border: 1px solid #000;
}
</style>
</head>
<body>
<div class="box">
<div class="box1"></div>
<div class="box2"></div>
<div class="box3"></div>
</div>
</body>
</html>
-
结果图

- 为什么结果图是一条边框线呢?因为在
div标签中还没有内容呢,现在我们将子div标签设置宽高度为100px像素并且添加背景颜色。 -
代码块
<!DOCTYPE html>
<html lang="en">
<head>
<meta charset="UTF-8">
<meta name="viewport" content="width=device-width, initial-scale=1.0">
<meta http-equiv="X-UA-Compatible" content="ie=edge">
<title>浮动</title>
<style>
.box{
width: 600px;
border: 1px solid #000;
}
.box1{
width: 100px;
height: 100px;
background-color: #f00;
}
.box2{
width: 100px;
height: 100px;
background-color: #0f0;
}
.box3{
width: 100px;
height: 100px;
background-color: #00f;
}
</style>
</head>
<body>
<div class="box">
<div class="box1"></div>
<div class="box2"></div>
<div class="box3"></div>
</div>
</body>
</html>
-
结果图
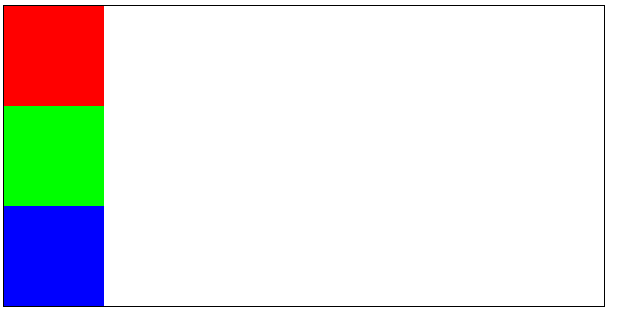
- 为什么会排列为3行呢,因为3个
div标签都是块级元素。 - 现在我们将
class属性值为.box1的元素设置为右浮动。 -
代码块
<!DOCTYPE html>
<html lang="en">
<head>
<meta charset="UTF-8">
<meta name="viewport" content="width=device-width, initial-scale=1.0">
<meta http-equiv="X-UA-Compatible" content="ie=edge">
<title>浮动</title>
<style>
.box{
width: 600px;
border: 1px solid #000;
}
.box1{
width: 100px;
height: 100px;
background-color: #f00;
float:right;
}
.box2{
width: 100px;
height: 100px;
background-color: #0f0;
}
.box3{
width: 100px;
height: 100px;
background-color: #00f;
}
</style>
</head>
<body>
<div class="box">
<div class="box1"></div>
<div class="box2"></div>
<div class="box3"></div>
</div>
</body>
</html>
-
结果图

-
注意:现在我们发现
calss属性值为.box元素高度变矮了,这就说明了(浮动元素它已经脱离了标准文档流,不再占用空间了)、并且向右浮动,浮动到自身的父元素的边缘位置就停止了浮动。
左浮动实践#
- 让我们进入左浮动的实践,实践内容如:将
class属性值为.box1元素设置为左浮动。 -
代码块
<!DOCTYPE html>
<html lang="en">
<head>
<meta charset="UTF-8">
<meta name="viewport" content="width=device-width, initial-scale=1.0">
<meta http-equiv="X-UA-Compatible" content="ie=edge">
<title>浮动</title>
<style>
.box{
width: 600px;
border: 1px solid #000;
}
.box1{
width: 100px;
height: 100px;
background-color: #f00;
float:left;
}
.box2{
width: 100px;
height: 100px;
background-color: #0f0;
}
.box3{
width: 100px;
height: 100px;
background-color: #00f;
}
</style>
</head>
<body>
<div class="box">
<div class="box1"></div>
<div class="box2"></div>
<div class="box3"></div>
</div>
</body>
</html>
-
结果图

- 我们先理解浮动的原理之后再解释下
class属性值为.box2元素看不见的原因。 - 现在笔者给大家看2张实践结果图如:
-
结果图A

-
结果图B

- 通过这2张结果图我们可以把浮动简单的理解为“漂”举例:
- 假设
class属性值为.box是一个池塘,3个子元素都是能够漂浮在池塘水面上的东西,现在我们将calss属性值为.box1元素浮动起来,漂在池塘水面上,是不是就不再占用池塘内的空间了。 - 既然我们理解为“漂”它一定是漂浮在池塘水面之上,但是没有浮动的元素在池塘水面之内,所以
class属性值为.box2元素看不见,并不代表它不存在只是被class属性值为.box1元素给遮挡住了,现在我们将class属性值为.box2元素宽度设置为150px像素。 -
代码块
<!DOCTYPE html>
<html lang="en">
<head>
<meta charset="UTF-8">
<meta name="viewport" content="width=device-width, initial-scale=1.0">
<meta http-equiv="X-UA-Compatible" content="ie=edge">
<title>浮动</title>
<style>
.box{
width: 600px;
border: 1px solid #000;
}
.box1{
width: 100px;
height: 100px;
background-color: #f00;
float:left;
}
.box2{
width: 150px;
height: 100px;
background-color: #0f0;
}
.box3{
width: 100px;
height: 100px;
background-color: #00f;
}
</style>
</head>
<body>
<div class="box">
<div class="box1"></div>
<div class="box2"></div>
<div class="box3"></div>
</div>
</body>
</html>
-
结果图
-
注意:事实证明
class属性值为.box2元素是存在的。 - 下面我们将
calss属性值为.box2元素设置为左浮动看看有什么不一样的效果 -
代码块
<!DOCTYPE html>
<html lang="en">
<head>
<meta charset="UTF-8">
<meta name="viewport" content="width=device-width, initial-scale=1.0">
<meta http-equiv="X-UA-Compatible" content="ie=edge">
<title>浮动</title>
<style>
.box{
width: 600px;
border: 1px solid #000;
}
.box1{
width: 100px;
height: 100px;
background-color: #f00;
float:left;
}
.box2{
width: 150px;
height: 100px;
background-color: #0f0;
float: left;
}
.box3{
width: 100px;
height: 100px;
background-color: #00f;
}
</style>
</head>
<body>
<div class="box">
<div class="box1"></div>
<div class="box2"></div>
<div class="box3"></div>
</div>
</body>
</html>
-
结果图

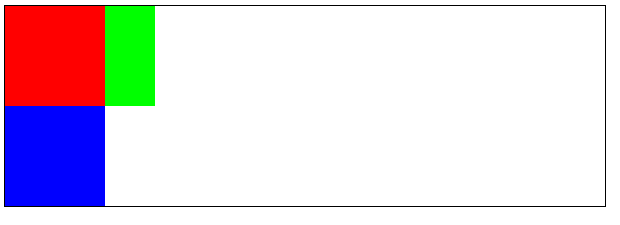
- 但是
class属性值为.box2的元素左浮动并没有左浮动到本身父元素的边缘位置,为什么在class属性值为.box1后面呢?因为父元素已经有了浮动的子元素后面的子元素在浮动就浮动到前面浮动的元素之后。 - 现在我们将
class属性值为.box3的元素设置为左浮动,看看有什么不一样的效果。 -
代码块
<!DOCTYPE html>
<html lang="en">
<head>
<meta charset="UTF-8">
<meta name="viewport" content="width=device-width, initial-scale=1.0">
<meta http-equiv="X-UA-Compatible" content="ie=edge">
<title>浮动</title>
<style>
.box{
width: 600px;
border: 1px solid #000;
}
.box1{
width: 100px;
height: 100px;
background-color: #f00;
float:left;
}
.box2{
width: 150px;
height: 100px;
background-color: #0f0;
float: left;
}
.box3{
width: 100px;
height: 100px;
background-color: #00f;
float: left;
}
</style>
</head>
<body>
<div class="box">
<div class="box1"></div>
<div class="box2"></div>
<div class="box3"></div>
</div>
</body>
</html>
-
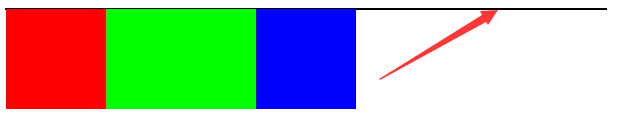
结果图
-
注意:浮动元素浮动以后,其父元素不再将浮动的子元素包裹在父元素之内,所以结果图出现一条黑色的边框线,若有不明白的看第一个实践内容。
将行内元素设置浮动#
- 如果我们给行内元素设置了浮动,行内元素就拥有了块级元素的特点。
- 让我们进入行内元素设置浮动实践,实践内容如:将
div标签中的span标签设置为左浮动。 - 在设置左浮动之前我们先看看给
span标签设置宽高度和背景颜色有什么效果。 -
代码块
<!DOCTYPE html>
<html lang="en">
<head>
<meta charset="UTF-8">
<meta name="viewport" content="width=device-width, initial-scale=1.0">
<meta http-equiv="X-UA-Compatible" content="ie=edge">
<title>浮动</title>
<style>
.box{
width: 600px;
border: 1px solid #000;
}
.box1{
width: 100px;
height: 100px;
background-color: #f00;
}
.box2{
width: 100px;
height: 100px;
background-color: #0f0;
}
.box3{
width: 100px;
height: 100px;
background-color: #00f;
}
</style>
</head>
<body>
<div class="box">
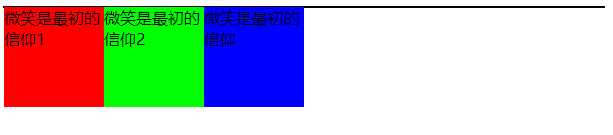
<span class="box1">微笑是最初的信仰1</span>
<span class="box2">微笑是最初的信仰2</span>
<span class="box3">微笑是最初的信仰3</span>
</div>
</body>
</html>
-
结果图

- 现在发现我们给
span标签设置了宽高度为100px像素并没有生效,因为现在span标签还是行内元素。 - 现在我们给
span标签设置左浮动,然后我们在看看效果如何。 -
代码块
<!DOCTYPE html>
<html lang="en">
<head>
<meta charset="UTF-8">
<meta name="viewport" content="width=device-width, initial-scale=1.0">
<meta http-equiv="X-UA-Compatible" content="ie=edge">
<title>浮动</title>
<style>
.box{
width: 600px;
border: 1px solid #000;
}
.box1{
width: 100px;
height: 100px;
background-color: #f00;
float: left;
}
.box2{
width: 100px;
height: 100px;
background-color: #0f0;
float: left;
}
.box3{
width: 100px;
height: 100px;
background-color: #00f;
float: left;
}
</style>
</head>
<body>
<div class="box">
<span class="box1">微笑是最初的信仰1</span>
<span class="box2">微笑是最初的信仰2</span>
<span class="box3">微笑是最初的信仰</span>
</div>
</body>
</html>
-
结果图
-
注意:行内元素设置为浮动之后就拥有了块级元素的特点。
设置浮动总结#
- 浮动的特点如:
- 浮动元素脱离了标准的文档流,不再占用父元素的任何空间。
- 浮动元素比标准文档流的元素层级要高,会将标准文档流的元素遮挡住。
- 浮动元素会向左浮动或向右浮动。
- 浮动元素会遇到父元素的边缘就停止了浮动。
- 浮动元素会遇到已经有了浮动的元素,后者会浮动到前者之后就停止了浮动。
- 浮动元素浮动之后就脱离了父元素,并且父元素不再包裹浮动的元素。
- 行内元素设置为浮动,就拥有了块级元素的特点。
为什么要清除浮动呢?#
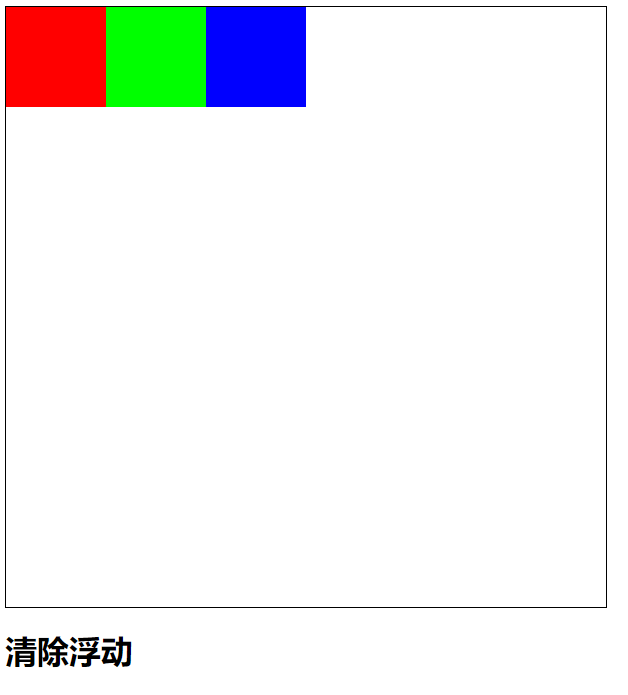
- 因为浮动的元素会影响到下面元素,具体看实践结果图大家就明白了。
class属性值为.box元素的子类元素没有浮动前的效果实践。-
代码块
<!DOCTYPE html>
<html lang="en">
<head>
<meta charset="UTF-8">
<meta name="viewport" content="width=device-width, initial-scale=1.0">
<meta http-equiv="X-UA-Compatible" content="ie=edge">
<title>清除浮动</title>
<style>
.box{
width: 600px;
border: 1px solid #000;
}
.box1{
width: 100px;
height: 100px;
background-color: #f00;
}
.box2{
width: 100px;
height: 100px;
background-color: #0f0;
}
.box3{
width: 100px;
height: 100px;
background-color: #00f;
}
</style>
</head>
<body>
<div class="box">
<div class="box1"></div>
<div class="box2"></div>
<div class="box3"></div>
</div>
<h1>清除浮动</h1>
</body>
</html>
-
结果图
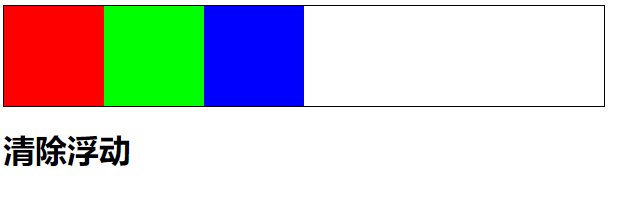
class属性值为.box元素的子元素左浮动之后影响到下面的元素排版布局实践。-
代码块
<!DOCTYPE html>
<html lang="en">
<head>
<meta charset="UTF-8">
<meta name="viewport" content="width=device-width, initial-scale=1.0">
<meta http-equiv="X-UA-Compatible" content="ie=edge">
<title>浮动</title>
<style>
.box{
width: 600px;
border: 1px solid #000;
}
.box1{
width: 100px;
height: 100px;
background-color: #f00;
float: left;
}
.box2{
width: 100px;
height: 100px;
background-color: #0f0;
float: left;
}
.box3{
width: 100px;
height: 100px;
background-color: #00f;
float: left;
}
</style>
</head>
<body>
<div class="box">
<div class="box1"></div>
<div class="box2"></div>
<div class="box3"></div>
</div>
<h1>清除浮动</h1>
</body>
</html>
-
结果图

-
现在大家应该明白了为什么要清除浮动了,有浮动就必须清除浮动,因为上面的元素设置了浮动就会影响到下面元素排版布局。
清除浮动有3种方式#
第一种方式#
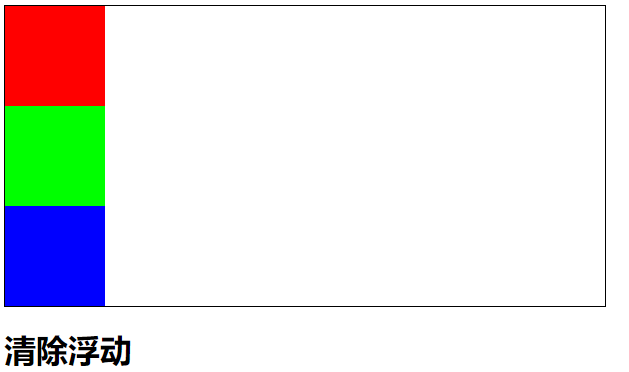
- 给浮动的元素父元素设置一个固定的高度,从视觉上看到浮动的元素在父元素包裹之内。
- 我们给浮动元素的父元素设置一个固定
600px像素的高度,一起来看看效果如何。 -
代码块
<!DOCTYPE html>
<html lang="en">
<head>
<meta charset="UTF-8">
<meta name="viewport" content="width=device-width, initial-scale=1.0">
<meta http-equiv="X-UA-Compatible" content="ie=edge">
<title>清除浮动</title>
<style>
.box{
width: 600px;
height: 600px;
border: 1px solid #000;
}
.box1{
width: 100px;
height: 100px;
background-color: #f00;
float: left;
}
.box2{
width: 100px;
height: 100px;
background-color: #0f0;
float: left;
}
.box3{
width: 100px;
height: 100px;
background-color: #00f;
float: left;
}
</style>
</head>
<body>
<div class="box">
<div class="box1"></div>
<div class="box2"></div>
<div class="box3"></div>
</div>
<h1>清除浮动</h1>
</body>
</html>
-
结果图
-
这样是解决了下面元素排版布局问题,但是笔者不推荐这么做,因为高度是由子元素的内容撑起来的高度,而不是我们给的固定高度。
第二种方式#
- 其实在
CSS中也有清除浮动的属性,清除浮动属性名为clear。 clear属性值说明表
| 属性值 | 描述 |
|---|---|
| left | 清除左侧浮动元素。 |
| right | 清除右侧浮动元素。 |
| both | 清除左右侧浮动元素。 |
- 要使用这个
clear属性必须创建一个新的div元素,创建新的div元素不能放置任何内容,它只能做一个件事情,那就是清除浮动并且将这个新创建的div元素放在最后一个浮动元素的后面才会生效。 - 左右清除浮动的属性值笔者在这里就不一一实践了,一般我们就用
both属性值就可以了,左右清除浮动,干嘛还要计较它是左浮动或右浮动呢,直接清除左右浮动就ok了。 - 具体的看我们实践的结果图。
-
代码块
<!DOCTYPE html>
<html lang="en">
<head>
<meta charset="UTF-8">
<meta name="viewport" content="width=device-width, initial-scale=1.0">
<meta http-equiv="X-UA-Compatible" content="ie=edge">
<title>清除浮动</title>
<style>
.box{
width: 600px;
border: 1px solid #000;
}
.box1{
width: 100px;
height: 100px;
background-color: #f00;
float: left;
}
.box2{
width: 100px;
height: 100px;
background-color: #0f0;
float: left;
}
.box3{
width: 100px;
height: 100px;
background-color: #00f;
float: left;
}
.clear{
clear: both;
}
</style>
</head>
<body>
<div class="box">
<div class="box1"></div>
<div class="box2"></div>
<div class="box3"></div>
<div class="clear"></div>
</div>
<h1>清除浮动</h1>
</body>
</html>
-
结果图
-
注意:这才是我们真正想要的结果,并且从视觉上来看浮动的元素包裹在父元素之内的效果。
第三种方式#
- 使用属性为
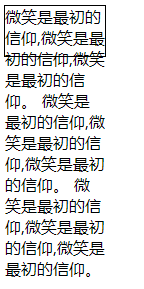
overflow并且属性值为hidden来清除浮动,必须将这个属性设置在浮动元素的父元素身上。 给大家普及下属性为
overflow并且属性值为hidden,它原意是用来将溢出的部分内容进行隐藏,但是它还可以清除浮动。- 笔者先将内容溢出然后在隐藏溢出的内容,那我们一起来看看呗。
-
代码块
<!DOCTYPE html>
<html lang="en">
<head>
<meta charset="UTF-8">
<meta name="viewport" content="width=device-width, initial-scale=1.0">
<meta http-equiv="X-UA-Compatible" content="ie=edge">
<title>溢出内容进行隐藏</title>
<style>
div{
width: 100px;
height: 50px;
border: 1px solid #000;
}
</style>
</head>
<body>
<div>
微笑是最初的信仰,微笑是最初的信仰,微笑是最初的信仰。
微笑是最初的信仰,微笑是最初的信仰,微笑是最初的信仰。
微笑是最初的信仰,微笑是最初的信仰,微笑是最初的信仰。
</div>
</body>
</html>
-
结果图
- 下面笔者将溢出的内容进行隐藏。
-
代码块
<!DOCTYPE html>
<html lang="en">
<head>
<meta charset="UTF-8">
<meta name="viewport" content="width=device-width, initial-scale=1.0">
<meta http-equiv="X-UA-Compatible" content="ie=edge">
<title>溢出内容进行隐藏</title>
<style>
div{
width: 100px;
height: 50px;
border: 1px solid #000;
overflow: hidden;
}
</style>
</head>
<body>
<div>
微笑是最初的信仰,微笑是最初的信仰,微笑是最初的信仰。
微笑是最初的信仰,微笑是最初的信仰,微笑是最初的信仰。
微笑是最初的信仰,微笑是最初的信仰,微笑是最初的信仰。
</div>
</body>
</html>
-
结果图
- 使用属性为
overflow并且属性值为hidden来清除浮动。 - 清除浮动之前我们先看看结构是如何的。
-
代码块
<!DOCTYPE html>
<html lang="en">
<head>
<meta charset="UTF-8">
<meta name="viewport" content="width=device-width, initial-scale=1.0">
<meta http-equiv="X-UA-Compatible" content="ie=edge">
<title>清除浮动</title>
<style>
ul{
list-style: none;
}
ul li{
float: left;
border: 1px solid red;
}
</style>
</head>
<body>
<ul>
<li>微笑是最初的信仰1</li>
<li>微笑是最初的信仰2</li>
<li>微笑是最初的信仰3</li>
<li>微笑是最初的信仰4</li>
<li>微笑是最初的信仰5</li>
<li>微笑是最初的信仰6</li>
<li>微笑是最初的信仰7</li>
<li>微笑是最初的信仰8</li>
</ul>
</body>
</html>
-
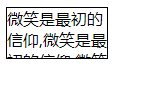
结果图

-
注意:在这里笔者还没有给浮动元素清除浮动呢,大家可以明显的看到
ul标签高度为0。 - 清除浮动实践
-
代码块
<!DOCTYPE html>
<html lang="en">
<head>
<meta charset="UTF-8">
<meta name="viewport" content="width=device-width, initial-scale=1.0">
<meta http-equiv="X-UA-Compatible" content="ie=edge">
<title>清除浮动</title>
<style>
ul{
list-style: none;
overflow: hidden;
}
ul li{
float: left;
border: 1px solid red;
}
</style>
</head>
<body>
<ul>
<li>微笑是最初的信仰1</li>
<li>微笑是最初的信仰2</li>
<li>微笑是最初的信仰3</li>
<li>微笑是最初的信仰4</li>
<li>微笑是最初的信仰5</li>
<li>微笑是最初的信仰6</li>
<li>微笑是最初的信仰7</li>
<li>微笑是最初的信仰8</li>
</ul>
</body>
</html>
-
结果图

-
现在我们很清楚的看到
ul标签高度为23px像素,为什么要使用:属性为overflow并且属性值为hidden来清除浮动,因为ul标签中只能使用li标签元素不能使用其它元素,所以属性为overflow并且属性值为hidden来清除浮动是最好不过啦。