ffmpeg
最近有工作需求用到ffmpeg,分享下。包括一些编码的基础知识,ffmpeg视频解码基础,还有GPU解码的部分。
属于科普工作,并不深入,记录了踩过的一些坑,希望有用
饮水思源:雷霄骅(雷神) &
代码部分参考自 同事***(打码)代码,谢谢大神!
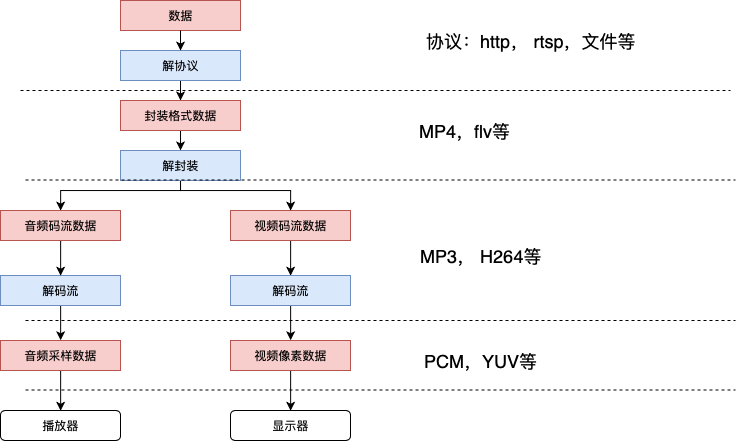
FFmpeg是一种功能强大的常用的视频/音频处理开源框架。支持几乎所有主流格式音视频的编解码,并能进行拼接等操作。
基础知识
- 视频格式:mp4, avi, mkv等,称之为封装格式,可以看成是一种容器。
- 视频流编码格式:h264, h265等,可以认为是一种压缩手段,减小文件体积。
- 音频流编码格式:MP3, AAC等,音频压缩方式。
- 视频像素数据:RGB、YUV(YUV420),实际上的图像编码格式,包括存储亮度和色彩数据。
封装格式和编码格式的关系:封装格式可以理解为存放编码后音视频信息的一种容器,不通的容器对支持的编码格式有所不同。

(侵删)整体解码流程:
(侵删)h264 h264参考博客:

(侵删)- 主要由NALU结构组成
- I帧:帧内编码,适度压缩,类似jpg,大约6:1;P帧:前向预测帧,大约20:1;B帧:双向预测内插编码帧,大约50:1.
- YUV420: Y(亮度),U(色度),V(浓度),Y决定灰度,UV共同决定颜色
由于人类对与色彩的感知能力有限,所以通常会选择降低颜色信息密度,即对UV分量进行压缩

(侵删)基于YUV分量在存储方式上的不同,又衍生出YUV420SP,YUV420P等格式


(侵删)
ffmpeg基本组成
- 术语,这些概念跟上面讲的步骤其实是能找到对用关系的:
- ⾳音/视频流(stream) 一路路⾳音/视频称为⼀一路路流。ffmpeg⽀支持5种流:⾳音频(a),视频(v),字幕(s),数据(d)以及附件(t)。
- 容器 对应上文提到的MP4,flv等,包括音频视频各个流。
- 编解码器 用于编解码各个流
- 解/复用 在容器中分离出流
- 过滤器 对音/视频进行特殊处理,比如加水印等
- 使用:FFmpeg可以通过它的工具,以命令行的形式使用,也支持利用接口进行编码调用。工具调用方式,不赘述,主要分享一下lib库的使用经历。
ffmpeg库的使用
- 关键结构体:
- AVIOContext(URLContext): IO类型,主要存储协议类型及状态
- AVFormatContext:主要存储视频音频中包含的封装信息
- AVInputFormat:存储对应音视频使用的封装格式
- AVStream:存储一个视频(或音频)流相关的数据
- AVCodecContext: 每个AVStream对应一个AVCodeContext,存储对应流的解码信息
- AVCodec:每个AVCodeContext对应一个AVCodec,包含对应的解码器
- AVPacket:编码后的数据
- AVFrame:解码后的数据

(侵删)
- 关键函数:
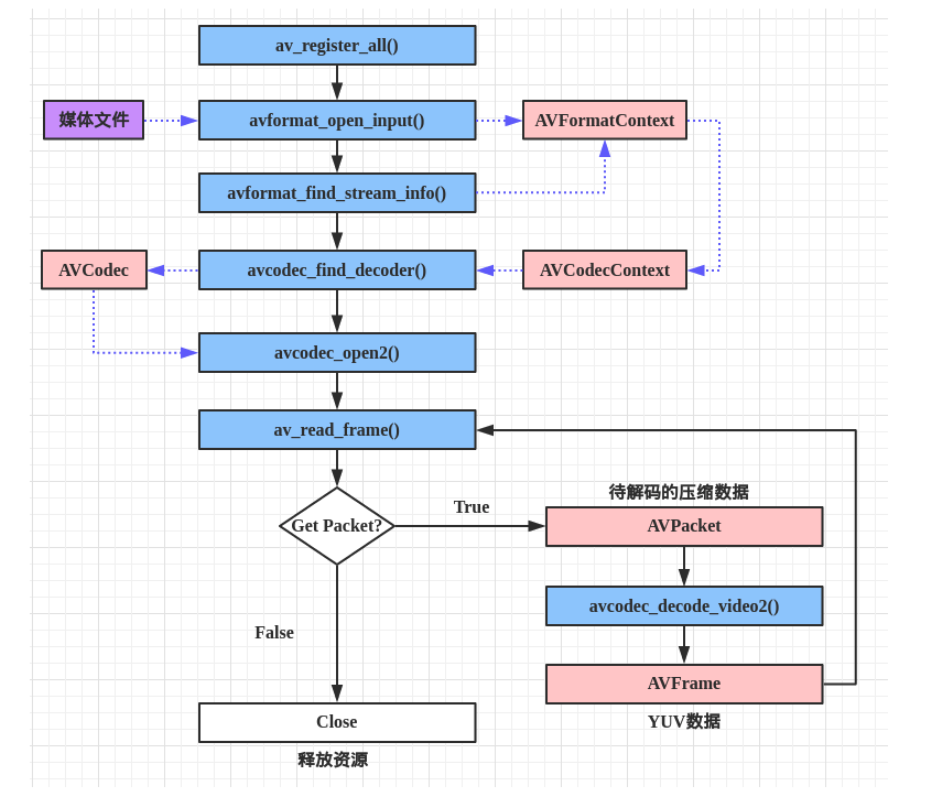
- av_register_all(新版本废弃):注册可用的编解码器,编解复用器等等
- avformat_alloc_context:分配一个AVFormatContext结构体
- avio_alloc_context:I/O上下文,可以用来定制IO操作
- av_open_input_file:以输入方式打开一个源文件,可以使用文件名作为参数,也可以使用定制I/O
- av_find_stream_info:获取文件流信息
- avcodec_find_decoder(ID)/avcodec_find_decoder_by_name:通过ID或者name查找解码器
- avcodec_open:使用一个给定的codec,初始化AVCodecContext用于解码操作
- av_read_frame:从源文件容器中读取一个packet数据包,并不是每一次读取都是有效的,当返回操作码>=0时,循环调用该函数进行读取,读出来的包需要进行解码操作
- avcodec_decode_video2(新版本中不推荐使用这个函数):解码,返回frame
- av_send_packet:向解码器发送一个packet数据,并解码
- av_receive_frame:获取解码后的数据,receive并不是每次都可以成功的。
(侵删)
- 定制I/O,ffmpeg直接在内存中读取视频文件
- 原因:对于网络传输过来的短视频base64文件,希望能够不经过磁盘IO,直接从内存读取。
-
- 定制IO回调,自定义缓存,IO数据源
-
- 通过av_probe_input_buffer函数探测当前视频格式信息
-
- 将探测得到的fmt信息注册到AVFormatContext中,并打开源文件
-
- 后续按常规方式使用ffmpeg接口即可
- 通过定制IO获得文件基本信息并确定视频流,解码器信息的代码示例
  struct  buffer_data {
    uint8_t *ptr_;
    size_t size_;
  };
typedef buffer_data BufferData;
    int VideoParseFFmpeg::read_packet(void *opaque, uint8_t *buf, int buf_size) {
    //opaque用户自定义指针
    struct buffer_data *bd = (struct buffer_data *) opaque;
    buf_size = FFMIN(buf_size, bd->size_);

    if (!buf_size)
      return AVERROR_EOF;

    memcpy(buf, bd->ptr_, buf_size);
    bd->ptr_ += buf_size;
    bd->size_ -= buf_size;

    return buf_size;
}
int LoadContent(const std::string &video_content){
  int ret = 0;
  //分配缓存空间
  video_size_ = video_content.size();
  avio_ctx_buffer_size_ = video_size_+AV_INPUT_BUFFER_PADDING_SIZE;
  avio_ctx_buffer_ = (uint8_t *)av_malloc(avio_ctx_buffer_size_);

  //bd为自定义结构,指向内存中的视频文件
  bd_.ptr_ = (uint8_t *)video_content.c_str();
  bd_.size_ = video_content.size();

  input_ctx_ = avformat_alloc_context();
  //自定义io
  avio_ctx_ = avio_alloc_context(avio_ctx_buffer_,
                                     avio_ctx_buffer_size_,
                                     0,
                                     &bd_,
                                     &read_packet, //自定义读取回调
                                     NULL,
                                     NULL);
  AVInputFormat *in_fmt{NULL};
//视频格式探测
  if((ret = av_probe_input_buffer(avio_ctx_, &in_fmt_, "", NULL, 0, 0)) < 0) {
        LOGGER_WARN(Log::GetLog(), "fail to prob input, err [{}]", AVERROR(ret));
    return -1;
  }
  //注册iocontext
  input_ctx_->pb = avio_ctx_;

  /* open the input file */
  if ((ret = avformat_open_input(&input_ctx_, "", in_fmt_, NULL)) != 0) {
        LOGGER_WARN(Log::GetLog(), "fail to open input, err [{}]", AVERROR(ret));
    return -1;
  }
//  if ((ret = avformat_open_input(&input_ctx_, "./smoke.mp4", NULL, NULL)) != 0) {
//    LOGGER_WARN(Log::GetLog(), "fail to open input, err [{}]", AVERROR(ret));
//    return -1;
//  }
//获取流信息
  if ((ret = avformat_find_stream_info(input_ctx_, NULL)) < 0) {
        LOGGER_WARN(Log::GetLog(), "fail to find input stream information, err[{}]", AVERROR(ret));
    return -1;
  }

  /* find the video stream information */
  //找到视频流,获取其对应的decoder
  if ((ret = av_find_best_stream(input_ctx_, AVMEDIA_TYPE_VIDEO, -1, -1, &decoder_, 0)) < 0) {
        LOGGER_WARN(Log::GetLog(), "fail to find a video stream from input, err[{}]", ret);
    return -1;
  }
  video_stream_idx_ = ret;
//获取decoder_context,把decoder注册进去
  if (!(decoder_ctx_ = avcodec_alloc_context3(decoder_))) {
        LOGGER_WARN(Log::GetLog(), "fail to alloc avcodec context");
    return -1;
  }
  video_stream_ = input_ctx_->streams[video_stream_idx_];

  //新版本不再将音视频流信息直接保存到streams[video_stream_idx_]中,而是存放在AVCodecParammeters中(涉及format,width,height,codec_type等),该函数提供了转换
  if ((ret = avcodec_parameters_to_context(decoder_ctx_, video_stream_->codecpar)) < 0){
        LOGGER_WARN(Log::GetLog(), "fail to convert parameters to context, err [{}]", ret);
    return -1;
  }
    //获取帧率等基本信息
  if(video_stream_->avg_frame_rate.den != 0) {
    fps_ = video_stream_->avg_frame_rate.num / video_stream_->avg_frame_rate.den;
  }
  video_length_sec_ = input_ctx_->duration/AV_TIME_BASE;
//YUV420p等
  pix_fmt_ = (AVPixelFormat)video_stream_->codecpar->format;
//硬解码部分
  if (hw_enable_ && is_hw_support_fmt(pix_fmt_)) {
      for (int i = 0;; i++)
      {
        const AVCodecHWConfig *config = avcodec_get_hw_config(decoder_, i);
        if (!config) {
            LOGGER_WARN(Log::GetLog(), "decoder [{}] does not support device type [{}]", decoder_->name, av_hwdevice_get_type_name(hw_type_));
          return -1;
        }
        if (config->methods & AV_CODEC_HW_CONFIG_METHOD_HW_DEVICE_CTX &&
          config->device_type == hw_type_) {
          hw_pix_fmt_ = config->pix_fmt;
          break;
        }
      }
    decoder_ctx_->pix_fmt = hw_pix_fmt_;

      if ((ret = hw_decoder_init(decoder_ctx_, hw_type_)) < 0) {
          LOGGER_WARN(Log::GetLog(), "fail to init hw decoder, err [{}]", ret);
      return -1;
      }
    }

  if ((ret = avcodec_open2(decoder_ctx_, decoder_, NULL)) < 0) {
        LOGGER_WARN(Log::GetLog(), "fail to open decodec, err[{}]", ret);
    return -1;
  }
}- 踩坑记录:
- 由于某些mp4文件的moov文件被放置在文件尾部,需要设置较大的缓存空间才能够顺利解析该文件,否则会在 av_find_best_stream时报找不到流信息。
- 自定义缓存buffer使用完毕后必须主动收回,否则会造成内存泄漏;该buffer在使用过程中,ffmpeg可能根据需要主动重新分配,导致buffer位置大小改变,此时该内存依旧需要外部手动释放,当然的不能使用源buffer指针。
- 视频解码
 while (true) {
      if ((av_read_frame(input_ctx_, &packet_)) < 0){
        break;
      }

      if (video_stream_idx_ == packet_.stream_index) {
        //std::shared_ptr<cv::Mat> p_frame = nullptr;
        decode_write(decoder_ctx_, &packet_, &buffer, frames);
        //frames.push_back(p_frame);
      }
    }

    /* flush the decoder */
    packet_.data = NULL;
    packet_.size = 0;
    //std::shared_ptr<cv::Mat> p_frame = nullptr;
    //cv::Mat *p_frame = NULL;
    decode_write(decoder_ctx_, &packet_, &buffer, frames);


    ====================================================

    //code block in decode_write
    ret = avcodec_send_packet(avctx, packet);
    if (ret < 0) {
        LOGGER_WARN(Log::GetLog(), "error during decodeing, err[{}]", AVERROR(ret));
    return ret;
  }

  while (true)
  {
    auto clear = [&frame, &sw_frame, this]{
      if (frame != NULL)
        av_frame_free(&frame);
      if (sw_frame != NULL)
        av_frame_free(&sw_frame);
      av_packet_unref(&packet_);
    };
    if (!(frame = av_frame_alloc()) || !(sw_frame = av_frame_alloc()))
    {
          LOGGER_WARN(Log::GetLog(), "cant alloc frame, err[{}]", AVERROR(ENOMEM));
      clear();
      return 0;
    }

    ret = avcodec_receive_frame(avctx, frame);
    if (ret == AVERROR(EAGAIN) || ret == AVERROR_EOF) {
      clear();
      return 0;
    }
    else if (ret < 0) {
          LOGGER_WARN(Log::GetLog(), "error while decoding, err[{}]", AVERROR(ret));
      clear();
      return ret;
    }
    ...
}- 视频解码的坑:
- read_frame/send_packet/receive_frame几个函数都有可能出现暂时的不成功(ret>0),可能是因为数据还没哟准备好,此时不能判断为错误,需要继续尝试。
- send_packet和receive_frame并不是一一对应的,大多数情况下解码较慢。所以可能当所有packet都已经发送,但是还有很多解码完的数据并没有通过receive_frame收到,此时需要通过一次flush连续将缓存中解码完的frame都取出来。
- 硬件解码:
- ffmpeg hw accelerate官网介绍
- 许多平台支持对部分视频处理的工作提供硬件加速能力,包括编码、解码、过滤等操作。通常我们会使用到一些API来进行编解码,这些API对不同硬件的支持各不相同,而ffmpeg对这些API的支持程度也有所不同。
- 通常我们使用NVENC/NVDEC(原名NVDIA)API,在NIVIDIA设备上进行编解码。
- 默认的ffmpeg并没有开启硬件解码的选项,需要我们重新编译ffmpeg库开启。
./configure --prefix=./ --bindir=bin/ffmpeg --incdir=include/ffmpeg --libdir=lib64/ffmpeg --disable-x86asm --arch=x86_64 --optflags='-O2 -g -pipe -Wall -Wp,-D_FORTIFY_SOURCE=2 -fexceptions -fstack-protector-strong --param=ssp-buffer-size=4 -grecord-gcc-switches -m64 -mtune=generic' --extra-ldflags='-Wl,-z,relro' --enable-libx264 --enable-libx265 --enable-avfilter --enable-pthreads --enable-shared --enable-gpl --disable-debug --enable-cuda --enable-cuvid --enable-nvenc --enable-nonfree --enable-libnpp --extra-cflags=-I/usr/local/cuda-8.0/include --extra-ldflags=-L/usr/local/cuda-8.0/lib64- 编译时要预先安装cuda库,然后使用--extra-cflags=-I/usr/local/cuda-8.0/include --extra-ldflags=-L/usr/local/cuda-8.0/lib64选项指定cuda库的版本,cuda8,cuda10在要注意区分
- 整个编译过程中可能会有各种库缺失的问题,查文档安装即可。
- ffmpeg编译选项
- 附一个编译错误解决
- ERROR: cuda requested, but not all dependencies are satisfied: ffnvcodec
参考解决
- ERROR: cuda requested, but not all dependencies are satisfied: ffnvcodec
- 硬件解码代码块
//配置解码器
if (hw_enable_ && is_hw_support_fmt(pix_fmt_)) {
    for (int i = 0;; i++)
    {
    //获取支持该decoder的hw 配置型
      const AVCodecHWConfig *config = avcodec_get_hw_config(decoder_, i);
      if (!config) {
            LOGGER_WARN(Log::GetLog(), "decoder [{}] does not support device type [{}]", decoder_->name, av_hwdevice_get_type_name(hw_type_));
        return -1;
      }

      //AV_CODEC_HW_CONFIG_METHOD_HW_DEVICE_CTX使用hw_device_ctx API
      //hw_type_支持的硬件类型(cuda)
      if (config->methods & AV_CODEC_HW_CONFIG_METHOD_HW_DEVICE_CTX &&
          config->device_type == hw_type_) {
        hw_pix_fmt_ = config->pix_fmt;
        break;
      }
    }
    //decoder_ctx_->get_format = &get_hw_format;
    decoder_ctx_->pix_fmt = hw_pix_fmt_;

    if ((ret = hw_decoder_init(decoder_ctx_, hw_type_)) < 0) {
          LOGGER_WARN(Log::GetLog(), "fail to init hw decoder, err [{}]", ret);
      return -1;
    }
  }
  ret = avcodec_open2(decoder_ctx_, decoder_, NULL))
  ...

  int VideoParseFFmpeg::hw_decoder_init(AVCodecContext *ctx, const enum AVHWDeviceType type)
  {
  int err = 0;
  if ((err = av_hwdevice_ctx_create(&hw_device_ctx_, type,NULL, NULL, 0)) < 0)
  {
        LOGGER_WARN(Log::GetLog(), "fail to create specified HW device, err[{}]", AVERROR(err));
    char buf[1024] = { 0 };
    av_strerror(err, buf, 1024);
    return err;
  }
  //注册硬解码上下文
  ctx->hw_device_ctx = av_buffer_ref(hw_device_ctx_);

  return err;
}

//解码
//receive_frame以后
if (frame->format == hw_pix_fmt_ &&
    hw_enable_ &&
    is_hw_support_fmt(pix_fmt_)) {
  /* retrieve data from GPU to CPU */
  if ((ret = av_hwframe_transfer_data(sw_frame, frame, 0)) < 0) {
    LOGGER_WARN(Log::GetLog(), "error transferring the data to system memory, err[{}]", ret);
    clear();
    return ret;
  }
  tmp_frame = sw_frame;
} else {
  tmp_frame = frame;
}
p_mat_out.push_back(avFrame2Mat(tmp_frame,
                                avctx,
                                (AVPixelFormat) tmp_frame->format));
clear();- 硬解码踩坑:
- CUDA只支持YUV420和YUV444格式图片的解码,不支持YUV422 。此时程序会直接在avcodec_send_packet函数core出,cuda库显示错误。应该有相关接口可以直接判断,但是我还没找到。
- 对于不支持的格式,依旧需要使用软件解码。也可以提前转成420再解码,对信息损失敏感的话,还是用软解码好了。
- 在将不同格式转换到RGB时需要使用到 ffmpeg的sws_scale格式转换接口,注意部分格式命名新版ffmpeg已经不支持,需要在进一步转换,参考FFmpeg deprecated pixel format used,接口使用不复杂,不再赘述
- 格式转换接口的坑:
在ffmpeg 4.1.4库使用过程中发现,旧版本中
avpicture_get_size
avpicture_fill
两个函数已经被废弃,网上常见教程依然使用这两个函数,新版本使用这两个函数转换图片会失真
应该使用以下函数替代之:
av_image_get_buffer_size
av_image_fill_arrays
---(end)---