MySQL高可用
(1)MMM: Multi-Master Replication Manager for MySQL,Mysql主主复制管理器是一套灵活的脚本程序,基于perl实现,用来对mysql replication进行监控和故障迁移,并能管理mysql Master-Master复制的配置(同一时间只有一个节点是可写的)
官网: http://www.mysql-mmm.org
https://code.google.com/archive/p/mysql-master-master/downloads
(2)MHA: Master High Availability,对主节点进行监控,可实现自动故障转移至其它从节点;通过提升某一从节点为新的主节点,基于主从复制实现,还需要客户端配合实现,目前MHA主要支持一主多从的架构,要搭建MHA,要求一个复制集群中必须最少有三台数 据库服务器,一主二从,即一台充当master,一台充当备用master,另外一台充当从库,出于机器成本的考虑,淘宝进行了改造,目前淘宝TMHA已经支持一主一从
官网:https://code.google.com/archive/p/mysql-master-ha/
(3)Galera Cluster:wsrep(MySQL extended with the Write Set Replication)
通过wsrep协议在全局实现复制;任何一节点都可读写,不需要主从复制,实现多主读写
(4)GR(Group Replication):MySQL官方提供的组复制技术(MySQL 5.7.17引入的技术),基于原生复制技术Paxos算法
MHA工作原理
1 从宕机崩溃的master保存二进制日志事件(binlog events) 2 识别含有最新更新的slave 3 应用差异的中继日志(relay log)到其他的slave 4 应用从master保存的二进制日志事件(binlog events) 5 提升一个slave为新的master 6 使其他的slave连接新的master进行复制
1、环境准备
A主机: 监控主服务器状态 192.168.34.105
B主机:主服务器 192.168.34.101
C主机: 从服务器1 192.168.34.102
D主机: 从服务器2 192.168.34.103
2、实现三台服务器的一主多从
注意点:
① 每个节点都需开启二进制和中继日志,因为主会宕机,当主的机器修复完毕,可以作为从继续使用,所以中继日志是必须的;从也会在主宕机的时候,顶为主,所以二进制日志也是必须的
② 各从节点必须显示启用其read-only 属性,并关闭relay_log_purge 清理中继日志的功能
③ 注意每个mysql 的server-id都不能相同
开始配置主从服务器的配置文件
B主服务器上配置
vim /etc/my.cnf
[mysqld]
server-id=1   服务ID
log_bin=/data/logbin/mysql-bin  指定二进制日志路径
binlog_format=ROW   以行的方式保存二进制日志
skip-name-resolve  不将IP地址解析成名字
C从服务器修改配置文件
vim /etc/my.cnf
[mysqld]
server-id=2
read-only
log_bin
binlog_format=row
skip-name-resolve
relay_log_purge=0   默认是清除中继日志,选择不清除
D从服务器上修改配置文件
[mysqld]
server-id=3
read-only
skip-name-resolve
relay_log_purge=0
log_bin
binlog_format=row
配置完主从复制之后,将三个服务器都重启
systemctl restart mariadb
先清除之前实验所做的二进制日志文件,生产中不要使用
MariaDB [(none)]> reset master;
在B主服务器上创建一个赋予所有权限的用户,可随时作为主节点的对象用户账号
MariaDB [(none)]> grant all on *.* to mhauser@'192.168.34.%' identified by 'magedu';
再在B主服务器创建一个赋予复制权限的用户
MariaDB [(none)]> grant replication slave on *.* to rpluser@'192.168.34.%' identified by 'centos';
在C从服务器上启动复制线程
MariaDB [(none)]> CHANGE MASTER TO
    ->   MASTER_HOST='192.168.34.101',
    ->   MASTER_USER='rpluser',
    ->   MASTER_PASSWORD='centos',
    ->   MASTER_PORT=3306,
    ->   MASTER_LOG_FILE='mysql-bin.000001',
    ->   MASTER_LOG_POS=245;
开启C从服务器slave
start slave
在D从服务器上开启复制线程和slave
MariaDB [(none)]> CHANGE MASTER TO  开启复制线程
    ->   MASTER_HOST='192.168.34.101',
    ->   MASTER_USER='rpluser',
    ->   MASTER_PASSWORD='centos',
    ->   MASTER_PORT=3306,
    ->   MASTER_LOG_FILE='mysql-bin.000001',
    ->   MASTER_LOG_POS=245;

Query OK, 0 rows affected (0.42 sec)

MariaDB [(none)]>
MariaDB [(none)]> start slave;  开启slave
Query OK, 0 rows affected (0.00 sec)
验证主从复制
在B主服务器上导入数据库,并查看结果
[root@centos7~]#mysql < hellodb_innodb.sql   导入数据库
MariaDB [(none)]> show databases;
+--------------------+
| Database           |
+--------------------+
| information_schema |
| hellodb            |
| mysql              |
| performance_schema |
| test               |
+--------------------+
在C和D从服务器上查看此时的数据库已经复制过去
MariaDB [(none)]> show databases;
+--------------------+
| Database           |
+--------------------+
| information_schema |
| hellodb            |
| mysql              |
| performance_schema |
| test               |
+--------------------+
3、配置MHA的准备
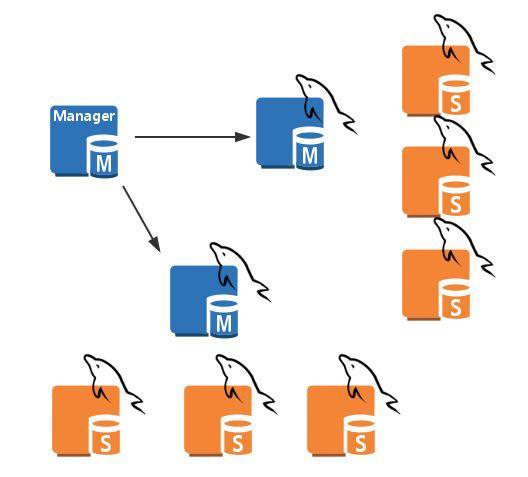
(1)MHA的安装
MHA软件由两部分组成,Manager工具包和Node工具包
Manager工具包主要包括以下几个工具: masterha_check_ssh 检查MHA的SSH配置状况 masterha_check_repl 检查MySQL复制状况 masterha_manger 启动MHA masterha_check_status 检测当前MHA运行状态 masterha_master_monitor 检测master是否宕机 masterha_master_switch 故障转移(自动或手动) masterha_conf_host 添加或删除配置的server信息
需安装2个包 rz传到A主机上:
mha4mysql-manager-0.56-0.el6.noarch.rpm
mha4mysql-node-0.56-0.el6.noarch.rpm
在管理节点上安装两个包:
mha4mysql-manager
mha4mysql-node
在被管理节点安装:
mha4mysql-node
在A主机安装MHA包:
[root@centos6~]#yum install mha4mysql* -y
在B、C、D主机上安装mha4mysql-node包
[root@centos777data]#yum install mahout-collection-codegen-plugin -y
(2)实现各个节点都基于KEY验证
在A主机上生成基于Key验证,先生成公私钥对
[root@centos6~]#ssh-keygen
在A主机上生成自己的公钥文件
[root@centos6~]#ssh-copy-id 192.168.34.105
将生成的公钥文件整个目录全部复制到其他服务器上
[root@centos6~]#scp -rp /root/.ssh  192.168.34.101:/root/   复制到B主服务器的
[root@centos6~]#scp -rp /root/.ssh  192.168.34.102:/root/   复制到C从服务器
[root@centos6~]#scp -rp /root/.ssh  192.168.34.103:/root/   复制到D从服务器
定义MHA 管理配置文件,在A主机上新建一个目录文件并配置相关的配置文件
[root@centos6~]#mkdir /etc/mha/   新建一个mha目录,存放配置文件路径
[root@centos6~]#vim /etc/mha/cluster1.conf  新建一个cluster1,cnf配置文件并在里边配置相关数据
[server default]
user=mhauser    #管理用户
password=magedu   管理密码
manager_workdir=/data/mastermha/cluster1/     mha工作路径
manager_log=/data/mastermha/cluster1/manager.log   mha日志文件
remote_workdir=/data/mastermha/cluster1/      每个远程主机的工作目录
ssh_user=root
repl_user=rpluser        数据库名称
repl_password=centos     数据库密码
ping_interval=1           ping时间时长


[server1]
hostname=192.168.34.101  主服务器IP地址
candidate_master=1
[server2]
hostname=192.168.34.102   候选主服务器IP地址
candidate_master=1
[server3]
hostname=192.168.34.103
开启服务前检测
在所有节点实现相互之间ssh key验证
[root@centos7~]#masterha_check_ssh --conf=/etc/mha/cluster1.conf
Wed Nov 27 10:41:04 2019 - [warning] Global configuration file /etc/masterha_default.cnf not found. Skipping.
Wed Nov 27 10:41:04 2019 - [info] Reading application default configuration from /etc/mha/cluster1.conf..
Wed Nov 27 10:41:04 2019 - [info] Reading server configuration from /etc/mha/cluster1.conf..
Wed Nov 27 10:41:04 2019 - [info] Starting SSH connection tests..
Wed Nov 27 10:41:05 2019 - [debug]
Wed Nov 27 10:41:04 2019 - [debug]  Connecting via SSH from [email protected](192.168.34.101:22) to [email protected](192.168.34.102:22)..
Wed Nov 27 10:41:05 2019 - [debug]   ok.
Wed Nov 27 10:41:05 2019 - [debug]  Connecting via SSH from [email protected](192.168.34.101:22) to [email protected](192.168.34.103:22)..
Warning: Permanently added '192.168.34.103' (ECDSA) to the list of known hosts.
Wed Nov 27 10:41:05 2019 - [debug]   ok.
Wed Nov 27 10:41:06 2019 - [debug]
Wed Nov 27 10:41:04 2019 - [debug]  Connecting via SSH from [email protected](192.168.34.102:22) to [email protected](192.168.34.101:22)..
Wed Nov 27 10:41:05 2019 - [debug]   ok.
Wed Nov 27 10:41:05 2019 - [debug]  Connecting via SSH from [email protected](192.168.34.102:22) to [email protected](192.168.34.103:22)..
Wed Nov 27 10:41:06 2019 - [debug]   ok.
Wed Nov 27 10:41:06 2019 - [debug]
Wed Nov 27 10:41:05 2019 - [debug]  Connecting via SSH from [email protected](192.168.34.103:22) to [email protected](192.168.34.101:22)..
Warning: Permanently added '192.168.34.103' (ECDSA) to the list of known hosts.
Wed Nov 27 10:41:05 2019 - [debug]   ok.
Wed Nov 27 10:41:05 2019 - [debug]  Connecting via SSH from [email protected](192.168.34.103:22) to [email protected](192.168.34.102:22)..
Wed Nov 27 10:41:06 2019 - [debug]   ok.
Wed Nov 27 10:41:06 2019 - [info] All SSH connection tests passed successfully.   验证已经成功
验证复制集群的连接配置参数是否OK
[root@centos7~]#masterha_check_repl --conf=/etc/mha/cluster1.conf
注意:如果测试时会报错 ,可能是从节点上没有账号,因为这个架构,任何一个从节点,将有可能成为主节点,所以也需要创建账号。
因此,这里只要在mater 节点上再次执行以下操作即可:
MariaDB [(none)]> grant all on *.* to mhauser@'192.168.34.%' identified by 'magedu';
启动MHA
(1)开启mha服务,此时是在前台执行命令
[root@centos7~]#masterha_manager --conf=/etc/mha/cluster1.conf
(2)检查此时mha的状态
[root@centos7~]#tail /data/mastermha/cluster1/manager.log  -f
192.168.34.101(192.168.34.101:3306) (current master)
 +--192.168.34.102(192.168.34.102:3306)
 +--192.168.34.103(192.168.34.103:3306)

Wed Nov 27 11:00:13 2019 - [warning] master_ip_failover_script is not defined.
Wed Nov 27 11:00:13 2019 - [warning] shutdown_script is not defined.
Wed Nov 27 11:00:13 2019 - [info] Set master ping interval 1 seconds.
Wed Nov 27 11:00:13 2019 - [warning] secondary_check_script is not defined. It is highly recommended setting it to check master reachability from two or more routes.
Wed Nov 27 11:00:13 2019 - [info] Starting ping health check on 192.168.34.101(192.168.34.101:3306)..
Wed Nov 27 11:00:13 2019 - [info] Ping(SELECT) succeeded, waiting until MySQL doesn't respond..   可以看到此时的状态是成功的,直至mysql不响应
测试MHA 测试故障转移
(1)将B主服务器down机
(2)在A服务器上查看此时监控状态,此时当前MHA的监控退出,提升一个从服务器作为主服务器
[root@centos7~]#masterha_manager --conf=/etc/mha/cluster1.conf
Wed Nov 27 11:00:07 2019 - [warning] Global configuration file /etc/masterha_default.cnf not found. Skipping.
Wed Nov 27 11:00:07 2019 - [info] Reading application default configuration from /etc/mha/cluster1.conf..
Wed Nov 27 11:00:07 2019 - [info] Reading server configuration from /etc/mha/cluster1.conf..
  Creating /data/mastermha/cluster1 if not exists..    ok.
  Checking output directory is accessible or not..
   ok.
  Binlog found at /var/lib/mysql, up to mariadb-bin.000001
Wed Nov 27 11:22:28 2019 - [warning] Global configuration file /etc/masterha_default.cnf not found. Skipping.
Wed Nov 27 11:22:28 2019 - [info] Reading application default configuration from /etc/mha/cluster1.conf..
Wed Nov 27 11:22:28 2019 - [info] Reading server configuration from /etc/mha/cluster1.conf..
(3)此时查看排错日志,可以看到将哪个从服务器作为主服务器
[root@centos7~]#tail /data/mastermha/cluster1/manager.log

Started automated(non-interactive) failover.
The latest slave 192.168.34.102(192.168.34.102:3306) has all relay logs for recovery.
Selected 192.168.34.102(192.168.34.102:3306) as a new master.      可以看到此时的新主服务器是192.168.34.102
192.168.34.102(192.168.34.102:3306): OK: Applying all logs succeeded.
192.168.34.103(192.168.34.103:3306): This host has the latest relay log events.
Generating relay diff files from the latest slave succeeded.
192.168.34.103(192.168.34.103:3306): OK: Applying all logs succeeded. Slave started, replicating from 192.168.34.102(192.168.34.102:3306)
192.168.34.102(192.168.34.102:3306): Resetting slave info succeeded.
Master failover to 192.168.34.102(192.168.34.102:3306) completed successfully.
查看日志里边的内容,也可以确认此时的192.168.34.102是新主服务器
[root@centos7~]#cat  /data/mastermha/cluster1/manager.log
Wed Nov 27 11:22:32 2019 - [info] New master is 192.168.34.102(192.168.34.102:3306)
可以查看此时新的主服务器的read-only已经关闭
MariaDB [(none)]> show variables like 'read_only';
+---------------+-------+
| Variable_name | Value |
+---------------+-------+
| read_only     | OFF   |
+---------------+-------+
查看D从服务器指向的是新主服务器(192.168.34.102)
MariaDB [(none)]> show slave status\G;
*************************** 1. row ***************************
               Slave_IO_State: Waiting for master to send event
                  Master_Host: 192.168.34.102
                  Master_User: rpluser
                  Master_Port: 3306
                Connect_Retry: 60
              Master_Log_File: mariadb-bin.000001
          Read_Master_Log_Pos: 245
               Relay_Log_File: mariadb-relay-bin.000002
                Relay_Log_Pos: 531
        Relay_Master_Log_File: mariadb-bin.000001
             Slave_IO_Running: Yes
            Slave_SQL_Running: Yes
注意:如果之前down掉的主服务器恢复,其他从服务器也不会再指向此服务器,只能将恢复的服务器作为从服务器更好,以免在操作过程中出现其他错误。
(1) 在生产环境中,当你的主节点挂了后,一定要在从节点上做一个备份,拿着备份文件把主节点手动提升为从节点,并指明从哪一个日志文件的位置开始复制
(2) 每一次自动完成转换后,每一次的(replication health ) 检测不ok 始终都是启动不了必须手动修复主节点,除非你改配置文件
(3) 手动修复主节点提升为从节点后,再次运行检测命令
masterha_check_repl --conf=/etc/mha/cluster1.conf
(4) 再次运行起来就恢复成功了
masterha_manager --conf=/etc/mha/cluster1.conf