目录
网络配置基本的IPV4与IPV6
拓扑图
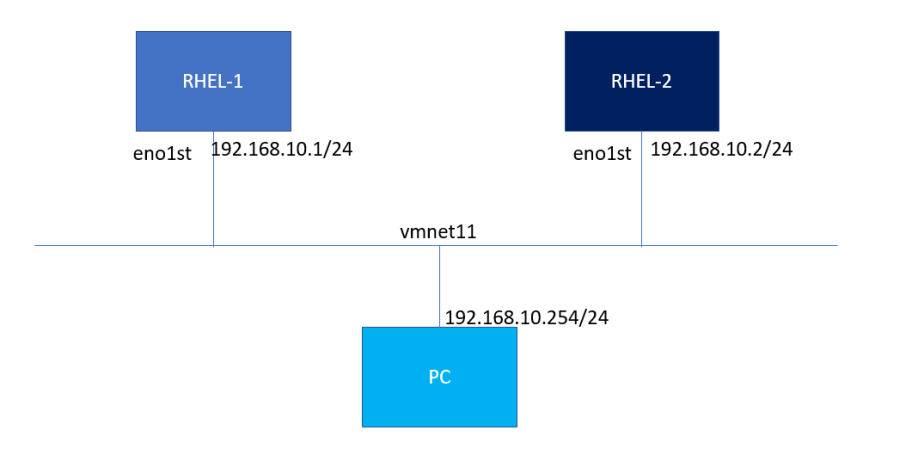
最终要实现的目标
- 虚拟机
RHEL1与RHEL2能够通过IPV6地址互相Ping通 - 通过
/etc/hosts配置,使用RHEL1与RHEL2可以通过域名Ping通 RHEL1与RHEL2的 IPV4地址能够互相Ping通- 物理机能够通过IPV6的地址
SSH到任何一台虚拟机上
操作
新加一块网卡
VMWare->编辑->虚拟网络编辑器->添加网络->选择一块网卡,我选择了VMnet16
注: Win10 需要点击下面的用管理员运行的按钮更改设置。
- 配置网卡
1. 仅主机模式
2. 选中`将主机虚拟适配器连接到此网络`
3. 子网IP `192.168.22.0`,子网掩码不用改`255.255.255.0`- 点击确定
- 此时在物理机上尝试
ping 192.168.22.1应该是可以Ping通的。WMware会吧这个网段上192.168.22.1这个ip分给物理机。n
将增加的网卡分别加到两台虚拟机上
右键虚拟机->设置->添加->网络适配器->完成- 选中刚才添加的
网络适配器进行配置
1. 设备状态不需要更改
2. 网络连接 选中`自定义(U):特定虚拟网络`
3. 在下拉列表中选中自己添加的网卡,我的是`VMnet16`
4. 确定- 第二台虚拟机做同样的操作
在两台虚拟机上配置IPV4与 IPV6
在两台虚拟机上 ip addr
# 第一台
[root@rhel1 Desktop]# ip addr
4: eno16777736: <BROADCAST,MULTICAST,UP,LOWER_UP> mtu 1500 qdisc pfifo_fast state UP qlen 1000
    link/ether 00:0c:29:fb:7d:19 brd ff:ff:ff:ff:ff:ff
# 第二台
[root@rhel2 ~]# ip addr
8: eno16777736: <BROADCAST,MULTICAST,UP,LOWER_UP> mtu 1500 qdisc pfifo_fast state UP qlen 1000
    link/ether 00:0c:29:10:6a:95 brd ff:ff:ff:ff:ff:ff
注: 本次添加后,两块网卡的名称切好都是eno16777736,而其实未必是这样,本次恰好两台虚拟机都是配置的第一块网卡是VMnet16,如果配置时 第几块不一样的时候,名称也将不同。
配置IPV4网络
VMnet16 网段是 192.168.22.0 对应的物理机IP是 192.168.22.1
- 第一台设备
##添加配置
[root@rhel1 Desktop]# nmcli connection add con-name ipv4-ipv6 ifname eno16777736 type ethernet ip4 192.168.22.10/24
Connection 'ipv4-ipv6' (2371b109-1edb-4e73-b4e1-b03068581d96) successfully added.
## 启动
[root@rhel1 Desktop]# nmcli connection up ipv4-ipv6
Connection successfully activated (D-Bus active path: /org/freedesktop/NetworkManager/ActiveConnection/8)
## 查看
[root@rhel1 Desktop]# nmcli connection show
NAME       UUID                                  TYPE            DEVICE
ipv4-ipv6  2371b109-1edb-4e73-b4e1-b03068581d96  802-3-ethernet  eno16777736
## 查看 `ip addr`
[root@rhel1 Desktop]# ip addr
4: eno16777736: <BROADCAST,MULTICAST,UP,LOWER_UP> mtu 1500 qdisc pfifo_fast state UP qlen 1000
    link/ether 00:0c:29:fb:7d:19 brd ff:ff:ff:ff:ff:ff
    inet 192.168.22.10/24 brd 192.168.22.255 scope global eno16777736
       valid_lft forever preferred_lft forever
    inet6 fe80::20c:29ff:fefb:7d19/64 scope link
       valid_lft forever preferred_lft forever
## 在物理机上ping这个IP
C:\Users\kanewang>ping 192.168.22.10

Pinging 192.168.22.10 with 32 bytes of data:
Reply from 192.168.22.10: bytes=32 time<1ms TTL=64
Reply from 192.168.22.10: bytes=32 time=1ms TTL=64
Reply from 192.168.22.10: bytes=32 time=1ms TTL=64
Reply from 192.168.22.10: bytes=32 time<1ms TTL=64

Ping statistics for 192.168.22.10:
    Packets: Sent = 4, Received = 4, Lost = 0 (0% loss),
Approximate round trip times in milli-seconds:
Minimum = 0ms, Maximum = 1ms, Average = 0ms- 第二台设备做同样操作
IP 是 192.168.22.11
## 在物理机上ping
C:\Users\kanewang>ping 192.168.22.11

Pinging 192.168.22.11 with 32 bytes of data:
Reply from 192.168.22.11: bytes=32 time=3ms TTL=64
Reply from 192.168.22.11: bytes=32 time=2ms TTL=64
Reply from 192.168.22.11: bytes=32 time=1ms TTL=64
Reply from 192.168.22.11: bytes=32 time<1ms TTL=64

Ping statistics for 192.168.22.11:
    Packets: Sent = 4, Received = 4, Lost = 0 (0% loss),
Approximate round trip times in milli-seconds:
    Minimum = 0ms, Maximum = 3ms, Average = 1ms
## 在第一台虚拟机上ping
[root@rhel1 Desktop]# ping 192.168.22.11
PING 192.168.22.11 (192.168.22.11) 56(84) bytes of data.
64 bytes from 192.168.22.11: icmp_seq=1 ttl=64 time=0.753 ms
64 bytes from 192.168.22.11: icmp_seq=2 ttl=64 time=3.82 ms
^C
--- 192.168.22.11 ping statistics ---
2 packets transmitted, 2 received, 0% packet loss, time 1001ms
rtt min/avg/max/mdev = 0.753/2.288/3.823/1.535 ms
nmcli connect add命令
# 敲到 add 这一级别后 按两次 `Tab` 都有提示
[root@rhel1 Desktop]# nmcli connection add
autoconnect  con-name     help         ifname       type
1. autoconnect 是否自动连接
2. con-name    显示名称
3. help        帮助
4. ifname      网卡的名称 本次是`eno16777736`打eno两次tab也能出来
5. type        连接方式
6. ip4 配置ipv4的IP配置IPV6网络
IPV6我们同样使用这块网卡,但是WMware并没有给物理机配置IPV6我们需要手动配置。
- 配置物理机在网卡
VMnet16上的IPV6地址:2019:ffff::1
注:::在IPV6中的意思是缩写,代表:连续多组0
物理机->控制面板->Network and Internet->Network and Sharing Center-> 左边栏Change adapter settings->VMware Network Adapter VMnet16右键->Properties 属性->点一下 Internet Protocol Version 6(TCP/IPV6)- 此时下面的
Properties 属性按钮可点击。点击。 - 勾中
Use the following IPV6 address:分别填入
IPv6 address (IPv6地址):                  2019:ffff::1
Subnet prefix length(子网前缀长度): 64点击确定- 本机测试一下
C:\Users\kanewang>ping -6 2019:ffff::1

Pinging 2019:ffff::1 with 32 bytes of data:
Reply from 2019:ffff::1: time<1ms
Reply from 2019:ffff::1: time<1ms
Reply from 2019:ffff::1: time=1ms
Reply from 2019:ffff::1: time<1ms

Ping statistics for 2019:ffff::1:
    Packets: Sent = 4, Received = 4, Lost = 0 (0% loss),
Approximate round trip times in milli-seconds:
Minimum = 0ms, Maximum = 1ms, Average = 0ms- 配置第一台虚拟机的
IPV6
## 修改 `ipv4-ipv6`的链接配置
# 一定要加上  ipv6.method manual
[root@rhel1 Desktop]# nmcli connection modify ipv4-ipv6 ipv6.addresses "2019:ffff::100/64" ipv6.method manual
## 重启
[root@rhel1 Desktop]# nmcli connection up ipv4-ipv6
Connection successfully activated (D-Bus active path: /org/freedesktop/NetworkManager/ActiveConnection/10)
## 查看
[root@rhel1 Desktop]# ip addr
4: eno16777736: <BROADCAST,MULTICAST,UP,LOWER_UP> mtu 1500 qdisc pfifo_fast state UP qlen 1000
    link/ether 00:0c:29:fb:7d:19 brd ff:ff:ff:ff:ff:ff
    inet 192.168.22.10/24 brd 192.168.22.255 scope global eno16777736
       valid_lft forever preferred_lft forever
    inet6 2019:ffff::100/64 scope global
       valid_lft forever preferred_lft forever
    inet6 fe80::20c:29ff:fefb:7d19/64 scope link
       valid_lft forever preferred_lft forever
## 物理机ping一下
C:\Users\kanewang>ping -6 2019:ffff::100

Pinging 2019:ffff::100 with 32 bytes of data:
Reply from 2019:ffff::100: time=10ms
Reply from 2019:ffff::100: time<1ms
Reply from 2019:ffff::100: time=1ms
Reply from 2019:ffff::100: time<1ms

Ping statistics for 2019:ffff::100:
    Packets: Sent = 4, Received = 4, Lost = 0 (0% loss),
Approximate round trip times in milli-seconds:
Minimum = 0ms, Maximum = 10ms, Average = 2ms- 第二台设备同样操作
IP是 2019:ffff::101
## 查看
[root@rhel2 ~]# ip addr
8: eno16777736: <BROADCAST,MULTICAST,UP,LOWER_UP> mtu 1500 qdisc pfifo_fast state UP qlen 1000
    link/ether 00:0c:29:10:6a:95 brd ff:ff:ff:ff:ff:ff
    inet 192.168.22.11/24 brd 192.168.22.255 scope global eno16777736
       valid_lft forever preferred_lft forever
    inet6 2019:ffff::101/128 scope global
       valid_lft forever preferred_lft forever
    inet6 fe80::20c:29ff:fe10:6a95/64 scope link
       valid_lft forever preferred_lft forever
## 物理机 ping
C:\Users\kanewang>ping -6 2019:ffff::101

Pinging 2019:ffff::101 with 32 bytes of data:
Reply from 2019:ffff::101: time=25ms
Reply from 2019:ffff::101: time<1ms
Reply from 2019:ffff::101: time<1ms
Reply from 2019:ffff::101: time<1ms

Ping statistics for 2019:ffff::101:
    Packets: Sent = 4, Received = 4, Lost = 0 (0% loss),
Approximate round trip times in milli-seconds:
    Minimum = 0ms, Maximum = 25ms, Average = 6ms
## 第一个设备 ping 一下
[root@rhel1 Desktop]# ping6 2019:ffff::101
PING 2019:ffff::101(2019:ffff::101) 56 data bytes
64 bytes from 2019:ffff::101: icmp_seq=1 ttl=64 time=4.36 ms
64 bytes from 2019:ffff::101: icmp_seq=2 ttl=64 time=11.9 ms
^C
--- 2019:ffff::101 ping statistics ---
2 packets transmitted, 2 received, 0% packet loss, time 1003ms
rtt min/avg/max/mdev = 4.364/8.157/11.951/3.794 ms
注意
- 设置
ip时, 后面跟的子网前缀的长度,一定要与字码掩码对应上。 ipv4.method manual,ipv6.method manual在修改connection时最好都加上。
配置域名访问
- 在虚拟机上设置域名
## 虚拟机1
[root@rhel1 Desktop]# hostname rhel1.node.com
[root@rhel1 Desktop]# hostnamectl set-hostname rhel1.node.com
## 虚拟机2
[root@rhel2 Desktop]# hostname rhel2.node.com
[root@rhel2 Desktop]# hostnamectl set-hostname rhel2.node.com- 更改
/etc/hosts
[root@rhel1 Desktop]# cat /etc/hosts
127.0.0.1   localhost localhost.localdomain localhost4 localhost4.localdomain4
::1         localhost localhost.localdomain localhost6 localhost6.localdomain6
192.168.22.11   rhel2.node.com
[root@rhel2 ~]# cat /etc/hosts
127.0.0.1   localhost localhost.localdomain localhost4 localhost4.localdomain4
::1         localhost localhost.localdomain localhost6 localhost6.localdomain6
2019:ffff::100 rhel1.node.com
## 配置 IPV4 与 IPV6地址都是可以的
拓展路由转发
拓扑图
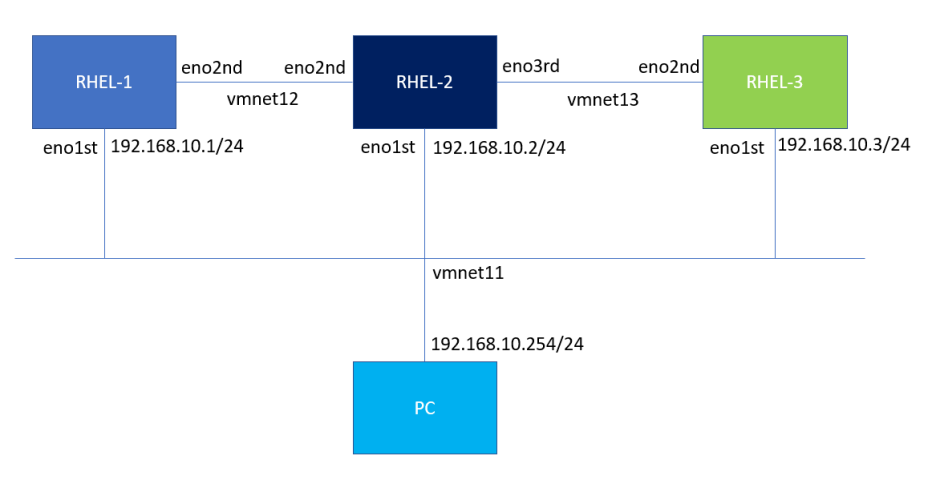
最终实现目标:
- 物理机使用 网卡
VMnet11可以SSH到三台虚拟机上 RHEL1与RHEL2之间通过VMnet12连接RHEL2与RHEL3之间通过VMnet13连接RHEL1可以直接访问到RHEL3
操作
注:做这个实验的时候,删除了所有网卡。三台虚机都增加了VMnet11、VMnet12、WMnet13三块网卡,包括网卡的顺序都相同。
# 保证 虚拟机的网卡号与正真网卡一一匹配
VMnet11->eno16777736
VMnet12->eno33554992
VMnet13->eno50332216
关于网关设置
实现上面的需求,是把RHEL2当做路由转发,所以RHEL1-RHEL2连接 RHEL1的网关必须是RHEL2,RHEL2-RHEL3连接RHEL3 的网关也必须是RHEL2
重新配置一下网络
物理机通过三台虚拟机的第一块网卡VMnet11连接虚拟机
物理机  ipv4 192.168.143.1  ipv6 2019:ac18::1
RHEL1  ipv4 192.168.143.10  ipv6 2019:ac18::100
RHEL2  ipv4 192.168.143.11  ipv6 2019:ac18::101
RHEL3  ipv4 192.168.143.12  ipv6 2019:ac18::102
命令
[root@rhel1 Desktop]#  nmcli connection add con-name control_connect ifname eno16777736 autoconnect yes type ethernet ip4 192.168.143.10/24 gw4 192.168.143.1 ip6  2019:ac18::100/64 gw6 2019:ac18::1
[root@rhel2 Desktop]#  nmcli connection add con-name control_connect ifname eno16777736 autoconnect yes type ethernet ip4 192.168.143.11/24 gw4 192.168.143.1 ip6  2019:ac18::101/64 gw6 2019:ac18::1
[root@rhel3 Desktop]# nmcli connection add con-name control_connect ifname eno16777736 autoconnect yes type ethernet ip4 192.168.143.12/24 gw4 192.168.143.1 ip6 2019:ac18::102/64 gw6 2019:ac18::1- 虚拟机
RHEL1与RHEL2通过他们的第二块网卡VMnet12进行连接
RHEL1  ipv4 192.168.27.10  ipv6 2019:ac18:1::100
RHEL1  gw4 192.168.27.11   gw6 2019:ac18:1::101 # 网关配置成RHEL2的
RHEL2  ipv4 192.168.27.11  ipv6 2019:ac18:1::101
[root@rhel1 Desktop]# nmcli connection add con-name connection12 ifname eno33554992 autoconnect yes type ethernet ip4 192.168.140.10/24 gw4 192.168.140.11 ip6 2019:ac18:1::100/64 gw6 2019:ac18:1::101
[root@rhel2 ~]# nmcli connection add con-name connection12 ifname eno33554992 autoconnect yes type ethernet ip4 192.168.140.11/24 ip6 2019:ac18:1::101/64 - 虚拟机
RHEL2与RHEL3通过他们的第三块网卡VMnet13进行连接
RHEL3  ipv4 192.168.245.10  ipv6 2019:ac18:2::100
RHEL3  gw4 192.168.245.11   gw6 2019:ac18:2::101 # 网关配置成RHEL2的
RHEL2  ipv4 192.168.245.11  ipv6 2019:ac18:2::101
命令
[root@rhel2 ~]# nmcli connection add con-name connection23 ifname eno50332216 autoconnect yes type ethernet ip4 192.168.245.11/24 ip6  2019:ac18:2::101/64
[root@rhel3 ~]#  nmcli connection add con-name connection23 ifname eno50332216 autoconnect yes type ethernet ip4 192.168.245.10/24 gw4 192.168.245.11 ip6  2019:ac18:2::100/64 gw6 2019:ac18:2::101
- 在
RHEL2上开启IPV4与IPV6进行路由转发,并开启防火墙的masquerade
## 临时开启 ipv6转发
echo 1 > /proc/sys/net/ipv6/conf/all/forwarding
## 临时开启 ipv4转发
echo 1 > /proc/sys/net/ipv4/conf/all/forwarding
## 永久开启 ipv4转发
vim /etc/sysctl.conf # 增加下面的行
net.ipv4.ip_forward=1

[root@rhel2 ~]# firewall-cmd --add-masquerade
[root@rhel2 ~]# firewall-cmd --add-masquerade --permanent
注:`masquerade` 地址伪装,算是snat中的一种特例,可以实现自动化的snat。
结果
# IPV4
[root@rhel1 Desktop]# ping 192.168.245.10
PING 192.168.245.10 (192.168.245.10) 56(84) bytes of data.
64 bytes from 192.168.245.10: icmp_seq=1 ttl=63 time=8.52 ms
^C
--- 192.168.245.10 ping statistics ---
1 packets transmitted, 1 received, 0% packet loss, time 0ms
rtt min/avg/max/mdev = 8.525/8.525/8.525/0.000 ms
# IPV6
[root@rhel1 Desktop]# ping6 2019:ac18:2::101
PING 2019:ac18:2::101(2019:ac18:2::101) 56 data bytes
64 bytes from 2019:ac18:2::101: icmp_seq=1 ttl=64 time=2.64 ms
64 bytes from 2019:ac18:2::101: icmp_seq=2 ttl=64 time=3.34 ms
^C
--- 2019:ac18:2::101 ping statistics ---
2 packets transmitted, 2 received, 0% packet loss, time 1003ms
rtt min/avg/max/mdev = 2.649/2.996/3.344/0.351 ms