父子路由的用法
父子路由一般用在页面中的一个小地方,只是通过某个触发按钮,改变整个页面中的一部分区域变化
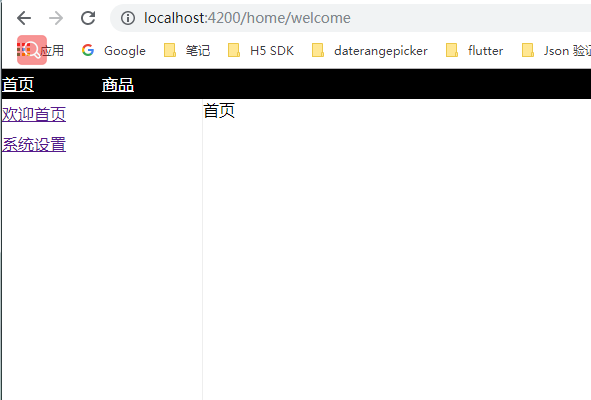
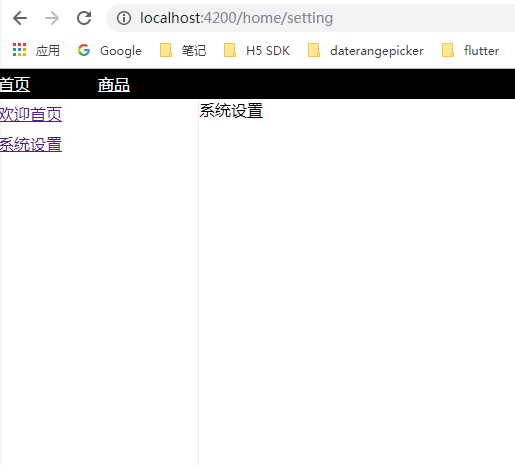
通过以上两张图片可以明显的看到路径localhost:4200/home是一样的,不一样的只是后面一部分
而后面的welcome和setting 正是两个页面的名称,同时也是通过左侧的两个按钮通过超链接的方式连接过去,从而达到点击触发按钮,整个页面中只有右侧不一样
父子路由实现步骤(实例):
1.新建两个组件
ng g component components/home
ng g component components/list
2.新建子组件(可以不按照这种方法新建,此办法新建会更加直观分清楚父子组件)
ng g component components/home/welcome 和 ng g component components/home/setting
ng g component components/list/listInfo 和 ng g component components/list/lists
3.路由设置(app-routing.modules)
1.新引进注入创建的组件
import { HomeComponent } from '../app/components/home/home.component';
import { ListComponent } from '../app/components/list/list.component';
import { WelcomeComponent } from '../app/components/home/welcome/welcome.component';
import { SettingComponent } from '../app/components/home/setting/setting.component';
import { ListsComponent } from '../app/components/list/lists/lists.component';
import { ListInfoComponent } from '../app/components/list/list-info/list-info.component';
2.路由配置(routes中)
{path:"home",component:HomeComponent,
children:[
{path:"welcome",component:WelcomeComponent},
{path:"setting",component:SettingComponent},
{path:"**",redirectTo:"welcome"}
]
},
{path:"list",component:ListComponent,
children:[
{path:"list-info",component:ListInfoComponent},
{path:"lists",component:ListsComponent},
{path:"**",redirectTo:"lists"}
]
},
{path:"**",redirectTo:"home"}
解析:一级路由(父路由)
{path:"home",component:HomeComponent},
{path:"list",component:ListComponent},
{path:"**",redirectTo:"home"}
二级路由(子路由)
对应的子路由需要嵌入到父级中,形成对应的嵌套
{path:"home",component:HomeComponent,
children:[
{path:"welcome",component:WelcomeComponent},
{path:"setting",component:SettingComponent},
{path:"**",redirectTo:"welcome"}
]
}
路由重定向 {path:"**",redirectTo:"home"} 此句的意思为:当找不到以上对应的嵌套的时候,则默认跳转到首页,子路由中同时也是需要给出默认的页面,否则就会出现空白部分
4.在对应的页面中的写法:
4-1.跟页面中的写法(app.component.html)中
<header class="header">
<div class="content">
<p>
<a [routerLink]="[ '/home' ]" routerLinkActive="active">首页</a>
</p>
<p>
<a [routerLink]="[ '/list' ]" routerLinkActive="active">商品</a>
</p>
</div>
</header>
<router-outlet></router-outlet>
4-1-1 app.component.scss(此处我使用的是scss预处理写法)
.header{
width: 100%; height: 30PX; line-height: 30PX; background: #000;
p{width:100px;float: left;
a{color: #fff;}
}
}
4-2 .在home.component.html 和 list.component.html中
<div class="content">
<div class="left">
<p> <a [routerLink]="[ '/home/welcome' ]" routerLinkActive="active">欢迎首页</a></p>
<p>
<a [routerLink]="[ '/home/setting' ]" routerLinkActive="active">系统设置</a>
</p>
</div>
<div class="right">
<router-outlet></router-outlet>
</div>
</div>
注释:在右侧中为什么写的是router-outlet,是因为右侧是需要改变的,并且运用此标签我们可以通过动态的路由把内容(子路由传递子组件的内容)传递过来,所以这里只需要写上一句<router-outlet></router-outlet>即可
4-2-2 home.component.scss 和 list.component.scss中
.content{width: 100%;height: 500px; display: flex;
.left{width: 200px; float: left; height: 500px;border-right: 1px solid #eee;
p{height: 30px; line-height: 30px;}
}
.right{flex: 1px;}
}
4-3 setting.component.html welcome.component.html list-info.component.html lists.component.html 四个子组件中进行分别写入想写的内容
5.ng serve运行 项目实现