导航:
原理介绍
代码实现
过程分析
追踪Cookie
原理介绍
众所周知,http协议是无状态的协议,简单理解是用户的前一步操作和后一步操作之间没有关系,互相不知道,不干扰。而在很多场景下,浏览网页时,网站服务器要记录访问者的浏览轨迹(前后操作之间要连续才叫轨迹);登陆的网站登陆一次可以访问多个资源(访问多个资源不必每次验证账号密码,使用前面的状态)。如何记录来访者的信息,如何查看登陆者的权限?目前的解决办法中,普遍使用cookie和session技术。在django的学习当中遇到cookie和session的理解,做笔记记录。
cookie简介
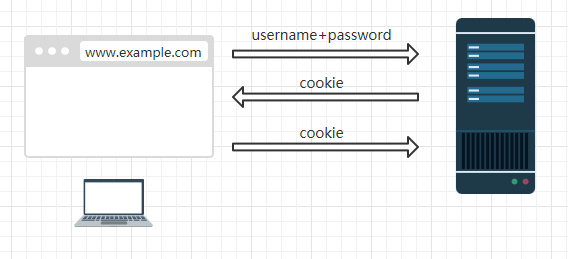
cookie是存储在浏览器中的一段文本。当第一次访问某网站时,网站服务器会在返回消息中附带cookie,下次在访问时浏览器携带cookie,方便服务器记录来访者。原理如下图:
session简介
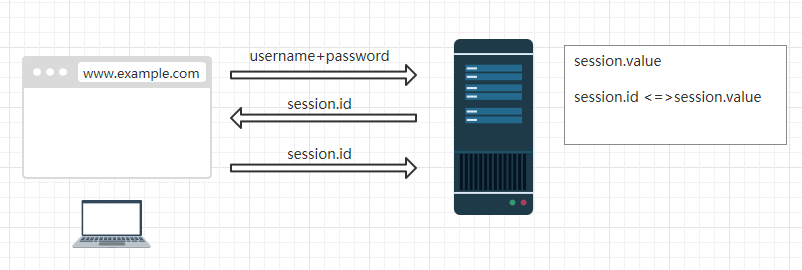
session是保存在服务上的一个键值对。当用户登陆成功之后,服务器产生session,分别是key和value。key发送给浏览器,当浏览器访问服务器时携带key,服务器判断key从而能知道登陆者的身份。
cookie和session比较:
相同点:
- 两者都是需要向浏览器发送过一段文字作为访问标识
- 都能通过浏览器携带的信息判断访问者的身份
不同点:
- cookie是将身份信息放在浏览器,访问时发送到服务器表明身份
- session是将身份信息放在服务器中,浏览器通过判断发送的session来查找用户身份
django代码实现
1、创建项目,名称为coookie
django-admin startproject cookie

2、进入项目创建应用名为online
python manage.py startapp online

3、配置setting文件,将应用online注册到系统中
cookie/setting

4、配置url。
http://ip:port/login 登陆
http://ip:port/regist 注册
http://ip:port/index 内容
http://ip:port/logout 退出
cookie/urls.py

5、配置用户数据表,存储用户姓名和密码。
online/models.py

6、完成登陆逻辑函数
views.py
 1 #coding:utf-8
 2
 3 from django.shortcuts import render,render_to_response
 4 from django.http import HttpResponse,HttpResponseRedirect
 5 from django.template import RequestContext
 6 from models import User
 7
 8 #注册
 9 def regist(req):
10     if req.method == 'POST':
11         username = req.POST['u']
12         password = req.POST['p']
13         if username and password:
14             #添加到数据库
15             User.objects.create(username= username,password=password)
16             return HttpResponse('<h2>regist success!!<h2>')
17     else:
18         return render_to_response('regist.html', context_instance=RequestContext(req))
19
20 #登陆
21 def login(req):
22     if req.method == 'POST':
23         username = req.POST['u']
24         password = req.POST['p']
25         #获取的表单数据与数据库进行比较
26         user = User.objects.filter(username__exact = username,password__exact = password)
27         if user:
28             #比较成功,跳转index
29             response = HttpResponseRedirect('/index')
30             #将username写入浏览器cookie,失效时间为3600
31             response.set_cookie('username',username,3600)
32             return response
33         else:
34             #比较失败,还在login
35             return HttpResponseRedirect('/login/')
36     else:
37         return render_to_response('login.html',context_instance=RequestContext(req))
38
39 #登陆成功
40 def index(req):
       #从post中的cookie中提取username字段
41     username = req.COOKIES.get('username','')
       #判断username是否为空,如果非空则直接调转到登陆界面,传入该username。如果为空,则跳转到登陆界面。
42     if username:
43         return render_to_response('index.html' ,{'username':username})
44     else:
45         return HttpResponseRedirect('/login')
46
47 #退出
48 def logout(req):
49     response = HttpResponse('<h2>logout !!<h2>')
50     #清理cookie里保存username
51     response.delete_cookie('username')
52     return response
7、创建页面文件
在函数中用到的html文件。在online文件夹下新建templates文件夹,将下面的三个html文件保存到当中。
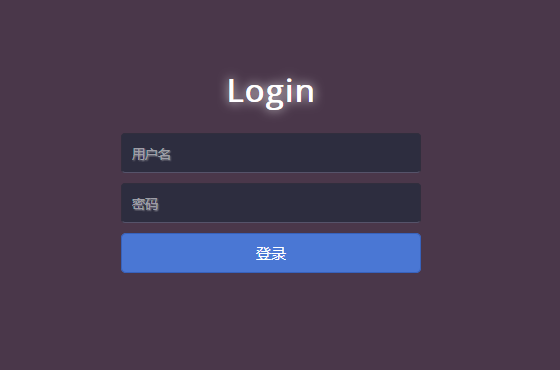
login.html
<!DOCTYPE html>
<html lang="en">
<style>

html{
    width: 100%;
    height: 100%;
    overflow: hidden;
    font-style: sans-serif;
}
body{
    width: 100%;
    height: 100%;
    font-family: 'Open Sans',sans-serif;
    margin: 0;
    background-color:#6E8B3D;
}
#login{
    position: absolute;
    top: 50%;
    left:50%;
    margin: -150px 0 0 -150px;
    width: 300px;
    height: 300px;
}
#login h1{
    color: #fff;
    text-shadow:0 0 10px;
    letter-spacing: 1px;
    text-align: center;
}
h1{
    font-size: 2em;
    margin: 0.67em 0;
}
input{
    width: 278px;
    height: 18px;
    margin-bottom: 10px;
    outline: none;
    padding: 10px;
    font-size: 13px;
    color: #fff;
    text-shadow:1px 1px 1px;
    border-top: 1px solid #312E3D;
    border-left: 1px solid #312E3D;
    border-right: 1px solid #312E3D;
    border-bottom: 1px solid #56536A;
    border-radius: 4px;
    background-color: #2D2D3F;
}
.but{
    width: 300px;
    min-height: 20px;
    display: block;
    background-color: #4a77d4;
    border: 1px solid #3762bc;
    color: #fff;
    padding: 9px 14px;
    font-size: 15px;
    line-height: normal;
    border-radius: 5px;
    margin: 0;
}


</style>

<head>
    <meta charset="UTF-8">
    <title>Login</title>
    <link rel="stylesheet" type="text/css" href="Login.css"/>
</head>
<body>
    <div id="login">
        <h1>Login</h1>
        <form method="post">
            {% csrf_token  %}
            <input type="text" required="required" placeholder="用户名" name="u"></input>
            <input type="password" required="required" placeholder="密码" name="p"></input>
            <button class="but" type="submit">登陆</button>
        </form>
    </div>
</body>
</html>
index.html
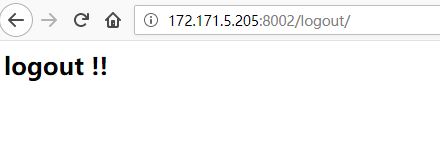
<?xml version="1.0" encoding="UTF-8"?>
<!DOCTYPE html PUBLIC "-//W3C//DTD XHTML 1.0 Strict//EN" "http://www.w3.org/TR/xhtml1/DTD/xhtml1-strict.dtd">
<html xmlns="http://www.w3.org/1999/xhtml" xml:lang="en" lang="en">
<head>
    <meta http-equiv="Content-Type" content="text/html; charset=UTF-8" />
        <title></title>
</head>

<body>
     <h1>welcome {{username}} !</h1>
     <br>
     <a href="http://172.171.5.205:8002/logout/">退出</a> #注意此处的url,在你的环境中要修改成你的url。
</body>
        </html>
regist.html
<!DOCTYPE html>
<html lang="en">
<style>

html{
    width: 100%;
    height: 100%;
    overflow: hidden;
    font-style: sans-serif;
}
body{
    width: 100%;
    height: 100%;
    font-family: 'Open Sans',sans-serif;
    margin: 0;
    background-color:#6E8B3D;
}
#login{
    position: absolute;
    top: 50%;
    left:50%;
    margin: -150px 0 0 -150px;
    width: 300px;
    height: 300px;
}
#login h1{
    color: #fff;
    text-shadow:0 0 10px;
    letter-spacing: 1px;
    text-align: center;
}
h1{
    font-size: 2em;
    margin: 0.67em 0;
}
input{
    width: 278px;
    height: 18px;
    margin-bottom: 10px;
    outline: none;
    padding: 10px;
    font-size: 13px;
    color: #fff;
    text-shadow:1px 1px 1px;
    border-top: 1px solid #312E3D;
    border-left: 1px solid #312E3D;
    border-right: 1px solid #312E3D;
    border-bottom: 1px solid #56536A;
    border-radius: 4px;
    background-color: #2D2D3F;
}
.but{
    width: 300px;
    min-height: 20px;
    display: block;
    background-color: #4a77d4;
    border: 1px solid #3762bc;
    color: #fff;
    padding: 9px 14px;
    font-size: 15px;
    line-height: normal;
    border-radius: 5px;
    margin: 0;
}


</style>

<head>
    <meta charset="UTF-8">
    <title>Login</title>
    <link rel="stylesheet" type="text/css" href="Login.css"/>
</head>
<body>
    <div id="Regist">
        <h1>Regist</h1>
        <form method="post">
            {% csrf_token  %}
            <input type="text" required="required" placeholder="用户名" name="u"></input>
            <input type="password" required="required" placeholder="密码" name="p"></input>
            <button class="but" type="submit">注册</button>
        </form>
    </div>
</body>
</html>
8、创建数据表
根据在文件models中创建的User类创建数据库的表。
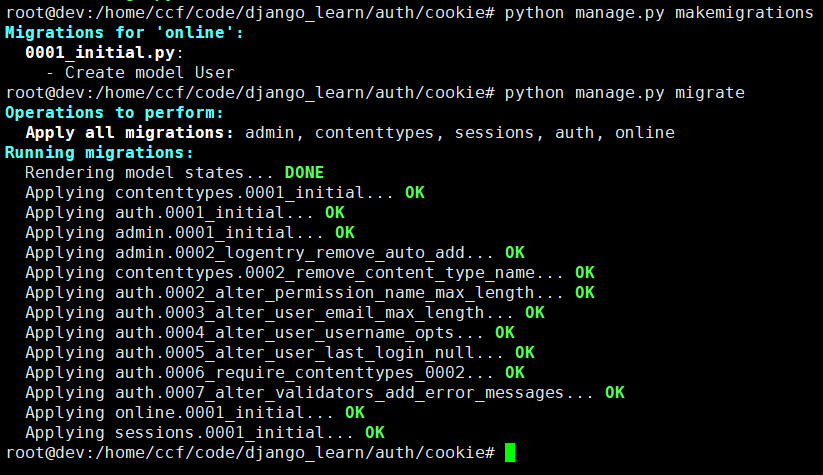
python manage.py makemigrations
python manage.py migrate
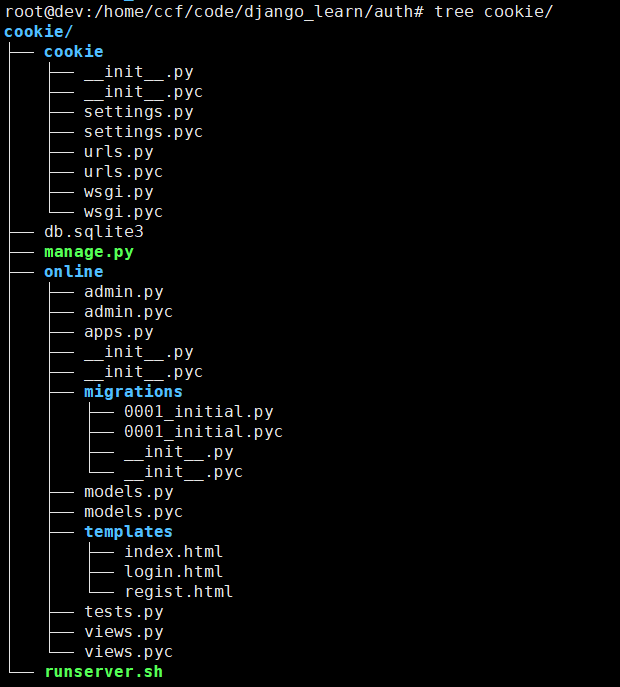
最终的文件目录
9、开启服务

10、页面介绍
http://172.171.5.205:8002/regist
注册:用户名/密码 koko/koko

http://172.171.5.205:8002/login
登陆:用户名/密码 koko/koko
http://172.171.5.205:8002/index
登陆之后的界面

http://172.171.5.205:8002/logout
退出
过程分析
- 注册一个账号。
- 直接跳转到http://172.171.5.205:8002/index界面,后台判断是否登陆过,没有则跳转到登陆界面。
- 登陆界面填写账号密码,进入/index界面。
- 查看浏览器中缓存的cookie。
- 重新打开一个窗口查看是否能直接登陆/index。
- 退出,查看浏览器缓存cookie。
追踪Cookie
cookie是由服务端产生,回传给浏览器的一个文本,所有在浏览器的cookie缓存中能够找到login代码中回传的字段 "username"。服务器返回给浏览器的response中携带该cookie,具体的代码处理如下:
response.set_cookie('username',username,3600)
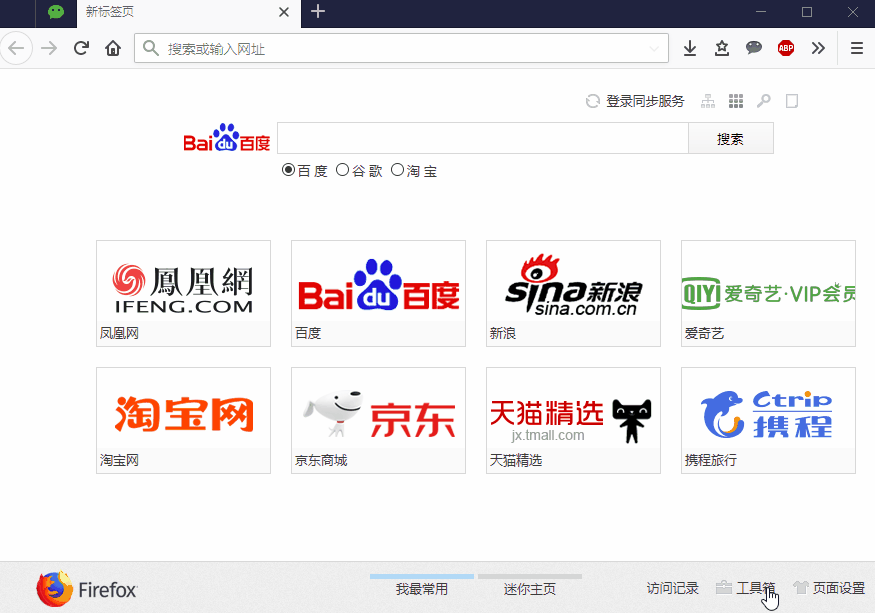
1、首先打开firefox浏览器的菜单,找到选项栏。
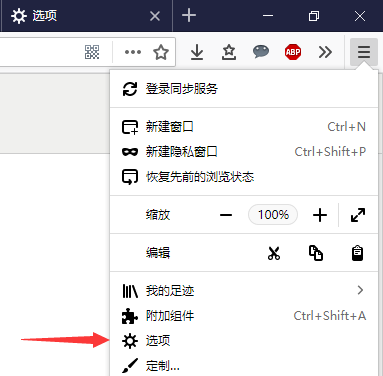
2、在隐私和安全中有一个"显示Cookie"的按钮,里面存放的是浏览器登陆各个网站时保存的cookie。
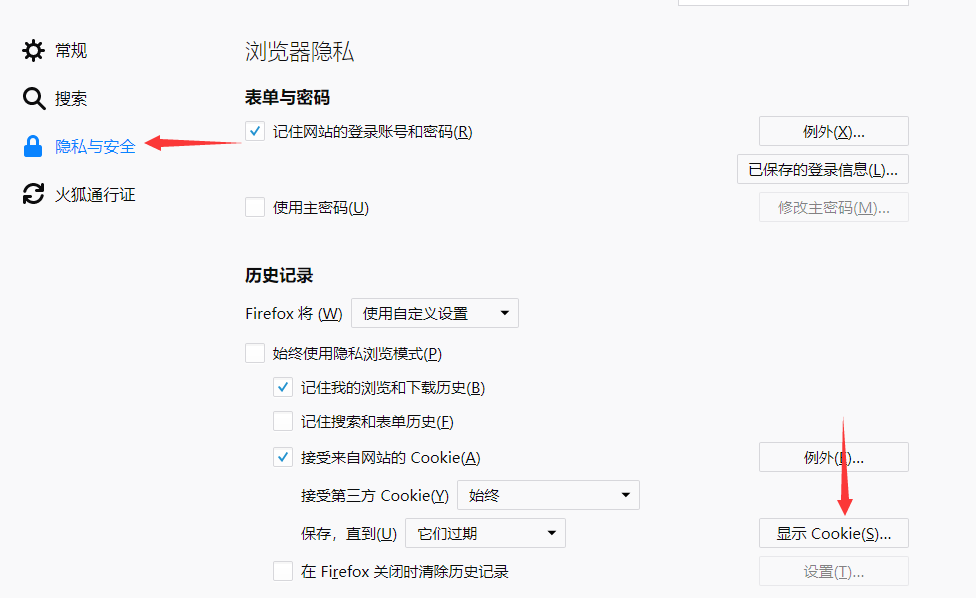
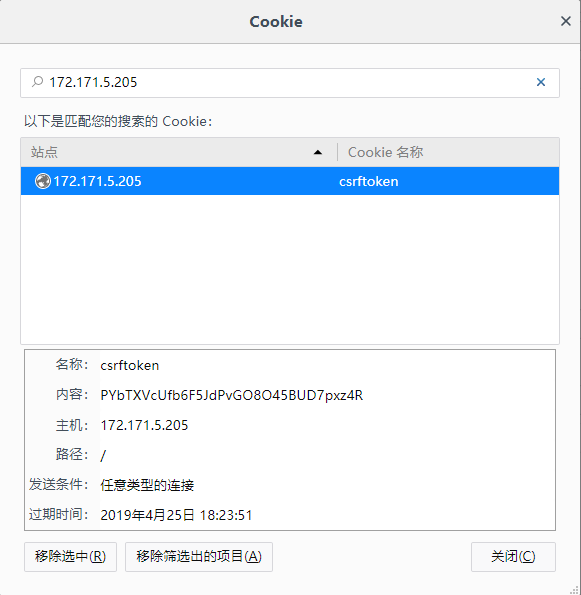
3、在Cookie缓存中搜索登陆的网址,对于我来说是172.171.5.205。开始只有注册用户时django颁发的一个中间件的认证。
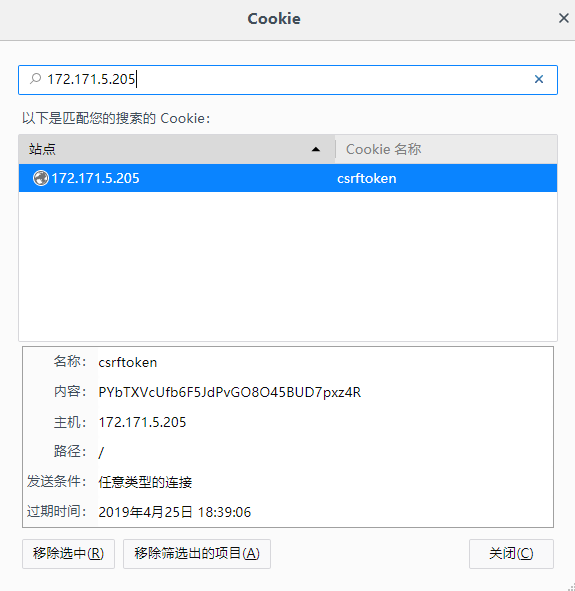
4、查看登陆之后的cookie
登陆之后查看除了本来存在的cookie之外多了一个username的cookie,该cookie就是上叙代码返回的username:koko字段。并且生效时间是3600s。在登陆之后的3600s之内,再次登陆不用用户名和密码。当直接输入http://172.171.5.205:8002/index时直接登陆,不会跳转到login。当然本着折腾的精神,可以删掉该cookie验证是否能免登陆。

5、退出之后该cookie被删除。这是如果在请求http://172.171.5.205:8002/index,则跳转到login界面,需要登陆。
篇幅原因session的文章留在下一篇。以上代码在我的环境中运行正常,如果在学习过程中有任何问题或者文中写的不明白的地方,欢迎随时交流。