koa2原生功能只提供了cookie的操作,但是没有提供session操作。session只能自己实现或者通过第三方中间件实现。
- 如果session数据量很小,可以直接存在内存中
- 如果session数据量很大,则需要存储介质存放session数据
数据库存储方案
- 将session存放在Redis数据库中
- 需要用到中间件
- koa-generic-session koa2 处理session的中间件,提供存储介质的读写接口 。
- koa-redis 为koa-generic-session中间件提供Redis数据库的session数据读写操作。
- 将sessionId和对应的数据存到数据库
- 将数据库的存储的sessionId存到页面的cookie中
- 根据cookie的sessionId去获取对应的session信息
Redis安装:https://www.runoob.com/redis/redis-install.html
安装成功后,进入redis根目录,运行:
redis-server redis.windows.conf
成功显示:

依赖包安装:
npm install koa-generic-session koa-redis
使用演示:
 1 const Koa = require('koa')
 2 const redisStore = require('koa-redis')
 3 const session = require('koa-generic-session')
 4
 5 const app = new Koa()
 6
 7 // 数据库对象
 8 const store = redisStore().client
 9
10 // 用作于session加密处理
11 app.keys = ['keys', 'keyskeys']
12
13 app.use(session({
14   // options
15   key: "SESSION_ID",
16   prefix: "pref",
17   store: redisStore()
18 }))
19
20 app.use(async ctx => {
21   if (ctx.request.url === '/set') {
22     // 设置session
23     ctx.session = {
24       user_id: Math.random().toString(16).slice(2).toUpperCase(),
25       count: 0
26     }
27
28     // 直接操作redis
29     await store.hset('name', 'test', 'messi')
30
31     ctx.body = {
32       code: 0
33     }
34   }
35
36   // 输出信息
37   if (ctx.request.url === '/') {
38     const name = await store.hget('name', 'test')
39
40     ctx.session.count++
41
42     ctx.body = {
43       name,
44       session: ctx.session
45     }
46   }
47 })
48
49 app.listen(4000, () => {
50   console.log('server running at:4000')
51 })
52
运行:
node demo.js
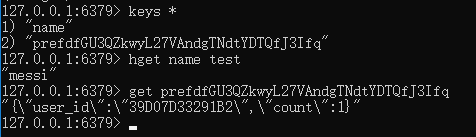
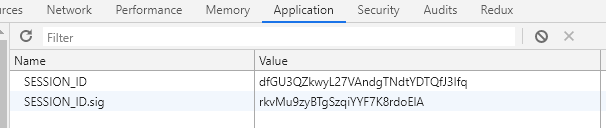
效果: