cookies 和session
为什么会有cookie?
由于http协议是无状态的,即用户访问过后,不留痕迹(状态可以理解为客户端和服务器在某次会话中产生的数据,那无状态的就以为这些数据不会被保留。) 无法记住用户是谁。但是我们可能在登录之后,要保存用户的部分信息,这样下次就可以直接登录了,这里就引出了cookie
什么是cookie
cookie是保存在客户端浏览器上的键值对,是服务端发来的,下次访问服务器时浏览器会自动携带这些键值对,以便服务器提取有用信息。
cookie的原理
cookie是服务端设置在客户端浏览器上的键值对,也就意味着浏览器其实可以拒绝服务端的"命令",默认情况下 浏览器都是直接让服务端设置键值对
cookie实例
#设置cookie
obj1.set_cookie()

#获取
request.COOKIES.get()

#删除
obj1.delete_cookie()


##################
##登录后端核心代码##
#################

def login(request):
    # print(request.path_info)  # 只拿url 不拿get请求携带的参数
    # print(request.get_full_path())  # 把url以及携带的参数都拿到

    if request.method == "POST":
        username = request.POST.get('username')
        password = request.POST.get('password')
        if username == 'jason' and password == '123':
            old_path = request.GET.get('next')  #通过get请求的后缀,拿到用户登录前是访问的哪一个页面
            if old_path:  #如果本来不是通过登录页面跳转到登录页面的(例如我想看后台管理,但是没登录,这个时候访问后台,就会跳转到登录页面,登录成功后,会回到后台管理页面,就是这个old_path)
                # 保存用户登录状态
                obj = redirect(old_path)
            else: #如果本来是登录页面,拿到的就是空,那登录成功,就回到主页
                obj = redirect('/home/') #/home 和/home/ 效果一样
            obj.set_cookie('name','jason')  # 只要登录成功,就让客户端浏览器 记录一个键值对,固定写法
            # obj.set_cookie('name','jason',max_age=5)  # 让客户端浏览器 记录一个键值对,max_age就是过期时间,默认是秒
            return obj   # 这是个固定写法,设置cookie,用三板斧,必须先用一个变量名赋值一下,然后,返回这个对象
    return render(request,'login.html')


from functools import wraps
def login_auth(func): # 登录认证装饰器
    @wraps(func)
    def inner(request,*args,**kwargs):
        if request.COOKIES.get('name'): #判断是否登录的依据就是看一看是否能拿到cookies值,有值就原路返回
            res = func(request,*args,**kwargs)
            return res
        else: #没有拿到值,那就先将用户访问的旧页面保存起来,然后把值传到后端
            target_url = request.path_info
            return redirect('/login/?next=%s'%target_url) #这个也会跳转到login页面
    return inner


@login_auth
def home(request):
    print(request.COOKIES.get('name')) #拿到cookie中,键对应的值
    return HttpResponse('我是主页 只有登录了才能看')


@login_auth
def index(request):
    return HttpResponse('我是index页面 也需要用户登录之后才能看')


##############
##登录前端代码##
##############
<body> #就是一个form表单,输入框和submit提交
<form action="" method="post">
    <p>username:<input type="text" name="username"></p>
    <p>password:<input type="text" name="password"></p>
    <input type="submit">
</form>
</body>
为什么会有Session及什么是session?
Cookie虽然在一定程度上解决了“保持状态”的需求,但是由于Cookie本身最大支持4096字节,以及Cookie本身保存在客户端,可能被拦截或窃取,因此就需要有一种新的东西,它能支持更多的字节,并且他保存在服务器,有较高的安全性。这就是Session。
cookie和session的使用
Cookie弥补了HTTP无状态的不足,让服务器知道来的人是“谁”;但是Cookie以文本的形式保存在本地,自身安全性较差;所以我们就通过Cookie识别不同的用户,对应的在Session里保存私密的信息以及超过4096字节的文本。
上述所说的Cookie和Session其实是共通性的东西,不限于语言和框架。django session的默认过期时间是14天
session设置流程
## 设置session

request.session['key'] = value #仅仅只会在内存中产生一个缓存
'''
上面一句话主要实现的是下面的步骤:

1. 在django内部自动生成了随机的字符串
2. 在django_session表中存入数据  ##这句话是django中间将帮我们干的
                    session_key          session_data         date
                    随机字符串1              数据1            ...
                    随机字符串2              数据2            ...
                    随机字符串3              数据3            ...

3. 将产生的随机字符串发送给浏览器 让浏览器保存到cookies中  name就叫 sessionid: 随机字符串
'''

##获取session
request.session.get('key')  #cookie中      sessionid对应的value值是后端数据库中 session 的id值
'''
1.浏览器发送cookie到django后端之后 django会自动获取到cookie值
2.拿着随机字符串去django_session表中比对 是否有对应的数据  #这句也是django中间件帮我们干的
3.如果比对上了 就将随机字符串所对应的数据 取出赋值给request.session如果对不上 那么request.session就是个空
'''
注意1: session必须存储在表中,要不然会报错。所以要先执行数据库迁移命令,但是不用自己去创建,执行迁移命令之后,这张表会自动生成
注意2:django session表针对的是浏览器,不同的浏览器 会设置不同的session
session登录、删除及超时时间
###################
##session版登录代码##
###################

def login(request):
    if request.method == 'POST':
        username = request.POST.get('username')
        password = request.POST.get('password')
        if password == '123' and username == 'jason':
            request.session['username'] =username  #设置session值,固定写法
            old_path = request.GET.get('next')
            if old_path:
                obj = redirect(old_path)
            else:
                obj = redirect('/home/')
            # obj.set_cookie('name', username)
            return obj
    return render(request, 'login.html')

from functools import wraps
def login_auth(func): # 登录认证装饰器
    @wraps(func)
    def inner(request,*args,**kwargs):
        if request.session.get('name'): #判断是否登录的依据就是看一看是否能拿到session值,有值就原路返回
            res = func(request,*args,**kwargs)
            return res
        else: #没有拿到值,那就先将用户访问的旧页面保存起来,然后把值传到后端
            target_url = request.path_info
            return redirect('/login/?next=%s'%target_url) #这个也会跳转到login页面
    return inner


def set_session(request):
    request.session['username'] = 'egondsb'
    request.session.set_expiry(value=0)  #这个用于规定session的存活时间,0表示关掉浏览器就没有了
    # request.session['password'] = '123'
    # request.session['age'] = '18'
    return HttpResponse("设置session")


def get_session(request):
    print(request.session.get('username'))
    # print(request.session.get('password'))
    # print(request.session.get('age'))
    return HttpResponse('获取session')


##############
##删除session##
##############

def delete_session(request):
    # request.session.delete()  #只能删除服务端的session
    request.session.flush()   #浏览器和服务端全部删除
    return HttpResponse("删除session")


###########################
##Session和Cookie的超时时间##
###########################


request.session.set_expiry(value)
    * 如果value是个整数,session会在些秒数后失效。
    * 如果value是个datatime或timedelta(时间差对象),session就会在这个时间后失效。
    * 如果value是0,用户关闭浏览器session就会失效。
    * 如果value是None,session会依赖全局session失效策略。
中间件
什么是中间件
官方的说法:中间件是一个用来处理Django的请求和响应的框架级别的钩子。它是一个轻量、低级别的插件系统,用于在全局范围内改变Django的输入和输出。每个中间件组件都负责做一些特定的功能。
通俗来讲,它本质上是一个自定义的类,用于帮助我们在视图函数执行之前或者执行之后都可以做一些额外的操作。但是它影响的是全局,所以需要谨慎使用,否则会影响性能
常见的几个应用场景:1.对用户的访问频率做限制;用户黑名单,白名单筛选;所有用户的登录校验;只要是涉及到网站全局的功能 就应该考虑到使用中间件
完整生命周期图
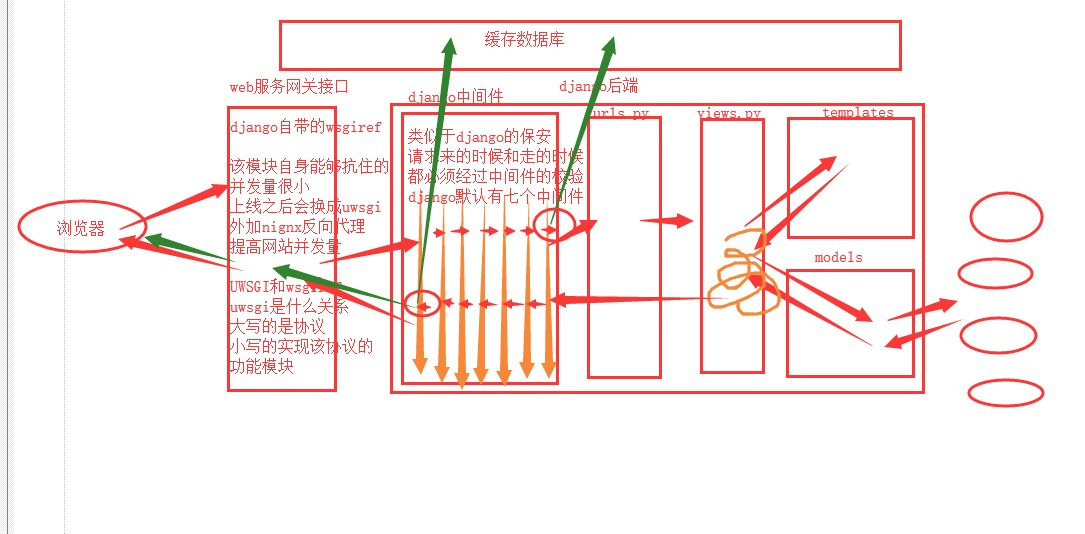
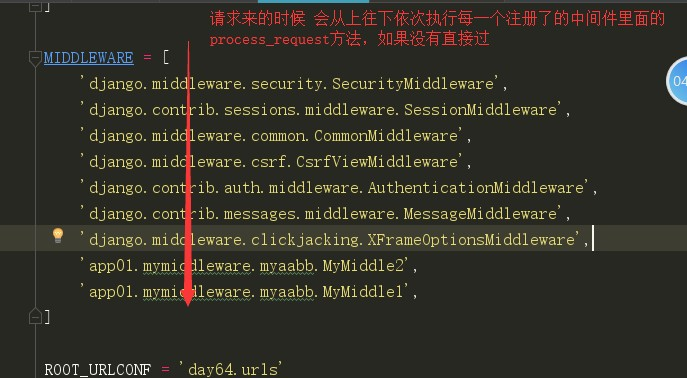
中间件执行顺序
中间件的使用
## 写在前面
'''
MIDDLEWARE配置项是一个有序的列表,列表中是一个个字符串,这些字符串其实是一个个类,也就是一个个中间件。
'''


##自定义中间件
'''
中间件可以定义五个方法,分别是:(主要的是process_request和process_response)

process_request(self,request)
#  请求来得时候 会从上往下依次经过每一个中间件里面的process_request,一旦里面返回了HttpResponse对象那么就不再继续执行,而是会执行同一级别的process_response


process_response(self, request, response)
#   响应走的时候 会从下往上依次进过每一个中间件里面的process_response

######下面三个做了解
process_view(self, request, view_func, view_args, view_kwargs)
#   路由匹配成功之后执行视图函数之前触发


process_exception(self, request, exception)
#   当视图函数出现异常(bug)的时候自动触发

process_template_response(self,request,response)
#   当视图函数执行完毕之后并且返回的对象中含有render方法的情况下才会触发

以上方法的返回值可以是None或一个HttpResponse对象,如果是None,则继续按照django定义的规则向后继续执行,如果是HttpResponse对象,则直接将该对象返回给用户。
'''


## 思路
'''
新建一个中间件文件夹,然后将我要写的中间件文件添加进去(本质就是写类,继承MiddlewareMinxin,然后在里面写函数,固定那五个,参数也是固定的),写完自定义的中间件之后,再在配置文件中MIDDLEWARE中导入路径,具体到模块(例如:app01.mymiddleware.myaabb.MyMiddle)
'''


#################
##myaabb中的代码##
#################

from django.utils.deprecation import MiddlewareMixin
from django.shortcuts import HttpResponse

class MyMiddle1(MiddlewareMixin):
    def process_request(self,request):
        print('我是第一个自定义中间件里面的process_request方法')
        # return HttpResponse("我是第一个自定义中间件里面的HttpResponse对象返回值")

    def process_response(self,request,response):  # response就是要返回给用户的数据
        print("我是第一个自定义中间件里面的process_response方法")
        return response

    def process_view(self,request,view_func,view_args,view_kwargs):
        print(view_func,view_args,view_kwargs)
        print('我是第一个自定义中间件里面的process_view方法')

    def process_exception(self,request,exception):
        print(exception)
        print('我是第一个自定义中间件里面的process_exception方法')

    def process_template_response(self,request,response):
        print('我是第一个自定义中间件里面的process_template_response方法')
        return response

class MyMiddle2(MiddlewareMixin):
    def process_request(self,request):
        print('我是第二个自定义中间件里面的process_request方法')

    def process_response(self, request, response):  # response就是要返回给用户的数据
        print("我是第二个自定义中间件里面的process_response方法")
        return response

    def process_view(self,request,view_func,view_args,view_kwargs):
        print(view_func,view_args,view_kwargs)
        print('我是第二个自定义中间件里面的process_view方法')

    def process_exception(self,request,exception):
        print(exception)
        print('我是第二个自定义中间件里面的process_exception方法')

    def process_template_response(self,request,response):
        print('我是第二个自定义中间件里面的process_template_response方法')
        return response


'''
#在登录界面的部分打印结果


我是第一个自定义中间件里面的process_request方法
我是第二个自定义中间件里面的process_request方法
<function login at 0x0000024EAF7F56A8> () {}
我是第一个自定义中间件里面的process_view方法
<function login at 0x0000024EAF7F56A8> () {}
我是第二个自定义中间件里面的process_view方法
我是第二个自定义中间件里面的process_response方法
我是第一个自定义中间件里面的process_response方法

'''
跨站请求伪造(csrf) 及钓鱼网站
# 什么是跨站请求伪造?
'''
简单来讲,就是假如我是一个有最高权限的管理员,管理全公司的总财务管理系统,那么我登录系统成功后,会返回一个cookie保存到当前浏览器,所以在未清空cookie,且没退出的情况下,如何使用这台浏览器的人都可以访问总财务系统

于是,黑客A把这个总财务系统的url嵌入到一个钓鱼网站中,我如果不小心访问到这个网站,会重定向到正常的总财务系统,这个时候,我把他当成正常的网站访问,我的cookie信息都会暴露个黑客(因为是通过钓鱼网站过去的,里面有一些恶意代码,伪造我给总财务系统发请求),这样,就会以一个最高权限的身份访问总财务系统。
'''


# 小例子
'''
        就类似于你搭建了一个跟银行一模一样的web页面
        用户在你的网站转账的时候输入用户名 密码 对方账户
        银行里面的钱确实少了 但是发现收款人变了


'''

# 最简单的原理
'''
        你写的form表单中 用户的用户名  密码都会真实的提交给银行后台
        但是收款人的账户却不是用户填的 你暴露给用户的是一个没有name属性的input框
        你自己提前写好了一个隐藏的带有name和value的input框
'''


# 解决钓鱼网站的策略
'''
        只要是用户想要提交post请求的页面 我在返回给用户的时候就提前设置好一个随机字符串
        当用户提交post请求的时候  我会自动先取查找是否有该随机字符串
        如果有 正常提交
        如果没有  直接报40
'''


##############
##正常网站代码##
##############

###前端核心代码(主要就是获取数据)(transfer.html)
<h1>我是正儿八经的网站</h1>
<form action="" method="post">
    <p>username:<input type="text" name="username"></p>
    <p>target_user:<input type="text" name="target_user"></p>
    <p>money:<input type="text" name="money"></p>
    <input type="submit">
</form>


###后端代码(主要就是拿数据,然后打印结果)
def transfer(request):
    if request.method == 'POST':
        username = request.POST.get('username')
        target_user = request.POST.get('target_user')
        money = request.POST.get('money')
        print('%s 给 %s转了%s钱'%(username,target_user,money))
    return render(request,'transfer.html')


##############
##钓鱼网站代码##
##############

##前端页面
<h1>我是钓鱼网站</h1>
<form action="http://127.0.0.1:8000/transfer/" method="post"> #会跳转到正儿八经的网站
    <p>username:<input type="text" name="username"></p>
    <p>targer_user:<input type="text"></p> #不设置name属性,实际传到后端的数据是下一句的jason
    <p><input type="text" name="target_user" value="jason" style="display: none"></p> #恶意代码,会把实际的目标用户隐藏起来
    <p>money:<input type="text" name="money"></p>
    <input type="submit">
</form>

##后端代码比较简单,因为真是数据是在正儿八经的网站拿到的。
from django.shortcuts import render

def transfer(request):
    return render(request,'transfer.html')
防止跨站请求的方式
#方式一:form表单里面
'''
前端页面加上  {% csrf_token %}

然后把那个csrf中间件注释掉
'''

#方式二: ajax
'''
第一种  自己再页面上先通过{% csrf_token %}获取到随机字符串(导入后就会去前端里面找csrfmiddlewaretoken的键值)  然后利用标签查找
data:{'username':'jason','csrfmiddlewaretoken':$('[name="csrfmiddlewaretoken"]').val()},

第二种 和第一种差不多
data:{'username':'jason','csrfmiddlewaretoken':'{{ csrf_token }}'},

第三种
拷贝js文件

##static
#setup:

    function getCookie(name) {
    var cookieValue = null;
    if (document.cookie && document.cookie !== '') {
        var cookies = document.cookie.split(';');
        for (var i = 0; i < cookies.length; i++) {
            var cookie = jQuery.trim(cookies[i]);
            // Does this cookie string begin with the name we want?
            if (cookie.substring(0, name.length + 1) === (name + '=')) {
                cookieValue = decodeURIComponent(cookie.substring(name.length + 1));
                break;
            }
        }
    }
    return cookieValue;
}
var csrftoken = getCookie('csrftoken');


function csrfSafeMethod(method) {
  // these HTTP methods do not require CSRF protection
  return (/^(GET|HEAD|OPTIONS|TRACE)$/.test(method));
}

$.ajaxSetup({
  beforeSend: function (xhr, settings) {
    if (!csrfSafeMethod(settings.type) && !this.crossDomain) {
      xhr.setRequestHeader("X-CSRFToken", csrftoken);
    }
  }
});

##前端代码:
<button id="b1">发ajax</button>

<script src="/static/setup.js"></script>
<script>
    $('#b1').click(function () {
        $.ajax({
            url:"",
            type:"post",
            // 第一种方式
            {#data:{'username':'jason','csrfmiddlewaretoken':$('[name="csrfmiddlewaretoken"]').val()},#}
            {#data:{'username':'jason','csrfmiddlewaretoken':'{{ csrf_token }}'},#}
            data:{'username':'jason'},
            success:function (data) {
                alert(data)
            }
        })
    })
</script>
'''


###csrf的装饰器使用

from django.views.decorators.csrf import csrf_exempt, csrf_protect
from django.utils.decorators import method_decorator
@csrf_exempt  #除了下面的函数,其他的都去校验
def exem(request):
    return HttpResponse('exempt')

@csrf_protect   #只校验下面的视图函数
def pro(request):
    return HttpResponse('pro')


### CBV中的csrf装饰器使用
        csrf_exempt  只有两种装饰的方式
        from django.views.decorators.csrf import csrf_exempt, csrf_protect
        from django.utils.decorators import method_decorator
        # 第一种
        # @method_decorator(csrf_exempt,name='dispatch') #在类外加
        class MyCsrf(View):
            # 第二种
            @method_decorator(csrf_exempt) #在类内加
            def dispatch(self, request, *args, **kwargs):
                return super().dispatch(request,*args,**kwargs)
            def get(self,request):
                return HttpResponse('hahaha')

        除了csrf_exempt之外 所有的其他装饰器 在CBV上面都有三种方式
        @method_decorator(csrf_protect,name='post') #第一种
        class MyCsrf(View):
            @method_decorator(csrf_protect) #第二种
            def dispatch(self, request, *args, **kwargs):
                return super().dispatch(request,*args,**kwargs)
            def get(self,request):
                return HttpResponse('hahaha')

            @method_decorator(csrf_protect) #第三种
            def post(self,request):
                return HttpResponse('post')