原文地址https://blog.csdn.net/iamhuanggua/article/details/53104345
简介
一直以来,安卓UI自动化测试都存在以下两个障碍,一是测试工具Mokey/Appium等的学习成本较高,不方便刚接触移动端自动化的新手入门;另一个是,在测试代码书写中耗费在控件元素查找上的时间太多,在一些稍微复杂的应用中尤其突出。LazyAndroid正是为了解决这些问题而诞生的一款UI自动化测试框架。它基于appium,封装了appiumDriver的设置、安卓基本控件的使用和手机的滑动、按键等基本操作,增加了元素查找的重试机制、异常处理截屏等。结合LazyUiautomaterViewer工具自动生成的bean层java代码,更可以使QA可以无需亲自动手完成具体页面中控件的抓取,无需关心appium api的使用,即可轻松完成测试逻辑代码的书写。
使用方法
一.下载源码进行编译,将源码编译生成的jar包推送到目标maven 私服仓库或者直接将jar包导入到测试项目中。源码下载地址: http://github.com/lazytestteam/LazyAndroid
二.建立测试工程,引入上面的jar包,开始测试代码的书写。下面以测试京东钱包apk的登陆和转账功能为例,以Maven作为项目管理工具,结合LazyUiAutomaterViewer工具进行示范(LazyAndroid也可以不依赖LazyUiAutomaterViewer单独使用)。
建立maven测试工程(前提是已下载安装maven和IDE的maven插件),在pom文件中添加jar包依赖(jar包已推到我们公司maven私服)。
Pom文件如下:
<projectxmlns="http://maven.apache.org/POM/4.0.0"xmlns:xsi="http://www.w3.org/2001/XMLSchema-instance"
xsi:schemaLocation="http://maven.apache.org/POM/4.0.0http://maven.apache.org/xsd/maven-4.0.0.xsd">
<modelVersion>4.0.0</modelVersion>
<groupId>LazyAndroidTestDemo</groupId>
<artifactId>LazyAndroidTestDemo</artifactId>
<version>0.0.1-SNAPSHOT</version>
<build>
<sourceDirectory>src</sourceDirectory>
<plugins>
<plugin>
<artifactId>maven-compiler-plugin</artifactId>
<version>3.1</version>
<configuration>
<source>1.7</source>
<target>1.7</target>
</configuration>
</plugin>
</plugins>
</build>
<dependencies>
<dependency>
<groupId>org.testng</groupId>
<artifactId>testng</artifactId>
<version>6.9.9</version>
</dependency>
<dependency>
<groupId>org.slf4j</groupId>
<artifactId>slf4j-log4j12</artifactId>
<version>1.7.2</version>
</dependency>
<dependency>
<groupId>lazyAndroid</groupId>
<artifactId>lazyAndroid</artifactId>
<version>0.0.1-SNAPSHOT</version>
</dependency>
</dependencies>
</project>
三.抓取页面元素导出java文件。
手机使用USB线连上电脑,启动LazyUiAutomaterViewer,进行截屏和抓取。LazyUiAutomaterViewer工具的获取及使用方法参见《LazyUiAutomatorViewer使用说明》。
四.开始测试代码的书写:
- 导入Bean层代码。将LazyUiAutomaterViewer自动生成的java代码导入到项目bean层中。
下面是京东钱包登录页使用LazyUiAutomaterViewer自动抓取、导出的java文件:
package test.java.bean;
import lazy.android.annotations.*;
import lazy.android.bean.BaseBean;
import lazy.android.controls.*;
import io.appium.java_client.AppiumDriver;
/**
* Gennerated by lazyUiautomaterViewer.
*/
public classLoginBean extendsBaseBean{
@Xpath(xpath={"//android.widget.TextView[@resource-id='com.wangyin.payment:id/txt_main_title']"})
@Description(description="登录")
public PlainText textView1;
@Xpath(xpath={"//android.view.View[@resource-id='com.wangyin.payment:id/view_divider_line']"})
@Description(description="")
public View view1;
@Xpath(xpath={"//android.widget.ScrollView[@resource-id='com.wangyin.payment:id/fragment_container']"})
@Description(description="")
public View scrollView2;
@Xpath(xpath={"//android.widget.RadioGroup[@resource-id='com.wangyin.payment:id/main_footbar_menu']"})
@Description(description="")
public View radioGroup3;
@Xpath(xpath={"//android.widget.RadioButton[@resource-id='com.wangyin.payment:id/login_tab_phone']"})
@Description(description="钱包账户")
public Click jdpayAccount;
@Xpath(xpath={"//android.widget.RadioButton[@resource-id='com.wangyin.payment:id/login_tab_jd']"})
@Description(description="京东账户")
public Click jdAccount;
@Xpath(xpath={"//android.widget.LinearLayout[@resource-id='com.wangyin.payment:id/layout_login_jd']/android.view.View[1]"})
@Description(description="")
public View view4;
@Xpath(xpath={"//android.widget.EditText[@resource-id='com.wangyin.payment:id/cp_input_combox_jd']"})
@Description(description="京东商城手机号/用户名/邮箱")
public Text editTextUserName;
@Xpath(xpath={"//android.widget.TextView[@text='账号']"})
@Description(description="账号")
public PlainText textView2;
@Xpath(xpath={"//android.widget.ImageView"})
@Description(description="")
public View imageView5;
@Xpath(xpath={"//android.widget.EditText[@resource-id='com.wangyin.payment:id/cp_input_pwd']"})
@Description(description="")
public Text editJDTextPwd;
@Xpath(xpath={"//android.widget.TextView[@text='密码']"})
@Description(description="密码")
public PlainText textView3;
@Xpath(xpath={"//android.widget.LinearLayout[@resource-id='com.wangyin.payment:id/layout_login_jd']/android.view.View[2]"})
@Description(description="")
public View view6;
@Xpath(xpath={"//android.widget.Button[@resource-id='com.wangyin.payment:id/btn_login_jd']"})
@Description(description="登录")
public Click buttonLogin;
@Xpath(xpath={"//android.widget.TextView[@resource-id='com.wangyin.payment:id/txt_jd_register']"})
@Description(description="注册京东账户")
public PlainText textView4;
@Xpath(xpath={"//android.widget.TextView[@resource-id='com.wangyin.payment:id/txt_forget_pwd']"})
@Description(description="忘记密码?")
public PlainText textView5;
@Xpath(xpath={"//android.widget.EditText[@resource-id='com.wangyin.payment:id/cp_input_combox_wy']"})
@Description(description="请填写手机号")
public Text editTextPhone;
@Xpath(xpath={"//android.widget.TextView[@text='手机号']"})
@Description(description="手机号")
public PlainText textViewPhone;
@Xpath(xpath={"//android.widget.Button[@resource-id='com.wangyin.payment:id/btn_login']"})
@Description(description="下一步")
public Click nextStep;
@Xpath(xpath={"//android.widget.EditText[@resource-id='com.wangyin.payment:id/cp_input_pwd']"})
@Description(description="")
public Text editjdPayTextPwd;
@Xpath(xpath={"//android.widget.TextView[@text='密码']"})
@Description(description="密码")
public PlainText textViewPwd;
@Xpath(xpath={"//android.widget.Button[@resource-id='com.wangyin.payment:id/btn_login']"})
@Description(description="登录")
public Click jdpayLogin;
publicLoginBean(AppiumDriveraDriver){super(aDriver);}
}
- page层代码编写。根据测试逻辑,完成page层代码的书写。基于bean层定义的控件变量,完成基本操作。
package test.java.page;
importorg.openqa.selenium.WebElement;
importorg.slf4j.Logger;
importorg.slf4j.LoggerFactory;
import test.java.bean.LifeBean;
import test.java.bean.LifeBean2;
importtest.java.bean.LoginBean;
importtest.java.bean.MineBean;
importtest.java.bean.TodayBean;
importio.appium.java_client.AppiumDriver;
importlazy.android.common.LazyDriver;
public class DemoPage {
private Loggerlogger = LoggerFactory.getLogger(this.getClass());
private LazyDriverlazyDriver;
private AppiumDriverdriver;
private TodayBeantodayBean;
private LifeBean2lifeBean2;
private MineBeanmineBean;
private LoginBeanloginBean;
/**
* 构造函数
* @param aLazyDriver
*/
public DemoPage(LazyDriveraLazyDriver) {
lazyDriver = aLazyDriver;
driver = lazyDriver.getDriver();
todayBean = new TodayBean(driver);
new LifeBean(driver);
lifeBean2 = new LifeBean2(driver);
mineBean = new MineBean(driver);
loginBean = new LoginBean(driver);
}
/**
* 登陆操作
*/
public void login() {
logger.info("login by jdpay account!");
todayBean.textViewToday.expectElementExistOrNot(true);
todayBean.textViewMine.expectElementExistOrNot(true);
todayBean.textViewMine.click();
lazyDriver.handleFailure("screen test:");
mineBean.login.expectElementExistOrNot(true);
mineBean.login.click();
loginBean.jdpayAccount.expectElementExistOrNot(true);
loginBean.jdpayAccount.click();
loginBean.editTextPhone.input("13034631475");
loginBean.nextStep.click();
loginBean.editjdPayTextPwd.expectElementExistOrNot(true);
loginBean.editjdPayTextPwd.input("haha123");
loginBean.jdpayLogin.click();
lazyDriver.swipeToLeft();
}
/**
* 转账操作
* @throws InterruptedException
*/
public void doTranAccount() throws InterruptedException {
logger.info("transfer accounts!");
todayBean.textViewLife.click();
lazyDriver.swipeDown();
lazyDriver.swipeToLeft();
lifeBean2.textViewTransAccount.click();
WebElement wl = lazyDriver.findElementByText("转账给朋友");
wl.click();
Thread.sleep(1000);
lazyDriver.goBack();
lazyDriver.goBack();
}
}
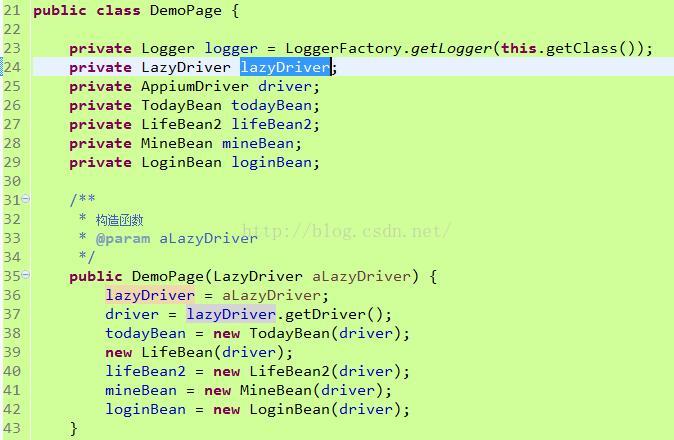
其中,需要注意一下构造函数。在Page层的构造函数中,需要做两个事情。一个是给LazyDriver赋值(通过Test层传递过来的LazyDriver对象),另一个是通过LazyDriver对象获取appiumDriver,来构造Bean层的类。Page层用到的所有bean层类都需要传入appiumDriver进行构造,见下图:
- 调用page层方法,完成测试。
package test.java.test;
importjava.net.MalformedURLException;
importorg.testng.annotations.BeforeClass;
importorg.testng.annotations.Test;
importtest.java.page.DemoPage;
importlazy.android.common.LazyDriver;
public class DemoTest {
private DemoPagedemoPage;
@BeforeClass
public void init() throws MalformedURLException {
LazyDriver lazyDriver =new LazyDriver("jdpay.apk","com.wangyin.payment",".home.ui.MainActivity","4.2.2",false);
demoPage = new DemoPage(lazyDriver);
}
/**
* 登陆测试
*/
@Test
public void loginTest() {
demoPage.login();
}
/**
* 转账测试
* @throws InterruptedException
*/
@Test
public void tranAccount() throws InterruptedException {
demoPage.doTranAccount();
}
}
在test层代码的BeforeClass(这个demo使用了testng,但是不是必须的)中,构造了一个lazyDriver,然后通过它去构造page层的类。

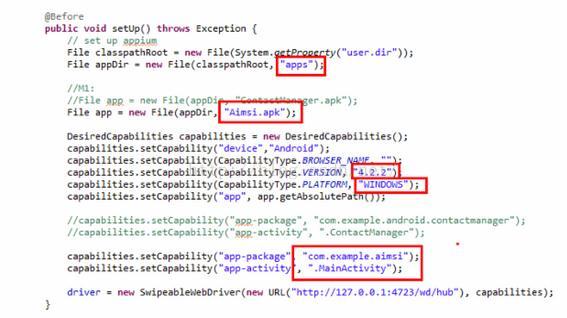
和如下appiumDriver的繁琐设置相比较,是不是简化很多了?
Bean、Page和Test层是我们在测试代码编写过程中,为了区分代码层次,根据代码功能定义的三个包名,不是必须的,大家可以灵活处理。
五.启动appium, 运行或调试测试代码,执行测试。
Demo工程源码:https://github.com/lazytestteam/LazyAndroidDemo
详细的使用说明请参考 http://blog.csdn.net/kaka1121/article/details/53301517