一般系统接口是hide修饰的隐藏类
1. 修改对于的AIDL文件,根据编译信息获知所需的jar包。
mmm /frameworks/base/ show commands > log.txt 2>&1
out/target/common/obj/JAVA_LIBRARIES/framework_intermediates/classes.jar (frameworks.jar是dex格式,非原生态Java文件)
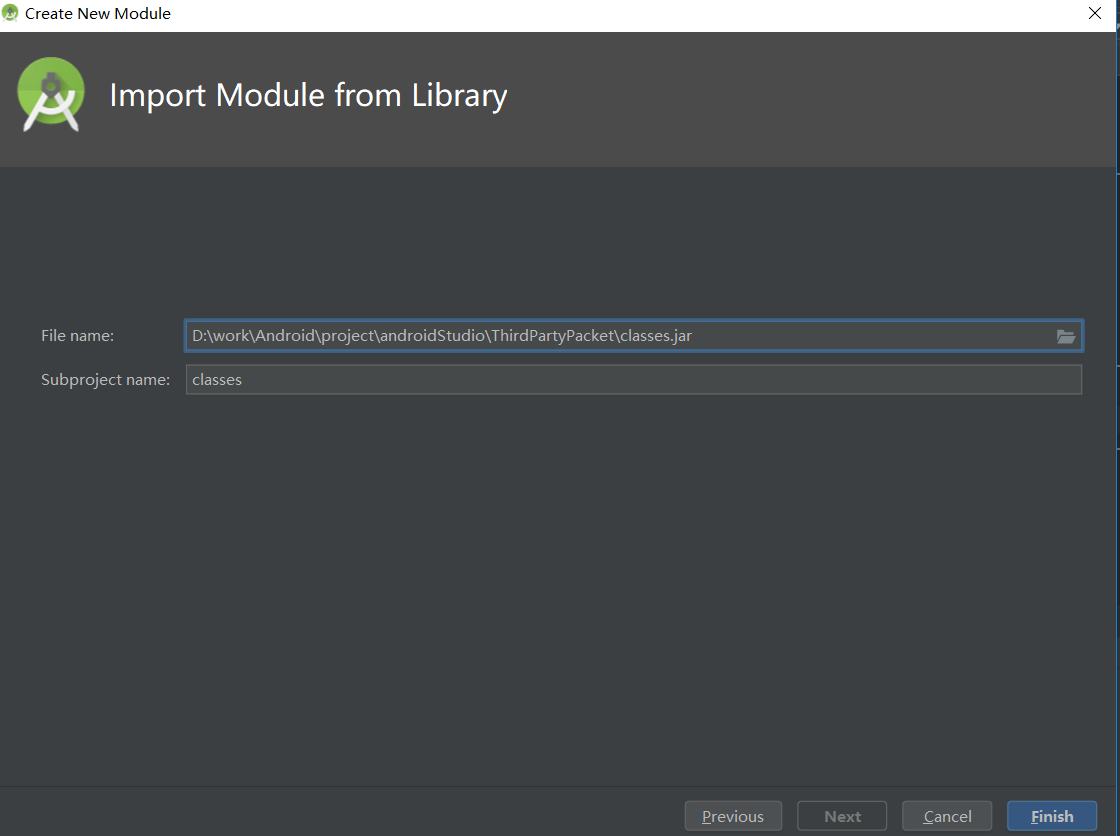
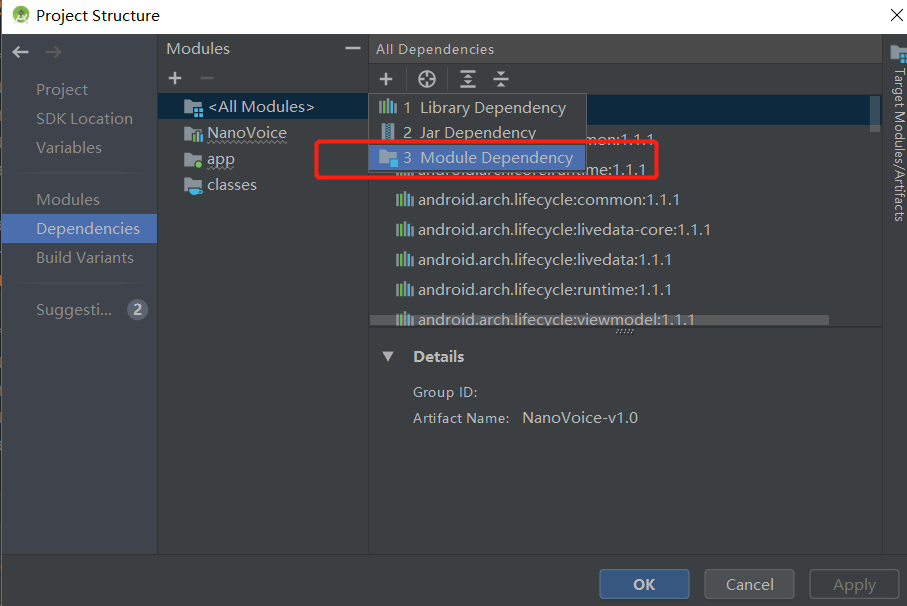
2.导入classes.jar到Android studio工程:
将系统jar包放到module的libs文件夹下,在Module下的build.gradle添加:
provided files('libs/classes.jar')
或图形如下操作: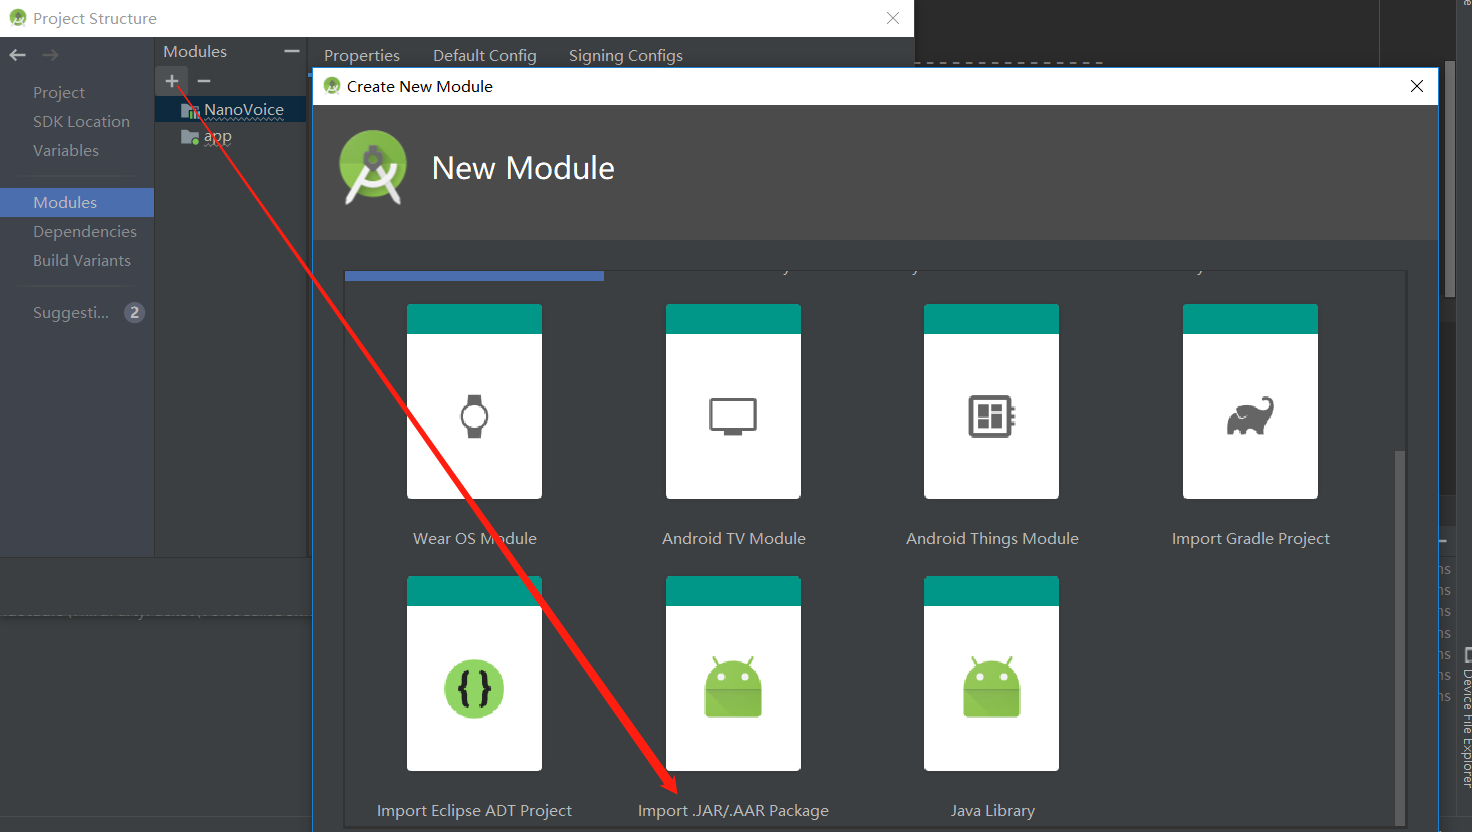

在Project下的build.gradle文件中添加:
  gradle.projectsEvaluated {
        tasks.withType(JavaCompile) {
            options.compilerArgs.add('-Xbootclasspath/p:app/libs/android_framework.jar')
    }
}
修改优先级:
allprojects {
    repositories {
        jcenter()
    }

    //添加以下代码,使classes-full-debug.jar包编译先于android.jar
    gradle.projectsEvaluated {
        tasks.withType(JavaCompile) {
            options.compilerArgs.add('-Xbootclasspath/p:setting\\libs\\frameworks.jar') } } }
找到对应Module下的.iml ,手动修改jar包引入顺序
把Android SDK的配置项放到最后,否则还是会提示找不到系统API:

3.编译错误:
a. java.lang.OutOfMemoryError: GC overhead limit exceeded
Android Studio Google jar causing GC overhead limit exceeded error
http://stackoverflow.com/questions/25013638/android-studio-google-jar-causing-gc-overhead-limit-exceeded-error
解决方法: build.gradle中添加:
dexOptions {
    javaMaxHeapSize "4g"
}
b. Too many field references
Building Apps with Over 65K Methods
https://developer.android.com/tools/building/multidex.html
解决方法:
    defaultConfig {

        // Enabling multidex support.
        multiDexEnabled true
    }
dependencies {

    compile 'com.android.support:multidex:1.0.0'

}
AndroidManifest.xml 中添加:android:name="android.support.multidex.MultiDexApplication"
<?xml version="1.0" encoding="utf-8"?>
<manifest xmlns:android="http://schemas.android.com/apk/res/android"
    package="com.thisway.app_0001_leddemo" >

    <application
        android:name="android.support.multidex.MultiDexApplication"
        android:allowBackup="true"
        android:icon="@mipmap/ic_launcher"
        android:label="@string/app_name"
        android:theme="@style/AppTheme" >
        <activity
            android:name=".MainActivity"
            android:label="@string/app_name" >
            <intent-filter>
                <action android:name="android.intent.action.MAIN" />

                <category android:name="android.intent.category.LAUNCHER" />
            </intent-filter>
        </activity>
    </application>

</manifest>
补充: scop修改为Provided,只参与编译不打包进apk。
provided files('libs/classes-full-debug.jar') 在Android studio3.0 后,provided 被 compileOnly 替代
打印指定 TAG/等级 的log: logcat LedHal:I *:S
4. 问服务使用反射
import android.os.IBinder;
        try {
            //iLedService = ILedService.Stub.asInterface(ServiceManager.getService("led"));
            Method getService = Class.forName("android.os.ServiceManager").getMethod("getService", String.class);
            Object ledService = getService.invoke(null, "led"); //static对象第一次参数可以是NULL,调用invoke IBinder向上转换为Object,如有使用IBinder返回需强制转换
            Method asInterface = Class.forName("android.os.ILedService$Stub").getMethod("asInterface", IBinder.class);
            proxy = asInterface.invoke(null, ledService);
            ledCtrl = Class.forName("android.os.ILedService$Stub$Proxy").getMethod("ledCtrl", int.class, int.class);  //设置第i盏灯熄灭: ledCtrl.invoke(proxy, i, 0);
        } catch (NoSuchMethodException e) {
            e.printStackTrace();
        } catch (ClassNotFoundException e) {
            e.printStackTrace();
        } catch (IllegalAccessException e) {
            e.printStackTrace();
        } catch (InvocationTargetException e) {
            e.printStackTrace();
        }