(由于下周考试考试比较多,任务比较重,所以今天的笔记整理先只整理思路和用到的命令,具体的实验截图,下下周进行整理上传)
Apache的虚拟主机功能 (Virtual Host) 是可以让一台服务器基于IP、主机名或端口号实现提供多个网站服务的技术。
第一种情况:基于IP地址
这种情况很常见:一台服务器拥有多个IP地址,当用户访问不同IP地址时显示不同的网站页面。
第1步:使用nmtui命令为网卡添加多个IP地址(192.168.10.10/20/30):(方法不唯一)
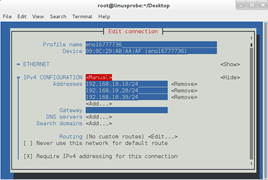
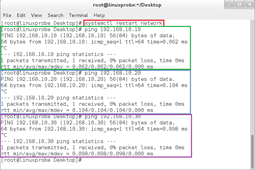
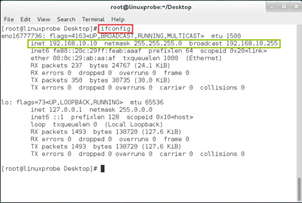
重新启动网卡设备后使用ping命令检查是否配置正确
第2步:分别创建网站数据目录。
在/home/wwwroot目录下分别创建三个网站数据目录:
[root@linuxprobe ~]# mkdir -p /home/wwwroot/10
[root@linuxprobe ~]# mkdir -p /home/wwwroot/20
[root@linuxprobe ~]# mkdir -p /home/wwwroot/30
分别在这三个网站数据目录中写入主页文件,内容为该网站的IP地址:
[root@linuxprobe ~]# echo "IP:192.168.10.10" > /home/wwwroot/10/index.html
[root@linuxprobe ~]# echo "IP:192.168.10.20" > /home/wwwroot/20/index.html
[root@linuxprobe ~]# echo "IP:192.168.10.30" > /home/wwwroot/30/index.html
第3步:在配置文件中描述基于IP地址的虚拟主机。
<VirtualHost 192.168.10.10>
DocumentRoot /home/wwwroot/10
ServerName www.linuxprobe.com
<Directory /home/wwwroot/10 >
AllowOverride None
Require all granted
</Directory>
</VirtualHost>
<VirtualHost 192.168.10.20>
DocumentRoot /home/wwwroot/20
ServerName bbs.linuxprobe.com
<Directory /home/wwwroot/20 >
AllowOverride None
Require all granted
</Directory>
</VirtualHost>
<VirtualHost 192.168.10.30>
DocumentRoot /home/wwwroot/30
ServerName tech.linuxprobe.com
<Directory /home/wwwroot/30 >
AllowOverride None
Require all granted
</Directory>
</VirtualHost>
第4步:分别访问192.168.10.10/20/30验证结果:
第二种情况:基于主机名
当服务器无法为每个网站都分配到独立IP地址时,可以试试让Apache服务程序自动识别来源主机名或域名然后跳转到指定的网站
第1步:配置网卡IP地址与hosts文件。
hosts文件作用是定义IP地址与主机名的映射关系,即强制将某个主机名地址解析到指定的IP地址。
[root@linuxprobe ~]# vim /etc/hosts
//每行只能写一条,格式为IP地址+空格+主机名(域名)。
192.168.10.10 www.linuxprobe.com
192.168.10.10 bbs.linuxprobe.com
192.168.10.10 tech.linuxprobe.com
第2步:分别创建网站数据目录:
[root@linuxprobe ~]# mkdir -p /home/wwwroot/www
[root@linuxprobe ~]# mkdir -p /home/wwwroot/bbs
[root@linuxprobe ~]# mkdir -p /home/wwwroot/tech
分别在网站目录中写入不同的首页文件:
[root@linuxprobe ~]# echo "WWW.linuxprobe.com" > /home/wwwroot/www/index.html
[root@linuxprobe ~]# echo "BBS.linuxprobe.com" > /home/wwwroot/bbs/index.html
[root@linuxprobe ~]# echo "TECH.linuxprobe.com" > /home/wwwroot/tech/index.html
第3步:在配置文件中描述基于主机名称的虚拟主机。
编辑主配置文件(/etc/httpd/conf/httpd.conf),在主配置文件的末尾按下面格式定义虚拟主机信息:
<VirtualHost 192.168.10.10>
DocumentRoot "/home/wwwroot/www"
ServerName "www.linuxprobe.com"
<Directory "/home/wwwroot/www">
AllowOverride None
Require all granted
</directory>
</VirtualHost>
<VirtualHost 192.168.10.10>
DocumentRoot "/home/wwwroot/bbs"
ServerName "bbs.linuxprobe.com"
<Directory "/home/wwwroot/bbs">
AllowOverride None
Require all granted
</Directory>
</VirtualHost>
<VirtualHost 192.168.10.10>
DocumentRoot "/home/wwwroot/tech"
ServerName "tech.linuxprobe.com"
<Directory "/home/wwwroot/tech">
AllowOverride None
Require all granted
</directory>
</VirtualHost>
第4步:分别访问网站验证结果
第三种情况:基于端口号
我们可以让服务器开启多个服务端口后,然后让用户能够通过访问服务器的指定端口来找到想要的网站。
第1步:配置服务器的IP地址:

第2步:分别创建网站数据目录。
分别创建端口为6111,6222的网站数据目录:
[root@linuxprobe ~]# mkdir -p /home/wwwroot/6111
[root@linuxprobe ~]# mkdir -p /home/wwwroot/6222
分别在网站数据目录中写入不同内容的主页文件:
[root@linuxprobe ~]# echo "port:6111" > /home/wwwroot/6111/index.html
[root@linuxprobe ~]# echo "port:6222" > /home/wwwroot/6222/index.html
第3步:在配置文件中描述基于端口号的虚拟主机。
编辑主配置文件(/etc/httpd/conf/httpd.conf),找到约在42行的Listen 80,并在下面追加:
Listen 6111
Listen 6222
然后在主配置文件的末尾按下面格式定义虚拟主机信息:
<VirtualHost 192.168.10.10:6111>
DocumentRoot “/home/wwwroot/6111”
ServerName www.linuxprobe.com
<Directory “/home/wwwroot/6111”>
AllowOverride None
Require all granted
</Directory>
</VirtualHost>
<VirtualHost 192.168.10.10:6222>
DocumentRoot “/home/wwwroot/6222”
ServerName bbs.linuxprobe.com
<Directory “/home/wwwroot/6222”>
AllowOverride None
Require all granted
</Directory>
</VirtualHost>
第4步:分别访问网站验证结果:
注意:以上三种情况均在SElinux禁用情况下进行实验的,每次实验最好还原上一次快照,防止配置文件冲突