新建一个项目,具体步骤可参照上文:SpringBoot系列(二) https://blog.csdn.net/mu_wind/article/details/94294138#_189
项目依赖
pom.xml 中添加依赖(添加此依赖并安装插件后,在实体类中使用@data注解,可以省略set和get方法):
<!--Web 依赖-->
<dependency>
	<groupId>org.springframework.boot</groupId>
	<artifactId>spring-boot-starter-web</artifactId>
</dependency>
<!--省略set、get方法-->
<dependency>
	<groupId>org.projectlombok</groupId>
	<artifactId>lombok</artifactId>
</dependency>
项目结构
1、启动类:
@SpringBootApplication
@SpringBootApplication
public class DemoApplication {

    public static void main(String[] args) {
        SpringApplication.run(DemoApplication.class, args);
    }
}
2、实体类 Student:
package com.example.demo.model;

import lombok.Data;

@Data
public class Student {
    private String name;
    private int age;
    private int score;
}
3、接口类 StudentController:
package com.example.demo.controller;

@RestController
public class StudentController {
    @RequestMapping(name="/getStudent", method= RequestMethod.POST)
    public User getStudent() {
        Student student = new Student();
        student.setName("小红");
        student.setAge(12);
        student .setScore(560);
        return user;
    }
}
@RestController 注解相当于 @ResponseBody + @Controller 合在一起的作用,如果 Web 层的类上使用了 @RestController 注解,就代表这个类中所有的方法都会以 JSON 的形式返回结果,也相当于 JSON 的一种快捷使用方式;
@RequestMapping(name="/getStudent", method= RequestMethod.POST),以 /getStudent 的方式去请求,method= RequestMethod.POST 是指只可以使用 Post 的方式去请求,如果使用 Get 的方式去请求的话,则会报 405 不允许访问的错误。
4、测试类:
在 test 包下新建 ControllerTest 测试类,对 getUser() 方法使用MockMvc进行测试。
package com.example.demo;

@RunWith(SpringRunner.class)
@SpringBootTest
@AutoConfigureMockMvc
public class ControllerTest {
    @Autowired
    private MockMvc mockMvc;
    @Test
    public void getStudent() throws Exception{
        String responseString = mockMvc.perform(MockMvcRequestBuilders.get("/getStudent"))
                .andReturn().getResponse().getContentAsString();
        System.out.println("result : "+responseString);
    }
}
运行Test,得到结果:
result : {"name":"小红","age":12,"score":650}
说明 Spring Boot 自动将 Student对象转成了 JSON 进行返回。那么如果返回的是一个 list 呢?
@RequestMapping("/getStudents")
public List<Student> getStudents() {
    List<Student> students = new ArrayList<>();
    Student student1 = new Student();
    student1.setName("王小宏");
    student1.setAge(31);
    student1.setScore(635);
    students.add(student1);

    Student student2 = new Student();
    student2.setName("宋小专");
    student2.setAge(27);
    student2.setScore(522);
    students.add(student2);
    return students;
}
添加测试方法:
@Test
public void getStudents() throws Exception{
    String responseString = mockMvc.perform(MockMvcRequestBuilders.get("/getStudents"))
            .andReturn().getResponse().getContentAsString();
    System.out.println("result : "+responseString);
}
运行测试结果,得到结果:
result : [{"name":"王小宏","age":31,"score":635},{"name":"宋小专","age":27,"score":522}]
请求传参
前端浏览器和后端服务器正是依赖交互过程中的参数完成了诸多用户操作行为,因此参数的传递和接收是一个 Web 系统最基础的功能。SpringBoot对参数接收做了很好的支持,内置了很多种参数接收方式,提供一些注解来帮助限制请求的类型、接收不同格式的参数等。
Get与Post:
如果我们希望一个接口以Post方式访问,在方法上添加一个配置(method= RequestMethod.POST)即可:
@RequestMapping(name="/getStudent", method= RequestMethod.POST)
public User getStudent() {
    ...
}
如果以Get方法请求该接口,将得到【Request method ‘GET’ not supported】的报错。
同样,如果是GET 请求,method 设置为:method= RequestMethod.GET;如果不进行设置默认两种方式的请求都支持。
请求传参一般分为 URL 地址传参和表单传参两种方式,都以键值对的方式将参数传递到后端。作为后端程序不用关注前端采用的那种方式,只需要根据参数的键来获取值。
通过 URL 传参
只要后端处理请求的方法中存在参数键相同名称的属性,在请求的过程中 Spring 会自动将参数值赋值到属性中,最后在方法中直接使用即可。
@RequestMapping(name = "/test", method = RequestMethod.GET)
public String test(String name) {
    return name;
}
测试:
@RunWith(SpringRunner.class)
@SpringBootTest
@AutoConfigureMockMvc
public class ControllerTest {
    @Autowired
    private MockMvc mockMvc;

    @Test
    public void getStudents() throws Exception {
        String responseString = mockMvc.perform(MockMvcRequestBuilders.get("/test?name=xiaohong"))
                .andReturn().getResponse().getContentAsString();
        System.out.println("result : " + responseString);
    }
}
结果:
result : xiaohong
另一种方式:
@RequestMapping(value="test/{name}", method=RequestMethod.GET)
public String get(@PathVariable String name) {
    return name;
}
这样的写法,传参地址栏会更加美观一些。
测试:
@Test
public void getStudents() throws Exception {
    String responseString = mockMvc.perform(MockMvcRequestBuilders.get("/test/xiaohong"))
            .andReturn().getResponse().getContentAsString();
    System.out.println("result : " + responseString);
}
结果同上例。
表单传参
通过表单传参一般适用于Post请求。例如下面这个接口,只要前端请求带入name和age两个参数,就能被解析到。
@RequestMapping(value = "/test", method = RequestMethod.POST)
public String get(String name, String age) {
    return "姓名:" + name + ",年龄:" + age;
}
使用Jmeter发送一个接口请求:
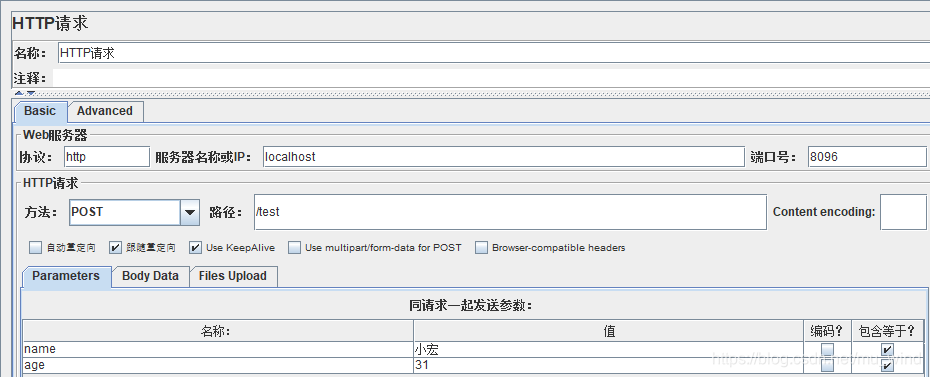
结果:
姓名:小宏,年龄:31
实体传参
有时候前端直接提交一个form表单,传入后端的参数就是JSON格式的,这种参数后端如何接收和处理呢,下面进行示范:
首先,在pom.xml中引入fastjson依赖
<dependency>
	<groupId>com.alibaba</groupId>
    <artifactId>fastjson</artifactId>
    <version>1.2.47</version>
 </dependency>
后端接口:
测试:
Jmeter中发送一个接口请求:

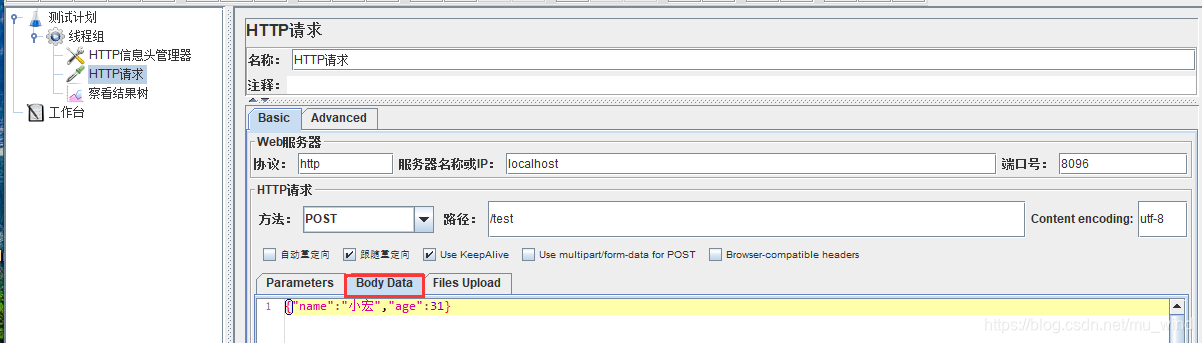
结果同上例。