这篇博文分享Centos 7 下如何使用yum安装以及配置Open JDK
Centos 7 yum方式安装和配置Open JDK攻略
- 查看Centos7 操作系统版本信息
uname -a
命令执行后如下所示:
[root@iZ8vbcspjfrjvp5tqam9c6Z opt]# uname -a
Linux iZ8vbcspjfrjvp5tqam9c6Z 3.10.0-957.21.3.el7.x86_64 #1 SMP Tue Jun 18 16:35:19 UTC 2019 x86_64 x86_64 x86_64 GNU/Linux
[root@iZ8vbcspjfrjvp5tqam9c6Z opt]#
我们可以得到信息当前操作系统是x86_x64,即兼容64位和32位的centos版本。
- 安装之前先查看一下有无系统自带jdk
rpm -qa |grep java

rpm -qa |grep jdk

rpm -qa |grep gcj
如果没有找到则什么也不会输出。
- 查看所有的open JDK 列表
yum list |grep jdk
返回列表如下:
copy-jdk-configs.noarch                 3.3-10.el7_5                   base
java-1.6.0-openjdk.x86_64               1:1.6.0.41-1.13.13.1.el7_3     base
java-1.6.0-openjdk-demo.x86_64          1:1.6.0.41-1.13.13.1.el7_3     base
java-1.6.0-openjdk-devel.x86_64         1:1.6.0.41-1.13.13.1.el7_3     base
java-1.6.0-openjdk-javadoc.x86_64       1:1.6.0.41-1.13.13.1.el7_3     base
java-1.6.0-openjdk-src.x86_64           1:1.6.0.41-1.13.13.1.el7_3     base
java-1.7.0-openjdk.x86_64               1:1.7.0.231-2.6.19.2.el7_7     updates
java-1.7.0-openjdk-accessibility.x86_64 1:1.7.0.231-2.6.19.2.el7_7     updates
java-1.7.0-openjdk-demo.x86_64          1:1.7.0.231-2.6.19.2.el7_7     updates
java-1.7.0-openjdk-devel.x86_64         1:1.7.0.231-2.6.19.2.el7_7     updates
java-1.7.0-openjdk-headless.x86_64      1:1.7.0.231-2.6.19.2.el7_7     updates
java-1.7.0-openjdk-javadoc.noarch       1:1.7.0.231-2.6.19.2.el7_7     updates
java-1.7.0-openjdk-src.x86_64           1:1.7.0.231-2.6.19.2.el7_7     updates
java-1.8.0-openjdk.i686                 1:1.8.0.222.b10-1.el7_7        updates
java-1.8.0-openjdk.x86_64               1:1.8.0.222.b10-1.el7_7        updates
java-1.8.0-openjdk-accessibility.i686   1:1.8.0.222.b10-1.el7_7        updates
java-1.8.0-openjdk-accessibility.x86_64 1:1.8.0.222.b10-1.el7_7        updates
java-1.8.0-openjdk-accessibility-debug.i686
java-1.8.0-openjdk-accessibility-debug.x86_64
java-1.8.0-openjdk-debug.i686           1:1.8.0.222.b10-1.el7_7        updates
java-1.8.0-openjdk-debug.x86_64         1:1.8.0.222.b10-1.el7_7        updates
java-1.8.0-openjdk-demo.i686            1:1.8.0.222.b10-1.el7_7        updates
java-1.8.0-openjdk-demo.x86_64          1:1.8.0.222.b10-1.el7_7        updates
java-1.8.0-openjdk-demo-debug.i686      1:1.8.0.222.b10-1.el7_7        updates
java-1.8.0-openjdk-demo-debug.x86_64    1:1.8.0.222.b10-1.el7_7        updates
java-1.8.0-openjdk-devel.i686           1:1.8.0.222.b10-1.el7_7        updates
java-1.8.0-openjdk-devel.x86_64         1:1.8.0.222.b10-1.el7_7        updates
java-1.8.0-openjdk-devel-debug.i686     1:1.8.0.222.b10-1.el7_7        updates
java-1.8.0-openjdk-devel-debug.x86_64   1:1.8.0.222.b10-1.el7_7        updates
java-1.8.0-openjdk-headless.i686        1:1.8.0.222.b10-1.el7_7        updates
java-1.8.0-openjdk-headless.x86_64      1:1.8.0.222.b10-1.el7_7        updates
java-1.8.0-openjdk-headless-debug.i686  1:1.8.0.222.b10-1.el7_7        updates
java-1.8.0-openjdk-headless-debug.x86_64
java-1.8.0-openjdk-javadoc.noarch       1:1.8.0.222.b10-1.el7_7        updates
java-1.8.0-openjdk-javadoc-debug.noarch 1:1.8.0.222.b10-1.el7_7        updates
java-1.8.0-openjdk-javadoc-zip.noarch   1:1.8.0.222.b10-1.el7_7        updates
java-1.8.0-openjdk-javadoc-zip-debug.noarch
java-1.8.0-openjdk-src.i686             1:1.8.0.222.b10-1.el7_7        updates
java-1.8.0-openjdk-src.x86_64           1:1.8.0.222.b10-1.el7_7        updates
java-1.8.0-openjdk-src-debug.i686       1:1.8.0.222.b10-1.el7_7        updates
java-1.8.0-openjdk-src-debug.x86_64     1:1.8.0.222.b10-1.el7_7        updates
java-11-openjdk.i686                    1:11.0.4.11-1.el7_7            updates
java-11-openjdk.x86_64                  1:11.0.4.11-1.el7_7            updates
java-11-openjdk-debug.i686              1:11.0.4.11-1.el7_7            updates
java-11-openjdk-debug.x86_64            1:11.0.4.11-1.el7_7            updates
java-11-openjdk-demo.i686               1:11.0.4.11-1.el7_7            updates
java-11-openjdk-demo.x86_64             1:11.0.4.11-1.el7_7            updates
java-11-openjdk-demo-debug.i686         1:11.0.4.11-1.el7_7            updates
java-11-openjdk-demo-debug.x86_64       1:11.0.4.11-1.el7_7            updates
java-11-openjdk-devel.i686              1:11.0.4.11-1.el7_7            updates
java-11-openjdk-devel.x86_64            1:11.0.4.11-1.el7_7            updates
java-11-openjdk-devel-debug.i686        1:11.0.4.11-1.el7_7            updates
java-11-openjdk-devel-debug.x86_64      1:11.0.4.11-1.el7_7            updates
java-11-openjdk-headless.i686           1:11.0.4.11-1.el7_7            updates
java-11-openjdk-headless.x86_64         1:11.0.4.11-1.el7_7            updates
java-11-openjdk-headless-debug.i686     1:11.0.4.11-1.el7_7            updates
java-11-openjdk-headless-debug.x86_64   1:11.0.4.11-1.el7_7            updates
java-11-openjdk-javadoc.i686            1:11.0.4.11-1.el7_7            updates
java-11-openjdk-javadoc.x86_64          1:11.0.4.11-1.el7_7            updates
java-11-openjdk-javadoc-debug.i686      1:11.0.4.11-1.el7_7            updates
java-11-openjdk-javadoc-debug.x86_64    1:11.0.4.11-1.el7_7            updates
java-11-openjdk-javadoc-zip.i686        1:11.0.4.11-1.el7_7            updates
java-11-openjdk-javadoc-zip.x86_64      1:11.0.4.11-1.el7_7            updates
java-11-openjdk-javadoc-zip-debug.i686  1:11.0.4.11-1.el7_7            updates
java-11-openjdk-javadoc-zip-debug.x86_64
java-11-openjdk-jmods.i686              1:11.0.4.11-1.el7_7            updates
java-11-openjdk-jmods.x86_64            1:11.0.4.11-1.el7_7            updates
java-11-openjdk-jmods-debug.i686        1:11.0.4.11-1.el7_7            updates
java-11-openjdk-jmods-debug.x86_64      1:11.0.4.11-1.el7_7            updates
java-11-openjdk-src.i686                1:11.0.4.11-1.el7_7            updates
java-11-openjdk-src.x86_64              1:11.0.4.11-1.el7_7            updates
java-11-openjdk-src-debug.i686          1:11.0.4.11-1.el7_7            updates
java-11-openjdk-src-debug.x86_64        1:11.0.4.11-1.el7_7            updates
java-latest-openjdk.x86_64              1:13.0.0.33-1.rolling.el7      epel
java-latest-openjdk-debug.x86_64        1:13.0.0.33-1.rolling.el7      epel
java-latest-openjdk-demo.x86_64         1:13.0.0.33-1.rolling.el7      epel
java-latest-openjdk-demo-debug.x86_64   1:13.0.0.33-1.rolling.el7      epel
java-latest-openjdk-devel.x86_64        1:13.0.0.33-1.rolling.el7      epel
java-latest-openjdk-devel-debug.x86_64  1:13.0.0.33-1.rolling.el7      epel
java-latest-openjdk-headless.x86_64     1:13.0.0.33-1.rolling.el7      epel
java-latest-openjdk-headless-debug.x86_64
java-latest-openjdk-javadoc.x86_64      1:13.0.0.33-1.rolling.el7      epel
java-latest-openjdk-javadoc-debug.x86_64
java-latest-openjdk-javadoc-zip.x86_64  1:13.0.0.33-1.rolling.el7      epel
java-latest-openjdk-javadoc-zip-debug.x86_64
java-latest-openjdk-jmods.x86_64        1:13.0.0.33-1.rolling.el7      epel
java-latest-openjdk-jmods-debug.x86_64  1:13.0.0.33-1.rolling.el7      epel
java-latest-openjdk-src.x86_64          1:13.0.0.33-1.rolling.el7      epel
java-latest-openjdk-src-debug.x86_64    1:13.0.0.33-1.rolling.el7      epel
ldapjdk.noarch                          4.19-5.el7                     base
ldapjdk-javadoc.noarch                  4.19-5.el7                     base
这里这么多版本选择哪个呢?
我们刚才已经得知当前操作系统是x86_x64,因此可选的只有x86_x64结尾的版本
去掉i686版本就只剩下如下几种:
java-1.8.0-openjdk.x86_64               1:1.8.0.222.b10-1.el7_7        updates
java-1.8.0-openjdk-accessibility.x86_64 1:1.8.0.222.b10-1.el7_7        updates
java-1.8.0-openjdk-accessibility-debug.x86_64
java-1.8.0-openjdk-debug.x86_64         1:1.8.0.222.b10-1.el7_7        updates
java-1.8.0-openjdk-demo.x86_64          1:1.8.0.222.b10-1.el7_7        updates
java-1.8.0-openjdk-demo-debug.x86_64    1:1.8.0.222.b10-1.el7_7        updates
java-1.8.0-openjdk-devel.x86_64         1:1.8.0.222.b10-1.el7_7        updates
java-1.8.0-openjdk-devel-debug.x86_64   1:1.8.0.222.b10-1.el7_7        updates
java-1.8.0-openjdk-headless.x86_64      1:1.8.0.222.b10-1.el7_7        updates
java-1.8.0-openjdk-headless-debug.x86_64
java-1.8.0-openjdk-javadoc.noarch       1:1.8.0.222.b10-1.el7_7        updates
java-1.8.0-openjdk-javadoc-debug.noarch 1:1.8.0.222.b10-1.el7_7        updates
java-1.8.0-openjdk-javadoc-zip.noarch   1:1.8.0.222.b10-1.el7_7        updates
java-1.8.0-openjdk-javadoc-zip-debug.noarch
java-1.8.0-openjdk-src.x86_64           1:1.8.0.222.b10-1.el7_7        updates
java-1.8.0-openjdk-src-debug.x86_64     1:1.8.0.222.b10-1.el7_7
但是再去掉源码,示例,文档,调试的版本,就只有如下两种选择:
| open JDK版本名称 | open JDK版本号 | 备注 | 说明 |
|---|---|---|---|
| java-1.8.0-openjdk.x86_64 | 1:1.8.0.222.b10-1.el7_7 | updates | open-jdk-8生产环境版本,只有JRE,不包括一些jps -l,javac等工具 |
| java-1.8.0-openjdk-devel.x86_64 | 1:1.8.0.222.b10-1.el7_7 | updates | open-jdk-8 开发环境版本,带有一些工具插件,比如javac编译工具,jps -l 进程查看工具 |
- 管理员身份安装open-jdk-8
su -c "yum install java-1.8.0-openjdk-devel.x86_64"
强烈建议安装这个java-1.8.0-openjdk-devel.x86_64版本 而不是另外一个。
Linux命令知识科普:
su [-fmp] [-c command] [-s shell] [–help] [–version] [-] [USER [ARG]]
- su:su的作用是变更为其它使用者的身份,超级用户除外,需要键入该使用者的密码。
- -c: 变更账号为USER的使用者,并执行指令(command)后再变回原来使用者。
- USER:欲变更的使用者账号,如果没有指定USER,缺省情况是root。
- su 和sudo以及sudo -i 的区别
- sudo : 暂时切换到超级用户模式以执行超级用户权限,提示输入密码时该密码为当前用户的密码,而不是超级账户的密码。不过有时间限制,Ubuntu默认为一次时长15分钟。
- su : 切换到某某用户模式,提示输入密码时该密码为切换后账户的密码,用法为“su 账户名称”。如果后面不加账户时系统默认为root账户,密码也为超级账户的密码。没有时间限制。
- sudo -i
为了频繁的执行某些只有超级用户才能执行的权限,而不用每次输入密码,可以使用该命令。提示输入密码时该密码为当前账户的密码。没有时间限制。执行该命令后提示符变为“#”而不是“$”。想退回普通账户时可以执行“exit”或“logout”
- 查看open jdk 安装版本
java -version
命令执行成功显示如下所示:
[root@iZ8vbcspjfrjvp5tqam9c6Z opt]# java -version
openjdk version "1.8.0_222"
OpenJDK Runtime Environment (build 1.8.0_222-b10)
OpenJDK 64-Bit Server VM (build 25.222-b10, mixed mode)
[root@iZ8vbcspjfrjvp5tqam9c6Z opt]#
- 查看open jdk 是否可用
javac
如果输入
javac命令后出现如下提示,说明环境变量没有配置[root@iZ8vbcspjfrjvp5tqam9c6Z opt]# javac -bash: javac: command not found [root@iZ8vbcspjfrjvp5tqam9c6Z opt]#
配置环境变量之前,我们需要先找到open jdk 的安装路径。
- 查看open jdk 8 安装路径
which java
命令执行成功显示如下所示:
[root@iZ8vbcspjfrjvp5tqam9c6Z opt]# which java
/usr/bin/java
[root@iZ8vbcspjfrjvp5tqam9c6Z opt]#
值得注意的是这里的/usr/bin/java中的java是一个快捷方式,并不是一个文件夹

那么实际的open jdk 安装目录在哪里?
输入命令查看上面java超链接的地址
ls -lrt /usr/bin/java
内容输出如下所示
lrwxrwxrwx 1 root root 22 Oct 12 07:52 /usr/bin/java -> /etc/alternatives/java
这个/etc/alternatives/java 实际上也是一个超链接
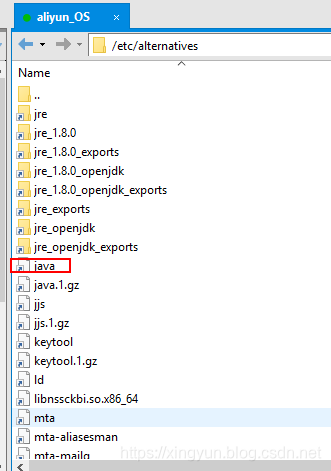
我们继续输入命令查看这个超链接
ls -lrt /etc/alternatives/java
输出内容如下所示:
/etc/alternatives/java -> /usr/lib/jvm/java-1.8.0-openjdk-1.8.0.222.b10-1.el7_7.x86_64/jre/bin/java
我们使用xftp工具打开可以看到如下内容:
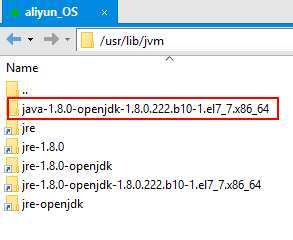
因此JAVA_HOME的实际安装路径应该是
/usr/lib/jvm/java-1.8.0-openjdk-1.8.0.222.b10-1.el7_7.x86_64
好了,明确了Open JDK 的安装目录,一切就简单多了。
- 打开环境变量配置文件并进行编辑,输入如下命令
vi /etc/profile
- 然后进入文件编辑模式输入如下命令:
i
然后移动光标到文件的最后面添加如下内容:
export JAVA_HOME=/usr/lib/jvm/java-1.8.0-openjdk-1.8.0.222.b10-1.el7_7.x86_64
export CLASS_PATH=.:$JAVA_HOME/lib/dt.jar:$JAVA_HOME/lib/tools.jar:$JAVA_HOME/jre/lib/rt.jar
export PATH=$PATH:$JAVA_HOME/bin
值得注意的是windows 和Linux不太一样:
- 在Linux 中,
$PATH表示之前的环境变量- 在Linux中
:冒号作为环境变量分割符号,而在Windows中是;分号作为分隔符。- 其次配置环境变量CLASS_PATH必须第一个是. 然后分号添加其他路径,这样会首选从当前路径下找,当前路径下如果找不到会从其他路径找。
dt.jar和tools.jar都位于$JAVA_HOME/lib/ 文件夹下,rt.jar位于jre 文件夹下
然后按下电脑上的ESC, 输入如下命令保存并退出
:wq
然后还需要将环境变量编译生效
source /etc/profile
最后测试编译*.java命令
javac
输出内容:
Usage: javac <options> <source files>
where possible options include:
  -g                         Generate all debugging info
  -g:none                    Generate no debugging info
  -g:{lines,vars,source}     Generate only some debugging info
  -nowarn                    Generate no warnings
  -verbose                   Output messages about what the compiler is doing
  -deprecation               Output source locations where deprecated APIs are used
  -classpath <path>          Specify where to find user class files and annotation processors
  -cp <path>                 Specify where to find user class files and annotation processors
  -sourcepath <path>         Specify where to find input source files
  -bootclasspath <path>      Override location of bootstrap class files
  -extdirs <dirs>            Override location of installed extensions
  -endorseddirs <dirs>       Override location of endorsed standards path
  -proc:{none,only}          Control whether annotation processing and/or compilation is done.
  -processor <class1>[,<class2>,<class3>...] Names of the annotation processors to run; bypasses default discovery process
  -processorpath <path>      Specify where to find annotation processors
  -parameters                Generate metadata for reflection on method parameters
  -d <directory>             Specify where to place generated class files
  -s <directory>             Specify where to place generated source files
  -h <directory>             Specify where to place generated native header files
  -implicit:{none,class}     Specify whether or not to generate class files for implicitly referenced files
  -encoding <encoding>       Specify character encoding used by source files
  -source <release>          Provide source compatibility with specified release
  -target <release>          Generate class files for specific VM version
  -profile <profile>         Check that API used is available in the specified profile
  -version                   Version information
  -help                      Print a synopsis of standard options
  -Akey[=value]              Options to pass to annotation processors
  -X                         Print a synopsis of nonstandard options
  -J<flag>                   Pass <flag> directly to the runtime system
  -Werror                    Terminate compilation if warnings occur
  @<filename>                Read options and filenames from file
输入执行*.class 字节码命令
java
输出内容如下:
Usage: java [-options] class [args...]
           (to execute a class)
   or  java [-options] -jar jarfile [args...]
           (to execute a jar file)
where options include:
    -d32	  use a 32-bit data model if available
    -d64	  use a 64-bit data model if available
    -server	  to select the "server" VM
                  The default VM is server.

    -cp <class search path of directories and zip/jar files>
    -classpath <class search path of directories and zip/jar files>
                  A : separated list of directories, JAR archives,
                  and ZIP archives to search for class files.
    -D<name>=<value>
                  set a system property
    -verbose:[class|gc|jni]
                  enable verbose output
    -version      print product version and exit
    -version:<value>
                  Warning: this feature is deprecated and will be removed
                  in a future release.
                  require the specified version to run
    -showversion  print product version and continue
    -jre-restrict-search | -no-jre-restrict-search
                  Warning: this feature is deprecated and will be removed
                  in a future release.
                  include/exclude user private JREs in the version search
    -? -help      print this help message
    -X            print help on non-standard options
    -ea[:<packagename>...|:<classname>]
    -enableassertions[:<packagename>...|:<classname>]
                  enable assertions with specified granularity
    -da[:<packagename>...|:<classname>]
    -disableassertions[:<packagename>...|:<classname>]
                  disable assertions with specified granularity
    -esa | -enablesystemassertions
                  enable system assertions
    -dsa | -disablesystemassertions
                  disable system assertions
    -agentlib:<libname>[=<options>]
                  load native agent library <libname>, e.g. -agentlib:hprof
                  see also, -agentlib:jdwp=help and -agentlib:hprof=help
    -agentpath:<pathname>[=<options>]
                  load native agent library by full pathname
    -javaagent:<jarpath>[=<options>]
                  load Java programming language agent, see java.lang.instrument
    -splash:<imagepath>
                  show splash screen with specified image
See http://www.oracle.com/technetwork/java/javase/documentation/index.html for more details.