-
- 本节主要介绍centos6和centos7的区别和常用的简单配置:
- 第一部分:
- 1.对比文件系统
- 2.对比防火墙,内核版本,默认数据库
- 3.对比时间同步,修改时区,修改语言
- 4.对比主机名
- 5.对比网络服务管理
- 6.对比网络设置
- 7.对比网络配置的命令
- 8.对比网络的服务
- 第二部分:
- 1.修改centos7为eth0的网卡名字
- 2.本节常用命令
- 3.添加一个普通的用户
- 4.centos更换yum源
- 5.安装必要的软件包
- 6.开机优化启动项
- 7.设置静态地址
- 8.关闭防火墙和selinux
- 9.优化VMware的SSH使其连接时候更快的连接
- 10.修改主机名
- 11.host解析
- 12.使用本地yum源
- 13.其他:
本节主要介绍centos6和centos7的区别和常用的简单配置:
第一部分:centos6和centos7的对比
第二部分:centos的简单配置
第一部分:
1.对比文件系统
    centos6.: EXT4
        EXT4的单个文件系统的容量达到1EB,单个文件大小则达到16TB。
    centos7.:XFS
        XFS默认支持8EB减掉1字节的单个文件系统,最大支持的文件大小为9EB,最大文件系统支持18EB。
2.对比防火墙,内核版本,默认数据库
    centos6:
        防火墙:iptables
        内核版本:2.6.x-x
        默认数据库:MySQL
    centos7:
        防火墙:firewalld (也可以使用iptables)
        内核版本:3.10.x-x (可以更好的支持docker)
        默认数据库:MariaDB (也可以用MySQL)
3.对比时间同步,修改时区,修改语言
    centos6:
        时间同步:ntpq -p
        修改时区:/etc/sysconfig/clock
        修改语言: /etc/sysconfig/i18n
    centos7:
        时间同步:chronyc sources
        修改时区:timedatectl set-timezone Asia/Shanghai
        修改语言: localectl set-locale LANG=zh_CN.UTF-8
但是我基本不用,记住修改后需要重启。我常用:
# locale -a |grep CN 先查看有没有zh_CN.utf-8 没有就安装
# yum install kde-l10n-Chinese -y ; yum groupinstall "fonts" -y
# vim /etc/locale.conf
#LANG="en_US.UTF-8"  #英文
    LANG="zh_CN.UTF-8" #修改后的中文 # source /etc/locale.conf
4.对比主机名
    centos6.:
        配置文件在/etc/sysconfig/network 这里永久设置主机名字
    centos7.:
        配置文件在/etc/hostname (永久设置)
        hostnamectl set-hostname liych
5.对比网络服务管理
    centos6:
    service 服务名 状态
        状态:
            status
            start
            stop
            --status-all
    chkconfig:
            on
            off
            --list

    centos7:
    systemctl 服务名 状态
        状态:
            status
            start
            stop
            list-units
            enable
            disable
            list-units-files
6.对比网络设置
    centos6:
        网卡名字是:eth0
    centos7:
        网卡名字是:ens33 ... enp4s0f0 ... eno1 ... eno167....
7.对比网络配置的命令
    centos6:
        ifconfig 、setup
    centos7:
        ip 、nmtui
8.对比网络的服务
    centos6:
        network
    centos7:
        networkmanager
第二部分:
1.修改centos7为eth0的网卡名字
# cd /etc/sysconfig/network-scripts/
# cp -a ifcfg-ens33 ifcfg-eth0
将网卡名字修改
    NAME=eth0
    DEVICE=eth0
修改grub配置文件
# vim /etc/defaule/grub
修改grub文件  在GRUB_CMDLINE_LINUX原有的参数后面加上"net.ifnames=0 biosdevname=0"
# grub2-mkconfig -o /boot/grub2/grub.cfg
# reboot
2.本节常用命令
    whoami #查看当前用户是谁
    su -   # 加-表示 带环境变量切换
    su root
3.添加一个普通的用户
    #useradd liych
    #passwd liych
4.centos更换yum源
    镜像源:
    搜狐:http://mirrors.sohu.com
    网易:http://mirrors.163.com
    阿里云:https://opsx.alibaba.com/mirror
    淘宝:http://npm.taobao.org

    阿里云镜像站:https://opsx.alibaba.com/mirror (这里使用阿里云提供的源,在做yum本地仓库的是也推荐使用阿里源)
使用阿里云源:
CentOS
1、备份
mv /etc/yum.repos.d/CentOS-Base.repo /etc/yum.repos.d/CentOS-Base.repo.backup
2、下载新的CentOS-Base.repo 到/etc/yum.repos.d/
CentOS 7
wget -O /etc/yum.repos.d/CentOS-Base.repo http://mirrors.aliyun.com/repo/Centos-7.repo
或者
curl -o /etc/yum.repos.d/CentOS-Base.repo http://mirrors.aliyun.com/repo/Centos-7.repo
3、之后运行yum makecache生成缓存
4、其他
非阿里云ECS用户会出现 Couldn't resolve host 'mirrors.cloud.aliyuncs.com' 信息,不影响使用。
用户也可自行修改相关配置:
sed -i -e '/mirrors.cloud.aliyuncs.com/d' -e '/mirrors.aliyuncs.com/d' /etc/yum.repos.d/CentOS-Base.repo
5.安装必要的软件包
yum install tree telnet dos2unix sysstat lrzsz -y6.开机优化启动项
    将不常用的服务关闭掉:
        # systemctl list-unit-files|egrep "^ab|^aud|^kdump|vm|^md|^mic|^post|lvm"  |awk '{print $1}'|sed -r 's#(.*)#systemctl disable &#g'|bash
7.设置静态地址
    dhcp的地址总是变化,需要设置静态地址,可以不变,方便连接使用。
    配置文件路径:cd /etc/sysconfig/network-scripts/

        TYPE=Ethernet
        BOOTPROTO=none               #取消dhcp
        NAME=eth0
        DEVICE=eth0
        ONBOOT=yes                   #设置开机启动
        IPADDR=172.16.0.5            #IP地址
        NETMASK=255.255.255.0        #子网掩码
        GATEWAY=172.16.0.254         #网关
        DNS1=114.114.114.114         #DNS
8.关闭防火墙和selinux
    配置服务实验环境,建议不启用这些,必要时候需要配置防火墙。
        关闭防护墙:
            # systemctl stop firewalld
            # systemctl disable firewalld.service
            # systemctl status firewalld
        关闭selinux:
            # sed -i 's#SELINUX=enforcing#SELINUX=disabled#g' /etc/selinux/config
            # sestatus
9.优化VMware的SSH使其连接时候更快的连接
    当时有CRT或Xshell连接虚拟机的时候,连接的速度很慢,会卡顿。
        关闭登陆的时候客户端需要对服务器端的IP地址进行反解析。
            但是测试的是发现GSSAPIAuthentication是默认关闭的,所以可以只设置UseDNS no 就可以加速连接。

        # sed  -i  '93s@GSSAPIAuthentication yes@GSSAPIAuthentication no@;129s@#UseDNS yes@UseDNS no@' /etc/ssh/sshd_config
为了避免迷惑解释下 93s和129s的示意如下:
[root@liych ~]# cat 1.txt
# Don't read the user's ~/.rhosts and ~/.shosts files
#IgnoreRhosts yes
[root@liych ~]# sed '1s@Don@123@;2s@yes@456@' 1.txt # 123't read the user's ~/.rhosts and ~/.shosts files #IgnoreRhosts 456 [root@liych ~]# sed 's@Don@123@;s@yes@456@' 1.txt # 123't read the user's ~/.rhosts and ~/.shosts files #IgnoreRhosts 456
10.修改主机名
# hostnamectl set-hostname liych11.host解析
    # vim /etc/hosts
    172.16.0.5 liych
12.使用本地yum源
后续单独出讲13.其他:
    1.时间:
        查看系统的开机时间:
        systemd-analyze time
        查看具体服务的运行时间:
        systemd-analyze blame
        输出图形展示:
        # systemd-analyze plot  >system_time.svg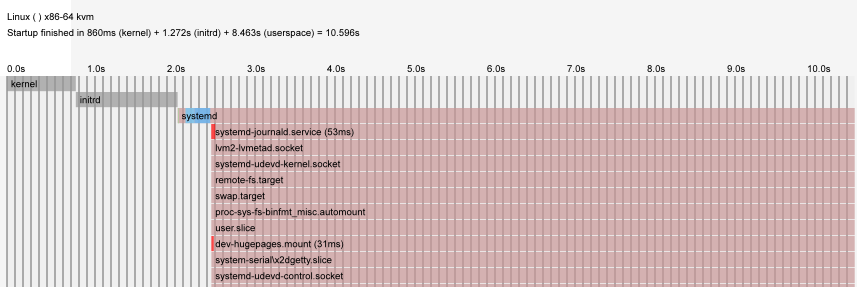
centos6和centos7的区别和常用的简单配置
猜你喜欢
转载自www.cnblogs.com/liych/p/11741632.html
今日推荐
周排行