前言
FlexBoxlayout是Google推出的开源的可伸缩性布局,在项目中也会经场使用,大大提高了用户的体验。
本文主要记录了 在项目中使用RecyclerView(多布局item)+FlexBoxLayout时遇到的问题做个总结,希望对你有所帮助。
以自身的项目需求为例,如图所示:
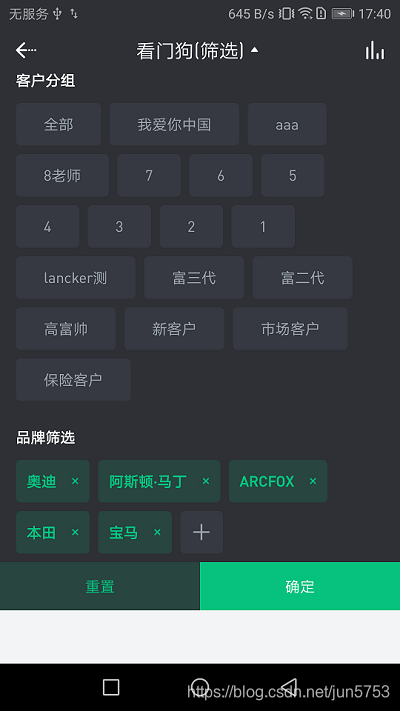
在”品牌筛选“、”客户分组“中用了三处可伸缩性布局。
首先回顾一下相关概念和属性,已熟悉的同学可以直接看用法。
什么是FlexboxLayout
看一下Github对这个库的介绍:
FlexboxLayout is a library project which brings the similar capabilities of CSS Flexible Box Layout Module to Android.
意思是:FlexboxLayout是一个Android平台上与CSS的 Flexible box 布局模块 有相似功能的库。
使用方式跟LinearLayout、Relativelayout相似,不同的是相关属性。使用也更为灵活,此处不在赘述到底有哪些属性。详情请点击flexbox_layout官方开源地址。
如何使用FlexboxLayout
有两种方式:

-
第一种
<com.google.android.flexbox.FlexboxLayout xmlns:android="http://schemas.android.com/apk/res/android" xmlns:app="http://schemas.android.com/apk/res-auto" android:layout_width="match_parent" android:layout_height="match_parent" app:flexWrap="wrap" app:alignItems="stretch" app:alignContent="stretch" > <TextView android:id="@+id/textview1" android:layout_width="120dp" android:layout_height="80dp" app:layout_flexBasisPercent="50%"/> <TextView android:id="@+id/textview2" android:layout_width="80dp" android:layout_height="80dp" app:layout_alignSelf="center"/> <TextView android:id="@+id/textview3" android:layout_width="160dp" android:layout_height="80dp" app:layout_alignSelf="flex_end"/> </com.google.android.flexbox.FlexboxLayout> -
第二种
FlexboxLayout flexboxLayout = (FlexboxLayout) findViewById(R.id.flexbox_layout);
flexboxLayout.setFlexDirection(FlexDirection.ROW);

View view = flexboxLayout.getChildAt(0);
FlexboxLayout.LayoutParams lp = (FlexboxLayout.LayoutParams) view.getLayoutParams();
lp.order = -1;
lp.flexGrow = 2;
view.setLayoutParams(lp);
介绍完基本使用后,下面说重点。
FlexboxLayout+RecyclerView的使用(重点)
在RecyclerView中,我已经知道 layoutManager支持了三种布局管理器有LinearLayoutManager(线性布局管理器)、GridLayoutManager(网格布局管理器)、StaggeredGridLayoutManager (瀑布流布局管理器)。
注:layoutManager:RecyclerView 会根据 Layout Manager 提供的视图来填充自身。
使用方法为:
RecyclerView recyclerView = (RecyclerView) context.findViewById(R.id.recyclerview);
FlexboxLayoutManager layoutManager = new FlexboxLayoutManager(context);
layoutManager.setFlexDirection(FlexDirection.COLUMN);
layoutManager.setJustifyContent(JustifyContent.FLEX_END);
recyclerView.setLayoutManager(layoutManager);
或者改变FlexboxLayoutManager中的属性值,方法比如:
mImageView.setImageDrawable(drawable);
ViewGroup.LayoutParams lp = mImageView.getLayoutParams();
if (lp instanceof FlexboxLayoutManager.LayoutParams) {
    FlexboxLayoutManager.LayoutParams flexboxLp = (FlexboxLayoutManager.LayoutParams) lp;
    flexboxLp.setFlexGrow(1.0f);
    flexboxLp.setAlignSelf(AlignSelf.FLEX_END);
}
使用FlexBoxLayoutManager的优点是,它可以回收屏幕外的视图,以便在用户滚动时对显示的视图进行重用,而不是对每个视图进行填充,这样消耗的内存要少得多,特别是当FlexBox容器中包含的项目数很大时。
如瀑布流效果
https://github.com/google/flexbox-layout/raw/master/assets/flexbox-layoutmanager.gif
FlexboxLayout+RecyclerView的完美结合使用,继承了各自己的优点。
项目中使用总结
最后总结一下在项目中RecyclerView使用多布局时遇到的问题。
在第一张需求图中,品牌筛选时 最后有一个”+“号,想要的效果时 根据品牌选择后,这个”+“号会紧挨着显示,如果显示不完,就换行显示。
刚开始考虑的是的在RecyclerView添加FooterView,FooterView为一个“+”的按钮,这个按钮会换一行显示,不能紧挨着显示,如果超过一行再换行显示。
此时会遇到两个问题,
按照RecyclerView中的基本用法使用后 会报错,日志如下:
ClassCastException: android.support.v7.widget.RecyclerView$LayoutParams cannot be cast to com.google.android.flexbox.FlexItem。
我们添加的FooterView,无法转换成FlexlItem。网上找到解决方案,详情见FlexboxLayoutManager 踩坑。
一是需要重写FlexboxLayoutManager,代码示例如下:
import com.google.android.flexbox.FlexboxLayoutManager

class MyFlexboxLayoutManager : FlexboxLayoutManager {
    constructor(context: Context) : super(context)

    constructor(context: Context, flexDirection: Int) : super(context, flexDirection)

    constructor(context: Context, flexDirection: Int, flexWrap: Int) : super(context, flexDirection, flexWrap)


    /**
     * 将LayoutParams转换成新的FlexboxLayoutManager.LayoutParams
     */
    override fun generateLayoutParams(lp: ViewGroup.LayoutParams): RecyclerView.LayoutParams {
        return when (lp) {
            //TODO:可能需要适配,特殊处理"+"的宽度
            is RecyclerView.LayoutParams -> LayoutParams(lp)
            is ViewGroup.MarginLayoutParams -> LayoutParams(lp)
            else -> LayoutParams(lp)
        }
    }
}
第二个问题:显示问题。此时会出现我们的FooterView(”+“号)换一行显示,不能紧挨着显示。
于是陷入思考,在上述代码中,RecyclerView.LayoutParams的计算方法LayoutParams(lp)也需要重写。
在查阅资料和源码后发现比较麻烦,最后在网友的帮助下(FlexboxLayoutManager 踩坑),换一种思路,用RecyclerView多布局来实现,豁然开朗。
思路如下:在数据实体类中添加一个标志,如是否是添加标志isAdd,根据该值的是不同显示不同的item布局。
class CameraVehicleBrandAdapter : MyBaseMultiItemAdapter<CameraVehicleBrandEntity>() {

    init {
        addItemType(CameraVehicleBrandEntity.ITEM_TYPE_NORMAL, R.layout.home_recycle_item_camera_vehicle_brand_selected)
        addItemType(CameraVehicleBrandEntity.ITEM_TYPE_ADD, R.layout.home_recycle_item_camera_vehicle_brand_add)
    }

    override fun convert(helper: BaseViewHolder, item: CameraVehicleBrandEntity) {
        super.convert(helper, item)
        if (item.isAdd) {
            helper.addOnClickListener(R.id.ivAddBrand)
            return
        }
        helper.setText(R.id.tvBrandName, item.brandName)
        helper.addOnClickListener(R.id.ivDelete)
    }
}
调用方法:
  //品牌筛选
rvBrand.layoutManager = FlexboxLayoutManager(context)
rvBrand.adapter = brandAdapter
至此,实现了想要的效果,问题得以解决。
参考资料: