mycat垂直分库
本文主要介绍了如何使用mycat对mysql数据库进行垂直分库,包括:
- 垂直分库的步骤
- 垂直分库的环境准备
- 配置mycat垂直分库
1. 垂直分库的步骤
- 收集分析业务模块间的关系
- 复制数据库到其他实例(减轻业务影响)
- 配置mycat垂直分库
- 通过mycat访问DB
- 删除原库中已迁移表
2. 垂直分库的环境准备
假定:node1主机为mysql数据库服务器,有dolphin_db数据库,访问压力大,要进行垂直分库。即将该数据库分为order_db,product_db,customer_db。
| 主机名 | IP | 角色 | 数据库 | 部署软件及版本 |
| node1 | 172.31.11.134 | mycat mysql | dolphin_db | mysql-5.7 mycat-1.6.7.3 xtrabackup-2.4.12 |
| node2 | 172.31.11.135 | mysql | order_db | mysql-5.7 xtrabackup-2.4.12 |
| node3 | 172.31.11.136 | mysql | product_db | mysql-5.7 xtrabackup-2.4.12 |
| node4 | 172.31.11.138 | mysql | customer_db | mysql-5.7 xtrabackup-2.4.12 |
2.1 node1备份
1. 进行物理备份
[root@node1 ~]# innobackupex --defaults-file=/data/mysql/my.cnf --user=root --password=abcd@1234 --socket=/data/mysql/run/mysql.sock /data/backup
2. 将备份文件复制到node2-4
[root@node1 ~]# scp -r /data/backup/2019-10-18_09-42-25/ node2:/data/backup/

[root@node1 ~]# scp -r /data/backup/2019-10-18_09-42-25/ node3:/data/backup/

[root@node1 ~]# scp -r /data/backup/2019-10-18_09-42-25/ node4:/data/backup/
3.创建复制用户
mysql> grant replication slave on *.* to repluser@'172.31.11.%' identified by 'replpass';
2.2 node2还原
1. 准备一个备份
innobackupex --defaults-file=/data/mysql/my.cnf --socket=/data/mysql/run/mysql.sock --user=root --password='abcd@1234' --apply-log /data/backup/2019-10-18_09-42-25
2. 恢复数据前需要清空/data/mysql/data(数据目录)和cd /data/mysql/log/iblog(innodb日志目录)的内容,否则报错
rm -rf /data/mysql/data/*

rm -rf /data/mysql/log/iblog/*
3. 恢复数据

innobackupex --defaults-file=/data/mysql/my.cnf --user=root --password --socket=/data/mysql/run/mysql.sock --copy-back /data/backup/2019-10-18_09-42-25
4. 修改目录权限
chown -R mysql:mysql /data/mysql
5. 重启mysqld服务
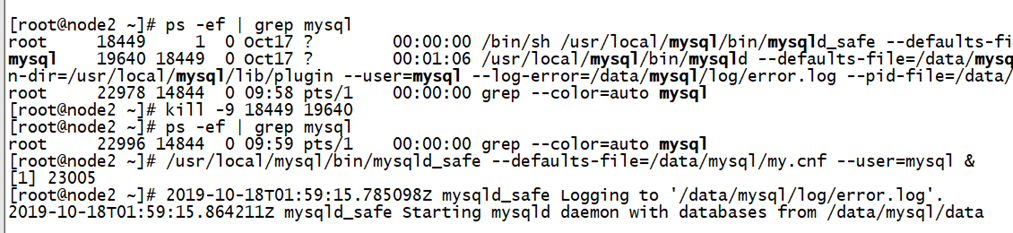
/usr/local/mysql/bin/mysqld_safe --defaults-file=/data/mysql/my.cnf --user=mysql &
6. 由于恢复过来的数据库时dolphin_db,需要将其改为order_db,由于不能直接修改数据库名称,可通过修改表名的方式间接修改。
修改数据库名称脚本:
  [root@node2 ~]# cat rename.sh

#!/bin/bash

#作者:fafu_li

#时间:2015.08.10

#mysql数据库改名,官方没有直接修改数据库名称的命令

#只有通过修改表名方式实现

source /etc/profile        #加载系统环境变量

source ~/.bash_profile    #加载用户环境变量

set -o nounset             #引用未初始化变量时退出

mysqlconn="mysql -hlocalhost -uroot -pabcd@1234"

#需要修改的数据库名

olddb="dolphin_db"

#修改后的数据库名

newdb="order_db"

#创建新数据库

$mysqlconn -e "drop database if exists ${newdb};create database ${newdb};"

#获取所有表名

tables=$($mysqlconn -N -e "select table_name from information_schema.tables where table_schema='${olddb}'")

#修改表名

for name in $tables;do

    $mysqlconn -e "rename table ${olddb}.${name} to ${newdb}.${name}"

done

#删除老的空库

$mysqlconn -e "drop database ${olddb}"
7. 重置二进制日志
mysql> reset master;
8. 连接至主服务器,配置主从复制
mysql> change master to master_host='172.31.11.134', master_user='repluser', master_password = 'replpass', master_auto_position=1;
9. 由于主从复制过程中可以使主从数据库的名称不一致(node1:dolphin_db,node2:order_db)
mysql> change replication filter replicate_rewrite_db=((dolphin_db, order_db));
10. 开启复制
mysql> start slave;
node3、node4都执行和node2相同的操作,只是数据库名称为:product_db和customer_db。
3. 配置mycat垂直分库
1. 需要修改的配置文件介绍
- 使用schema.xml配置逻辑库、
- 使用server.xml配置系统变量及用户权限
- 由于没有用到水平分片,不需要配置rule.xml
2. 配置schema.xml,配置逻辑库
 1 <?xml version="1.0"?>
 2 <!DOCTYPE mycat:schema SYSTEM "schema.dtd">
 3 <mycat:schema xmlns:mycat="http://io.mycat/">
 4         <schema name="dolphin_db" checkSQLschema="false" sqlMaxLimit="100">
 5            <table name="order_master" primaryKey="order_id" dataNode="ordb"/>
 6            <table name="order_detail" primaryKey="order_detail_id" dataNode="ordb"/>
 7            <table name="order_customer_addr" primaryKey="customer_addr_id" dataNode="ordb"/>
 8            <table name="order_cart" primaryKey="cart_id" dataNode="ordb"/>
 9            <table name="region_info" primaryKey="region_id" dataNode="ordb"/>
10            <table name="shipping_info" primaryKey="ship_id" dataNode="ordb"/>
11            <table name="warehouse_info" primaryKey="w_id" dataNode="ordb"/>
12            <table name="warehouse_proudct" primaryKey="wp_id" dataNode="ordb"/>
13
14
15            <table name="product_brand_info" primaryKey="brand_id" dataNode="prodb"/>
16            <table name="product_category" primaryKey="category_id" dataNode="prodb"/>
17            <table name="product_comment" primaryKey="comment_id" dataNode="prodb"/>
18            <table name="product_info" primaryKey="product_id" dataNode="prodb"/>
19            <table name="product_pic_info" primaryKey="product_pic_id" dataNode="prodb"/>
20            <table name="product_supplier_info" primaryKey="supplier_id" dataNode="prodb"/>
21
22
23            <table name="customer_balance_log" primaryKey="balance_id" dataNode="custdb"/>
24            <table name="customer_inf" primaryKey="customer_inf_id" dataNode="custdb"/>
25            <table name="customer_level_inf" primaryKey="customer_level" dataNode="custdb"/>
26            <table name="customer_login" primaryKey="customer_id" dataNode="custdb"/>
27            <table name="customer_login_log" primaryKey="login_id" dataNode="custdb"/>
28            <table name="customer_point_log" primaryKey="point_id" dataNode="custdb"/>
29         </schema>
30
31
32         <dataNode name="ordb" dataHost="node2" database="order_db" />
33         <dataNode name="prodb" dataHost="node3" database="product_db" />
34         <dataNode name="custdb" dataHost="node4" database="customer_db" />
35
36
37         <dataHost name="node2" maxCon="1000" minCon="10" balance="3" writeType="0" dbType="mysql" dbDriver="native" switchType="1"  slaveThreshold="100">
38                 <heartbeat>select user()</heartbeat>
39                 <writeHost host="172.31.11.135" url="172.31.11.135:3306" user="mycat" password="mycat"></writeHost>
40         </dataHost>
41
42         <dataHost name="node3" maxCon="1000" minCon="10" balance="3" writeType="0" dbType="mysql" dbDriver="native" switchType="1"  slaveThreshold="100">
43                 <heartbeat>select user()</heartbeat>
44                 <writeHost host="172.31.11.136" url="172.31.11.136:3306" user="mycat" password="mycat"></writeHost>
45         </dataHost>
46
47         <dataHost name="node4" maxCon="1000" minCon="10" balance="3" writeType="0" dbType="mysql" dbDriver="native" switchType="1"  slaveThreshold="100">
48                 <heartbeat>select user()</heartbeat>
49                 <writeHost host="172.31.11.138" url="172.31.11.138:3306" user="mycat" password="mycat"></writeHost>
50         </dataHost>
51
52 </mycat:schema>
注意:由于mycat在和node2 node3 node4节点的mysql通信时,使用的是mycat用户,密码是mycat。因此我们需要在node2 node3 node4中分别创建该用户并授权
mysql> grant select, insert, update, delete, execute on *.* to 'mycat'@'172.31.11.%' identified by 'mycat';
3. 配置server.xml,添加用户,让其可访问该逻辑库
1 <user name="dolphin" defaultAccount="true">
2             <property name="usingDecrypt">1</property>
3             <property name="password">PtBAuXp5Fi0b8riGxcG5SFzxqRHGVLD/bcXi+66Q/tppwZxy2P2DnhNm0mj+8u1JGyW/bLvqSXMDlntRy+n3ig==</property>
4             <property name="schemas">dolphin_db</property>
5 </user>
注意:这里对password进行了加密,方法如下:
[root@node1 ~]# cd /usr/local/mycat/lib
[root@node1 lib]# java -cp Mycat-server-1.6.7.3-release.jar io.mycat.util.DecryptUtil 0:dolphin:dolphin
4. 通过mycat连接数据库
[root@node1 bin]# ./mycat start
发现9066和8066端口已经开启,则说明mycat已经启动成功。

5. 通过8066端口,访问逻辑数据库dolphin_db
[root@node1 bin]# mysql -udolphin -p -P8066 -h127.0.0.1
Enter password:
Welcome to the MySQL monitor.  Commands end with ; or \g.
Your MySQL connection id is 1
Server version: 5.6.29-mycat-1.6.7.3-release-20190927161129 MyCat Server (OpenCloudDB)

Copyright (c) 2000, 2019, Oracle and/or its affiliates. All rights reserved.

Oracle is a registered trademark of Oracle Corporation and/or its
affiliates. Other names may be trademarks of their respective
owners.

Type 'help;' or '\h' for help. Type '\c' to clear the current input statement.

mysql> show databases;
+------------+
| DATABASE   |
+------------+
| dolphin_db |
+------------+
1 row in set (0.01 sec)

mysql> use dolphin_db
Reading table information for completion of table and column names
You can turn off this feature to get a quicker startup with -A

Database changed
mysql> show tables;
+-----------------------+
| Tables in dolphin_db  |
+-----------------------+
| customer_balance_log  |
| customer_inf          |
| customer_level_inf    |
| customer_login        |
| customer_login_log    |
| customer_point_log    |
| order_cart            |
| order_customer_addr   |
| order_detail          |
| order_master          |
| product_brand_info    |
| product_category      |
| product_comment       |
| product_info          |
| product_pic_info      |
| product_supplier_info |
| region_info           |
| shipping_info         |
| warehouse_info        |
| warehouse_proudct     |
+-----------------------+
20 rows in set (0.00 sec)
6. 取消 node2 node3 node4 与node1的主从复制关系,顺便删除node2 node3 node4中多余的表。
node2:
mysql> stop slave;
mysql> reset slave all;
将多余的表都drop掉。
node3、node4上的操作同理。
4. 配置和应用全局表
mysql> select supplier_name, b.region_name as '省', c.region_name as '市', d.region_name as '区' from product_supplier_info a join region_info b on b.region_id = a.province join region_info c on c.region_id = a.city join region_info d on d.region_id = a.district;

ERROR 1064 (HY000): invalid route in sql, multi tables found but datanode has no intersection  sql:select supplier_name, b.region_name as '省', c.region_name as '市', d.region_name as '区' from product_supplier_info a join region_info b on b.region_id = a.province join region_info c on c.region_id = a.city join region_info d on d.region_id = a.district
由于表product_supplier_info位于node2上的product_db库中,表region_info位于node1上的order_db库中,两个表并不位于同一物理库中,因此当联合查询时会报错。
此外,region_info表在其他物理库中也会使用到,因此可以考虑将region_info表定义为全局表。
4.1 配置步骤
1. 将region_info表备份,并在node3和node4上各恢复一份
主机node2上:获取建表语句
CREATE TABLE `region_info` (
  `region_id` smallint(6) NOT NULL AUTO_INCREMENT COMMENT '主键id',
  `parent_id` smallint(6) NOT NULL DEFAULT '0' COMMENT '上级地区id',
  `region_name` varchar(150) COLLATE utf8mb4_bin NOT NULL COMMENT '城市名称',
  `region_level` tinyint(1) NOT NULL COMMENT '级别',
  PRIMARY KEY (`region_id`)
) ENGINE=InnoDB DEFAULT CHARSET=utf8mb4 COLLATE=utf8mb4_bin COMMENT='地区信息表';
主机node3上:
- 创建表
CREATE TABLE `region_info` (
  `region_id` smallint(6) NOT NULL AUTO_INCREMENT COMMENT '主键id',
  `parent_id` smallint(6) NOT NULL DEFAULT '0' COMMENT '上级地区id',
 `region_name` varchar(150) COLLATE utf8mb4_bin NOT NULL COMMENT '城市名称',
  `region_level` tinyint(1) NOT NULL COMMENT '级别',
 PRIMARY KEY (`region_id`)
) ENGINE=InnoDB DEFAULT CHARSET=utf8mb4 COLLATE=utf8mb4_bin COMMENT='地区信息表';
- 删除表空间,只剩表结构
mysql> ALTER TABLE region_info DISCARD TABLESPACE;
- 从xtrabackup的全备中,找到这个文件复制过去
cp /data/backup/2019-10-18_09-42-25/dolphin_db/region_info.ibd /data/mysql/data/product_db/
chown mysql:mysql region_info.ibd
- 导入表空间
mysql> ALTER TABLE region_info IMPORT TABLESPACE;
主机node4上的操作与node3相同。
2. 修改mycat的配置文件schema.xml中表region_info的配置
该行修改后为:
<table name="region_info" primaryKey="region_id" dataNode="ordb,prodb,custdb" type="global"/>
3. 重启mycat服务
[root@node1 bin]# ./mycat stop
[root@node1 bin]# ./mycat start
4. 再运行上面的语句,发现没有报错。(由于数据不全,因此查询为空)
mysql> select supplier_name, b.region_name as '省', c.region_name as '市', d.region_name as '区' from product_supplier_info a join region_info b on b.region_id = a.province join region_info c on c.region_id = a.city join region_info d on d.region_id = a.district;

Empty set (1.76 sec)