需求说明文档
主要是mycat分库分表,读写分离,主从同步训练
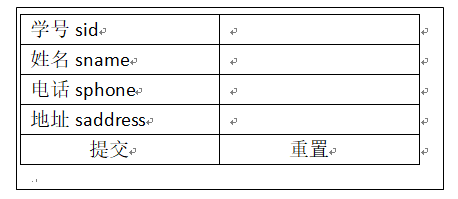
1实现学生信息添加
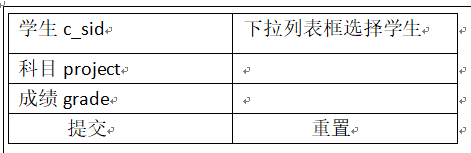
2实现学生成绩信息的录入
3实现要求
学生信息按照学号求余数分库分表,同时实现学生成绩录入的时候,学生的成绩信息跟着学生的基本信息走,某个学生的成绩的分库分表的结果和该学生信息在同一个分片
需要自定义分片算法,按照学生表中的sno学号列分片。

4实现学生信息的分页查询
按照以下数据模型显示查询结果,同时按照成绩高到低排序。

设计实现思路
创建MyCat组从数据库环境
一主一从 , 每个数据库都有三个分库 ,具体配置可查看本人Mycat的博文或者百度

构建相应的数据库表-学生表,成绩表
先规划好如何建表,或者将表建在自己本地数据库中 ,
学生表 t_student ,成绩表 t_grade
待配置好mycat 数据库分片规则后在将表移动到mycat数据库中
学生表的学号sid作为主键不设置自增 ,被成绩表中c_sid作为外键引用,
成绩表需要额外添加一个主键 gid设置自增
注: 每张表都必须设置主键外键, 可以不一定设置自增
技术选型,搭建项目环境,实现分页查询
SpringBoot 2.1.7+Thymeleaf+mybatis
thymeleaf : 前端编写代码的一种语言规范,在html页面中书写代码
实现过程
Mycat数据库分库
搭建主从数据库环境,主数据库新建三个数据库,从库同步
Mycat数据库分表
schema.xml
<?xml version="1.0"?>
<!DOCTYPE mycat:schema SYSTEM "schema.dtd">
<mycat:schema xmlns:mycat="http://io.mycat/">

	<!--
		schema :声明mycat的虚拟数据库/逻辑库
	-->
	<schema name="schema_t_student" checkSQLschema="false" sqlMaxLimit="100">

		<!-- t_student 声明学生表
			table : 表示声明虚拟表
				name : 虚拟表的表名字
				dataNode :虚拟表对应的数据分片
				rule :分片规则,必须和rule.xml中声明的分片规则的名字一样
		-->

		<table name="t_student" dataNode="dn1,dn2,dn3" rule="mod-long1" >

			<!-- t_grade 成绩表
			     childTable : 声明er关系表,是tb_content_category的字表
				 name :子表的表名
				 primaryKey : 指定字表的主键
				 joinKey : 指定子表的外键
				 parentKey :子表外键,关联主表的哪一个列
			-->


				<!--  成绩表 -->
			<childTable name="t_grade" primaryKey="gid" joinKey="c_sid"
						parentKey="sid">
			</childTable>


		</table>
	</schema>

	<dataNode name="dn1" dataHost="localhost1" database="java1" />
	<dataNode name="dn2" dataHost="localhost1" database="java2" />
	<dataNode name="dn3" dataHost="localhost1" database="java3" />
	<dataHost name="localhost1" maxCon="1000" minCon="10" balance="1"
			  writeType="0" dbType="mysql" dbDriver="native" switchType="1"  slaveThreshold="100">
		<heartbeat>select user()</heartbeat>
		<!-- can have multi write hosts -->
		<writeHost host="hostM1" url="192.168.179.128:3306" user="root"
				   password="root">
			<!-- can have multi read hosts -->
			<readHost host="hostS2" url="192.168.179.129:3306" user="root" password="root" />
		</writeHost>
	</dataHost>
</mycat:schema>
逻辑库 : schema_t_student
学生表 t_student ,成绩表 t_grade

rule.xml
columns 指的是自己需要配置分片规则的列名!!!
	<tableRule name="为分片规则起的别名,方便在schema.xml中引用">
	<rule>
			<columns>分片规则的列名</columns>
			<algorithm>依据的算法/algorithm>
		</rule>
	</tableRule>

server.xml
<user name="root">
		<property name="password">root</property>
		<property name="schemas">逻辑库名</property>

		<!-- 表级 DML 权限设置 -->
		<!--
		<privileges check="false">
			<schema name="schema_t_users" dml="0110" >
				<table name="tb01" dml="0000"></table>
				<table name="tb02" dml="1111"></table>
			</schema>
		</privileges>
		 -->
	</user>

	<user name="user">
		<property name="password">user</property>
		<property name="schemas">逻辑库名</property>
		<property name="readOnly">true</property>
	</user>

项目最终框架
实现过程
1.官网快速生成SpringBoot项目,添加相关pom文件
- 添加三个启动器 thymeleaf .web. mybatis
- 添加JDBC的jar的坐标
- 数据库连接池的坐标
- Jstl 的坐标
- jasper:SpringBoot对jsp的支持
- DevTools 的坐标,用于运行时,修改SpringBoot代码时立即生效的jar包
- pagehelper分页插件
<?xml version="1.0" encoding="UTF-8"?>
<project xmlns="http://maven.apache.org/POM/4.0.0" xmlns:xsi="http://www.w3.org/2001/XMLSchema-instance"
	xsi:schemaLocation="http://maven.apache.org/POM/4.0.0 https://maven.apache.org/xsd/maven-4.0.0.xsd">
	<modelVersion>4.0.0</modelVersion>
	<parent>
		<groupId>org.springframework.boot</groupId>
		<artifactId>spring-boot-starter-parent</artifactId>
		<version>2.1.8.RELEASE</version>
		<relativePath/> <!-- lookup parent from repository -->
	</parent>
	<groupId>ah.szxy.system</groupId>
	<artifactId>StudentOASystem</artifactId>
	<version>0.0.1-SNAPSHOT</version>
	<name>StudentOASystem</name>
	<description>StudentOASystem project for Spring Boot</description>

	<properties>
		<java.version>1.8</java.version>
		<!-- 解决springboot快速创建的项目pom文件第一行报错问题-->
		<maven-jar-plugin.version>2.6</maven-jar-plugin.version>
	</properties>

	<dependencies>
		<dependency>
			<groupId>org.springframework.boot</groupId>
			<artifactId>spring-boot-starter-thymeleaf</artifactId>
		</dependency>
		<dependency>
			<groupId>org.springframework.boot</groupId>
			<artifactId>spring-boot-starter-web</artifactId>
		</dependency>
		<dependency>
			<groupId>org.mybatis.spring.boot</groupId>
			<artifactId>mybatis-spring-boot-starter</artifactId>
			<version>2.1.0</version>
		</dependency>

		<dependency>
			<groupId>mysql</groupId>
			<artifactId>mysql-connector-java</artifactId>
			<version>5.1.34</version>
		</dependency>
		<dependency>
			<groupId>org.springframework.boot</groupId>
			<artifactId>spring-boot-starter-test</artifactId>
			<scope>test</scope>
		</dependency>


		<!-- jstl -->
		<dependency>
			<groupId>javax.servlet</groupId>
			<artifactId>jstl</artifactId>
		</dependency>
		<!-- jasper:SpringBoot对jsp的支持 -->
		<dependency>
			<groupId>org.apache.tomcat.embed</groupId>
			<artifactId>tomcat-embed-jasper</artifactId>
			<scope>provided</scope>
		</dependency>

		<!-- druid数据库连接池 -->
		<dependency>
			<groupId>com.alibaba</groupId>
			<artifactId>druid</artifactId>
			<version>1.0.9</version>
		</dependency>

		<!-- DevTools 的坐标 -->
		<dependency>
			<groupId>org.springframework.boot</groupId>
			<artifactId>spring-boot-devtools</artifactId>
			<optional>true</optional>
		</dependency>
		<!-- 分页插件jar -->
		<dependency>
			<groupId>com.github.pagehelper</groupId>
			<artifactId>pagehelper-spring-boot-starter</artifactId>
			<version>1.2.5</version>
		</dependency>
	</dependencies>

	<build>
		<plugins>
			<plugin>
				<groupId>org.springframework.boot</groupId>
				<artifactId>spring-boot-maven-plugin</artifactId>
			</plugin>
		</plugins>
	</build>

</project>
2.修改全局配置文件 application.yml
server:
      port: 8080   #内嵌服务器端口号设置

spring:
  datasource:
    driverClassName: com.mysql.jdbc.Driver
    url: jdbc:mysql://192.168.179.131:8066/schema_t_student   #mycat数据库的url
    username: root
    password: root
    type: com.alibaba.druid.pool.DruidDataSource
3.根据数据库表,创建实体类
创建实体类时 ,需要考虑表与表的关系
学生表: 成绩表 = 一对多关系
故需要考虑使用集合list集合来存放实体表 ,
使用后Mapper的多表关联查询需要添加ResultMap属性
public class Student{
	private int sid;
	private String sname;
	private String sphone;
	private String saddress;

	private List<Grade> grades;
	...
	}

public class Grade {

	private int gid;
	private int c_sid;
	private String project;
	private int grade;
	...
	}
使用PageHelper工具显示数据完整步骤
分页显示学生和成绩的相关信息
1.添加相关的jar包
<!-- 分页插件jar -->
		<dependency>
			<groupId>com.github.pagehelper</groupId>
			<artifactId>pagehelper-spring-boot-starter</artifactId>
			<version>1.2.5</version>
		</dependency>
2.dao层,接口正常写,mapper层关联查询ResultMap
/**
	 * 分页查询
	 * @return
	 */
	List<Student> selectPageQuery();
关联一个对象的集合时
<?xml version="1.0" encoding="UTF-8" ?>
<!DOCTYPE mapper PUBLIC "-//mybatis.org//DTD Mapper 3.0//EN" "http://mybatis.org/dtd/mybatis-3-mapper.dtd" >
<mapper namespace="ah.szxy.system.mapper.StudentMapper"><!--  -->
	 <resultMap type="ah.szxy.system.pojo.Student" id="stuMapper">
	 <!-- id:主键,,result:其他属性 -->
	 	<id column="sid" property="sid"></id>
		<result column="sname" property="sname"></result>
		<result column="sphone" property="sphone"></result>
		<result column="saddress" property="saddress"></result>

		<!-- collection:表示封装关联的list集合 的相关属性,grades为学生实体类封装的属性名称  -->
		<collection property="grades" ofType="ah.szxy.system.pojo.Grade">
			<id property="gid" column="gid"/>
			<result property="c_sid" column="c_sid"/>
			<result property="project" column="project"/>
			<result property="grade" column="grade"/>
		</collection>
	</resultMap>


	<!-- 多表关联查询 select ..from ..join 表1  别名1 on 表2 别名 2 group列名1,2..-->
	<select id="selectPageQuery"  resultMap="stuMapper">
	   select s.sid,s.sname,g.project,g.grade
		from t_student s
		join t_grade g
		on s.sid=g.c_sid
		group by s.sid,g.project
	</select>


</mapper>
关联一个对象

注意 :
这两种关联方式都需要将两个对象的属性都要写上
3.业务层,方法返回值需要添加 PageInfo(jar包自带)
接口类 ,注意返回值类型用的是 PageInfo
PageInfo<Student> selectPageQuery(int page,int rows);
这个类所封装/可使用的属性

实现类
将返回的数据放入pageInfo中 ,然后返回即可
@Override
	public PageInfo<Student> selectPageQuery(int page, int rows) {
		PageHelper.startPage(page,rows*4);

		List<Student> list = this.studentMapper.selectPageQuery();
		//System.out.println(list);
		PageInfo<Student> PageInfo = new PageInfo<Student>(list);


		return  PageInfo;
	}
4.controller
需要接收行数和列数,并将其返回到前端,前端负责获取和统计
@RequestMapping("/stu/stuList")
	@ResponseBody
	public PageInfo<Student> selectPageQuery(@RequestParam(defaultValue="1",required=false) int page,@RequestParam(defaultValue="4",required=false)int rows,Model model) {
		PageInfo<Student> pageinfo = this.studentService.selectPageQuery(page, rows);
		model.addAttribute("page", page);
		model.addAttribute("rows", rows);

		System.out.println(pageinfo);
		return pageinfo;
	}
5. 前端页面
注意
1.ajax以及dom操作,建议多查看jquery官方文档
2.jquery的联网引入<script src="https://cdn.bootcss.com/jquery/2.2.1/jquery.min.js"></script>
<!DOCTYPE html>
<html>
<head>
<title>stuInfo.html</title>
<meta name="keywords" content="keyword1,keyword2,keyword3">
<meta name="description" content="this is my page">
<meta name="content-type" content="text/html; charset=UTF-8">
<script src="https://cdn.bootcss.com/jquery/2.2.1/jquery.min.js"></script>
<script type="text/javascript">
var page;
$(document).ready(function() {
getData(1);
});
function getData(pageindex) {
$.get("/stu/stuList", {
page : pageindex,
rows : 1
}, function(data) {
page = data;
console.log(page);
var hstr = '<th>学号</th><th>姓名</th>';
var bstr = '';
for (var i in page.list) {
bstr += '<tr><td>' + page.list[i].sid + '</td>'
+ '<td>' + page.list[i].sname + '</td>';
for (var j in page.list[i].grades) {
hstr += '<th>' + page.list[i].grades[j].project + '</th>';
bstr += '<td>' + page.list[i].grades[j].grade + '</td>';
}
bstr += '</tr>';
}
$("#thead").empty();
$("#thead").html(hstr);
$("#tbody").empty();
$("#tbody").html(bstr);
$("#total").empty();
$("#page").empty();
$("#total").text(page.total /4);
$("#page").text(page.pageNum);
});
}
;
function pre() {
if (!page.isFirstPage) {
getData(page.pageNum - 1);
}
}
function next() {
if (!page.isLastPage) {
getData(page.pageNum + 1);
}
}
function last() {
if (!page.isLastPage) {
getData(page.total / 3);
}
}
function first() {
if (!page.isFirstPage) {
getData(1);
}
}
</script>
<style type="text/css">
table{
border:1px solid #000;
border-collapse:collapse; //去掉边框间空隙
width: 100%;
}
th,td{
border:1px solid #000;
}
</style>
</head>
<body>
<h1>查询学生信息</h1>
<a th:href="@{/addStudent}">添加学生</a>
<a th:href="@{/addGrade}">添加成绩</a>
<hr />
<center>
<table style="width: 60%;">
<thead>
<tr id="thead">
</tr>
</thead>
<tbody id="tbody">
</tbody>
</table>
<hr />
<div>
<a href="javascript:first()">首页</a> <a
href="javascript:pre()">上一页</a> 总页数:<span id="total"></span>
当前页:<span id="page"></span> <a href="javascript:next()">下一页</a>
<a href="javascript:last()">尾页</a>
</div>
</center>
</body>
</html>
联网引入Jquery静态资源
无需下载,一行搞定
<script src="https://cdn.bootcss.com/jquery/2.2.1/jquery.min.js"></script>
分页效果展示

项目源码分享
链接:https://pan.baidu.com/s/1t5iCz2q05LYdOrVPIHqGcQ
提取码:q655
复制这段内容后打开百度网盘手机App,操作更方便哦