版权声明:本文为博主原创文章,遵循 CC 4.0 BY-SA 版权协议,转载请附上原文出处链接和本声明。
1、Maven:
<!-- swagger2-->
<dependency>
	<groupId>io.springfox</groupId>
	<artifactId>springfox-swagger2</artifactId>
	<version>2.7.0</version>
</dependency>

<!-- swagger2-UI-->
<dependency>
	<groupId>io.springfox</groupId>
	<artifactId>springfox-swagger-ui</artifactId>
	<version>2.7.0</version>
</dependency>
2、Swagger2的接口配置:
import io.swagger.annotations.ApiOperation;
import org.springframework.context.annotation.Bean;
import org.springframework.context.annotation.Configuration;
import springfox.documentation.builders.ApiInfoBuilder;
import springfox.documentation.builders.PathSelectors;
import springfox.documentation.builders.RequestHandlerSelectors;
import springfox.documentation.service.ApiInfo;
import springfox.documentation.service.Contact;
import springfox.documentation.spi.DocumentationType;
import springfox.documentation.spring.web.plugins.Docket;
import springfox.documentation.swagger2.annotations.EnableSwagger2;

/**
 * Swagger2的接口配置
 *
 * @author xiaofei
 * @create 2019-07-20 下午 04:40
 */
@Configuration
@EnableSwagger2
public class SwaggerConfig {

    /**
     * 创建API
     */
    @Bean
    public Docket customDocket() {
        return new Docket(DocumentationType.SWAGGER_2)
                // 用来创建该API的基本信息,展示在文档的页面中
                .apiInfo(apiInfo())
                // 设置哪些接口暴露给Swagger展示
                .select()
                // 扫描所有有注解的api,用这种方式更加灵活
                .apis(RequestHandlerSelectors.withMethodAnnotation(ApiOperation.class))
                // 扫描指定包中的swagger注解
                // .apis(RequestHandlerSelectors.basePackage("top.xf.springbootrestful"))
                // 扫描所有 .apis(RequestHandlerSelectors.any())
                .paths(PathSelectors.any())
                .build();
    }

    /**
     * 添加摘要信息
     */
    private ApiInfo apiInfo() {
        Contact contact = new Contact("xiaofei","http://www.xiaofei.top","[email protected]");
        // 用ApiInfoBuilder进行定制
        return new ApiInfoBuilder()
                // 设置标题
                .title("标题:小飞API接口文档")
                // 描述
                .description("描述:XXXXX")
                // 作者信息
                .contact(contact)
                // 版本
                .version("版本号:1.0")
                .build();
    }
}
3、Controller:
import io.swagger.annotations.Api;
import io.swagger.annotations.ApiImplicitParam;
import io.swagger.annotations.ApiOperation;
import org.springframework.web.bind.annotation.*;
import top.xf.springbootrestful.model.User;

import java.util.ArrayList;
import java.util.HashMap;
import java.util.List;

/**
 * Restful风格 增删改查接口
 * @author xiaofei
 */
@Api(value = "用户模块",tags = "{用户模块}")
@RestController
public class UserController {

    /**
     * 模拟数据
     */
    public static ArrayList<User> users = new ArrayList<>();
    static {
        users.add(new User(1,"xiaofei1","123"));
        users.add(new User(2,"xiaofei2","234"));
    }


    /**
     * 获取用户列表
     *
     * @return 用户信息
     */
    @ApiOperation(value = "获取用户列表",notes = "获取所有用户信息")
    @GetMapping("/user")
    public Object selectAllUser() {
        HashMap<String, List> map = new HashMap<>();
        map.put("users", users);
       return map;
    }

    /**
     * 根据Id查询用户
     * @param id
     * @return
     */
    @ApiOperation(value = "根据用户ID查询用户",notes = "查询单个用户")
    @ApiImplicitParam(name = "id",value = "用户ID",required = true,dataType = "int", paramType = "path")
    @GetMapping("/user/{id}")
    public Object getUserById(@PathVariable("id") String id){
        int uid = Integer.parseInt(id);
        return users.get(uid);
    }
}
4、Swagger中paramType说明:
paramType:表示参数放在哪个地方
header-->请求参数的获取:@RequestHeader(代码中接收注解)
query-->请求参数的获取:@RequestParam(代码中接收注解)
path(用于restful接口)-->请求参数的获取:@PathVariable(代码中接收注解)
body-->请求参数的获取:@RequestBody(代码中接收注解)
form(不常用)
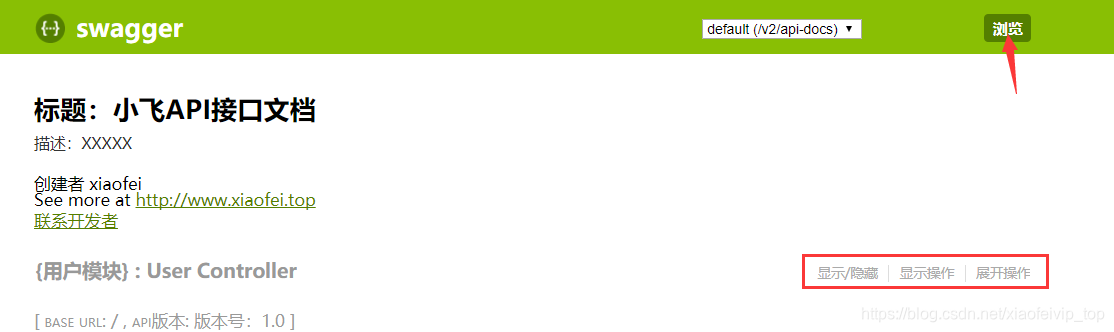
5、Swagger使用:
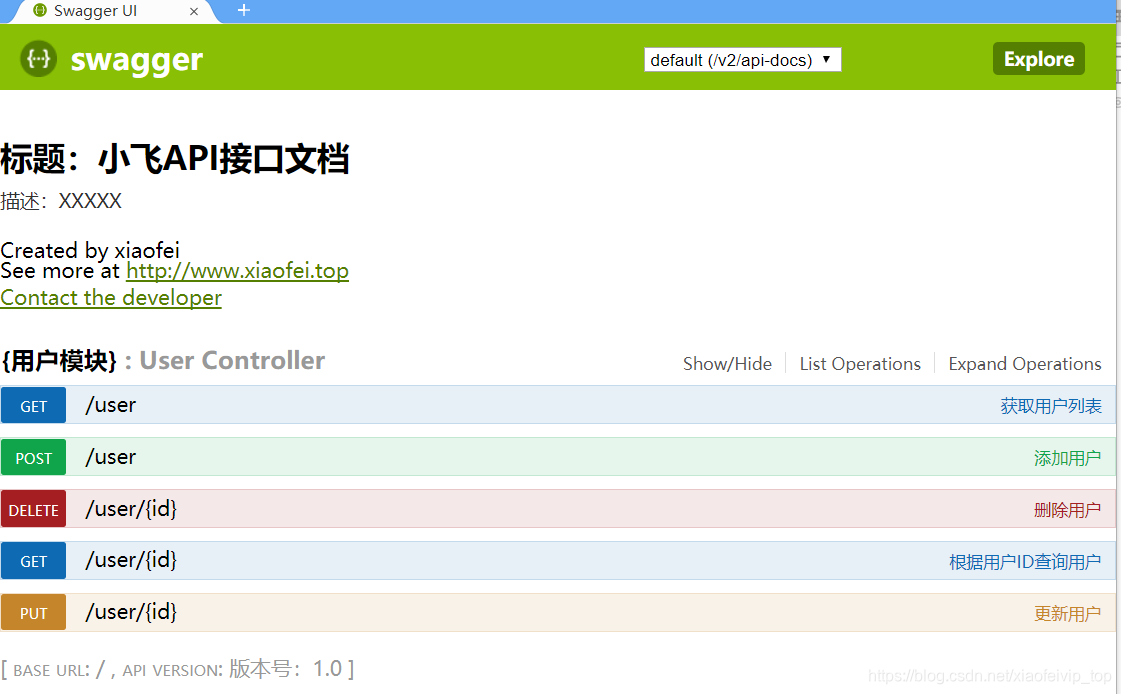
访问地址:http://127.0.0.1/swagger-ui.html
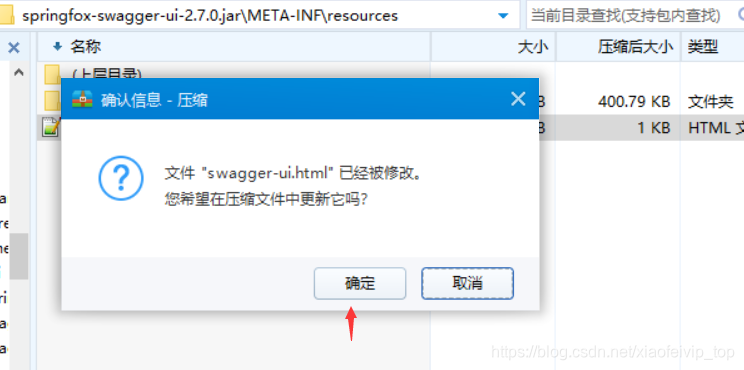
6、汉化Swagger界面:
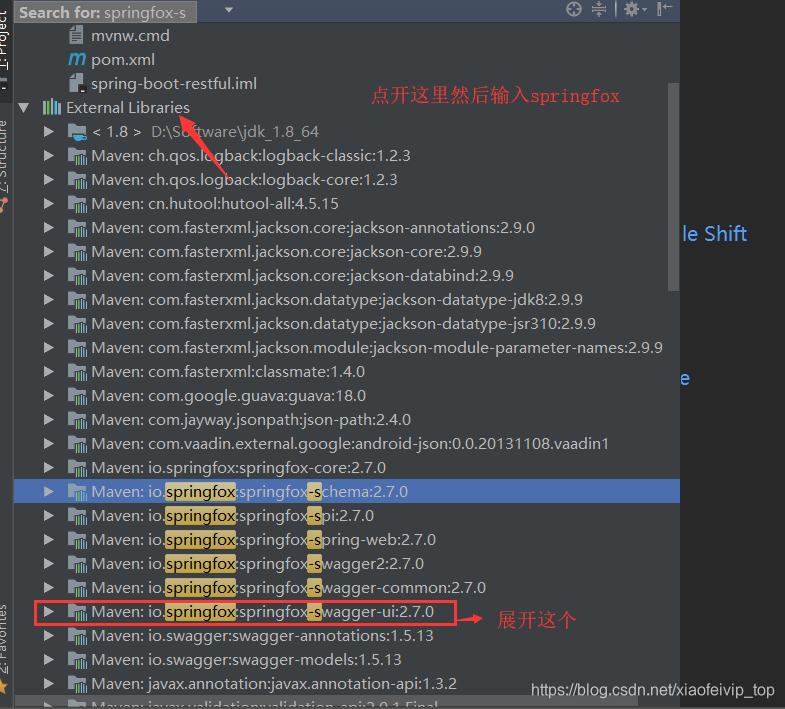
1.找到springfox-swagger-ui-x.x.x.jar
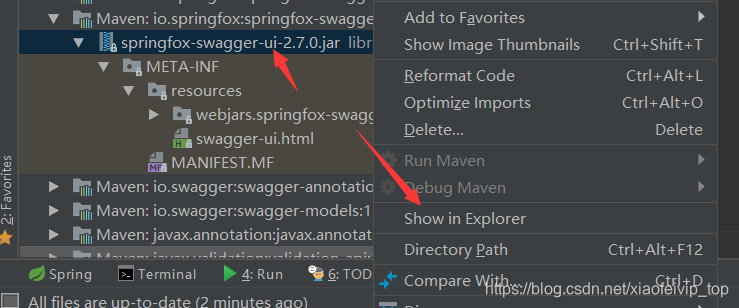
2.选中该jar包然后打开所在位置
3.使用压缩工具打开该jar包
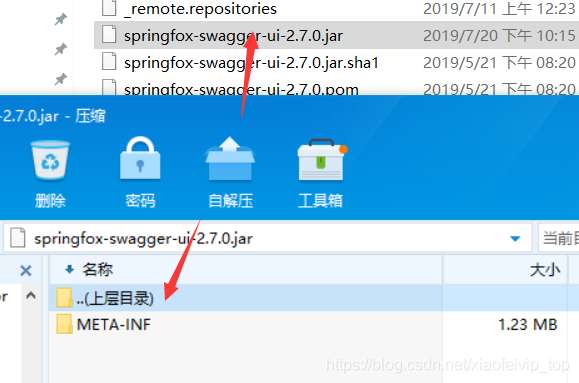
4.找到jar包内resources目录下swagger-ui.html的文件进行添加一下代码

<!-- 中文版 -->
<script src='webjars/springfox-swagger-ui/lang/translator.js' type='text/javascript'></script>
<script src='webjars/springfox-swagger-ui/lang/zh-cn.js' type='text/javascript'></script>
确定
效果:
QQ群:470765097