复习:
事件绑定的三种方式:


事件:
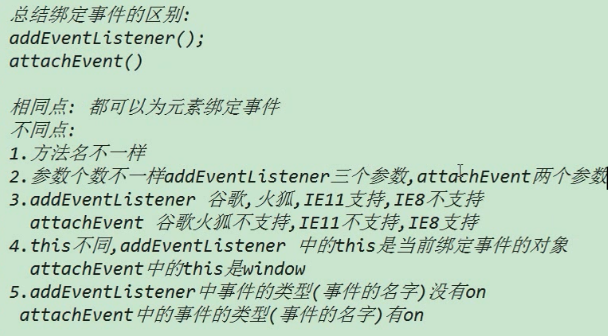
绑定事件的区别:
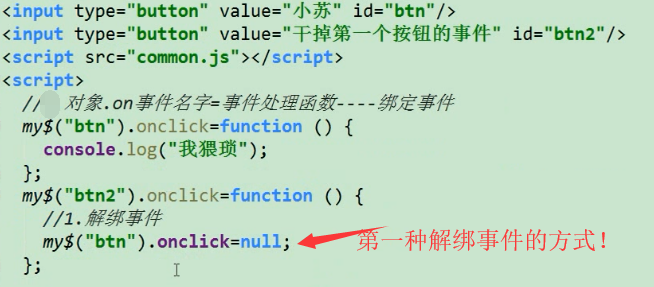
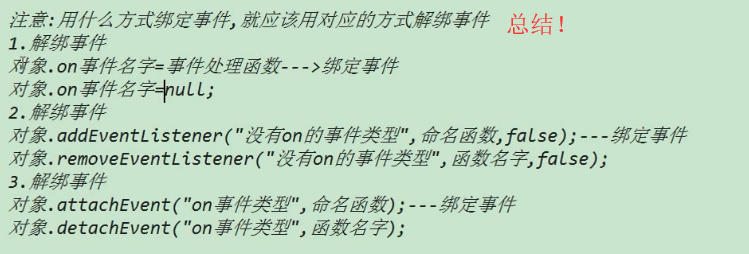
为元素解绑事件:
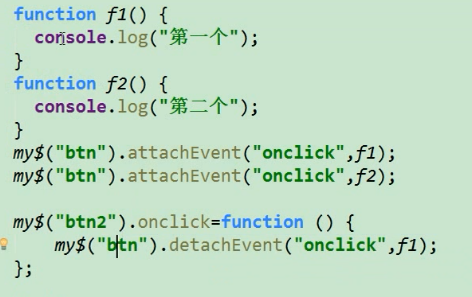
第一种解绑的方式:

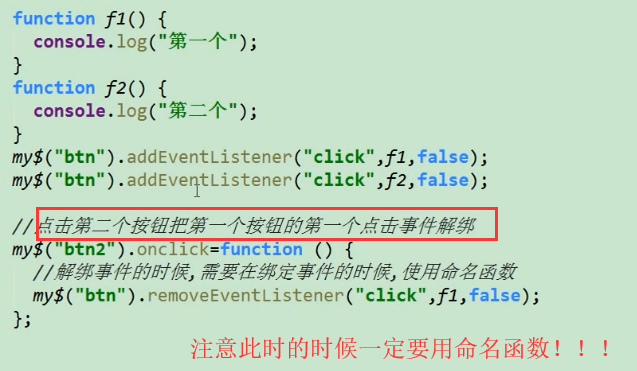
第二种解绑的方式:

第三种解绑的方式:

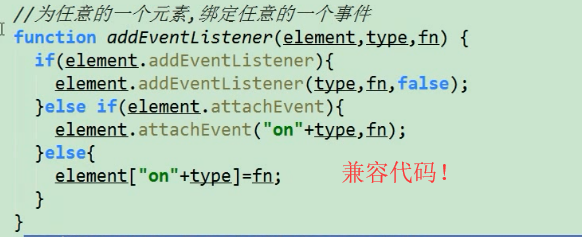
绑定事件和 解绑事件的兼容代码:
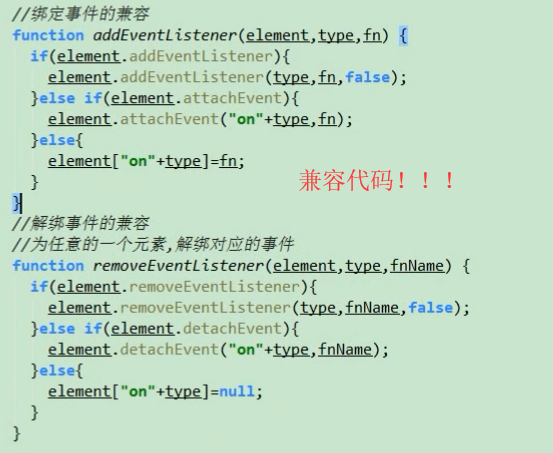


 1 //绑定事件 和 取消绑定的 兼容代码:
 2 function addEventListener(ele, type, fn) {
 3     if(ele.addEventListener){
 4         ele.addEventListener(type,fn,false);
 5     }else if(ele.attachEvent){
 6         ele.attachEvent("on"+type,fn);
 7     }else{
 8         ele["on"+type] = fn;
 9     }
10 }
11
12 function removeEventListener(ele, type, fn) {
13     if(ele.removeEventListener){
14         ele.removeEventListener(type,fn,false);
15     }else if(ele.detachEvent){
16         ele.detachEvent("on"+type,fn);
17     }else{
18         ele["on"+type] =null;
19     }
20 }
到目前为止,common.js 的代码如下:
 1 /**
 2  * 根据id 或者根据tagName 返回相应的元素
 3  * */
 4 function getId$(id){
 5    return document.getElementById(id);
 6 }
 7 function getTags$(tagName) {
 8     return document.getElementsByTagName(tagName)
 9 }
10
11 //绑定事件 和 取消绑定的 兼容代码:
12 function addEventListener(ele, type, fn) {
13     if(ele.addEventListener){
14         ele.addEventListener(type,fn,false);
15     }else if(ele.attachEvent){
16         ele.attachEvent("on"+type,fn);
17     }else{
18         ele["on"+type] = fn;
19     }
20 }
21
22 function removeEventListener(ele, type, fn) {
23     if(ele.removeEventListener){
24         ele.removeEventListener(type,fn,false);
25     }else if(ele.detachEvent){
26         ele.detachEvent("on"+type,fn);
27     }else{
28         ele["on"+type] =null;
29     }
30 }
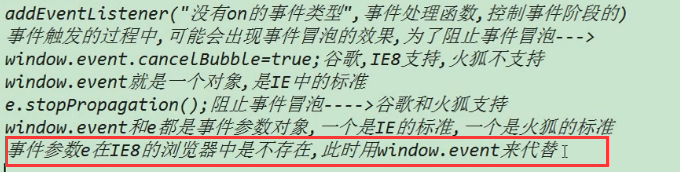
事件冒泡:

 1 <!DOCTYPE>
 2 <html lang="en">
 3     <head>
 4         <meta charset="UTF-8">
 5         <title>这是网页标题</title>
 6         <style>
 7             #dv1{
 8                 width: 300px;
 9                 height: 300px;
10                 background-color: cyan;
11             }
12             #dv2{
13                 width: 200px;
14                 height: 200px;
15                 background-color: red;
16             }
17             #dv3{
18                 width: 100px;
19                 height: 100px;
20                 background-color: green;
21             }
22         </style>
23     </head>
24     <body>
25         <div id="dv1">
26             <div id="dv2">
27                 <div id="dv3"></div>
28             </div>
29         </div>
30         <script src="js/common.js"></script>
31         <script>
32             getId$("dv1").onclick = function () {
33                 console.log(this.id);
34             };
35             getId$("dv2").onclick = function () {
36                 console.log(this.id);
37             };
38             getId$("dv3").onclick = function () {
39                 console.log(this.id);
40             };
41         </script>
42     </body>
43 </html>
事件冒泡有很大的坏处,一般,我们都是组织事件冒泡的。
阻止事件冒泡:

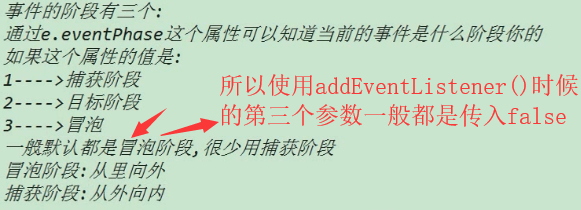
事件的阶段:
1,事件捕获阶段(1代表) :从外到里。
2,事件目标阶段(2代表)
3,事件冒泡阶段 (3代表):从里到外 。
 1 <!DOCTYPE>
 2 <html lang="en">
 3     <head>
 4         <meta charset="UTF-8">
 5         <title>这是网页标题</title>
 6         <style>
 7             #dv1{
 8                 width: 300px;
 9                 height: 300px;
10                 background-color: cyan;
11             }
12             #dv2{
13                 width: 200px;
14                 height: 200px;
15                 background-color: red;
16             }
17             #dv3{
18                 width: 100px;
19                 height: 100px;
20                 background-color: green;
21             }
22         </style>
23     </head>
24     <body>
25         <div id="dv1">
26             <div id="dv2">
27                 <div id="dv3"></div>
28             </div>
29         </div>
30         <script src="js/common.js"></script>
31         <script>
32             var objs = [getId$("dv1"),getId$("dv2"),getId$("dv3")];
33             // objs.forEach(function (ele,idx,arr) {
34             //     console.log("1 "+ele);
35             //     console.log("2 "+idx);
36             //     console.log("3 "+arr);
37             // })
38             objs.forEach(function (ele) {
39                 //为每个元素注册事件
40                 ele.addEventListener("click",function () {
41                     console.log(this.id);
42                 },false); //如果false 改为ture 就是事件的捕获阶段。
43             })
44         </script>
45     </body>
46 </html>
查看具体事件的阶段可以通过属性来查看,它在事件处理函数中的参数中 evt.eventPhase .
 1 <!DOCTYPE>
 2 <html lang="en">
 3     <head>
 4         <meta charset="UTF-8">
 5         <title>这是网页标题</title>
 6         <style>
 7             #dv1{
 8                 width: 300px;
 9                 height: 300px;
10                 background-color: cyan;
11             }
12             #dv2{
13                 width: 200px;
14                 height: 200px;
15                 background-color: red;
16             }
17             #dv3{
18                 width: 100px;
19                 height: 100px;
20                 background-color: green;
21             }
22         </style>
23     </head>
24     <body>
25         <div id="dv1">
26             <div id="dv2">
27                 <div id="dv3"></div>
28             </div>
29         </div>
30         <script src="js/common.js"></script>
31         <script>
32             var objs = [getId$("dv1"),getId$("dv2"),getId$("dv3")];
33             // objs.forEach(function (ele,idx,arr) {
34             //     console.log("1 "+ele);
35             //     console.log("2 "+idx);
36             //     console.log("3 "+arr);
37             // })
38             objs.forEach(function (ele) {
39                 //为每个元素注册事件
40                 ele.addEventListener("click",function (evt) {
41                     console.log(this.id);
42                     console.log("当前的事件阶段是 "+evt.eventPhase);
43                 },false); //如果false 改为ture 就是事件的捕获阶段。
44             })
45         </script>
46     </body>
47 </html>
注意: 事件的捕获阶段是不可能和冒泡阶段同时出现的。
要么是目标 -> 冒泡
要么是捕获 -> 目标

第三个参数如果是false 则是冒泡,如果是true 则是捕获阶段。
事件的总结:
为同一个元素注册多个不同的事件 并用同一个事件处理函数:
 1 <!DOCTYPE>
 2 <html lang="en">
 3     <head>
 4         <meta charset="UTF-8">
 5         <title>这是网页标题</title>
 6
 7     </head>
 8     <body>
 9         <input type="button" value="按钮" id="btn">
10
11         <script src="js/common.js"></script>
12         <script>
13             //为同一个元素绑定 多个不同的事件  ,并用同一个事件处理函数处理
14             getId$("btn").onclick = f1;
15             getId$("btn").onmouseenter = f1;
16             getId$("btn").onmouseleave = f1;
17             function f1(evt) {
18                 switch (evt.type) {
19                     case "click": alert("鼠标点击了"); break;
20                     case "mouseenter": this.style.backgroundColor="cyan"; break;
21                     case "mouseleave": this.style.backgroundColor =""; break;
22                 }
23             }
24         </script>
25     </body>
26 </html>