android6.0 SystemUi分析
http://www.jianshu.com/p/28f1954812b3
前言
状态栏与导航栏属于SystemUi的管理范畴,虽然界面的UI会受到SystemUi的影响,但是,APP并没有直接绘制SystemUI的权限与必要。APP端之所以能够更改状态栏的颜色、导航栏的颜色,其实还是操作自己的View更改UI。可以这么理解:状态栏与导航栏拥有自己独立的窗口,而且这两个窗口的优先级较高,会悬浮在所有窗口之上,可以把系统自身的状态栏与导航栏看做全透明的,之所以会有背景颜色,是因为下层显示界面在被覆盖的区域添加了颜色,之后,通过SurfaceFlinger的图层混合,好像是状态栏、导航栏自身有了背景色。看一下一个普通的Activity展示的时候,所对应的Surface(或者说Window也可以)。如下Surface图:
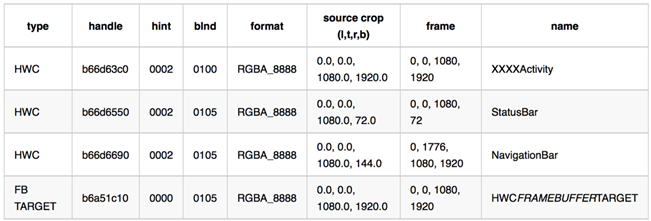
- 第一个XXXXActivity,大小是屏幕大小
- 第二个状态栏StatusBar,大小对应顶部那一条
- 第三个是底部虚拟导航栏NavigationBar,大小对应底部那一条
- HWC_FRAMEBUFFER_TARGET:是合成的目标Layer,不参与合成
从上表可以看出,虽然只展示了一个Activity,但是同时会有StatusBar、NavigationBar、XXXXActivity可以看出Activity是在状态栏与导航栏下面的,被覆盖了,它们共同参与显示界面的合成,但是,StatusBar、NavigationBar明显不是属于APP自身UI管理的范畴。下面就来分析一下,APP层的API如何影响SystemUI的显示的,并一步步解开所谓沉浸式与全屏的原理,首先看一下如何更改状态栏颜色。
查看布局
tool->android->layout inspector
WindowInsets介绍
https://blog.csdn.net/yuanjw2014/article/details/78363353
https://www.jianshu.com/p/756e94fa2e09
inset的直译是插入物,理解为特定屏幕区域更合适一些。WindowInsets的三个成员变量mSystemWindowInsets,mWindowDecorInsets,mStableInsets表示了三种屏幕区域。
- mSystemWindowInsets
The system window inset represents the area of a full-screen window that is partially or fully obscured by the status bar, navigation bar, IME or other system windows.
代表着整个屏幕窗口上,状态栏,导航栏,输入法等系统窗口占用的区域
- mWindowDecorInsets
The window decor inset represents the area of the window content area that is partially or fully obscured by decorations within the window provided by the framework. This can include action bars, title bars, toolbars, etc.
代表着内容区域被系统框架提供的action bars, title bars, toolbars这些组件占用的区域。
- mStableInsets
The stable inset represents the area of a full-screen window that may be partially or fully obscured(被遮蔽的) by the system UI elements. This value does not change based on the visibility state of those system UI elements; for example, if the status bar is normally shown, but temporarily hidden, the stable inset will still provide the inset associated with the status bar being shown.
SystemBar setColor支持
Android 5.0之前activity默认是在statusbar下边,navigationbar上边,
而在Android5.0开始,activity真正的全屏,只不过内容布局还会空出statusbar,navigationbar空间(除非设置了SYSTEM_UI_FLAG_xx),statusbar和navigationbar处加入了有颜色的view。
Android在API 21的时候为Window添加了setNavigationBarColor、setStatusBarColor,进一步提升SystemBar用户体验。
PhoneWindow继承Window具体实现了setNavigationBarColor、setStatusBarColor,具体代码如下:
public void setStatusBarColor(int color) {
    mStatusBarColor = color;
    mForcedStatusBarColor = true;
    if (mDecor != null) {
        mDecor.updateColorViews(null, false /* animate */);
    }
}
public void setNavigationBarColor(int color) {
    mNavigationBarColor = color;
    mForcedNavigationBarColor = true;
    if (mDecor != null) {
        mDecor.updateColorViews(null, false /* animate */);
        mDecor.updateNavigationGuardColor();
    }}
}
不难发现主要是DecorView的updateColorViews在work,通过查看代码,可以明白是DecorView在SystemBar的位置add了对应的ColorStateView,这个有点类似PhoneWindowManager里边的WindowState,之后对ColotStateView里边的view进行操作即可,比如说setBackground来改变其颜色。
状态栏颜色更新原理
假设当前的场景是默认样式的Activity,如果想要更新状态栏颜色只需要如下代码:
getWindow().setStatusBarColor(RED);
其实这里调用的是PhoneWindow的setStatusBarColor函数,无论是Activity还是Dialog都是被抽象成PhoneWindow:
@Overrider
public void setStatusBarColor(int color) {
    mStatusBarColor = color;
    mForcedStatusBarColor = true;
    if (mDecor != null) {
        mDecor.updateColorViews(null, false /* animate */);
    }
}
最终调用的是DecorView的updateColorViews函数,DecorView是属于Activity的PhoneWindow的内部对象,也就说,更新的对象从所谓的Window进入到了Activity自身的布局视图中,接着看DecorView,这里只关注更改颜色:
private WindowInsets updateColorViews(WindowInsets insets, boolean animate) {
        WindowManager.LayoutParams attrs = getAttributes();
        int sysUiVisibility = attrs.systemUiVisibility | getWindowSystemUiVisibility();

        if (!mIsFloating && ActivityManager.isHighEndGfx()) {
            boolean disallowAnimate = !isLaidOut();
            disallowAnimate |= ((mLastWindowFlags ^ attrs.flags) & FLAG_DRAWS_SYSTEM_BAR_BACKGROUNDS) != 0;
            mLastWindowFlags = attrs.flags;
            ...

            boolean navBarToRightEdge = isNavBarToRightEdge(mLastBottomInset, mLastRightInset);
            boolean navBarToLeftEdge = isNavBarToLeftEdge(mLastBottomInset, mLastLeftInset);
            int navBarSize = getNavBarSize(mLastBottomInset, mLastRightInset, mLastLeftInset);
            <!--更新NavigatioColor-->
            updateColorViewInt(mNavigationColorViewState, sysUiVisibility,
                    mWindow.mNavigationBarColor, navBarSize, navBarToRightEdge || navBarToLeftEdge,
                    navBarToLeftEdge,
                    0 /* sideInset */, animate && !disallowAnimate, false /* force */);

            boolean statusBarNeedsRightInset = navBarToRightEdge && mNavigationColorViewState.present;
            int statusBarRightInset = statusBarNeedsRightInset ? mLastRightInset : 0;
            <!--更新StatusColor-->
            updateColorViewInt(mStatusColorViewState, sysUiVisibility, mStatusBarColor,
                    mLastTopInset, false /* matchVertical */, statusBarRightInset,
                    animate && !disallowAnimate);
        }
        ...
}
这里mStatusColorViewState其实就代表StatusBar的背景颜色对象,主要属性包括显示的条件以及颜色值:
    private final ColorViewState mStatusColorViewState = new ColorViewState(
            SYSTEM_UI_FLAG_FULLSCREEN,
            FLAG_TRANSLUCENT_STATUS,
            Gravity.TOP,
            Gravity.LEFT,
            STATUS_BAR_BACKGROUND_TRANSITION_NAME,
            com.android.internal.R.id.statusBarBackground,
            FLAG_FULLSCREEN);

构造函数:
ColorViewState(int systemUiHideFlag,
                int translucentFlag,
                int verticalGravity,
                int horizontalGravity,
                String transitionName,
                int id,
                int hideWindowFlag)
如果当前对应Window的SystemUi(下边的sysUiVis)设置了SYSTEM_UI_FLAG_FULLSCREEN后,就会隐藏状态栏,那就不需要为状态栏设置背景,否则就设置背景。
  private void updateColorViewInt(final ColorViewState state, int sysUiVis, int color,
                int size, boolean verticalBar, int rightMargin, boolean animate) {
                <!--关键点1 条件1-->
            state.present = size > 0 && (sysUiVis & state.systemUiHideFlag) == 0
                    && (getAttributes().flags & state.hideWindowFlag) == 0
                    && (getAttributes().flags & FLAG_DRAWS_SYSTEM_BAR_BACKGROUNDS) != 0;
               <!--关键点2 条件2-->
            boolean show = state.present
                    && (color & Color.BLACK) != 0
                    && (getAttributes().flags & state.translucentFlag) == 0;

            boolean visibilityChanged = false;
            View view = state.view;
            int resolvedHeight = verticalBar ? LayoutParams.MATCH_PARENT : size;
            int resolvedWidth = verticalBar ? size : LayoutParams.MATCH_PARENT;
            int resolvedGravity = verticalBar ? state.horizontalGravity : state.verticalGravity;

            if (view == null) {
                if (show) {
                    state.view = view = new View(mContext);
                    view.setBackgroundColor(color);
                    view.setTransitionName(state.transitionName);
                    view.setId(state.id);
                    visibilityChanged = true;
                    view.setVisibility(INVISIBLE);
                    state.targetVisibility = VISIBLE;
            <!--关键点3-->
                    LayoutParams lp = new LayoutParams(resolvedWidth, resolvedHeight, resolvedGravity);
                    lp.rightMargin = rightMargin;
                    addView(view, lp);
                    updateColorViewTranslations();
                }
}
          ...
}
先看下关键点1跟2 ,这里是根据SystemUI的配置决定是否显示状态栏背景颜色,
1.如果状态栏都不显示,那就没必要显示背景色了,
2.WindowManager.LayoutParams.FLAG_DRAWS_SYSTEM_BAR_BACKGROUNDS
指示此窗口要负责进行system bar的绘制,绘制颜色是由Window.getStatusBarColor()/getNavigationBarColor()获取。
3.其次,如果状态栏显示,但背景是透明色,也没必要添加背景颜色,即不满足(color & Color.BLACK) != 0。
4.最后看一下translucentFlag,默认情况下,状态栏背景色与translucent半透明效果互斥,半透明就统一用半透明颜色,不会再添加额外颜色。
最后,再来看关键点3,其实很简单,就是往DecorView上添加一个View,原则上说DecorView也是一个FrameLayout,所以最终的实现就是在FrameLayout添加一个有背景色的View。
导航栏颜色更新原理
更新导航栏颜色的原理同更新状态栏的原理几乎完全一致,如下代码
@Override
public void setNavigationBarColor(int color) {
    mNavigationBarColor = color;
    mForcedNavigationBarColor = true;
    if (mDecor != null) {
        mDecor.updateColorViews(null, false /* animate */);
    }
}
只不过在DecorView进行颜色更新的时候,传递的对象是 mNavigationColorViewState
private final ColorViewState mNavigationColorViewState = new ColorViewState(
        SYSTEM_UI_FLAG_HIDE_NAVIGATION,
FLAG_TRANSLUCENT_NAVIGATION,
        Gravity.BOTTOM,
Gravity.RIGHT,
        Window.NAVIGATION_BAR_BACKGROUND_TRANSITION_NAME,
        com.android.internal.R.id.navigationBarBackground,
        0 /* hideWindowFlag */);

构造函数:
ColorViewState(int systemUiHideFlag,
                int translucentFlag,
                int verticalGravity,
                int horizontalGravity,
                String transitionName,
                int id,
                int hideWindowFlag)
同样mNavigationColorViewState也有显示的条件,如果设置了SYSTEM_UI_FLAG_HIDE_NAVIGATION、或者半透明、或者颜色为透明色,那同样也不需要为导航栏添加背景色,具体不再重复。改变状体栏及导航栏的颜色的本质是往DecorView中添加有颜色的View, 并放在状态栏及导航栏下面。
当然,如果设置了隐藏状态栏,或者导航栏,并且没有让布局随着隐藏而动态变化的话,就会看到被覆盖的padding,默认是白色,如下图,隐藏状态栏前后的对比:

没隐藏状态栏
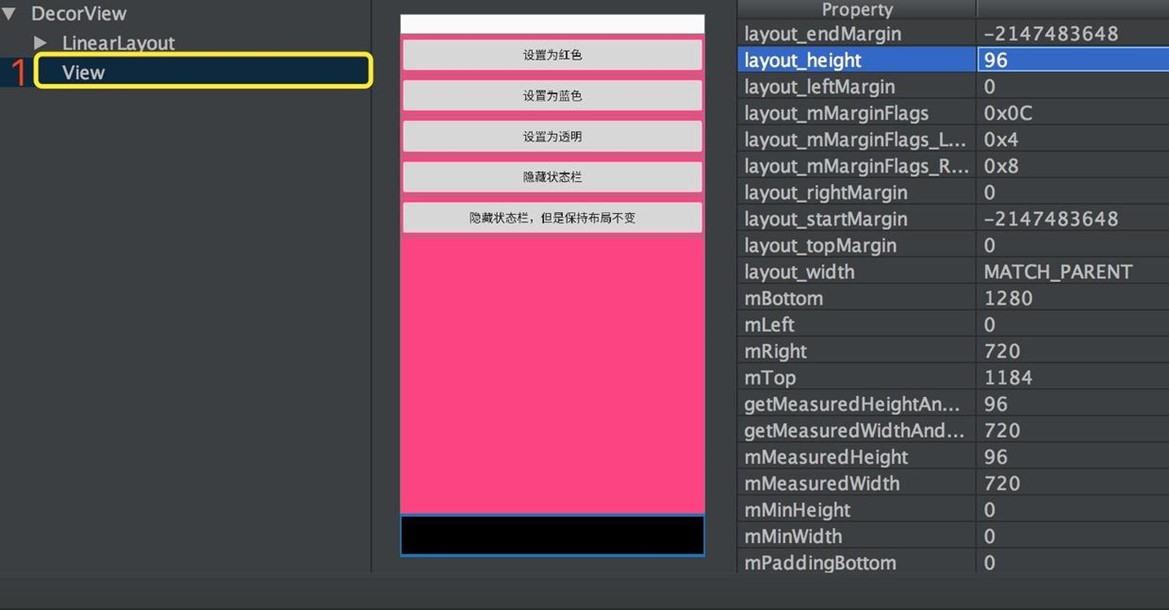
隐藏了状态栏
以上是DecorView对状态栏的添加机制,总结出来就是一句话:只要状态栏/导航栏不设置隐藏,设置颜色就会有效。实际应用中经常将状态栏或者导航栏设置为透明色:即想要沉浸式体验,这个时候背景颜色View就不再被绘制。
但是,默认样式下DecorView的 内容绘制区域 并未扩展到状态栏、或者导航栏下面(TRANSLUCENT半透明效果除外(5.0之上,一般不会有TRANSLUCENT功能)),结果就是会看到被覆盖区域的一篇空白。想要解决这个问题,就牵扯到下面的fitsystemwindow的处理。
DecorView内容区域的扩展与fitsystemwindow的意义
fitSystemWindow属性 当DecorView的内容区域延伸到系统UI下方时,防止在扩展时被覆盖,达到全屏、沉浸等不同体验效果。这里牵扯到WindowInsets的消费,其实就是周围一些系统的边框padding的消耗,它分成不同的消耗层级:
- DecorView层级的消费 :主要针对NavigationBar部分
- DecorView根布局消费(非用户布局)
- 用户布局消费
消费层级的选择是可控的,使用得当,就能在不同的场景得到想要的样式。接下来分析下不同层级控制与消费的原理。
DecorView级别的WindowInsets消费
看下ViewRootImpl的源码,在ViewRootImpl进行布局与绘制的时候会选择性调用dispatchApplyInsets,这个函数的作用是找到符合要求的View,消费掉WindowInsets:
ViewRootImpl:
    private void performTraversals() {
        ...
        dispatchApplyInsets(host);
        ...
    }
    <!--关键点1-->
    void dispatchApplyInsets(View host) {
        host.dispatchApplyWindowInsets(getWindowInsets(true /* forceConstruct */));
    }
host其实就是DecorView对象
/* package */ WindowInsets getWindowInsets(boolean forceConstruct) {
    if (mLastWindowInsets == null || forceConstruct) {
        mDispatchContentInsets.set(mAttachInfo.mContentInsets);
        mDispatchStableInsets.set(mAttachInfo.mStableInsets);
        Rect contentInsets = mDispatchContentInsets;
        Rect stableInsets = mDispatchStableInsets;
        // For dispatch we preserve old logic, but for direct requests from Views we allow to
        // immediately use pending insets.
        if (!forceConstruct
                && (!mPendingContentInsets.equals(contentInsets) ||
                    !mPendingStableInsets.equals(stableInsets))) {
            contentInsets = mPendingContentInsets;
            stableInsets = mPendingStableInsets;
        }
        Rect outsets = mAttachInfo.mOutsets;
        if (outsets.left > 0 || outsets.top > 0 || outsets.right > 0 || outsets.bottom > 0) {
            contentInsets = new Rect(contentInsets.left + outsets.left,
                    contentInsets.top + outsets.top, contentInsets.right + outsets.right,
                    contentInsets.bottom + outsets.bottom);
        }
        mLastWindowInsets = new WindowInsets(contentInsets,
                null /* windowDecorInsets */, stableInsets,
                mContext.getResources().getConfiguration().isScreenRound(),
                mAttachInfo.mAlwaysConsumeNavBar);
    }
    return mLastWindowInsets;
}

public WindowInsets(Rect systemWindowInsets, Rect windowDecorInsets, Rect stableInsets,
        boolean isRound, boolean alwaysConsumeNavBar)
ViewGroup:
    @Override
    public WindowInsets dispatchApplyWindowInsets(WindowInsets insets) {
        insets = super.dispatchApplyWindowInsets(insets);
        if (!insets.isConsumed()) {
            final int count = getChildCount();
            for (int i = 0; i < count; i++) {
                insets = getChildAt(i).dispatchApplyWindowInsets(insets);
                if (insets.isConsumed()) {
                    break;
                }
            }
        }
        return insets;
    }
先自己消费,之后会把剩余的交给子view消费。
View:
    public WindowInsets dispatchApplyWindowInsets(WindowInsets insets) {
        try {
            mPrivateFlags3 |= PFLAG3_APPLYING_INSETS;
            if (mListenerInfo != null && mListenerInfo.mOnApplyWindowInsetsListener != null) {
                return mListenerInfo.mOnApplyWindowInsetsListener.onApplyWindowInsets(this, insets);
            } else {
                return onApplyWindowInsets(insets);
            }
        } finally {
            mPrivateFlags3 &= ~PFLAG3_APPLYING_INSETS;
        }
    }
DecorView最终会回调View的onApplyWindowInsets函数,不过DecorView重写了该函数:
DecorView:
    @Override
    public WindowInsets onApplyWindowInsets(WindowInsets insets) {
        final WindowManager.LayoutParams attrs = mWindow.getAttributes();
        ...
        mFrameOffsets.set(insets.getSystemWindowInsets());
        <!--关键点1-->
        insets = updateColorViews(insets, true /* animate */);
        insets = updateStatusGuard(insets);
        updateNavigationGuard(insets);
        if (getForeground() != null) {
            drawableChanged();
        }
        return insets;
    }
关键是调用updateColorViews函数,之前看过对颜色的处理,这里我们主要看下对于边距的处理:
DecorView:
    private WindowInsets updateColorViews(WindowInsets insets, boolean animate) {
        WindowManager.LayoutParams attrs = getAttributes();
        int sysUiVisibility = attrs.systemUiVisibility | getWindowSystemUiVisibility();
        if (!mIsFloating && ActivityManager.isHighEndGfx()) {
            ...//设置statusbar和navigationbar颜色view
        }

        <!--关键点1 :6.0代码 判断是否能够扩展到导航栏下面-->
        boolean consumingNavBar = (attrs.flags & FLAG_DRAWS_SYSTEM_BAR_BACKGROUNDS) != 0
                                && (sysUiVisibility & SYSTEM_UI_FLAG_LAYOUT_HIDE_NAVIGATION) == 0
                                && (sysUiVisibility & SYSTEM_UI_FLAG_HIDE_NAVIGATION) == 0;

        int consumedRight = consumingNavBar ? mLastRightInset : 0;
        int consumedBottom = consumingNavBar ? mLastBottomInset : 0;

        <!--关键点1 ,可以看到,根布局会根据消耗的状况,来评估到底底部,右边部分margin多少,并设置进去-->
        if (mContentRoot != null
            && mContentRoot.getLayoutParams() instanceof MarginLayoutParams) {

            MarginLayoutParams lp = (MarginLayoutParams) mContentRoot.getLayoutParams();
            if (lp.rightMargin != consumedRight || lp.bottomMargin != consumedBottom) {
                lp.rightMargin = consumedRight;
                lp.bottomMargin = consumedBottom;
                mContentRoot.setLayoutParams(lp);
                ...
            }

            <!--关键点2 重新计算消费结果---->
            if (insets != null) {
                insets = insets.replaceSystemWindowInsets(
                                insets.getSystemWindowInsetLeft(),
                                insets.getSystemWindowInsetTop(),
                                insets.getSystemWindowInsetRight() - consumedRight,
                                insets.getSystemWindowInsetBottom() - consumedBottom);
            }
        }
        if (insets != null) {
            insets = insets.consumeStableInsets();
        }
        return insets;
    }
mContentRoot是DecorView的直接子view,就是个linearlayout。
在6.0对应的源码中,DecorView自身主要对NavigationBar那部分的Insets做了处理,并没有对状态栏(消费)做处理。
并且DecorView通过设置Margin的方式来处理Insets的消费的:mContentRoot.setLayoutParams(lp);
这里主要关心下consumingNavBar的条件,什么情况下DecorView会通过设置Margin来消费掉导航栏那部分Padding,
主要有三个条件:
- sysUiVisibility & SYSTEM_UI_FLAG_HIDE_NAVIGATION == 0 不设置隐藏导航栏
- sysUiVisibility & SYSTEM_UI_FLAG_LAYOUT_HIDE_NAVIGATION == 0,导航栏显示时,内容不能扩展到导航栏下方
- (attrs.flags & FLAG_DRAWS_SYSTEM_BAR_BACKGROUNDS) != 0 不使用系统背景
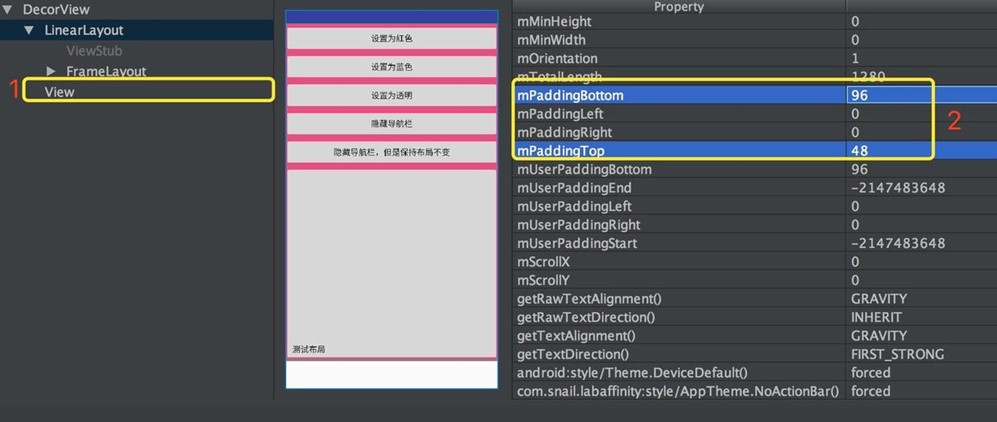
同时满足以上三点,Insets的bottom部分就会被DecorView利用Margin的方式消费掉,默认样式的Activity满足上述三个条件,因此,底部导航栏部分Insets默认被DecorView消费掉了,如下图:

非悬浮Activity的DecorView默认是全屏的,图中1、2代表着DecorView中添加状体栏、导航栏对应的颜色View,而DecorView的Content是一个LinearLayout,可以看出它并不是全屏,而是底部有一个Margin,正好对应导航栏的高度,顶部有个padding这个其实是由fitSystemWindow决定的。
系统布局级别(非DecorView)的fitSystemWindow消费
默认样式Activity的状态栏是有颜色的,如果内容直接扩展到状态栏下方,一定会被覆盖掉,系统默认的实现是在DecorView的根布局上加了个padding,那么用户的UI视图就不会被覆盖。不过,如果状态栏被设置为透明,用户就会看到状态栏下方有一片空白,这种体验肯定不好。这种情况下,往往希望内容能够延伸到状体栏下方,因此,就需要把空白的也留给内容视图。
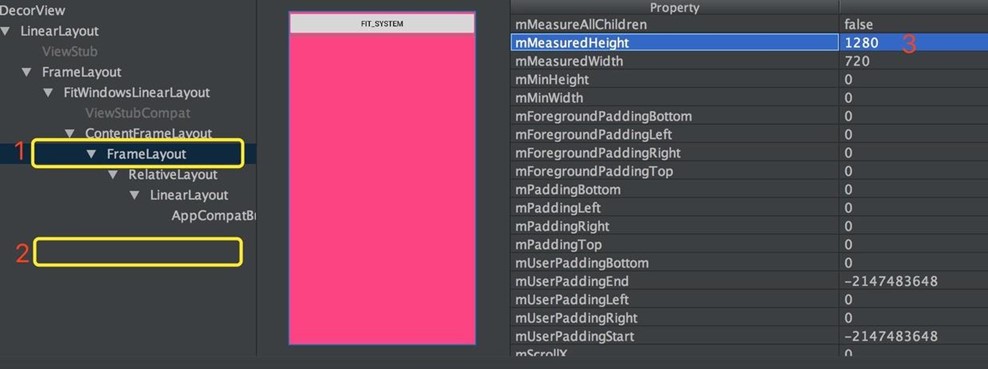
首先,分析下,默认样式的Activity为什么会有顶部的空白,看下一默认情况下系统的根布局属性,里面有我们要找的关键点 android:fitsSystemWindows="true":
<LinearLayout xmlns:android="http://schemas.android.com/apk/res/android"
    android:layout_width="match_parent"
    android:layout_height="match_parent"
    <!--关键点1-->
    android:fitsSystemWindows="true"
    android:orientation="vertical">
    <ViewStub android:id="@+id/action_mode_bar_stub"
              android:inflatedId="@+id/action_mode_bar"
              android:layout="@layout/action_mode_bar"
              android:layout_width="match_parent"
              android:layout_height="wrap_content"
              android:theme="?attr/actionBarTheme" />
    <FrameLayout
         android:id="@android:id/content"
         android:layout_width="match_parent"
         android:layout_height="match_parent"
         android:foregroundInsidePadding="false"
         android:foregroundGravity="fill_horizontal|top"
         android:foreground="?android:attr/windowContentOverlay" />
</LinearLayout>
上面的布局是DecorView的直接子view,在DecorView中叫mContentRoot,其中关键点1:android:fitsSystemWindows属性是系统添加状态栏padding的关键,为什么这样呢?
由上边decorview对navigationbar的消费可知,如果想要让内容布局mContentRoot进行消费,那么需要设置SYSTEM_UI_FLAG_HIDE_NAVIGATION,就意味着DecorView没有消耗SystemWindowInsets(主要是bottom,即导航栏高度),mContentRoot的fitsystemwindow就会生效,并通过设置padding消费掉,这里就是系统布局级别的消费(不是用户自己定义的View布局),设置代码,
setSystemUiVisibility(View.SYSTEM_UI_FLAG_HIDE_NAVIGATION
                    |View.SYSTEM_UI_FLAG_LAYOUT_STABLE);
View.SYSTEM_UI_FLAG_LAYOUT_STABLE为了保证内容布局不随着导航栏的消失而把内容扩展到导航栏位置,
效果如下图:
上图中由于设置了SYSTEM_UI_FLAG_HIDE_NAVIGATION,所以没有导航栏View被添加,DecorView中只有状态栏背景1 .View与根内容布局,从图中的点2可以看出,这里是通过设置mContentRoot的padding来处理Insets消费的(同时消费了状态栏与导航栏部分)。但是,不管何种方式,消费了就是消费了,被消费的部分不能再次消费。
6.0源码中,DecorView并没有对状态栏进行消费,状态栏的消费都留给了DecorView子布局及孙子辈布局,不过7.0在系统级别的配置上留了个入口(ForceWindowDrawsStatusBarBackground)。
接着上边DecorView消费完后会把WindowInsets 传递给子view进行处理。
ViewGroup:
   @Override
    public WindowInsets dispatchApplyWindowInsets(WindowInsets insets) {
        insets = super.dispatchApplyWindowInsets(insets);
        if (!insets.isConsumed()) {
            final int count = getChildCount();
            for (int i = 0; i < count; i++) {
                insets = getChildAt(i).dispatchApplyWindowInsets(insets);
                if (insets.isConsumed()) {
                    break;
                }
            }
        }
        return insets;
    }
先自己消费,之后会把剩余的交给子view消费。
View:
    public WindowInsets dispatchApplyWindowInsets(WindowInsets insets) {
        try {
            mPrivateFlags3 |= PFLAG3_APPLYING_INSETS;
            if (mListenerInfo != null && mListenerInfo.mOnApplyWindowInsetsListener != null) {
                return mListenerInfo.mOnApplyWindowInsetsListener.onApplyWindowInsets(this, insets);
            } else {
                return onApplyWindowInsets(insets);
            }
        } finally {
            mPrivateFlags3 &= ~PFLAG3_APPLYING_INSETS;
        }
    }

    public WindowInsets onApplyWindowInsets(WindowInsets insets) {
        if ((mPrivateFlags3 & PFLAG3_FITTING_SYSTEM_WINDOWS) == 0) {
            // We weren't called from within a direct call to fitSystemWindows,
            // call into it as a fallback in case we're in a class that overrides it
            // and has logic to perform.
            if (fitSystemWindows(insets.getSystemWindowInsets())) {
                // 如果能消费,则全都消费完。
                return insets.consumeSystemWindowInsets();
            }
        } else {
            // We were called from within a direct call to fitSystemWindows.
            if (fitSystemWindowsInt(insets.getSystemWindowInsets())) {
                return insets.consumeSystemWindowInsets();
            }
        }
        return insets;
    }

    protected boolean fitSystemWindows(Rect insets) {
        if ((mPrivateFlags3 & PFLAG3_APPLYING_INSETS) == 0) {
            if (insets == null) {
                // Null insets by definition have already been consumed.
                // This call cannot apply insets since there are none to apply,
                // so return false.
                return false;
            }
            // If we're not in the process of dispatching the newer apply insets call,
            // that means we're not in the compatibility path. Dispatch into the newer
            // apply insets path and take things from there.
            try {
                mPrivateFlags3 |= PFLAG3_FITTING_SYSTEM_WINDOWS;
                return dispatchApplyWindowInsets(new WindowInsets(insets)).isConsumed();
            } finally {
                mPrivateFlags3 &= ~PFLAG3_FITTING_SYSTEM_WINDOWS;
            }
        } else {
            // We're being called from the newer apply insets path.
            // Perform the standard fallback behavior.
            <!--关键函数-->
            return fitSystemWindowsInt(insets);
        }
    }
fitSystemWindowsInt是最为关键的消费处理函数,里面有当前View能否消费WindowInsets的判断逻辑。
View:
    private boolean fitSystemWindowsInt(Rect insets) {
        <!--关键点1-->
        if ((mViewFlags & FITS_SYSTEM_WINDOWS) == FITS_SYSTEM_WINDOWS) {
            mUserPaddingStart = UNDEFINED_PADDING;
            mUserPaddingEnd = UNDEFINED_PADDING;
            Rect localInsets = sThreadLocal.get();
            if (localInsets == null) {
                localInsets = new Rect();
                sThreadLocal.set(localInsets);
            }

            <!--关键点2-->
            boolean res = computeFitSystemWindows(insets, localInsets);
            mUserPaddingLeftInitial = localInsets.left;
            mUserPaddingRightInitial = localInsets.right;
            internalSetPadding(localInsets.left, localInsets.top,
                            localInsets.right, localInsets.bottom);
            return res;
        }
        return false;
    }
先看关键点1,如果View设置了FITS_SYSTEM_WINDOWS,就通过关键点2 的computeFitSystemWindows去计算是否能消费,
接着看computeFitSystemWindows
    protected boolean computeFitSystemWindows(Rect inoutInsets, Rect outLocalInsets) {
        if ((mViewFlags & OPTIONAL_FITS_SYSTEM_WINDOWS) == 0
            || mAttachInfo == null
            || ((mAttachInfo.mSystemUiVisibility & SYSTEM_UI_LAYOUT_FLAGS) == 0
                && !mAttachInfo.mOverscanRequested)) {

            outLocalInsets.set(inoutInsets);
            inoutInsets.set(0, 0, 0, 0);
            return true;
        }
        ...
    }
- (mViewFlags & OPTIONAL_FITS_SYSTEM_WINDOWS) == 0 代表是用户的UI(contentView),因为OPTIONAL_FITS_SYSTEM_WINDOWS只有除了contentView之外的view才会设置,而这些view是系统预定义的view,下边有解析。
- 如果是普通View可以直接消费,如果是系统View,要看看是不是设置了SYSTEM_UI_FLAG_LAYOUT_HIDE_NAVIGATION、 SYSTEM_UI_FLAG_LAYOUT_FULLSCREEN
- mAttachInfo.mSystemUiVisibility & SYSTEM_UI_LAYOUT_FLAGS == 0 代表没有设置SYSTEM_UI_FLAG_LAYOUT_HIDE_NAVIGATION、 SYSTEM_UI_FLAG_LAYOUT_FULLSCREEN的参数,
如果设置了任意一个flag,就只能让用户View去消费,正如之前decorview布局simple_screen.xml布局,虽然根布局设置了fitSystemWindow为true,但是,如果你用了全屏参数,根布局的fitSystemWindow就会无效,
如果上面都没有消费,就会转换为用户布局级别的消费。
View.internalSetPadding:
protected void internalSetPadding(int left, int top, int right, int bottom) {
    mUserPaddingLeft = left;
    mUserPaddingRight = right;
    mUserPaddingBottom = bottom;

    boolean changed = false;

    ...

    if (mPaddingLeft != left) {
        changed = true;
        mPaddingLeft = left;
    }
    if (mPaddingTop != top) {
        changed = true;
        mPaddingTop = top;
    }
    if (mPaddingRight != right) {
        changed = true;
        mPaddingRight = right;
    }
    if (mPaddingBottom != bottom) {
        changed = true;
        mPaddingBottom = bottom;
    }

    if (changed) {
        requestLayout();
        invalidateOutline();
    }
}
OPTIONAL_FITS_SYSTEM_WINDOWS设置
OPTIONAL_FITS_SYSTEM_WINDOWS是通过 makeOptionalFitsSystemWindows设置的,入口只在PhoneWindow中,
通过mDecor.makeOptionalFitsSystemWindows()设置:
    @Override
    public void setContentView(View view, ViewGroup.LayoutParams params) {
        // Note: FEATURE_CONTENT_TRANSITIONS may be set in the process of installing the window
        // decor, when theme attributes and the like are crystalized. Do not check the feature
        // before this happens.
        if (mContentParent == null) {
            installDecor();
        } else if (!hasFeature(FEATURE_CONTENT_TRANSITIONS)) {
            mContentParent.removeAllViews();
        }

        if (hasFeature(FEATURE_CONTENT_TRANSITIONS)) {
            view.setLayoutParams(params);
            final Scene newScene = new Scene(mContentParent, view);
            transitionTo(newScene);
        } else {
            mContentParent.addView(view, params);
        }
        mContentParent.requestApplyInsets();
        final Callback cb = getCallback();
        if (cb != null && !isDestroyed()) {
            cb.onContentChanged();
        }
        mContentParentExplicitlySet = true;
}

private void installDecor() {
    mForceDecorInstall = false;
    if (mDecor == null) {
        mDecor = generateDecor(-1);
        mDecor.setDescendantFocusability(ViewGroup.FOCUS_AFTER_DESCENDANTS);
        mDecor.setIsRootNamespace(true);
        if (!mInvalidatePanelMenuPosted && mInvalidatePanelMenuFeatures != 0) {
            mDecor.postOnAnimation(mInvalidatePanelMenuRunnable);
        }
    } else {
        // 设置Window
        mDecor.setWindow(this);
    }
    if (mContentParent == null) {
        mContentParent = generateLayout(mDecor);
        <!--关键点1-->
        mDecor.makeOptionalFitsSystemWindows();
        ...
    }
}
在installDecor()中,mDecor.makeOptionalFitsSystemWindows的时候,里面还未涉及用户view,所以标记的都是系统自己的View布局
ViewGroup:
    public void makeOptionalFitsSystemWindows() {
        super.makeOptionalFitsSystemWindows();
        final int count = mChildrenCount;
        final View[] children = mChildren;
        for (int i = 0; i < count; i++) {
            children[i].makeOptionalFitsSystemWindows();
        }
}
View:
public void makeOptionalFitsSystemWindows()  {
    setFlags(OPTIONAL_FITS_SYSTEM_WINDOWS, OPTIONAL_FITS_SYSTEM_WINDOWS);
}
用户布局级别的fitSystemWindow消费
想要用户布局消费则需要让系统布局mContentRoot不消费才行。
可以在上边看到,设置了SYSTEM_UI_FLAG_LAYOUT_HIDE_NAVIGATION、 SYSTEM_UI_FLAG_LAYOUT_FULLSCREEN这其中一个就可以让mContentRoot不消费。
如果用户布局中设置了fitSystemWindow="true",那么消费逻辑跟系统布局mContentRoot消费逻辑是一样的,所以就不再分析。
如果想要实现全屏效果的话,假设图片浏览的场景:全屏,导航栏与状态栏透明,图片浏览区伸展到整个屏幕,通过设置下面的配置就能达到效果:全屏,并且用户布局与系统布局都不消费WindowInsets:
getWindow().getDecorView().setSystemUiVisibility(
        View.SYSTEM_UI_FLAG_LAYOUT_STABLE
        | View.SYSTEM_UI_FLAG_LAYOUT_FULLSCREEN
        | View.SYSTEM_UI_FLAG_LAYOUT_HIDE_NAVIGATION);

if (Build.VERSION.SDK_INT >= Build.VERSION_CODES.LOLLIPOP) {
    getWindow().setStatusBarColor(Color.TRANSPARENT);
    getWindow().setNavigationBarColor(Color.TRANSPARENT);
}
- 由于StatusBarColor和NavigationBarColor都设置的是透明的,所以状态栏与导航栏背景色View都没有被添加,
- 其次,由于设置了View.SYSTEM_UI_FLAG_LAYOUT_FULLSCREEN | View.SYSTEM_UI_FLAG_LAYOUT_HIDE_NAVIGATION,DecorView与 系统布局mContentRoot 都不会消费WindowInsets,
- 而在用户自己的布局中也没有设置 android:fitsSystemWindows="true"的话,这样不会有View消费WindowInsets,达到全屏效果。
如下图所示:
有一个小点需要注意下,那就是Theme中也支持fitsSystemWindows的设置
<item name="android:fitsSystemWindows">true</item>
默认情况下上属性为false,如果设置了True,就会被第一个未设置fitsSystemWindows的View消费掉。
遵守View默认的消费逻辑,被第一个FitSystemWindow=true的布局通过设置自己padding的方式消费掉。
setSystemUiVisibility流程
View
public void setSystemUiVisibility(int visibility) {
    if (visibility != mSystemUiVisibility) {
        mSystemUiVisibility = visibility;
        if (mParent != null && mAttachInfo != null && !mAttachInfo.mRecomputeGlobalAttributes) {
            mParent.recomputeViewAttributes(this);
        }
    }
}
ViewGrou
@Override
public void recomputeViewAttributes(View child) {
    if (mAttachInfo != null && !mAttachInfo.mRecomputeGlobalAttributes) {
        ViewParent parent = mParent;
        if (parent != null) parent.recomputeViewAttributes(this);
    }
}
ViewRootImpl
Override
public void recomputeViewAttributes(View child) {
    checkThread();
    if (mView == child) {
        mAttachInfo.mRecomputeGlobalAttributes = true;
        if (!mWillDrawSoon) {
            scheduleTraversals();
        }
    }
}
ViewRootImpl
在performTraversals和setView时都会调用collectViewAttributes来收集一下子孙view设置的setSystemUiVisibility
private boolean collectViewAttributes() {
    if (mAttachInfo.mRecomputeGlobalAttributes) {
        //Log.i(mTag, "Computing view hierarchy attributes!");
        mAttachInfo.mRecomputeGlobalAttributes = false;
        boolean oldScreenOn = mAttachInfo.mKeepScreenOn;
        mAttachInfo.mKeepScreenOn = false;
        mAttachInfo.mSystemUiVisibility = 0;
        mAttachInfo.mHasSystemUiListeners = false;
        mView.dispatchCollectViewAttributes(mAttachInfo, 0);
        mAttachInfo.mSystemUiVisibility &= ~mAttachInfo.mDisabledSystemUiVisibility;
        WindowManager.LayoutParams params = mWindowAttributes;
        mAttachInfo.mSystemUiVisibility |= getImpliedSystemUiVisibility(params);
        if (mAttachInfo.mKeepScreenOn != oldScreenOn
                || mAttachInfo.mSystemUiVisibility != params.subtreeSystemUiVisibility
                || mAttachInfo.mHasSystemUiListeners != params.hasSystemUiListeners) {
            applyKeepScreenOnFlag(params);
            params.subtreeSystemUiVisibility = mAttachInfo.mSystemUiVisibility;
            params.hasSystemUiListeners = mAttachInfo.mHasSystemUiListeners;
            mView.dispatchWindowSystemUiVisiblityChanged(mAttachInfo.mSystemUiVisibility);
            return true;
        }
    }
    return false;
}
如何获取需要消费的WindowInsets
前面说的消费的WindowInsets 是怎么来的呢?其实是ViewRootImpl在relayout的时候请求WMS进行计算出来的,计算成功后保存到mAttachInfo中,并不为APP所控制。这里的contentInsets作为systemInsets
ViewRootImpl.java
    int relayoutResult = mWindowSession.relayout(
            mWindow, mSeq, params,
            (int) (mView.getMeasuredWidth() * appScale + 0.5f),
            (int) (mView.getMeasuredHeight() * appScale + 0.5f),
            viewVisibility, insetsPending ? WindowManagerGlobal.RELAYOUT_INSETS_PENDING : 0,
            mWinFrame, mPendingOverscanInsets, mPendingContentInsets, mPendingVisibleInsets,
            mPendingStableInsets, mPendingOutsets, mPendingBackDropFrame, mPendingConfiguration,
            mSurface);
WindowManagerService.java
public int relayoutWindow(Session session, IWindow client, int seq,
        WindowManager.LayoutParams attrs, int requestedWidth,
        int requestedHeight, int viewVisibility, int flags,
        Rect outFrame, Rect outOverscanInsets, Rect outContentInsets,
        Rect outVisibleInsets, Rect outStableInsets, Rect outOutsets, Rect outBackdropFrame,
        Configuration outConfig, Surface outSurface) {
最终通过WindowManagerService获取对应的Insets,其实是存在WindowState中的。这里不再深入,有兴趣自己学习。
为何windowTranslucentStatus与statusBarColor不能同时生效
Android4.4的时候,加了个windowTranslucentStatus属性,实现了状态栏导航栏半透明效果,而Android5.0之后以上状态栏、导航栏支持颜色随意设定,所以,5.0之后一般不需要使用windowTranslucentStatus,而且设置状态栏颜色与windowTranslucentStatus是互斥的。所以,默认情况下android:windowTranslucentStatus是false。也就是说:'windowTranslucentStatus'和'windowTranslucentNavigation'设置为true后就再设置'statusBarColor'和'navigationBarColor'就没有效果了。。
原因是在decorview添加状态栏view时有如下判断:
 boolean show = state.present
                && (color & Color.BLACK) != 0
                && ((mWindow.getAttributes().flags & state.translucentFlag) == 0  || force);
可以看到,添加背景View有一个必要条件
(mWindow.getAttributes().flags & state.translucentFlag) == 0
也就是说一旦设置了
    <item name="android:windowTranslucentStatus">true</item>
    <item name="android:windowTranslucentNavigation">true</item>
相应的状态栏或者导航栏的颜色设置就不在生效。不过它并不影响fitSystemWindow的逻辑。
总结
- 状态栏与导航栏颜色的设置与其显示隐藏有关系,一旦隐藏,设置颜色就无效,并且颜色是通过向DecorView根布局addView的方式来实现的。
- 默认样式下DecorView消费导航栏,利用其内部Content的Margin来实现
- fitsysytemwindow与UI的content的扩展有关系,如果设置了全屏之类的属性,WindowsInsets一定留给子View消费
- Translucent与设置颜色互斥,但是与fitSystemWindow不互斥
- 设置颜色与扩展布局是不互斥的两种操作
- fitSystemWindow只会通过padding方式来消费WindowInsets