1. 简介
Linux通用的SCSI 目标子系统(SCST)是一个为Linux SCSI目标子系统的另一种实现。它是由英国著名存储开发团队ID7研发,目前由SanDisk管理(收购了Fusion IO)。它的出现要早于LIO,功能也比LIO完善,目前的用户是许多提供存储解决方案的大公司如EMC,IBM,HP采用。它提供Linux内核之间和处理和SCSI目标驱动程序的统一的,一致的接口,同时提供Linux内核与存储后端句柄连接,连接真实或模拟的存储后端与目标驱动程序。SCST支持主流的SCSI数据传输方式,包括光纤通道,iSCSI,SAS,InfiniBand和并行(宽)的SCSI。
2. 架构
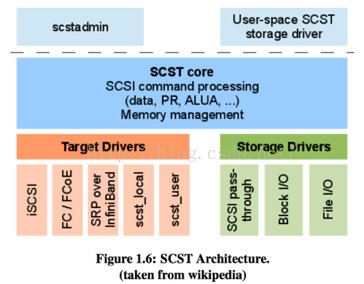

虚线上方主要是用户态管理工具,scst core实现在内核中,中间蓝色为核心子系统(位于SCSI top layer),其代码框架设计合理,将target具体驱动封装成可注册的插件驱动,如我们经常会用到的就是iscsi-scst插件,通过这个驱动程序我们可以在以太网上做iscsi协议的访问,即iscsi over tcp/ip,后续会继续分析initiator端开源驱动open-iscsi,再详细介绍iscsi协议。
同时,除了必备的target插件驱动,scst内核核心系统也支持了几个存储设备驱动,从外部使用上就是我们经常在配置scsi设备导出时可选择的导出方式,比如blockio 或者 fileio导出,或者 pass through,这几种导出方式在scst 内核其实是由几个专用的存储驱动完成的,它们也实现为可注册插件的形式。
SCST core:实现了协议无关的SCSI处理功能。
Target drivers:实现了SCSI协议的传输层功能。
Storage drivers:实现了SCST的后端存储驱动
3. 安装、使用和配置
3.1 安装
1)下载源码,因为scst的代码使用svn托管在sourceforge上,所以需要安装svn软件
svn co https://scst.svn.sourceforge.net/svnroot/scst/trunk scst
2)准备kernel,因为scst没有加入到linux的内核中,所以为了达到很好的性能,需要在向内核中打入scst自己的patch并重新编译内核。
-
-
-
-
-
Select Networking support -> Networking options -> TCP/IP networking
-
Select Networking support -> Networking options -> TCP/IP zero-copy transfer completion notification
-
Select Device Drivers -> SCSI device support -> SCSI disk support
-
Select Enable the block layer -> IO Schedulers -> CFQ I/O Scheduler
-
Set Enable the Block layer -> IO Schedulers -> Default I/O Scheduler to 'CFQ'
-
Set Processor type and features -> Preemption Model to 'No Forced Preemption (Server)'
-
-
-
-
-
-
3)编译安装
-
# make 2perf
-
# make scst scst_install -j24
-
# make iscsi iscsi_install -j24
-
# make scstadm scstadm_install -j24
-
<pre name="code" class="plain">
-
-
-
-
-
isert_scst 51996 4
-
iscsi_scst 92286 5 isert_scst
-
scst_vdisk 93522 0
-
scst 869809 2 iscsi_scst,scst_vdisk
-
rdma_cm 44234 2 isert_scst,ib_iser
-
ib_core 88413 7 isert_scst,ib_iser,rdma_cm,ib_cm,iw_cm,ib_sa,ib_mad
-
libcrc32c 12644 4 iscsi_scst,scst_vdisk,dm_persistent_data,xfs
-
1a) 创建block设备
-
scstadmin -open_dev disk03 -handler vdisk_blockio -attributes filename=/dev/sdc1
-
1b) 创建target
-
scstadmin -add_target iqn.2011-08.nl.feka:storage.vdisk1 -driver iscsi
-
1c) 创建lun
-
scstadmin -add_lun 0 -driver iscsi -target iqn.2011-08.nl.feka:storage.vdisk1 -device disk03
-
1d) 启动target
-
scstadmin -enable_target iqn.2011-08.nl.feka:storage.vdisk1 -driver iscsi
-
1e) 使用iscsi driver
-
scstadmin -set_drv_attr iscsi -attributes enabled=1
-
1f) 写入配置文件
-
scstadmin -write_config /etc/scst.conf
2)通过配置文件配置
# cat /etc/scst.conf
-
HANDLER vdisk_blockio {
-
DEVICE disk01 {
-
filename /dev/iscsilun/iscsilun0
-
}
-
DEVICE disk02 {
-
filename /dev/iscsilun/iscsilun1
-
}
-
}
-
TARGET_DRIVER iscsi {
-
enabled 1
-
TARGET iqn.2007-05.com.example:storage.disk1.scst.jevon {
-
LUN 0 disk01
-
LUN 1 disk02
-
enabled 1
-
}
-
}
-
# /etc/init.d/scst start
-
# iscsi-scstd
注意如果改变了scst的配置一定要重启scst。
3.3 使用
按照以上的配置,你可以得到一个iscsi target。通过iscsiadm就可以访问这个target,具体访问方式在之前的文章已经介绍过,这里就不再赘述了。