a 安装
[root@localhost ~]# yum -y install gcc automake autoconf libtool make
yum install gcc gcc-c++

安装pcre
cd /usr/local/src
wget    https://netix.dl.sourceforge.net/project/pcre/pcre/8.40/pcre-8.40.tar.gz
tar -zxvf pcre-8.40.tar.gz
cd pcre-8.40
./configure
make && make install

安装zlib

cd /usr/local/src
wget http://zlib.net/zlib-1.2.11.tar.gz      wget  http://www.zlib.net/zlib-1.2.11.tar.gz
tar -zxvf zlib-1.2.11.tar.gz
cd zlib-1.2.11
./configure
make && make install
yum install -y zlib zlib-devel

安装openssl
cd /user/local/scr
wget https://www.openssl.org/source/openssl-1.0.1t.tar.gz
tar -zxvf openssl-1.0.1t.tar.gz


安装nginx
cd /user/local/scr
wget http://nginx.org/download/nginx-1.1.10.tar.gz
tar zxvf nginx-1.1.10.tar.gz
cd nginx-1.1.10
./configure
make && make install
启动nginx
/usr/local/nginx/sbin/nginx -c /usr/local/nginx/conf/nginx.conf

cd ~
开启端口
firewall-cmd --zone=public --add-port=80/tcp --permanent
[root@localhost ~]# systemctl stop firewalld.service
[root@localhost ~]# systemctl start firewalld.service


firewall-cmd --zone=public --add-port=80/tcp --permanent

systemctl stop firewalld.service
systemctl start firewalld.service
搭建负载均衡
准备两台计算机:
nginx1 192.168.142.131 作为nginx的负载均衡器
nginx2 192.168.142.135 web服务,提供一个页面
1.配置web页面
vim /usr/local/nginx/html
然后启动nginx
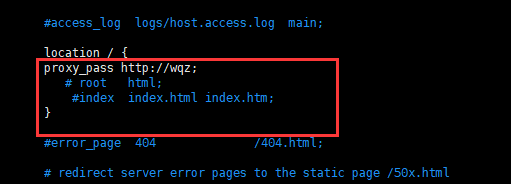
2. 准备负载均衡器,修改以下配置
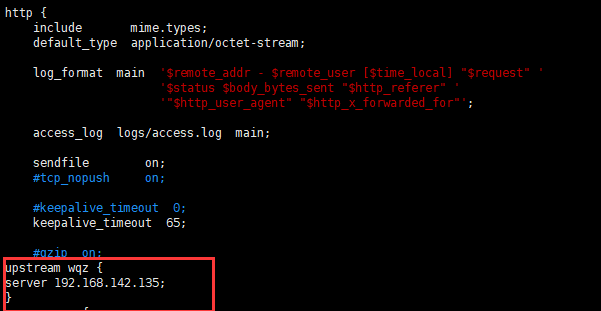
做反向代理
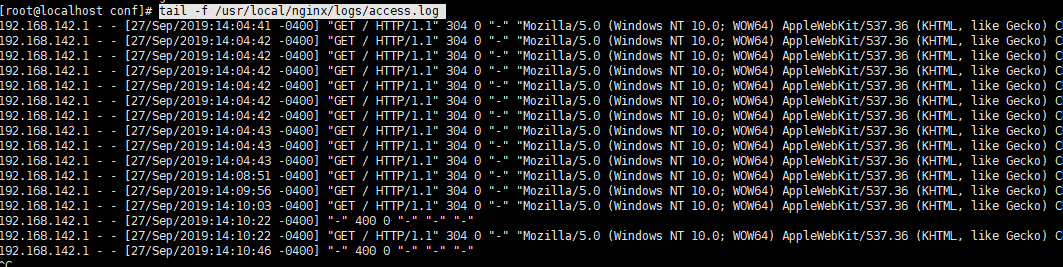
分别在负载均衡器和web页面开启日志查看
tail -f /usr/local/nginx/logs/access.log

备注:
负载均衡的算法有
			调度算法      概述
			轮询        按时间顺序逐一分配到不同的后端服务器(默认)
			weight       加权轮询,weight值越大,分配到的访问几率越高
			ip_hash      每个请求按访问IP的hash结果分配,这样来自同一IP的固定访问一个后端服务器
			url_hash      按照访问URL的hash结果来分配请求,是每个URL定向到同一个后端服务器
			least_conn    最少链接数,那个机器链接数少就分发

			1.轮询(不做配置,默认轮询)

			2.weight权重(优先级)

			3.ip_hash配置,根据客户端ip哈希分配,不能和weight一起用