1.Spring核心复习:控制反转和动态代理
a) IOC:因为之前使用对象必须创建,运用了Spring之后,就不用再创建,直接依赖注入就行了.
b) AOP: 就是不影响正常执行过程的前后加入额外的逻辑。比如权限,日志等,该执行的业务逻辑正常执行知识可以进行权限的判断核日志记录。
2.Spring注解编程IOC:不用在配置文件里面进行bean的配置,直接使用注解a)@Configuration:加了这个注解的类就相当于传统的一个applicationContext-xxx.xml
@Bean:在标注了@Configuration的类里面的方式上面打上@bean就相当于在applicationContext-xxx.xml配置的一个<bean id=”userDao” class=”cn.itsource.dao.UserDao”>
Dao的名字默认就是方法名,如果想改方法名使用@Bean(“beanName”)
测试:
//2 注解方式不需要配置文件,那bean怎么配置呢? 获取容器的时候原来制定配置文件,现在制定配置类
ApplicationContext context = new AnnotationConfigApplicationContext
(MainConfig.class);
UserDao userDao = context.getBean(UserDao.class);
System.out.println(userDao.loadUser(1L));
String[] beanNamesForType = context.getBeanNamesForType(UserDao.class);
for (String beanName : beanNamesForType) {
System.out.println(beanName);
}
a) @ComponentScan扫描bean
- i. 我们原来使用Spring不用在XML里面一个一个的配置bean,而是在类上打上@Controller,@service,@Repository,然后在在配置文件配置一个包扫描<context:component-scan base-package="cn.itsource"/>里面的所有bean.
- ii. 注意如果配置了自动扫描(@ComponentScan扫描bean),就不用在config里面使用@bean了. @ComponentScan默认是扫同包及子包的类上的@Commpont,@Service,@Controller注解,
b) @ ComponentScans高级语法
c) @ComponentScans(value = {
@ComponentScan(
value = "cn.itsource"
// ,excludeFilters = { //排除 //excludeFilters = Filter[] 排除过滤器
// @ComponentScan.Filter(type = FilterType.ANNOTATION
// ,classes = {Controller.class})
// }
,includeFilters = {//includeFilters = Filter[] 包含过滤器
@ComponentScan.Filter(type = FilterType.ANNOTATION,classes = {
Controller.class
})
}
,useDefaultFilters = false //关闭默认全部扫描includeFilters才能生效
)
})
d) @Import注解:作用就是一个配置类引用另一个配置类的信息
- i. @Import(配置类的字节码对象)
- ii. 传入MyImportSelector自定义类实现ImportSelector的实现类的字节码对象
- iii. 传入MyImportBeanDefinitionRegistrar自定义类实现ImportBeanDefinitionRegistrar接口,
e) FactoryBean方式注册bean
- i. 自定义类实现FactoryBean<Person>接口,
- ii. 在配置类里面配置
//注解类==配置文件
@Configuration //告诉spring这是一个注解类
@Import({RedColor.class, GreenColor.class, MyImportSelector.class, MyImportBeanDefinitionRegistrar.class})
public class MainConfig {
@Bean
public PersonFactoryBean personFactoryBean(){
return new PersonFactoryBean();
}
}
f) @Condition注解
- i. 自定义类实现Condition接口
总结:创建bean的方式
方式1:@ComponentScan+注解(@Controller+@Service+@Repository+@Compont)-自己创建的bean
方式2:@Bean 别人的bean
方式3:@Import(快速向容器中注册一个bean)
1)@Import(要导入的组件),名称就是累的全限定名
2)ImportSelector:导入选择器,返回需要导入组件类的全限定名数组-springboot底层用的多
3)ImportBeanDefinitionRegistrar:通过bean定义注册器手动项目spring中容器中注册
方式4:FactoryBean的方式,返回的是getObject的类实例-和其他框架集成是用的多
3.SpringBoot入门
a) 创建项目,到入依赖包
<parent>
artifactId>springboot_parent</artifactId>
<groupId>cn.itsource.springboot</groupId>
<version>1.0-SNAPSHOT</version>
</parent>
<dependencies>
<dependency>
<groupId>org.springframework.boot</groupId>
<artifactId>spring-boot-starter-web</artifactId>
</dependency>
</dependencies>
b) 创建启动类
import org.springframework.boot.*;
import org.springframework.boot.autoconfigure.*; import org.springframework.stereotype.*;
import org.springframework.web.bind.annotation.*;
@RestController
@EnableAutoConfiguration //开启自动配置功能的注解//@SpringBootApplication比@ EnableAutoConfiguration強
public class Example {
@RequestMapping("/hello")
public String home(){
return "Hello World!";
}
//启动类
public static void main(String[] args) throws Exception {
SpringApplication.run(Example.class, args);//启动Springboot应用
}
}
页面访问:localhost:8080/hello
输出 hello word.
a):pom文件理解
1.父模块: spring-boot-starter-parent依赖spring-boot-dependencies
2.启动器模块: spring-boot-starter-web依赖spring-boot-starters模块
b):@SpringBootApplication:主配置类注解@SpringBootConfiguration:Springboot配置类
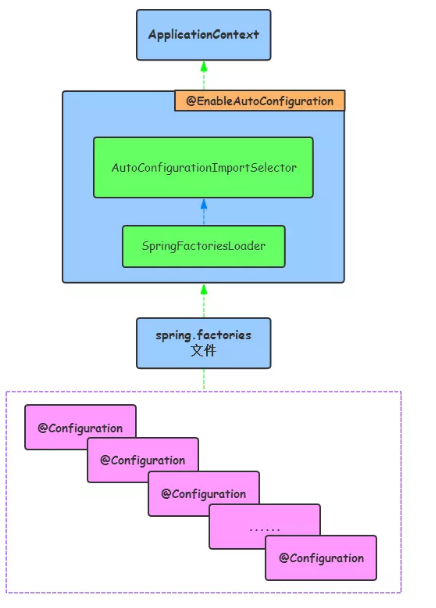
@EnableAutoConfiguration:开启自动配置注解功能

@ComponentScan;扫描包注解
 启动类执行的流程:@ SpringBootApplication-->
@EnableAutoConfiguration--> @Import({AutoConfigurationImportSelector.class})选择器选择是根据是哪一个选择器运行的
Springboot的执行流程
启动:
每个SpringBoot程序都有一个主入口,也就是main方法,main里面调用SpringApplication.run()启动整个spring-boot程序,该方法所在类需要使用@SpringBootApplication注解,以及@ImportResource注解(if need),@SpringBootApplication包括三个注解,功能如下:@EnableAutoConfiguration:SpringBoot根据应用所声明的依赖来对Spring框架进行自动配置
@SpringBootConfiguration(内部为@Configuration):被标注的类等于在spring的XML配置文件中(applicationContext.xml),装配所有bean事务,提供了一个spring的上下文环境
@ComponentScan:组件扫描,可自动发现和装配Bean,默认扫描SpringApplication的run方法里的Booter.class所在的包路径下文件,所以最好将该启动类放到根包路径下
1.首先进入run方法,在run方法中去创建了一个SpringApplication实例,在该构造方法内,我们可以发现其调用了一个初始化的initialize方法