1、Hibernate的原理
1.通过Configuration().configure(); 读取并解析hibernate.cfg.xml配置文件
2.由hibernate.cfg.xml中的<mapping resource="com/xxx/xxx/Student.hbm.xml"/>读取并解析映射信息
3.通过configure().buildSessionFactory(); //创建SessionFactory
4.sessionFactory.openSession(); //打开Sesssion
5.session.beginTransaction(); //创建事务Transation
6.persistent operate 持久化操作
7.session.getTransaction().commit(); //提交事务
8.session.close(); //关闭Session
9.sessionFactory.close(); //关闭SesstionFactory
2、实例
本实例所用到的jar包:Hibernate的基础常用包和连接MySQL数据库的常用包
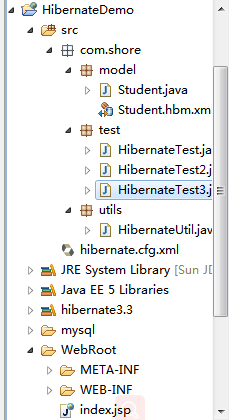
2.1、首先创建一个Student实体
 1 package com.shore.model;
 2
 3 /**
 4  * @author DSHORE/2019-9-8
 5  *
 6  */
 7 public class Student {
 8     private Integer id;
 9     private String name;
10     private String number;
11     private String idCard;
12     private Boolean sex;
13
14     public Student(){
15
16     }
17     public Student(Integer id, String name, String number, String idCard,
18             Boolean sex) {
19         super();
20         this.id = id;
21         this.name = name;
22         this.number = number;
23         this.idCard = idCard;
24         this.sex = sex;
25     }
26
27     public Integer getId() {
28         return id;
29     }
30     public void setId(Integer id) {
31         this.id = id;
32     }
33     public String getName() {
34         return name;
35     }
36     public void setName(String name) {
37         this.name = name;
38     }
39     public String getNumber() {
40         return number;
41     }
42     public void setNumber(String number) {
43         this.number = number;
44     }
45     public String getIdCard() {
46         return idCard;
47     }
48     public void setIdCard(String idCard) {
49         this.idCard = idCard;
50     }
51     public Boolean getSex() {
52         return sex;
53     }
54     public void setSex(Boolean sex) {
55         this.sex = sex;
56     }
57 }
2.2、配置 Student 实体在数据库表的映射 student.hbm.xml 文件(创建在和Student实体类同一级目录下)
 1 <?xml version="1.0"?>
 2 <!DOCTYPE hibernate-mapping PUBLIC
 3         "-//Hibernate/Hibernate Mapping DTD 3.0//EN"
 4         "http://www.hibernate.org/dtd/hibernate-mapping-3.0.dtd">
 5
 6 <hibernate-mapping package="com.shore.model">
 7     <class name="Student" table="student">   <!-- table="student"可以省略 -->
 8         <id name="id" column="id">   <!-- column="id"可以省略 -->
 9             <generator class="native"/>
10         </id>
11         <property name="name" column="name" type="java.lang.String"/> <!-- column="name"可以省略 -->
12         <property name="number" column="number" type="java.lang.String"/>
13         <property name="idCard" column="idCard" type="java.lang.String"/>
14         <property name="sex" column="sex" type="java.lang.Boolean"/>
15     </class>
16 </hibernate-mapping>
17
18 <!-- 注意:
19         1、如果classname和tablename一样,可以省略tablename。
20         2、如果class字段名和table字段名一样,可以省略table字段名。
21         3、如果要使用自增长,那么<generator class="native"/>和建表脚本的主键的aotu-increment,都不能省略。
22 -->
2.3、配置 hibernate.cfg.xml 文件(创建在和src同一级目录下),这个文件名可以随便修改(xxx.cfg.xml),但是没多大意义,一般不建议修改。
 1 <?xml version='1.0' encoding='utf-8'?>
 2 <!DOCTYPE hibernate-configuration PUBLIC
 3         "-//Hibernate/Hibernate Configuration DTD 3.0//EN"
 4         "http://www.hibernate.org/dtd/hibernate-configuration-3.0.dtd">
 5
 6 <hibernate-configuration>
 7     <session-factory>
 8         <!-- Database connection settings -->
 9         <property name="connection.driver_class">com.mysql.jdbc.Driver</property>
10         <property name="connection.url">jdbc:mysql://localhost:3306/school</property>
11         <property name="connection.username">root</property>
12         <property name="connection.password">root</property>
13
14         <!-- JDBC connection pool (use the built-in) -->
15         <!-- <property name="connection.pool_size">1</property> -->
16
17         <!-- SQL dialect -->   <!-- 方言 (MySQL、Oracle等数据库/语言)-->
18         <property name="dialect">org.hibernate.dialect.MySQLDialect</property>
19
20         <!-- Enable Hibernate's automatic session context management -->
21         <!-- <property name="current_session_context_class">thread</property> -->
22
23         <!-- Disable the second-level cache  -->
24         <property name="cache.provider_class">org.hibernate.cache.NoCacheProvider</property>
25
26         <!-- Echo all executed SQL to stdout -->
27         <property name="show_sql">true</property>
28
29         <!-- Drop and re-create the database schema on startup -->
30         <property name="hbm2ddl.auto">update</property>
31
32         <mapping resource="com/shore/model/Student.hbm.xml"/>  <!-- 从这里读取指定实体类和数据库表的映射关系 -->
33     </session-factory>
34 </hibernate-configuration>
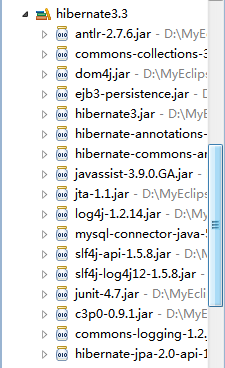 这里面的jar包,有些用不到
到此为止,Hibernate的简单配置已经基本完成,下面,我们来添加一个测试类,看看测试是否成功
当我们在写项目的时候,要测试的东西可能不止一个,我们把重复部分 封装起来:
 1 package com.shore.utils;
 2
 3 import org.hibernate.SessionFactory;
 4 import org.hibernate.cfg.Configuration;
 5
 6 /**
 7  * @author DSHORE/2019-9-8
 8  *
 9  */
10 //创建session工厂
11 public class HibernateUtil {
12     private static final SessionFactory sessionFactory = buildSessionFactory();
13
14     private static SessionFactory buildSessionFactory() {
15         try {
16             // 创建Configuration对象去读取hibernate.cfg.xml配置文件,并创建一个session工厂出来
17             return new Configuration().configure().buildSessionFactory();
18         } catch (Throwable e) {
19             // 将异常打印到控台
20             System.err.println("初始化sessionFactory创建失败:" + e);
21             throw new ExceptionInInitializerError(e);
22         }
23     }
24
25     public static SessionFactory getSessionFactory() {
26         return sessionFactory;
27     }
28 }
下面开始测试:
 1 package com.shore.test;
 2
 3 import org.hibernate.Session;
 4 import org.hibernate.SessionFactory;
 5 import org.hibernate.Transaction;
 6 import org.junit.Test;
 7
 8 import com.shore.model.Student;
 9 import com.shore.utils.HibernateUtil;
10
11
12 /**
13  * @author DSHORE/2019-9-8
14  *
15  */
16 public class HibernateTest {
17     @Test
18     public void testStudent() {
19         // 1、创建session工厂(获取HibernateUtil类里面创建好的session工厂)
20         SessionFactory sessionFactory = HibernateUtil.getSessionFactory();
21         // 2、打开一个session
22         Session session = sessionFactory.openSession();
23         // 3、开启事务
24         Transaction transaction = session.beginTransaction();
25
26     /********************************** 第四步测试操作的内容  *****************************/
27         /**
28          *4、 持久化操作
29          *
30          * 更新(保存/修改)
31          * session.update(student);
32          * session.save(student);
33          * session.saveOrUpdate(student)
34          * student的id是否给定了,如果给了id,执行update;如果没有给id,执行save  //即:修改数据用update,保存/插入数据用save
35          */
36         Student student = new Student(null, "zhangsan", "654321", "4201011995687657612", false);
37         session.save(student);//向学生表中插入数据
38         //session.update(student);//根据id修改学生表中的数据
39
40     /********************************** 第四步测试操作的内容  *****************************/
41         // 5、事务提交
42         transaction.commit();
43         // 6、关闭session
44         session.close();
45         // 7、关闭session工厂
46         sessionFactory.close();
47     }
48 }
测试成功(且数据库内已成功插入数据):

附录
上面的实例测试步骤,如果不封装,可以这样测试
 1 package com.shore.test;
 2
 3 import org.hibernate.Session;
 4 import org.hibernate.SessionFactory;
 5 import org.hibernate.Transaction;
 6 import org.hibernate.cfg.Configuration;
 7 import org.junit.Test;
 8
 9 import com.shore.model.Student;
10
11 /**
12  * @author DSHORE/2019-9-8
13  *
14  */
15 public class HibernateTest3 {
16     private static SessionFactory sessionFactory = new Configuration().configure(
17             "hibernate.cfg.xml").buildSessionFactory();//读取配置文件并创建一个session工厂
18
19     @Test
20     public void addStudent() {
21         Session session = null;
22         Transaction tran = null;
23         try {
24             session = sessionFactory.openSession(); // 打开一个Session
25             tran = session.beginTransaction(); // 开启事务
26
27             //持久化操作
28             Student student = new Student(3, "zhangsan", "88888888","110000234632432", true);
29             session.save(student);
30
31             tran.commit();// 事务提交
32         } catch (Exception e) {
33             tran.rollback(); // 事务回滚
34             throw new ExceptionInInitializerError(e);
35         } finally {
36             session.close(); // 关闭session
37         }
38     }
39 }
或者这样:
 1 package com.shore.test;
 2
 3 import org.hibernate.Session;
 4 import org.hibernate.SessionFactory;
 5 import org.hibernate.Transaction;
 6 import org.hibernate.cfg.Configuration;
 7 import org.junit.Test;
 8
 9 import com.shore.model.Student;
10
11 /**
12  * @author DSHORE/2019-9-8
13  *
14  */
15 public class HibernateTest2 {
16     @Test
17     public void addStudent2() {
18         //创建一个Configuration对象
19         Configuration configuration = new Configuration();
20         //读取Hibernate.cfg.xml配置文件
21         configuration.configure();
22         //创建SessionFactory
23         SessionFactory sessionFactory = configuration.buildSessionFactory();
24         //创建Session
25         Session session = sessionFactory.openSession();
26         //开启事务
27         Transaction transaction = session.beginTransaction();
28         /**
29          * 执行一个具体的mysql操作
30          */
31         Student student = new Student(1, "sange", "666666", "110000234632432", false);
32         session.update(student);
33
34         transaction.commit();
35         session.close();
36         sessionFactory.close();
37     }
38 }
以下代码是上面实例测试步骤的拓展:
 1 package com.shore.test;
 2
 3 import java.util.List;
 4
 5 import org.hibernate.Criteria;
 6 import org.hibernate.Session;
 7 import org.hibernate.SessionFactory;
 8 import org.hibernate.Transaction;
 9 import org.hibernate.criterion.Restrictions;
10 import org.junit.Test;
11
12 import com.shore.model.Student;
13 import com.shore.utils.HibernateUtil;
14
15
16 /**
17  * @author DSHORE/2019-9-8
18  *
19  */
20 public class HibernateTest {
21     @Test
22     public void testStudent() {
23         // 1、创建session工厂(获取HibernateUtil类里面创建好的session工厂)
24         SessionFactory sessionFactory = HibernateUtil.getSessionFactory();
25         // 2、打开一个session
26         Session session = sessionFactory.openSession();
27         // 3、开启事务
28         Transaction transaction = session.beginTransaction();
29
30     /********************************** 第四步测试操作的内容  *****************************/
31         /**
32          * 4、 持久化操作
33          *
34          * 更新(保存/修改)
35          * session.update(student);
36          * session.save(student);
37          * session.saveOrUpdate(student)
38          * student的id是否给定了,如果给了id,执行update;如果没有给id,执行save  //即:修改数据用update,保存/插入数据用save
39          */
40         Student student = new Student(null, "zhangsan", "654321", "4201011995687657612", false);
41         session.save(student);//向学生表中插入数据
42         //session.update(student);//根据id修改学生表中的数据
43
44         /**
45          * 查询(根据主键查询)  lazy
46          */
47         session.get(Student.class, 1);
48         student = (Student) session.load(Student.class, 1); //懒加载
49         System.out.println(student);
50
51         //Criteria查询全部
52         Criteria criteria = session.createCriteria(String.class);
53         List<Student> students = criteria.list();  //listAll
54
55         //Criteria根据条件查询
56         criteria.add(Restrictions.eq("id",1));
57
58     /********************************** 第四步测试操作的内容  *****************************/
59         // 5、事务提交
60         transaction.commit();
61         // 6、关闭session
62         session.close();
63         // 7、关闭session工厂
64         sessionFactory.close();
65     }
66 }
| 原创作者:DSHORE 作者主页:http://www.cnblogs.com/dshore123/ 原文出自:https://www.cnblogs.com/dshore123/p/11488911.html 欢迎转载,转载务必说明出处。(如果本文对您有帮助,可以点击一下右下角的 推荐,或评论,谢谢!) |