Spark Streaming通过push模式和pull模式两种模式来集成Flume
push模式:Spark Streaming端会启动一个基于Avro Socket Server的Receiver来接收Flume中的avro sink发来的数据,这个时候Flume avro sink就是作为客户端
pull模式:这种模式是Spark自定义了一个Flume的sink作为Avro Server,flume收集到的数据发往这个sink,然后数据存储在这个sink的缓存中,然后Spark Streaming启动包含有Avro Client的Recevier从自定义的Flume的sink中拉取数据。相对于push模式,这种模式更加的可靠不会丢失数据,这个是因为以下两点原因:
1、pull模式的Receiver是一个可靠的Receiver,就是这个Receiver接收到了数据,并且将这个数据存储并且备份了后会发送一个ack响应给Flume的sink
2、结合Flume的事务特性,保证了数据不会丢失,一定会拉取到数据,如果没有拉取成功的话(就是Flume Sink没有接收到Receiver发送的ack),则事务失败
4个demo看懂Flume
1、netcat数据展示到console
bin/flume-ng agent --conf conf --conf-file conf/flume-conf.properties --name agent1 -Dflume.root.logger=INFO,console
## 定义 sources、channels 以及 sinks
agent1.sources = netcatSrc
agent1.channels = me moryChannel
agent1.sinks = loggerSink

## netcatSrc 的配置
agent1.sources.netcatSrc.type = netcat
agent1.sources.netcatSrc.bind = localhost
agent1.sources.netcatSrc.port = 44445

## loggerSink 的配置
agent1.sinks.loggerSink.type = logger

## memoryChannel 的配置
agent1.channels.memoryChannel.type = memory
agent1.channels.memoryChannel.capacity = 100

## 通过 memoryChannel 连接 netcatSrc 和 loggerSink
agent1.sources.netcatSrc.channels = memoryChannel
agent1.sinks.loggerSink.channel = memoryChannel
2、netcat数据保存到HDFS,分别使用memory和file channal
bin/flume-ng agent --conf conf --conf-file conf/flume-conf.properties --name agent1
telnet localhost 44445
## 定义 sources、channels 以及 sinks
agent1.sources = netcatSrc
agent1.channels = memoryChannel
agent1.sinks = hdfsSink

## netcatSrc 的配置
agent1.sources.netcatSrc.type = netcat
agent1.sources.netcatSrc.bind = localhost
agent1.sources.netcatSrc.port = 44445

## hdfsSink 的配置
agent1.sinks.hdfsSink.type = hdfs
agent1.sinks.hdfsSink.hdfs.path = hdfs://master:9999/user/hadoop-twq/spark-course/steaming/flume/%y-%m-%d
agent1.sinks.hdfsSink.hdfs.batchSize = 5
agent1.sinks.hdfsSink.hdfs.useLocalTimeStamp = true

## memoryChannel 的配置
agent1.channels.memoryChannel.type = memory
agent1.channels.memoryChannel.capacity = 100

## 通过 memoryChannel 连接 netcatSrc 和 hdfsSink
agent1.sources.netcatSrc.channels = memoryChannel
agent1.sinks.hdfsSink.channel = memoryChannel
3、日志文件数据保存到HDFS
bin/flume-ng agent --conf conf --conf-file conf/flume-conf.properties --name agent1
echo testdata >> webserver.log
## 定义 sources、channels 以及 sinks
agent1.sources = logSrc
agent1.channels = fileChannel
agent1.sinks = hdfsSink

## logSrc 的配置
agent1.sources.logSrc.type = exec
agent1.sources.logSrc.command = tail -F /home/hadoop-twq/spark-course/steaming/flume-course/demo3/logs/webserver.log

## hdfsSink 的配置
agent1.sinks.hdfsSink.type = hdfs
agent1.sinks.hdfsSink.hdfs.path = hdfs://master:9999/user/hadoop-twq/spark-course/steaming/flume/%y-%m-%d
agent1.sinks.hdfsSink.hdfs.batchSize = 5
agent1.sinks.hdfsSink.hdfs.useLocalTimeStamp = true

## fileChannel 的配置
agent1.channels.fileChannel.type = file
agent1.channels.fileChannel.checkpointDir = /home/hadoop-twq/spark-course/steaming/flume-course/demo2-2/checkpoint
agent1.channels.fileChannel.dataDirs = /home/hadoop-twq/spark-course/steaming/flume-course/demo2-2/data

## 通过 fileChannel 连接 logSrc 和 hdfsSink
agent1.sources.logSrc.channels = fileChannel
agent1.sinks.hdfsSink.channel = fileChannel
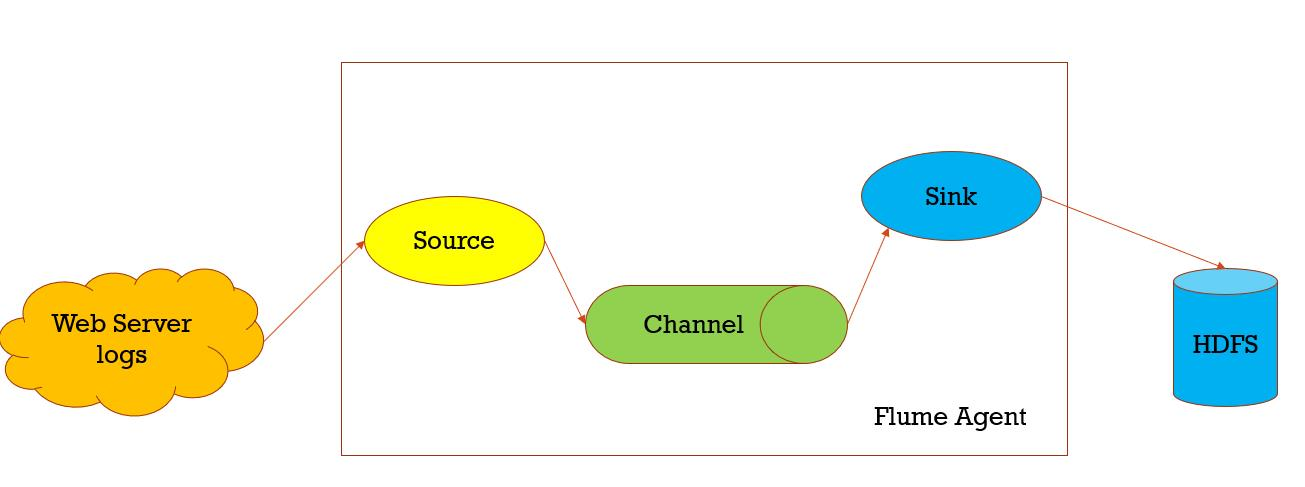
数据收集,从一个数据源经过channels,Sink到存储结构上,以event的方式发送

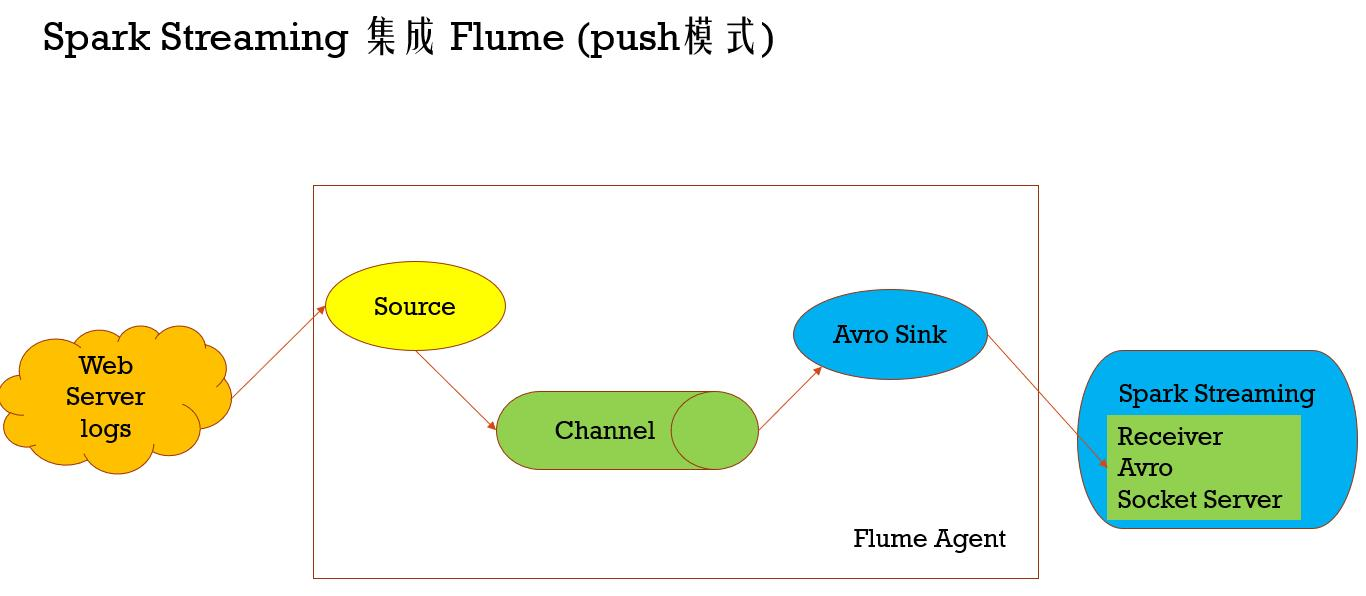
Spark Streaming 集成 Flume (push模式)
Spark Streaming通过push模式和pull模式两种模式来集成Flume
push模式:Spark Streaming端会启动一个基于Avro Socket Server的Receiver来接收Flume中的avro sink发来的数据,这个时候Flume avro sink就是作为客户端
pull模式:这种模式是Spark自定义了一个Flume的sink作为Avro Server,flume收集到的数据发往这个sink,然后数据存储在这个sink的缓存中,然后Spark Streaming启动包含有Avro Client的Recevier从自定义的Flume的sink中拉取数据。相对于push模式,这种模式更加的可靠不会丢失数据,这个是因为以下两点原因:
1、pull模式的Receiver是一个可靠的Receiver,就是这个Receiver接收到了数据,并且将这个数据存储并且 备份了后会发送一个ack响应给Flume的sink
2、结合Flume的事务特性,保证了数据不会丢失,一定会拉取到数据,如果没有拉取成功的话(就是Flume Sink没有接收到Receiver发送的ack),则事务失败
import org.apache.spark.SparkConf
import org.apache.spark.storage.StorageLevel
import org.apache.spark.streaming._
import org.apache.spark.streaming.dstream.DStream
import org.apache.spark.streaming.flume._
import org.apache.spark.util.IntParam

/**
 *  Produces a count of events received from Flume.
 *
 *  This should be used in conjunction with an AvroSink in Flume. It will start
 *  an Avro server on at the request host:port address and listen for requests.
 *  Your Flume AvroSink should be pointed to this address.
 *
  * Flume-style Push-based Approach(Spark Streaming作为一个agent存在)
  *
  * 1、在slave1(必须要有spark的worker进程在)上启动一个flume agent
  * bin/flume-ng agent -n agent1 -c conf -f conf/flume-conf.properties
  *
  * 2、启动Spark Streaming应用
 spark-submit --class com.twq.streaming.flume.FlumeEventCountPushBased \
 --master spark://master:7077 \
 --deploy-mode client \
 --driver-memory 512m \
 --executor-memory 512m \
 --total-executor-cores 4 \
 --executor-cores 2 \
 /home/hadoop-twq/spark-course/streaming/spark-streaming-datasource-1.0-SNAPSHOT-jar-with-dependencies.jar \
 172.26.232.97 44446

 3、在slave1上 telnet slave1 44445 发送消息
 */
object FlumeEventCountPushBased {
  def main(args: Array[String]) {
    if (args.length < 2) {
      System.err.println(
        "Usage: FlumeEventCount <host> <port>")
      System.exit(1)
    }

    val Array(host, port) = args

    val batchInterval = Milliseconds(2000)

    // Create the context and set the batch size
    val sparkConf = new SparkConf().setAppName("FlumeEventCount")
    val ssc = new StreamingContext(sparkConf, batchInterval)

    // Create a flume stream
    val stream: DStream[SparkFlumeEvent] = FlumeUtils.createStream(ssc, host, port.toInt, StorageLevel.MEMORY_ONLY_SER_2)

    // Print out the count of events received from this server in each batch
    stream.count().map(cnt => "Received " + cnt + " flume events." ).print()

    ssc.start()
    ssc.awaitTermination()
  }
}
扫描二维码关注公众号,回复:
7233685 查看本文章

import org.apache.spark.SparkConf
import org.apache.spark.streaming._
import org.apache.spark.streaming.flume._
import org.apache.spark.util.IntParam

/**
 *  Produces a count of events received from Flume.
 *
 *  This should be used in conjunction with the Spark Sink running in a Flume agent. See
 *  the Spark Streaming programming guide for more details.
 *
  * Pull-based Approach using a Custom Sink(Spark Streaming作为一个Sink存在)
  *
  * 1、将jar包scala-library_2.11.8.jar(这里一定要注意flume的classpath下是否还有其他版本的scala,要是有的话,则删掉,用这个,一般会有,因为flume依赖kafka,kafka依赖scala)、
  * commons-lang3-3.5.jar、spark-streaming-flume-sink_2.11-2.2.0.jar
  * 放置在master上的/home/hadoop-twq/spark-course/streaming/spark-streaming-flume/apache-flume-1.8.0-bin/lib下
  *
  * 2、配置/home/hadoop-twq/spark-course/streaming/spark-streaming-flume/apache-flume-1.8.0-bin/conf/flume-conf.properties
  *
  * 3、启动flume的agent
  * bin/flume-ng agent -n agent1 -c conf -f conf/flume-conf.properties
  *
  * 4、启动Spark Streaming应用
 spark-submit --class com.twq.streaming.flume.FlumeEventCountPullBased \
 --master spark://master:7077 \
 --deploy-mode client \
 --driver-memory 512m \
 --executor-memory 512m \
 --total-executor-cores 4 \
 --executor-cores 2 \
 /home/hadoop-twq/spark-course/streaming/spark-streaming-datasource-1.0-SNAPSHOT-jar-with-dependencies.jar \
 master 44446

 3、在master上 telnet localhost 44445 发送消息

 */
object FlumeEventCountPullBased {
  def main(args: Array[String]) {
    if (args.length < 2) {
      System.err.println(
        "Usage: FlumePollingEventCount <host> <port>")
      System.exit(1)
    }

    val Array(host, port) = args

    val batchInterval = Milliseconds(2000)

    // Create the context and set the batch size
    val sparkConf = new SparkConf().setAppName("FlumePollingEventCount")
    val ssc = new StreamingContext(sparkConf, batchInterval)

    // Create a flume stream that polls the Spark Sink running in a Flume agent
    val stream = FlumeUtils.createPollingStream(ssc, host, port.toInt)

    // Print out the count of events received from this server in each batch
    stream.count().map(cnt => "Received " + cnt + " flume events." ).print()

    ssc.start()
    ssc.awaitTermination()
  }
}