版权声明:本文为博主原创文章,遵循 CC 4.0 BY-SA 版权协议,转载请附上原文出处链接和本声明。
实验环境
- 实验环境非常重要!
所有节点防火墙和SELinux都关闭!

角色			IP			系统版本
master		172.25.5.1	RHEL7
minion		172.25.5.2	CentOS7
所有节点的解析:
- IP尽量用普通IP,不要使用5.5.5.5,1.1.1.1之类的IP
- 我作死使用特殊IP,吃了不少苦头

一、部署Saltstack
1、配置yum源
# cat saltstack.repo
[saltstack-repo]
name=SaltStack repo for Red Hat Enterprise Linux $releasever
baseurl=https://repo.saltstack.com/yum/redhat/$releasever/$basearch/latest
enabled=1
gpgcheck=1
gpgkey=https://repo.saltstack.com/yum/redhat/$releasever/$basearch/latest/SALTSTACK-GPG-KEY.pub
       https://repo.saltstack.com/yum/redhat/$releasever/$basearch/latest/base/RPM-GPG-KEY-CentOS-7
2、解决依赖性
现在安装会出现这样一个报错,也就是缺少依赖性

执行以下命令下载依赖包
# wget ftp://ftp.pbone.net/mirror/ftp5.gwdg.de/pub/opensuse/repositories/home%3A/lenovo-lico%3A/lico-dep%3A/5.1%3A/el7/el7/noarch/python2-futures-3.2.0-4.1.el7.noarch.rpm
将下载好的依赖包安装好即可
# ls
python2-futures-3.2.0-4.1.el7.noarch.rpm
# rpm -vih python2-futures-3.2.0-4.1.el7.noarch.rpm

- 由于所有主机都要装软件,所以以上操作所有主机都需要
3、安装Master和Minion
Master机:
# yum install salt* -y
# systemctl start salt-master
# systemctl enable salt-master
客户机(Minion):
# yum install salt-minion -y
# systemctl start salt-minion.service
# systemctl enable salt-minion.service
4、修改配置文件
所有minion端:
# vim /etc/salt/minion
master: 172.25.5.1						#master端IP
# systemctl restart salt-minion
5、master端连接所有minion端
# salt-key -L				#列表
# salt-key -A				#接收钥匙

- 以下命令可以查看端口的走向
 # yum install lsof -y
 # lsof -i :4505

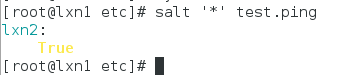
6、测试
# salt '*' test.ping
二、Saltstack实践
1、自动化部署httpd
在master端
1、构建环境
# vim /etc/salt/master
 649    base:							# 设定根目录
 650      - /srv/salt/
# mkdir /srv/salt/						# 创建根目录
# cd /srv/salt/
# mkdir -p  httpd/files			# 在根目录中创建存放httpd部署文件的目录
2、编辑httpd自动化部署设置文件
- 注:编辑配置文件不允许使用TAB键,只能用空格
# cp /etc/httpd/conf/httpd.conf /srv/salt/httpd/files/
# pwd
 /srv/salt/httpd

# vim install.sls
httpd:						#声明,也是服务
  pkg.installed				#安装

# vim service.sls
include:					#与install.sls文件建立联系
  - httpd.install

/etc/httpd/conf/httpd.conf:						#目标文件
  file.managed:									#文件管理
    - source: salt://httpd/files/httpd.conf		#文件源头

httpd-service:
  service.running:				#服务模块
    - name: httpd				#服务名
    - enable: True				#是否开机自启
    - reload: True				#以下文件修改是否重新加载配置文件
      watch:					#监控模块
        - file: /etc/httpd/conf/httpd.conf
3、测试
- 当前目录是啥不重要
- lxn2为主机名
- httpd是目录,service是httpd目录下的文件service.sls的名字
# salt lxn2 state.sls httpd.service

# salt lxn2 cmd.run 'systemctl status httpd'
可以看到httpd服务已经安装成功并启动成功

2、自动化部署keepalive
master端
1、构建环境
# mkdir keepalived
# cd keepalived/
# mkdir files
# pwd
 /srv/salt/keepalived
- 此处我将master端也当作一个minion端了

2、制作 keepalived 的配置文件
# yum install keepalived.x86_64  -y
# mv /etc/keepalived/keepalived.conf /srv/salt/keepalived/files/
3、编辑httpd自动化部署设置文件
# cd files/
# vim keepalived.conf 					#修改并留下以下部分
! Configuration File for keepalived

global_defs {
   notification_email {
        root@localhost
   }
   notification_email_from [email protected]
   smtp_server 127.0.0.1
   smtp_connect_timeout 30
   router_id LVS_DEVEL
}

vrrp_instance VI_1 {
    state {{ STATE }}
    interface eth0
    virtual_router_id {{ VRID }}
    priority {{ PRIORITY}}
    advert_int 1
    authentication {
        auth_type PASS
        auth_pass 1111
    }
    virtual_ipaddress {
        172.25.5.100
    }
}

# cd ..
# vim install.sls
keepalived-install:
  pkg.installed:
    - pkgs:
      - keeplived

  file.managed:
    - name: /etc/keepalived/keepalived.conf
    - source: salt://keeplived/files/keepalived.conf
    - template: jinja
      {% if grains['fqdn'] == 'server2' %}
webserver: httpd
state: master
vrid: 100
priority: 100
ip: 172.25.5.2
port: 80
{% elif grains['fqdn'] == 'server3' %}
webserver: httpd
state: backup
vrid: 100
priority: 50
ip: 172.25.5.3
port: 80
{% endif %}
    - context:
        STATE: {{ pillar['state'] }}
        VRID: {{ pillar['vrid'] }}
        PRIORITY: {{ pillar['priority'] }}

  service.running:
    - name: keepalived
    - enable: true
    - reload: true
    - watch:
      - file: keepalived-install
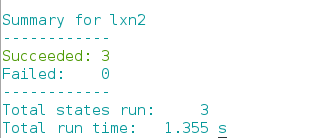
4、测试
# salt lxn2 state.sls keepalived.install
结尾是这样,没有任何failed!
vip
