一、Eclipse创建Maven项目


二、配置Maven依赖pom.xml文件
1、修改报错:此时,Maven项目有一个报错,在pom.xml中显示,web.xml文件丢失


解决办法:右击项目,选择Java EE Tools,选择Generate Deployment Descriptor Sub,自动生成web.xml文件

2、百度搜索 Maven Repository ,进入Maven依赖包查询官网,输入spring搜索,点击

选择使用次数最多的相对新的SpringMVC版本 5.1.5.RELEASE

点击Maven依赖配置,复制到项目的pom.xml文件中

代码如下:
  	<!-- https://mvnrepository.com/artifact/org.springframework/spring-webmvc -->
	<dependency>
	    <groupId>org.springframework</groupId>
	    <artifactId>spring-webmvc</artifactId>
	    <version>5.1.5.RELEASE</version>
	</dependency>
在项目Libraries-Maven Dependencies下出现这几个包则导入依赖成功。
可以看到SpringMVC已经把Spring的相关依赖一起导入进来了,如果使用Spring的核心jar包不需要再手动添加配置。

在webapp目录下创建index.jsp文件


此时,有一个javaax.servelt.http.HttpServlet的报错

解决办法:添加servlet依赖
在 Maven Repository官网中搜索servelt关键字,点击第一个 Java Servlet API

这里选择4.0.1和3.1.0版本都可以

把依赖配置信息复制到项目的pom.xml文件中

代码如下:
<!-- https://mvnrepository.com/artifact/javax.servlet/javax.servlet-api -->
<dependency>
    <groupId>javax.servlet</groupId>
    <artifactId>javax.servlet-api</artifactId>
    <version>4.0.1</version>
    <scope>provided</scope>
</dependency>
pom.xml全部依赖配置完成,代码如下:
<project xmlns="http://maven.apache.org/POM/4.0.0" xmlns:xsi="http://www.w3.org/2001/XMLSchema-instance" xsi:schemaLocation="http://maven.apache.org/POM/4.0.0 http://maven.apache.org/xsd/maven-4.0.0.xsd">

  <modelVersion>4.0.0</modelVersion>
  <groupId>com.jmxk</groupId>
  <artifactId>SpringMVCC</artifactId>
  <version>0.0.1-SNAPSHOT</version>
  <packaging>war</packaging>


  <dependencies>
  	<!-- https://mvnrepository.com/artifact/org.springframework/spring-webmvc -->
	<dependency>
	    <groupId>org.springframework</groupId>
	    <artifactId>spring-webmvc</artifactId>
	    <version>5.1.5.RELEASE</version>
	</dependency>
  	<!-- https://mvnrepository.com/artifact/javax.servlet/javax.servlet-api -->
	<dependency>
	    <groupId>javax.servlet</groupId>
	    <artifactId>javax.servlet-api</artifactId>
	    <version>4.0.1</version>
	    <scope>provided</scope>
	</dependency>

  </dependencies>

</project>
三、配置web.xml文件
百度搜索SpringMVC,进入Spring Framwork官网,点击Spring MVC

下滑,找到web.xml文件配置

把官网的web.xml信息复制到自己项目的web.xml文件中,根据自己的实际情况修改,具体如下:
<?xml version="1.0" encoding="UTF-8"?>
<web-app xmlns:xsi="http://www.w3.org/2001/XMLSchema-instance" xmlns="http://java.sun.com/xml/ns/javaee" xsi:schemaLocation="http://java.sun.com/xml/ns/javaee http://java.sun.com/xml/ns/javaee/web-app_2_5.xsd" version="2.5">

  <display-name>SpringMVCC</display-name>

  <!-- 欢迎页面 -->
  <welcome-file-list>
    <welcome-file>index.html</welcome-file>
    <welcome-file>index.jsp</welcome-file>
  </welcome-file-list>

  <!-- Spring监听器 -->
  <listener>
  	<listener-class>org.springframework.web.context.ContextLoaderListener</listener-class>
  </listener>

  <!-- Spring核心配置 -->
  <context-param>
  	<param-name>contextConfigLocation</param-name>
  	<param-value>classpath:spring-core.xml</param-value>
  </context-param>

  <!-- SpringMVC配置 -->
  <servlet>
  	<servlet-name>springmvc</servlet-name>
  	<servlet-class>org.springframework.web.servlet.DispatcherServlet</servlet-class>
  	<!-- 加载SpringMVC配置文件 -->
  	<init-param>
  		<param-name>contextConfigLocation</param-name>
  		<param-value>classpath:spring-web.xml</param-value>
  	</init-param>
  	<load-on-startup>1</load-on-startup>
  </servlet>

  <!-- 配置SpringMVC的拦截规则 -->
  <servlet-mapping>
  	<servlet-name>springmvc</servlet-name>
  	<url-pattern>/</url-pattern>
  </servlet-mapping>

</web-app>
四、配置Spring和SpringMVC的xml文件
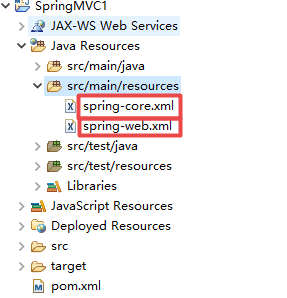
1、在resources目录下新建两个xml文件:spring-core.xml和spring-web.xml。


spring-core.xml用于spring的配置管理
spring-web.xml用于spirngMVC的配置管理
在springMVC的官方文档中,用浏览器按Ctrl+F搜索xmlns(xml namespace英文缩写),找到spring的xml配置信息

复制xml的配置文件,拷贝到spring-core.xml文件中,根据自己的项目修改配置
spring-core.xml配置如下:
<?xml version="1.0" encoding="UTF-8"?>
<beans xmlns="http://www.springframework.org/schema/beans"
    xmlns:xsi="http://www.w3.org/2001/XMLSchema-instance"
    xmlns:p="http://www.springframework.org/schema/p"
    xmlns:context="http://www.springframework.org/schema/context"
    xsi:schemaLocation="
        http://www.springframework.org/schema/beans
        https://www.springframework.org/schema/beans/spring-beans.xsd
        http://www.springframework.org/schema/context
        https://www.springframework.org/schema/context/spring-context.xsd">

	<!-- 开启注解类扫描 -->
    <context:component-scan base-package="com.jmxk"/>

    <!-- ... -->

</beans>在springMVC的官方文档中,继续向下搜索xmlns关键字,找到MVC的配置文件信息
把配置文件复制到spring-web.xml文件中

在spring-web.xml同样需要扫描注解类,因此需要在<beans>标签中添加spring-context约束:(在spring-core中复制即可)
xmlns:context="http://www.springframework.org/schema/context" http://www.springframework.org/schema/context
https://www.springframework.org/schema/context/spring-context.xsd">spring-web.xml配置文件如下:
<?xml version="1.0" encoding="UTF-8"?>
<beans xmlns="http://www.springframework.org/schema/beans"
xmlns:mvc="http://www.springframework.org/schema/mvc"
xmlns:xsi="http://www.w3.org/2001/XMLSchema-instance"
xmlns:context="http://www.springframework.org/schema/context"
xsi:schemaLocation="
http://www.springframework.org/schema/beans
https://www.springframework.org/schema/beans/spring-beans.xsd
http://www.springframework.org/schema/mvc
https://www.springframework.org/schema/mvc/spring-mvc.xsd
        http://www.springframework.org/schema/context
        https://www.springframework.org/schema/context/spring-context.xsd">
<mvc:annotation-driven/>
<!-- 开启注解类扫描 -->
<context:component-scan base-package="com.jmxk.web"/>
</beans>五、编写controller类,验证项目配置
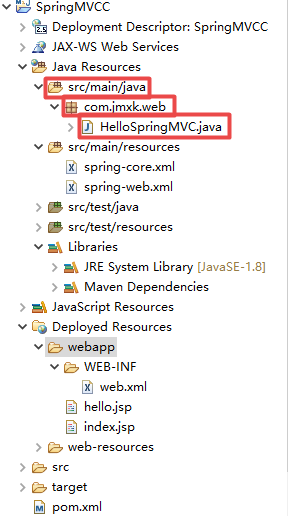
1、在Maven项目的src/main/java下创建HelloSpringMVC类


HelloSpringMVC.java代码如下:
package com.jmxk.web;

import org.springframework.stereotype.Controller;
import org.springframework.web.bind.annotation.RequestMapping;

@Controller
public class HelloSpringMVC {

	@RequestMapping("/hello")
	public String hello() {

		return "hello.jsp";
	}
}
在webapp下创建hello.jsp用于跳转成功页面
<%@ page language="java" contentType="text/html; charset=UTF-8"
    pageEncoding="UTF-8"%>
<!DOCTYPE html>
<html>
<head>
<meta charset="UTF-8">
<title>Hello SpringMVC!</title>
</head>
<body>
	<h2>Hello SpringMVC!</h2>
</body>
</html>
在index.jsp中添加跳转代码:
<a href="http://localhost:8080/SpringMVCC/hello"> hello</a>六、发布项目到Tomcat上,浏览器运行http://localhost:8080/SpringMVCC

点击hello,跳转成功!
