版权声明:本文为博主原创文章,遵循 CC 4.0 BY-SA 版权协议,转载请附上原文出处链接和本声明。
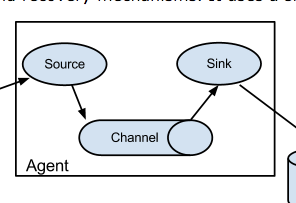
单管道设计
示例代码
# example.conf: A single-node Flume configuration

# Name the components on this agent
a1.sources = r1
a1.sinks = k1
a1.channels = c1

# Describe/configure the source
a1.sources.r1.type = netcat
a1.sources.r1.bind = localhost
a1.sources.r1.port = 44444

# Describe the sink
a1.sinks.k1.type = logger

# Use a channel which buffers events in memory
a1.channels.c1.type = memory
a1.channels.c1.capacity = 1000
a1.channels.c1.transactionCapacity = 100

# Bind the source and sink to the channel
a1.sources.r1.channels = c1
a1.sinks.k1.channel = c1
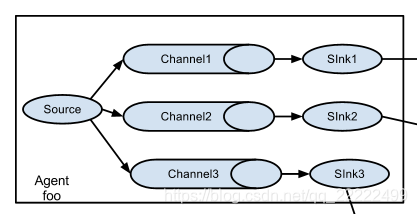
多管道、多输出
多管道的好处在于多个数据流之间互不影响,提高程序的稳定性
示例代码
# list the sources, sinks and channels for the agent
<Agent>.sources = <Source>
<Agent>.sinks = <Sink>
<Agent>.channels = <Channel1> <Channel2>

# set channel for source
# 尤其是这里要注意,多管道没生效的话,就是这里配置不对
<Agent>.sources.<Source>.channels = <Channel1> <Channel2> ...

# set channel for sink
<Agent>.sinks.<Sink>.channel = <Channel1>