本篇目录
前言
这篇文章主要讲解图书的增删改查在前端如何实现。
这些功能基本的逻辑很简单,就是发送请求调用后端编写好的接口,再根据返回的结果动态渲染页面。由于涉及到了一些概念和技术细节,如 钩子函数、组件间通信、模糊查询 等,而且贴了很多代码,所以篇幅比较长。
一、代码部分
由于各个功能对应的组件有交叉,我先把完整的代码贴出来,再做详细讲解。
大家可以先不管三七二十一把所有代码贴进去,测试下能用了,再看后面的分析。
1.EditForm.vue(新增)
这个组件是增加或者修改图书的弹出表单。同样放在 library 文件夹下。
<template>
  <div>
    <i class="el-icon-circle-plus-outline"  @click="dialogFormVisible = true"></i>
    <el-dialog
      title="添加/修改图书"
      :visible.sync="dialogFormVisible"
      @close="clear">
      <el-form v-model="form" style="text-align: left" ref="dataForm">
        <el-form-item label="书名" :label-width="formLabelWidth" prop="title">
          <el-input v-model="form.title" autocomplete="off" placeholder="不加《》"></el-input>
        </el-form-item>
        <el-form-item label="作者" :label-width="formLabelWidth" prop="author">
          <el-input v-model="form.author" autocomplete="off"></el-input>
        </el-form-item>
        <el-form-item label="出版日期" :label-width="formLabelWidth" prop="date">
          <el-input v-model="form.date" autocomplete="off"></el-input>
        </el-form-item>
        <el-form-item label="出版社" :label-width="formLabelWidth" prop="press">
          <el-input v-model="form.press" autocomplete="off"></el-input>
        </el-form-item>
        <el-form-item label="封面" :label-width="formLabelWidth" prop="cover">
          <el-input v-model="form.cover" autocomplete="off" placeholder="图片 URL"></el-input>
        </el-form-item>
        <el-form-item label="简介" :label-width="formLabelWidth" prop="abs">
          <el-input type="textarea" v-model="form.abs" autocomplete="off"></el-input>
        </el-form-item>
        <el-form-item label="分类" :label-width="formLabelWidth" prop="cid">
          <el-select v-model="form.category.id" placeholder="请选择分类">
            <el-option label="文学" value="1"></el-option>
            <el-option label="流行" value="2"></el-option>
            <el-option label="文化" value="3"></el-option>
            <el-option label="生活" value="4"></el-option>
            <el-option label="经管" value="5"></el-option>
            <el-option label="科技" value="6"></el-option>
          </el-select>
        </el-form-item>
        <el-form-item prop="id" style="height: 0">
          <el-input type="hidden" v-model="form.id" autocomplete="off"></el-input>
        </el-form-item>
      </el-form>
      <div slot="footer" class="dialog-footer">
        <el-button @click="dialogFormVisible = false">取 消</el-button>
        <el-button type="primary" @click="onSubmit">确 定</el-button>
      </div>
    </el-dialog>
  </div>
</template>

<script>
  export default {
    name: 'EditForm',
    data () {
      return {
        dialogFormVisible: false,
        form: {
          id: '',
          title: '',
          author: '',
          date: '',
          press: '',
          cover: '',
          abs: '',
          category: {
            id: '',
            name: ''
          }
        },
        formLabelWidth: '120px'
      }
    },
    methods: {
      clear () {
        this.form = {
          id: '',
          title: '',
          author: '',
          date: '',
          press: '',
          cover: '',
          abs: '',
          category: ''
        }
      },
      onSubmit () {
        this.$axios
          .post('/books', {
            id: this.form.id,
            cover: this.form.cover,
            title: this.form.title,
            author: this.form.author,
            date: this.form.date,
            press: this.form.press,
            abs: this.form.abs,
            category: this.form.category
          }).then(resp => {
          if (resp && resp.status === 200) {
            this.dialogFormVisible = false
            this.$emit('onSubmit')
          }
        })
      }
    }
  }
</script>

<style scoped>
  .el-icon-circle-plus-outline {
    margin: 50px 0 0 20px;
    font-size: 100px;
    float: left;
    cursor: pointer;
  }
</style>
2.SearchBar.vue(新增)
这个组件是用于搜索的搜索框。
<template>
  <div style="margin-bottom: 30px;display: flex;justify-content: center;align-items: center">
    <el-input
      @keyup.enter.native="searchClick"
      placeholder="通过书名或作者搜索..."
      prefix-icon="el-icon-search"
      size="small"
      style="width: 400px;margin-right: 10px"
      v-model="keywords">
    </el-input>
    <el-button size="small" type="primary" icon="el-icon-search" @click="searchClick">搜索</el-button>
  </div>
</template>

<script>
  export default {
    name: 'SearchBar',
    data () {
      return {
        keywords: '',
        books: [],
        cardLoading: []
      }
    },
    methods: {
      searchClick () {
        this.$emit('onSearch')
      }
    }
  }
</script>

<style scoped>

</style>
3.Books.vue(修改)
Books.vue 是我们图书管理页面的核心组件,主要的修改如下:
- 添加搜索框
- 添加增加、删除按钮
- 完善分页功能
- 构造增、删、改、查对应的请求
<template>
  <div>
    <el-row style="height: 840px;">
      <search-bar @onSearch="searchResult" ref="searchBar"></search-bar>
      <el-tooltip effect="dark" placement="right"
                  v-for="item in books.slice((currentPage-1)*pagesize,currentPage*pagesize)"
                  :key="item.id">
        <p slot="content" style="font-size: 14px;margin-bottom: 6px;">{{item.title}}</p>
        <p slot="content" style="font-size: 13px;margin-bottom: 6px">
          <span>{{item.author}}</span> /
          <span>{{item.date}}</span> /
          <span>{{item.press}}</span>
        </p>
        <p slot="content" style="width: 300px" class="abstract">{{item.abs}}</p>
        <el-card style="width: 135px;margin-bottom: 20px;height: 233px;float: left;margin-right: 15px" class="book"
                 bodyStyle="padding:10px" shadow="hover">
          <div class="cover" @click="editBook(item)">
            <img :src="item.cover" alt="封面">
          </div>
          <div class="info">
            <div class="title">
              <a href="">{{item.title}}</a>
            </div>
            <i class="el-icon-delete" @click="deleteBook(item.id)"></i>
          </div>
          <div class="author">{{item.author}}</div>
        </el-card>
      </el-tooltip>
      <edit-form @onSubmit="loadBooks()" ref="edit"></edit-form>
    </el-row>
    <el-row>
      <el-pagination
        @current-change="handleCurrentChange"
        :current-page="currentPage"
        :page-size="pagesize"
        :total="books.length">
      </el-pagination>
    </el-row>
  </div>
</template>

<script>
  import EditForm from './EditForm'
  import SearchBar from './SearchBar'
  export default {
    name: 'Books',
    components: {EditForm, SearchBar},
    data () {
      return {
        books: [],
        currentPage: 1,
        pagesize: 17
      }
    },
    mounted: function () {
      this.loadBooks()
    },
    methods: {
      loadBooks () {
        var _this = this
        this.$axios.get('/books').then(resp => {
          if (resp && resp.status === 200) {
            _this.books = resp.data
          }
        })
      },
      handleCurrentChange: function (currentPage) {
        this.currentPage = currentPage
        console.log(this.currentPage)
      },
      searchResult () {
        var _this = this
        this.$axios
          .post('/search', {
            keywords: this.$refs.searchBar.keywords
          }).then(resp => {
          if (resp && resp.status === 200) {
            _this.books = resp.data
          }
        })
      },
      deleteBook (id) {
        this.$confirm('此操作将永久删除该书籍, 是否继续?', '提示', {
          confirmButtonText: '确定',
          cancelButtonText: '取消',
          type: 'warning'
        }).then(() => {
            this.$axios
              .post('/delete', {id: id}).then(resp => {
              if (resp && resp.status === 200) {
                this.loadBooks()
              }
            })
          }
        ).catch(() => {
          this.$message({
            type: 'info',
            message: '已取消删除'
          })
        })
        // alert(id)
      },
      editBook (item) {
        this.$refs.edit.dialogFormVisible = true
        this.$refs.edit.form = {
          id: item.id,
          cover: item.cover,
          title: item.title,
          author: item.author,
          date: item.date,
          press: item.press,
          abs: item.abs,
          category: {
            id: item.category.id.toString(),
            name: item.category.name
          }
        }
      }
    }
  }
</script>
<style scoped>

  .cover {
    width: 115px;
    height: 172px;
    margin-bottom: 7px;
    overflow: hidden;
    cursor: pointer;
  }

  img {
    width: 115px;
    height: 172px;
    /*margin: 0 auto;*/
  }

  .title {
    font-size: 14px;
    text-align: left;
  }

  .author {
    color: #333;
    width: 102px;
    font-size: 13px;
    margin-bottom: 6px;
    text-align: left;
  }

  .abstract {
    display: block;
    line-height: 17px;
  }

  .el-icon-delete {
    cursor: pointer;
    float: right;
  }

  .switch {
    display: flex;
    position: absolute;
    left: 780px;
    top: 25px;
  }

  a {
    text-decoration: none;
  }

  a:link, a:visited, a:focus {
    color: #3377aa;
  }

</style>
4.LibraryIndex.vue(修改)
这里的修改主要是实现按分类查询。
<template>
  <el-container>
    <el-aside style="width: 200px;margin-top: 20px">
      <switch></switch>
      <SideMenu @indexSelect="listByCategory" ref="sideMenu"></SideMenu>
    </el-aside>
    <el-main>
      <books class="books-area" ref="booksArea"></books>
    </el-main>
  </el-container>
</template>

<script>
  import SideMenu from './SideMenu'
  import Books from './Books'

  export default {
    name: 'AppLibrary',
    components: {Books, SideMenu},
    methods: {
      listByCategory () {
        var _this = this
        var cid = this.$refs.sideMenu.cid
        var url = 'categories/' + cid + '/books'
        this.$axios.get(url).then(resp => {
          if (resp && resp.status === 200) {
            _this.$refs.booksArea.books = resp.data
          }
        })
      }
    }
  }
</script>

<style scoped>
  .books-area {
    width: 990px;
    margin-left: auto;
    margin-right: auto;
  }
</style>
5.SideMenu.vue(修改)
侧边分类导航栏的修改主要是实现了点击分类引发查询事件。
<template>
  <el-menu
    class="categories"
    default-active="0"
    @select="handleSelect"
    active-text-color="red">
    <el-menu-item index="0">
      <i class="el-icon-menu"></i>
      <span slot="title">全部</span>
    </el-menu-item>
    <el-menu-item index="1">
      <i class="el-icon-menu"></i>
      <span slot="title">文学</span>
    </el-menu-item>
    <el-menu-item index="2">
      <i class="el-icon-menu"></i>
      <span slot="title">流行</span>
    </el-menu-item>
    <el-menu-item index="3">
      <i class="el-icon-menu"></i>
      <span slot="title">文化</span>
    </el-menu-item>
    <el-menu-item index="4">
      <i class="el-icon-menu"></i>
      <span slot="title">生活</span>
    </el-menu-item>
    <el-menu-item index="5">
      <i class="el-icon-menu"></i>
      <span slot="title">经管</span>
    </el-menu-item>
    <el-menu-item index="6">
      <i class="el-icon-menu"></i>
      <span slot="title">科技</span>
    </el-menu-item>
  </el-menu>
</template>

<script>
  export default {
    name: 'SideMenu',
    data () {
      return {
        cid: ''
      }
    },
    methods: {
      handleSelect (key, keyPath) {
        this.cid = key
        this.$emit('indexSelect')
      }
    }
  }
</script>

<style scoped>
  .categories {
    position: fixed;
    margin-left: 50%;
    left: -600px;
    top: 100px;
    width: 150px;
  }
</style>
6.测试
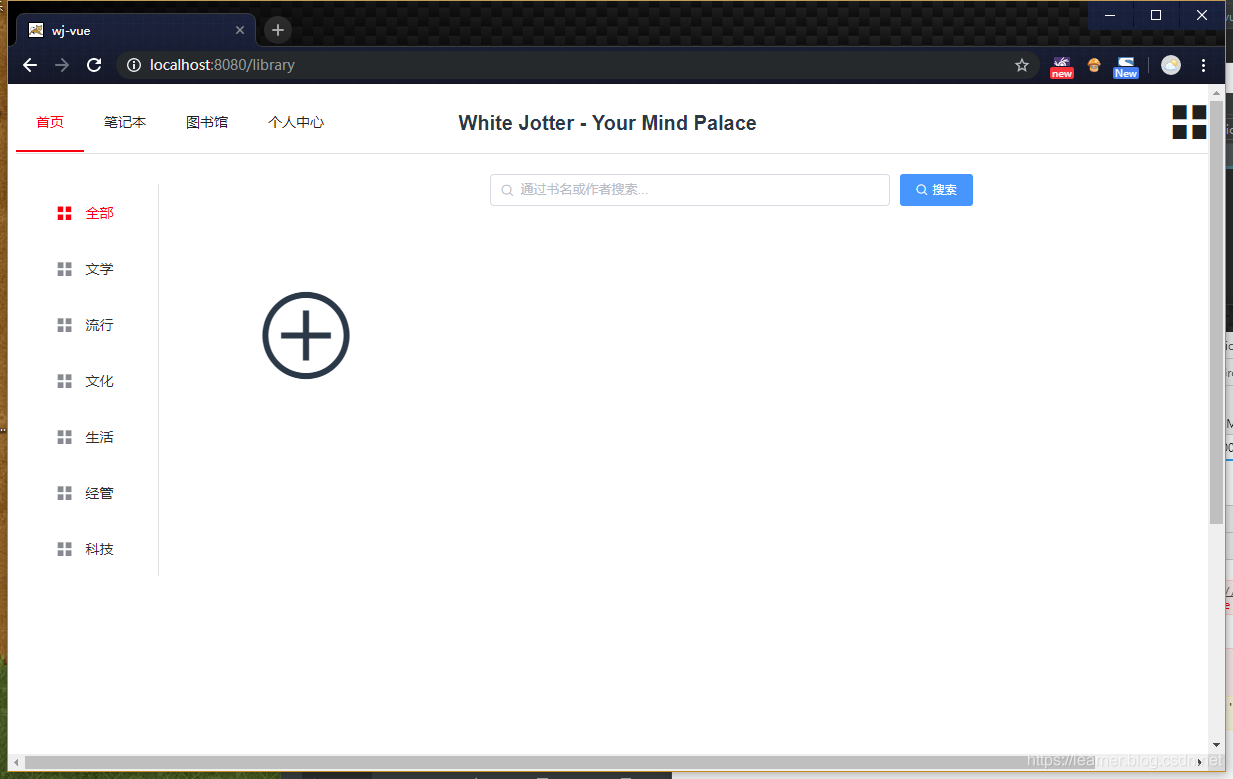
把上述代码贴进去后,我们就可以测试效果啦,运行前端与后端项目,访问 http://localhost:8080/library ,结果竟然啥都没有出来!!!
打开控制台,发现有如下错误:
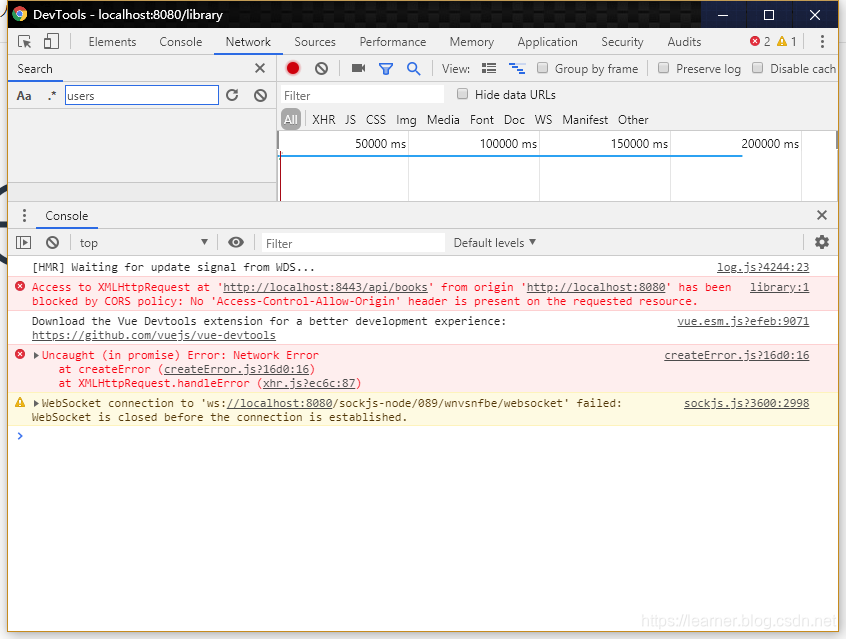
原来是跨域的问题。上次在写后端的接口时没有加上 @CrossOrigin 注解,现在我们在 LibraryController.java 的每个方法前面都加上 @CrossOrigin,重新运行后端项目,访问 http://localhost:8080/library, 这下就妥妥的了。
解决跨域问题,也可以通过修改 MyWebConfigurer.java 来实现,所有请求都允许跨域的代码如下:
    @Override
    public void addCorsMappings(CorsRegistry registry) {
        //所有请求都允许跨域
        registry.addMapping("/**")
                .allowedOrigins("*")
                .allowedMethods("*")
                .allowedHeaders("*");
    }
各个功能大家可以测试一下:
- 点击封面图片,弹出修改页面
- 封面右下角的小垃圾桶图标是删除
- 点击页面中的大圆圈加号以添加图书
- 最下面的页码也可以使用了
- 左侧分类栏可以使用
- 搜索栏,可以根据书名和作者模糊查询,不好意思,还不能使用,一会儿再讲,还要修改部分代码
另外大家如果发现了 BUG 可以在评论区提出,虽然我可能很久才会改,哈哈哈,怎么会有 BUG,我不听我不听。
封面图片为了方便演示,上传到了一个公共图床上,加载慢的要死,很多还挂了。目前添加图片只是通过 URL 实现,下一篇我会讲如何上传图片。
二、要点讲解
贴完了代码,这篇文章已经变得又臭又长了,啥时候 CSDN 出个折叠代码功能就好了。
接下来我们分别讲解一下实现各个功能的要点。没有讲到的地方如果有疑问可以在评论中提出,我一定及时回答。CSS 的部分我就不多说了,这个玩意儿多试多用就好。
1、查询功能实现
项目中需要应用查询的地方有以下三处:
- 打开页面,默认查询出所有图书并显示(即页面的初始化)
- 点击左侧分类栏,按照分类显示图书
- 在搜索栏中输入作者或书名,可以模糊查询出相关书籍
页面的初始化
第一个功能,打开页面显示所有图书,即在打开页面时就自动触发相应代码发送请求并渲染页面。为了实现这个目的,我们用到了 Vue 的 钩子函数 —— mounted。
钩子函数,就是在某个特定条件下被触发的函数。钩子函数由于一般与生命周期对应,所以也有 “生命周期钩子函数” 这种叫法,有的地方简称 “生命周期函数”,倒也无可厚非。(严格意义上讲钩子函数的范围更广一些)
mouted 即 “已挂载” ,所谓挂载,就是我们写的 Vue 代码被转换为 HTML 并替换相应的 DOM 这个过程,这个过程完事儿的时候,就会执行 mouted 里面的代码,即
    mounted: function () {
      this.loadBooks()
    }
loadBooks() 方法写在 methonds 里面:
loadBooks () {
        var _this = this
        this.$axios.get('/books').then(resp => {
          if (resp && resp.status === 200) {
            _this.books = resp.data
          }
        })
      }
很简单,就是利用 axios 发送了一个 get 请求,在接受到后端返回的成功代码后把 data 里的数据替换为后端返回的数据。利用 data 和 template 里相应元素的双向绑定,实现页面的动态渲染。
补充说明:
Vue 官方文档中对 mouted 的描述如下:
el 被新创建的 vm.$el 替换,并挂载到实例上去之后调用该钩子。
我猜这句话大家不太好理解,还记得 main.js 里的代码吗
new Vue({
  el: '#app',
  router,
  components: { App },
  template: '<App/>'
})
我们 new 的这个 Vue 对象,就是 vm.$el ,而 el ,则是 index.html 里的一个 div。可以复习一下 「Vue + Spring Boot 项目实战(二)」 的项目结构部分。
除了 mouted 之外,也可以使用 created,但把初始化的操作放在 created 里可能会导致渲染变慢,但差别并不是很大(据说在低端 Android 机上能看出来)。
分类显示
分类这个功能的前端实现逻辑是,点击左侧导航栏,向后端发送一个带有参数的 get 请求,然后同样是修改 data 里的数据以实现动态渲染。核心方法如下:
      listByCategory () {
        var _this = this
        var cid = this.$refs.sideMenu.cid
        var url = 'categories/' + cid + '/books'
        this.$axios.get(url).then(resp => {
          if (resp && resp.status === 200) {
            _this.$refs.booksArea.books = resp.data
          }
        })
      }
这个方法写在 LibraryIndex.vue 里。
终于要讲到 组件之间的通信 了。
在 LibraryIndex 组件的方法里,我们需要获取 SideMenu组件的 data,如何实现?
可以看出,SideMenu 组件在 LibraryIndex 组件中作为一个 子组件 存在,是 LibraryIndex 组件的一部分。在它的标签中,我们用 ref 属性设置了一个引用名。
<SideMenu @indexSelect="listByCategory" ref="sideMenu"></SideMenu>
这样,我们就可以通过 _this.refs.sideMenu 来引用侧面导航栏的实例,并获取它的 data 了。
更骚的是 @indexSelect="listByCategory",这个东西为 listByCategory() 方法设置了触发事件。大家熟悉的事件有点击、鼠标移动之类,都有固定的名称,而这个 indexSelect 是我随便起的,为了触发这个事件,在子组件,也即 SideMenu 里有这么个方法:
      handleSelect (key) {
        this.cid = key
        this.$emit('indexSelect')
      }
emit,即触发,在子组件中使用 $emit 方法,即可触发在父组件中定义的事件。而这个 handleSelect 方法,则由 @select 事件触发。
总结一下,当你通过点击选择侧边导航栏的一个标签后,发生了如下的动人的故事:
- 触发
<el-menu>组件的@select事件,执行handleSelect方法 handleSelect方法触发indexSelect事件,并把 key,即<el-menu-item>标签的index属性的值赋给data中定义的属性,即分类码。- 父组件收到指令,执行事件对应的方法,即
listByCategory方法 - 发送请求,后端执行查询代码,返回数据,再通过
refs修改Books组件的data以动态渲染页面。
最后还有一点需要注意的就是 url 的构造方式:
var url = 'categories/' + cid + '/books'
这样,便与后端控制器的写法对应起来了。
    @GetMapping("/api/categories/{cid}/books")
    public List<Book> listByCategory(@PathVariable("cid") int cid) throws Exception {
        if (0 != cid) {
            return bookService.listByCategory(cid);
        } else {
            return list();
        }
    }
搜索栏查询
鬼鬼,又要贴代码了。。。这可能是我职业生涯中最长的一篇文章了。
之前后端没有实现按关键字查询的接口,现在我们补上。打开后端项目,首先,新建一个 pojo,名为 Search,只有一个属性,代码如下:
package com.evan.wj.pojo;

public class Search {
    String keywords;

    public String getKeywords() {
        return keywords;
    }

    public void setKeywords(String keywords) {
        this.keywords = keywords;
    }
}
然后在 BookService.java 中添加一个方法:
    public List<Book> Search(String keywords) {
        return bookDAO.findAllByTitleLikeOrAuthorLike('%' + keywords + '%', '%' + keywords + '%');
    }
在上一节中,我阴差阳错地把 BookDAO 接口里的内容都贴了出来,所以这次不用添加了,但我们还是得拿出来看一下:
List<Book> findAllByTitleLikeOrAuthorLike(String keyword1, String keyword2);
这个 findAllByTitleLikeOrAuthorLike,翻译过来就是“根据标题或作者进行模糊查询”,参数是两个 String,分别对应标题或作者。记住这个写法,我想当然的以为是 findAllByTitleOrAuthorLike,只设置一个参数就行,结果瞎折腾了好久。
因为 DAO 里是两个参数,所以在 Service 里把同一个参数写了两遍。用户在搜索时无论输入的是作者还是书名,都会对两个字段进行匹配。
再向 libraryController 里面添加如下方法:
    @CrossOrigin
    @PostMapping("/api/search")
    public List<Book> searchResult(@RequestBody Search s) throws Exception {
        // 关键字为空时查询所有书籍
        if ("".equals(s.getKeywords())) {
            return bookService.list();
        } else {
            return bookService.Search(s.getKeywords());
        }
    }
这样后端的部分就完成了,这里实现的只是初级的模糊查询,只能搜索出完全包含关键字的内容,而且顺序不能变。感兴趣的同学可以改进一下。
前端的部分,核心的组件是 SearchBar,核心的方法写在 Books.vue (SearchBar 的父组件)里,还是父子组件调用、axios 请求的那一套。
      searchResult () {
        var _this = this
        this.$axios
          .post('/search', {
            keywords: this.$refs.searchBar.keywords
          }).then(resp => {
          if (resp && resp.status === 200) {
            _this.books = resp.data
          }
        })
      },
2.增加、修改、删除
增、删、改,需要向后端发送 Post 请求对数据库进行操作。
发送完请求后有两种选择,一是在接收到后端返回的成功代码后,直接利用前端的数据刷新显示,二是重新执行查询以显示修改后的数据。
前一种做法,如果代码不够严谨,可能出现未能按期望修改数据库却返回成功代码的情况,会造成数据的不一致,这里我们先不采用。
后一种做法又有两种实现方法,一是直接刷新页面,二是执行查询对应的 Ajax 请求,利用双向绑定更新显示。刷新页面太粗暴了,会感觉到明显的卡顿,白白增加了前后端的负担,所以我们还是选第二种方法吧。
增加和修改
之前说过我的设计是点击圆圆的那个添加按钮,可以新增,点击书籍封面图片,可以修改。增加和修改其实用的是同一个表单,不同的是修改需要先查询出原来的信息,然后对数据库执行更新操作,而增加则是直接执行插入操作。不过由于我们使用了 JPA,一个 save() 方法就搞定了。我真是爱死 JPA 了,用 Mybatis 写 SQL 真的烦(我可不是说 Mybatis 不好用哈)。
这两个功能的核心组件是 EditForm.vue,它由两部分组成,一个是那个加号图标,即
<i class="el-icon-circle-plus-outline" @click="dialogFormVisible = true"></i>
一个是 Element 的 dialog 组件 <el-dialog>。我们通过该组件的 :visble.sync 属性控制它的显示,默认是隐藏的,当点击加号时才会显示。
在 EditForm.vue 组件中,我们实现了一个 clear() 方法,目的是在关闭输入框时清空原来的内容。不然如果先修改一本书,又点击添加,表单里的内容会仍旧存在。
核心的方法是 onSubmit,提交数据,并触发父组件中定义的 onSubmit 事件,而这个事件对应的方法则是 loadBooks(),即查询出所有的书籍。
为了实现修改,在 Books.vue 中的书籍封面部分我们也添加了一个点击事件,并传递了书籍的参数:
          <div class="cover" @click="editBook(item)">
            <img :src="item.cover" alt="封面">
          </div>
editBook 这个方法即负责弹出修改表单并渲染数据:
      editBook (item) {
        this.$refs.edit.dialogFormVisible = true
        this.$refs.edit.form = {
          id: item.id,
          cover: item.cover,
          title: item.title,
          author: item.author,
          date: item.date,
          press: item.press,
          abs: item.abs,
          category: {
            id: item.category.id.toString(),
            name: item.category.name
          }
        }
      }
删除
删除真是最简单的部分了。先安排一个图标元素的点击事件:
<i class="el-icon-delete" @click="deleteBook(item.id)"></i>
然后编写核心方法:
      deleteBook (id) {
        this.$confirm('此操作将永久删除该书籍, 是否继续?', '提示', {
          confirmButtonText: '确定',
          cancelButtonText: '取消',
          type: 'warning'
        }).then(() => {
            this.$axios
              .post('/delete', {id: id}).then(resp => {
              if (resp && resp.status === 200) {
                this.loadBooks()
              }
            })
          }
        ).catch(() => {
          this.$message({
            type: 'info',
            message: '已取消删除'
          })
        })
      },
这里需要注意的一个是确认对话框的使用,一个是 post 请求的构造方式,post 不能像 get 请求那样直接把参数写在 url 里,而需要以键值对的方式传递。
下一步
至此,项目的核心功能就基本上讲解完毕了。我还打算再写一篇关于图片上传的文章,另外用户注册这块儿也可以再说说,利用 shiro 加上加密机制之类的。
总算是能赶在 Vue3.0 出之前把这个系列完结啦,最近实在是太忙了,不过也学到了不少东西,感谢读者朋友们的支持,下半年我们继续一起进步!